![[How-to] Enable Autocheckout in AssetSonar](https://cdn.ezo.io/wp-content/uploads/2023/07/27122305/How-to-Enable-Autocheckout-in-AssetSonar-scaled-1-1024x512.webp)
AssetSonar’s Auto Checkout feature streamlines custody management for organizations by allowing IT administrators to automatically check out devices to users using the data collected through the device integrations provided by other software applications (Intune, Jamf, Google Workspace, etc.). This feature makes custody management more efficient by automating the recurring process of checking out devices – ensuring minimal manual effort and accurate custody updates.
Here is how this Auto Checkout can add value to your IT processes:
- Bulk provisioning: If your organization is going through mass recruitment or if you have procured a large number of IT assets in one go, Auto Checkout can help you reduce manual labor. Instead of updating custody information for every device manually, you can automatically assign the new users based on their information fetched from an integration. This makes your IT assets custody efficient, allowing you to handle mass provisioning.
- Compliance and audit readiness: By ensuring that your device custody information is up to date at all times, you can provide a clear record of asset custody, facilitating any external or internal audits.
- Accurate asset tracking: This feature enables tracking of assets based on their primary users and also tracks changes in location. This allows for better asset tracking, reporting, and decision-making.
Now let’s dive in to see how the feature works:
1. Enabling Auto Checkout
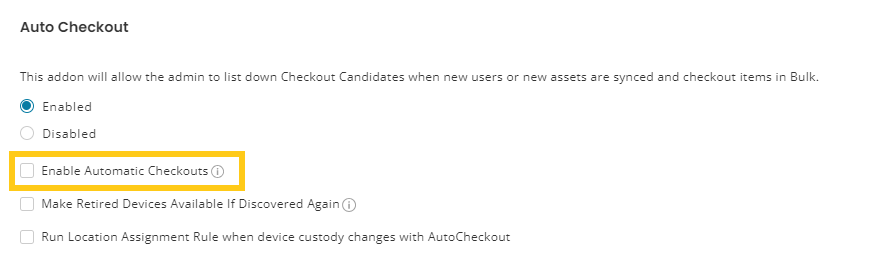
The Auto Checkout feature helps streamline the assignment and check out of devices when new users and devices are added to AssetSonar. To enable Auto Checkout, go to Settings > Automations → Auto Checkout and click ‘Enabled’.

Enabling this option allows the admin to list Checkout Candidates when new users or new assets are synced and check out items in bulk. Once enabled, you’ll also be able to view more options to select.
1.1 Basis for Auto Checkout
By default, Auto Checkout is triggered by the email field. This allows you to automatically check out MDM-detected devices based on the primary user. However, you can configure Auto Checkout to match based on any custom field as long as the field contains a valid email address.

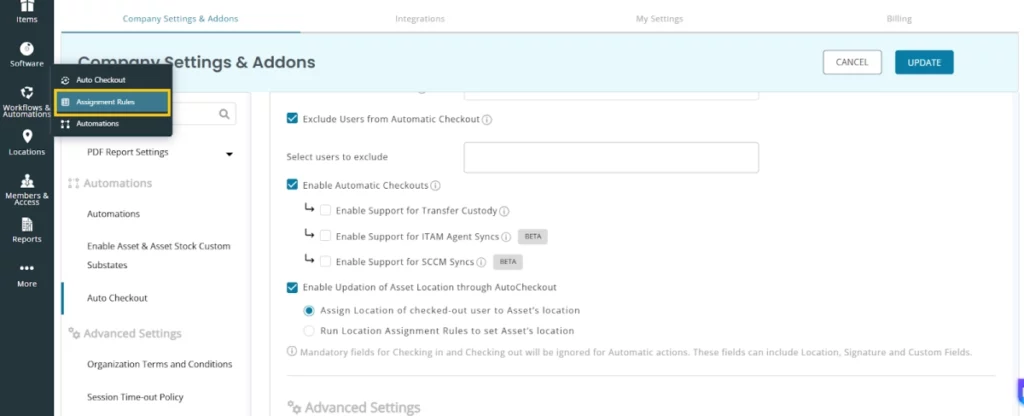
1.2 Exclude Users from Automatic Checkout
This gives you the option to search and select users to be excluded from the automatic checkouts. These users will also not appear on the recommended user dropdown on the Auto Checkout page.

1.3 Enabling Automatic Checkouts
Click on ‘Enable Automatic Checkouts’ to ensure that every new device being discovered from an integration will be checked out based on the primary user.
The Auto Checkout feature supports automatic checkout of devices in the following cases:
- If a new user is onboarded to AssetSonar
- If a new device is provisioned into AssetSonar
In addition, the user also has the option to enable support for the following:
- Transfer Custody: Transfer custody of the item when the primary user changes.
- ITAM Agent Syncs: Auto Checkout to the last logged-in user instead of the candidate emails for the ITAM Agent.
- SCCM Syncs: Auto Checkout to the last logged-in user instead of candidate emails for SCCM syncs.
Note: Auto Checkout feature doesn’t allow you to check out devices that are in maintenance.
2. Location-Based Automation
The users can also enable updation of asset locations through Auto Checkout by checking the relevant option.

Selecting the “Assign Location of the checked-out user to Asset’s location” will ensure that the location of the asset is updated based on the checked-out user’s location.
Meanwhile, selecting the “Run Location Assignment Rules to set Asset’s location” will ensure that the assignment rules you have previously created are being followed and will also ensure that the location of your asset is updated in the following cases:
- When a new device is being brought in to AssetSonar.
- When the custody of the device changes.
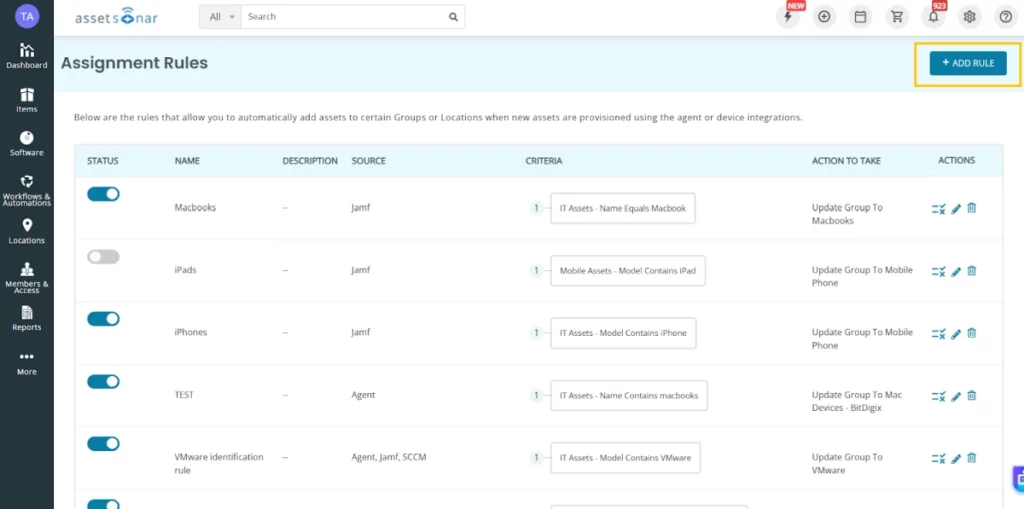
2.1 Creating new assignment rule
To create a new assignment rule for automatically checking out devices go to Workflows & Automations (Navigation Bar) > Assignment Rules
Click on ‘Add Rule’ to create a new rule for auto checkouts.
3. Auto Checkout use case
Once you have imported the updated device and user data from an integration, you can then check out a device to their provisioned user. Click on the thunderbolt icon on the top right and select the Quick Checkout option to open the following dialog box.
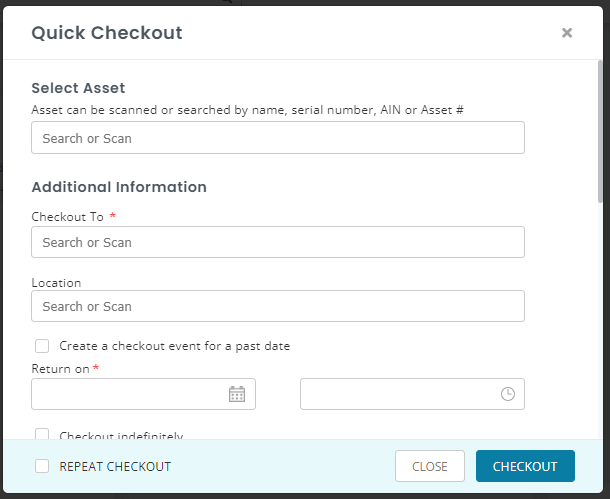
Add the device name or ID along with the associated primary user’s name under the ‘Checkout to’ option. Similarly, the location details will also appear since they have already been fetched from the discovery source. You can change the check-in date on the dialog box and then hit ‘Checkout’.
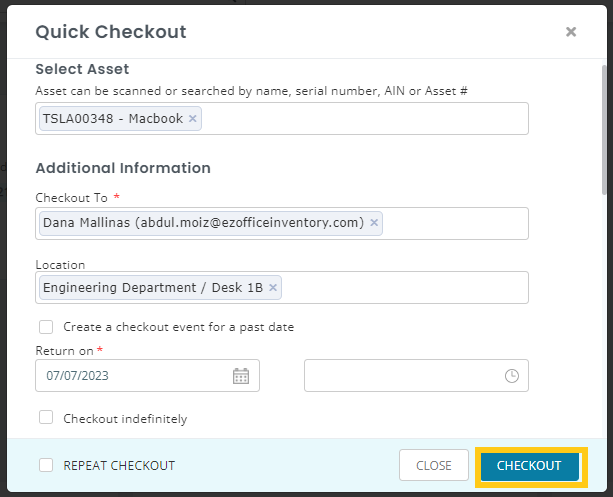
The device will automatically be checked out to the detected user. You’ll also receive an email notifying you that the Auto Checkout has been successful.
4. Auto Checkout Report
To access Auto Checkout Reports, go to Reports > Asset Reports > Check-in/out Events and click “Open”.
In the report you can see some devices with “Automation Users” listed under the ‘Asset Check-in/out – Action Taken By’ column. These are the devices that have been fetched from a discovery source and are automatically checked out.
4.1 Creating a new report
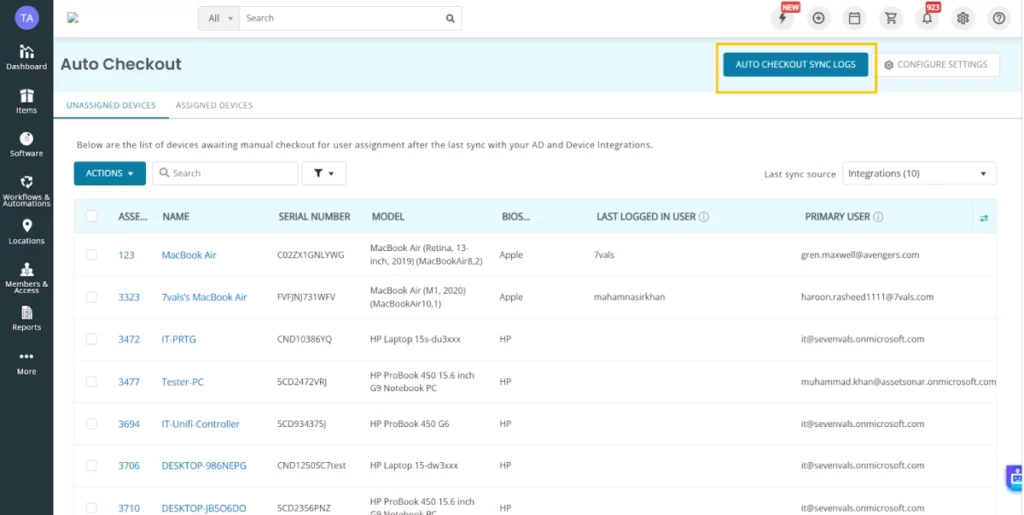
To create a new report that is filtered for automatically checked out devices, go to Workflows & Automations (Navigation Bar) > Auto Checkout.
On the Auto Checkout page click on “Auto Custody Sync Logs” button on the top right to create a new report.
Click on the filters icon and set the ‘Asset Check-in/out – Action Taken By’ filter to be an “Automation User” and click “Apply Filters”. You will be able to view a filtered report on the main Auto Checkout details page.

About AssetSonar
AssetSonar is a powerful ITAM solution used by tech organizations and businesses all over the globe.
For more assistance, drop us an email at support@ezo.io.


