The Cart Module in AssetSonar empowers you to stay on top of your jobs and events, greatly simplifying IT Asset management. You can mark these jobs and events on your calendar, have a list of required IT equipment and inventory, collaborate as a team, and do so much more.
Understanding jobs and events in AssetSonar
The IT departments of several industries, including construction, media, and education, often fragment their work into smaller “jobs”.
Here are some common examples of jobs from our user base.
Job 001: Fixing the routers at the construction site of Griffith Park.
Job 002: Dispatching IT inventory for new product photoshoots.
Job 003: Lending laptops to students in the PSYCH 100 class.
Similarly, for industries such as technology, education, and exporting, the Sales and Marketing departments participate in different “events” that often require the use of IT Assets.
Here are some common examples of events from our user base.
Event 001: Products showcase at TechCrunch Disrupt SF.
Event 002: Health Education Conference, England.
Event 003: Infrastructure Trade Mission in Mexico.
Event 004: Sep 2019 Sales Conference in Vegas.
1. Enabling Carts
The Carts module enables you to check out multiple IT Assets at the same time, either for a specific job or an event.
To enable Carts in AssetSonar, go to Settings → Add Ons → Cart Module → Enabled.
2. Planning and managing an event or job
2.1. Identify the required items
Identify the IT hardware required for an upcoming job or event.
If it’s a photoshoot, you’ll probably add laptops, USB cables or projectors for taking, editing and producing the images. If it’s a conference, you’ll add items such as laptops, speakers and WiFi routers.
2.2. Add items to Cart
Add multiple items to the Cart from the Item Listings Page via mass action.

You can also add items to a Cart from the Basket icon next to your notification bell:


From the carts listing page, you can also allow users to sort the carts by the following fields:
- From
- To
- Created on

2.3. Move Cart items
You can transfer new or drafted Carts seamlessly between different locations. Move IT assets between different locations from the Cart Details page as many times as you want by clicking the ‘Move Items’ button from the More option.

Once you click on ‘Move Items’, you are redirected to another page where you can update location data.

Note: The location of assets will be updated and specified stock quantities of the Asset Stock and Inventory will be transferred to the selected Stock Location.
The ability to move Cart items comes in handy when IT equipment is needed at a different location. For example, say a few laptops malfunction at a conference in San Jose. The equipment manager can transfer the entire Cart for conferences to the new location and the items can be shipped to San Jose.
In order for this to come into play, enable the “Transfer of Stock” Add On from Settings → Add Ons.
2.4. Reserve a Cart
If you’re planning ahead for an event or job, and you’re afraid someone else might check out the Cart, simply reserve it! Reserving a Cart for a number of days makes all of its items unavailable for that duration. Then, just check out the reserved Cart when the reservation time arrives.
For conflict-free item reservations, enable them from Settings → Company Settings → Reservations.
You can also edit items in a reserved Cart. Let’s say you reserve a Cart for an upcoming event, but you underestimate the number of WiFi routers needed. Don’t fret over; easily add items you’d like to reserve in the Cart. Similarly, you can also remove them if needed.


For quick edits, easily view a Cart from Notification Bell → Reservations.
Once here, click on the Carts tab to view all reserved Carts. Clicking the pen icon on the Cart in question enables you to make the required changes.

2.5. Clone a Cart
Instead of going through the process of making exactly the same Cart all over again, you can simply clone one. To do so, just open the detail page of the concerned Cart, and click on ‘Clone’, and voila! This works for all Carts irrespective of their status i.e. reserved, checked out, completed, canceled, or moved.

2.6. Swap items in checked out Carts
There may be instances when items in a Cart you’ve checked out aren’t what you needed or one of them is damaged.
To overcome such cases, the swap functionality enables you to exchange multiple items within a checked out Cart. To replace items within Carts, enable ‘Swap Checked Out Items’ from Settings → Add Ons.
To swap items, open the details page of the Cart in question. Select the items you wish to swap and click on the swap icon like so:

Note: The swap functionality is only available in checked out Carts.
Once you click the swap icon, an overlay appears. Here, choose what you’d like to do with the selected items. In our example, Item #4 — Dell laptop is faulty so you can replace it with another laptop.
Once you’re done making the relevant changes, hit ‘Update’.

Note: Items in a Cart can only be swapped by the members who created the Cart or by admins. Items within a Package cannot be swapped. However, items that are within a Bundle can be swapped in a checked out Cart.
3. Staying on top of upcoming events and jobs
The reserved Carts represent all your upcoming events and jobs.

Keep track of all these upcoming reservations with the help of the Dashboard Calendar. There is a ‘by Cart’ widget in the calendar that enables you to stay on top of all information related to Carts — which ones are coming in, going out or are overdue.

You can also enable the following email alerts from the Alerts tab:
- Reservations starting today
- Reservations alert in advance (say 2 days before a reservation starts)
- Cart reservation
- Reservation of Cart pending
- Reservation approved
- Reservation denied
- Reserved Cart changes
4. Keeping up with ongoing events and jobs
The checked out Carts represent your events and jobs that are currently ongoing. The Dashboard Calendar helps you stay on top of which Carts are due back. You also receive email alerts that list down all the items that are due.
Once a Cart is returned, all Assets and Asset Stock within the Cart are checked back in and the Cart is marked ‘Completed’.
5. Everything you can do with Carts
Apart from editing and reserving Carts, there are several other actions that you can take. Let’s take a look at what these are:
5. 1. Create custom fields
Create custom fields according to your workflows, such as Event Venue or Shipment Charges, from More → Custom Fields → Cart.
5.2. Print details
If you need the Cart details in hard copy, easily print them as a PDF. Configure the layout from More → Cart Printouts → Add a new template.
5.3. Verify Cart items
Before sending a Cart out to the event/job, verify the items of the reserved Cart. For this purpose, use the mobile app scanner or a handheld barcode or QR code scanner.
Click on the ‘Verify by Scanning’ button. Open the details page of a Cart and go to Scan items → Submit the scanned list → Items are verified.

5.4. Relate Carts to one another
You can relate Carts to each other. Let’s say you’re shipping 3 computer repair kits to the same job site. Each kit can be a Cart with its own list, having a different person responsible for it.
All 3 kits can be related so you know that they’re all going to the same job site.
5.5. Maintain Cart history
If your Carts move around a lot, you might want to maintain a history of all the movements. Easily obtain this information from our logs from History → Cart History on the Cart Details page.
5.6. Tracking with Cart Identification Numbers
AssetSonar enables you to track Carts by a system-generated Cart#. However, if your operations require more personalized Cart identifiers, use our Cart Identification Number (CIN) instead.
Make this change from Company Settings → Advanced Settings → Cart Identifier.
6. Making Carts mandatory
If your operations require you to use Carts all the time, then you can make them compulsory. This way, all members will have to use Carts for actions such as check-ins, checkouts, and reservations.
To do so, go to Settings → Add Ons → Cart Module→ Force Cart Actions. Here, select whether you want to force Cart actions for Staff Users or Administrators, or both.

Enabling this setting removes the prompts for check-ins, checkouts, reservations, and reservation requests for your chosen user category from the following pages:
- Item detail pages (Asset, Asset Stock, Inventory)
- Listing pages (for Mass Actions)
- Package pages (both Detail Pages and Mass Actions)
- Dashboard
- Group pages
- Vendor pages
- Location pages
Note: To enable this setting, first resolve all reservations and checkouts.
7. Enhanced insights into Staff User’s Carts
It’s difficult to manage several projects scattered across locations. Whether it’s tracking your IT equipment across job-sites or at different events, you need to find a way to supervise Cart movements.
To help aid this, Administrators in AssetSonar can view all Drafted Carts created by Staff Users at different locations.
In this manner, a user can only take actions on Carts that they create themselves. However, Administrators can keep an eye on all Drafted Carts within the system by applying the ‘Active Carts (Including Drafts)’ filter. This bird’s eye view of all Carts helps make managing projects across different locations much easier.
8. Item recommendations for Carts (Beta)
Even if you forget to add an item or two to a Cart, don’t worry because we remember!
Our Item Recommendations feature suggests missing equipment relevant to your specific business needs. The recommendations are made by learning from previous company preferences. The aim is to increase the discoverability of business assets. This primes you to make more informed decisions.
Enable Item recommendations from Settings → Add Ons → Item Recommendation for Carts → Enable.

The recommendations are shown when a user adds an item to a Cart.
Note: This feature is currently in Beta. It is available only to users with Diamond packages and above.
9. Carts tab on an Item Details page
As you may notice, each Item Details page has a Carts tab at the bottom. This helps trace all the Carts associated with that item, making all of them accessible. Apart from the Carts tab, there are other tabs available such as History and Reservations so you can easily access relevant data.
To open the Carts tab, simply click on the Carts tab:
This image shows the default view, displaying all Carts. You can also apply a filter using the dropdown menu available on the top-right corner above the results table.
10. IT equipment management “on the go”
Managing IT equipment on the go is a serious concern for most companies.
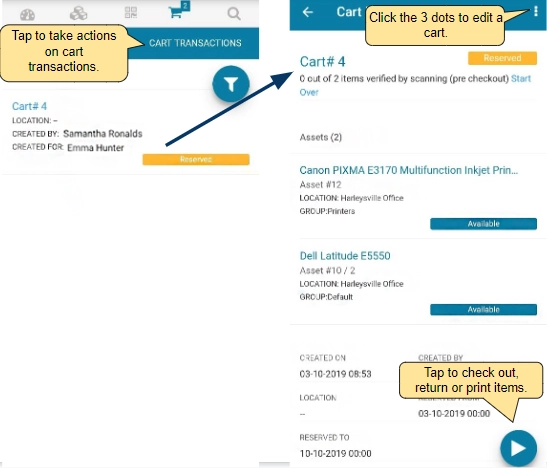
Luckily, we provide Cart management right from our mobile app as well. Add or remove items from Carts, or reserve, check out or print them. You can also add comments and documents, and view all Cart transactions, no matter where you are.
10.1. Current Cart view

10.2. Cart transactions and Cart states

10.3. Verify items via scanning
Similar to our web application, the mobile app also enables you to verify items within a reserved Cart before it is checked out. Item verification is possible for Carts in all states except drafted or current Carts.
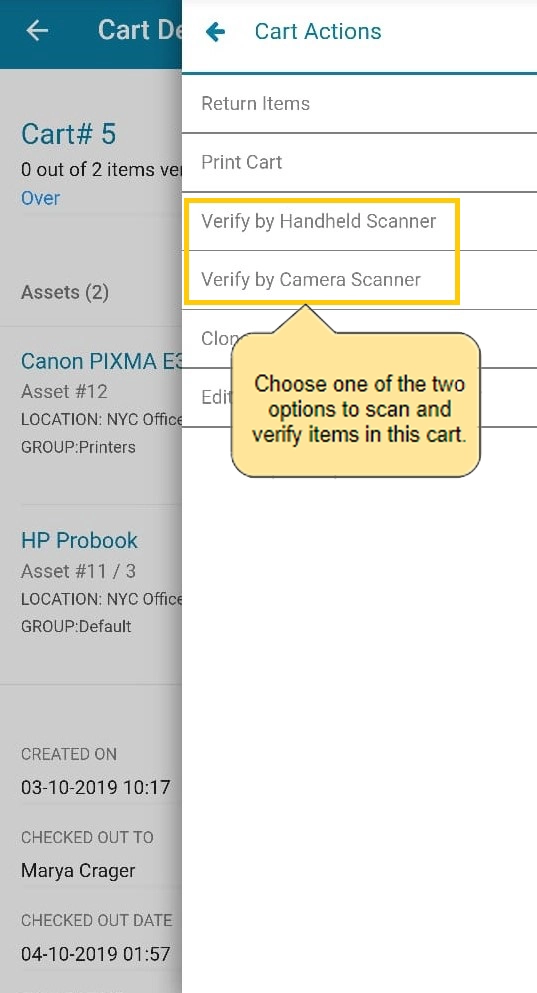
To do so, click on the ‘Verify by Handheld Scanner’ button or the ‘Verify by Camera Scanner’ button in the Cart Details page.
However, before you can do this, enable the Add On from Settings → Add Ons → Cart Module and check the option to ‘Enable verification of items in a cart via scanning of labels’. Once that is done, follow these steps:
1. Open the relevant Cart from the mobile app. In our example, we will open up a reserved Cart. Click on the ‘Play’ icon to take actions on the cart, such as verifying items. Keep in mind that verification can only take place once a Cart is checked out.

Note: You require a barcode or QR code scanner for handheld scanning. Enable the Handheld Scanner Integration from Settings → Add Ons → Barcode Reader. You can also use a phone camera if you wish to verify items with Camera Scanner.
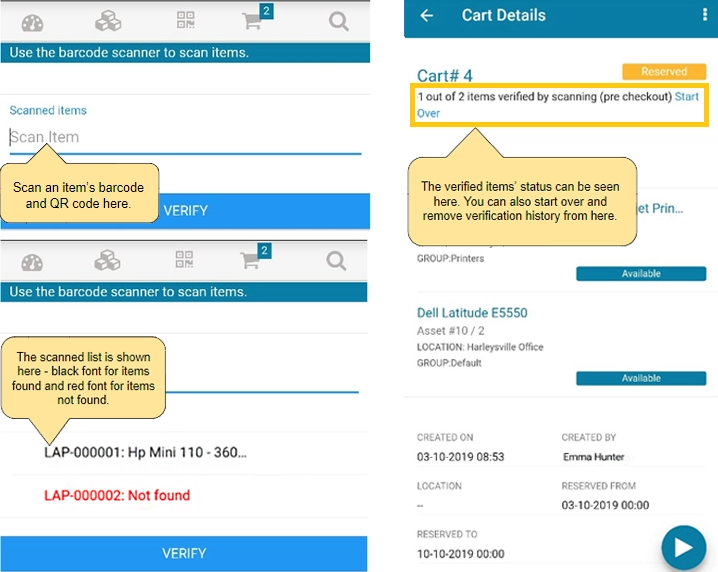
2. To verify, scan the item’s barcode or QR code. The verification identifies whether the item exists within your system. Only items within the Cart will be verified. A ‘Not found’ message will show for all other items. Once you are done scanning, click ‘Verify’ to submit the scanned list.

3. The items have been verified. You can see the status of item verification on the Cart Details page in the app, under the Cart#. If need be, you can also start over the verification process.
And that’s how Carts work in AssetSonar!
Share your feedback with us!
If you have any comments or questions regarding our Advanced Dashboard, drop us an email at support@ezo.io.


