![[How-to] Configure Custom Roles in AssetSonar](https://cdn.ezo.io/wp-content/uploads/2020/04/How-to-Configure-Custom-Roles-in-AssetSonar.png)
While the system has predefined user roles, every company is different and might want to configure unique roles for each user. This is now possible with the Custom Roles feature in AssetSonar.
1. Enable Custom Roles
Enable Custom Roles from Settings → Add Ons → Custom Roles and select ‘Enabled’.

2. Create a new Role
Once you’ve enabled Custom Roles, you can now create new roles or edit existing ones by going to Members → Roles.

Once you click ‘Add New Role’, the following form opens up:
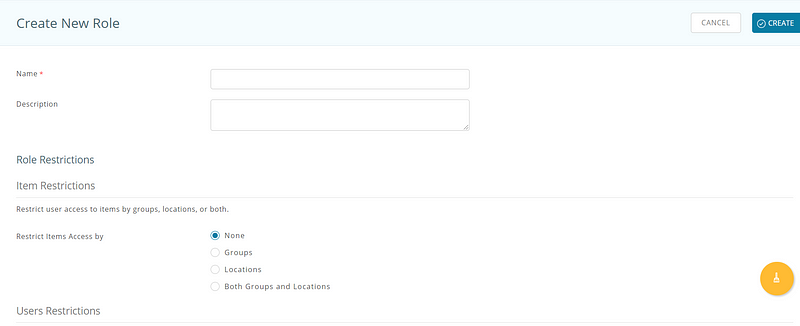
Begin by specifying a name and description for your new role.
Then, specify Role Restrictions and Permissions.
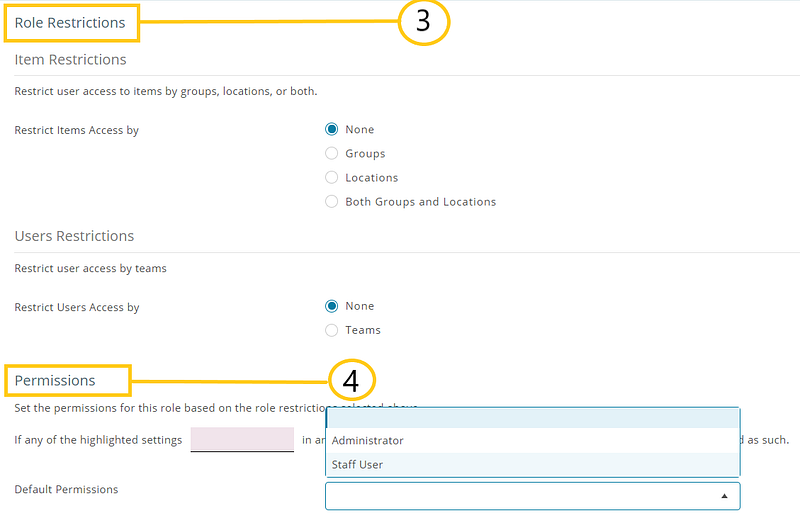
3. Role Restrictions
Next, you have to specify what kind of restrictions you will apply to this role. There are two types of Role Restrictions. Both of these are discussed in detail here:
3.1. Item Restrictions
Item Restrictions limit the user’s access to certain items. There are four possible ways to restrict item access by:

Note: You can choose multiple Groups and Locations.
3.2. User Restrictions
User Restrictions limit the role of interacting with certain users and taking actions for them. You can restrict user access by:

Note: You may choose multiple Teams.
3.3. Create Teams
Teams are associated with Custom Roles and are automatically disabled when the Custom Roles Add On is disabled. To create a new team, go to More → Teams and click on ‘Add New Team’. This leads to the following overlay:

4. Permissions
Based on the Role Restrictions selected above, you can set detailed permissions for the role. These permissions include a multitude of options for various items and modules. We will discuss these in detail later on.
4.1. Default permissions
Instead of specifying all the permission settings available, you can keep things simple and start off with the following Default Permissions:
- Administrator
- Staff User
For example, when you select ‘Administrator’ from the dropdown menu, the system automatically selects all Administrator permissions.

This way, whichever default role you select, all relevant checkboxes will automatically be selected. Then, you only need to edit checkboxes that require changes.
The pink boxes represent actions only Administrators can take, whereas the blue boxes represent actions Staff Users can take.
Once done, scroll down and hit the ‘Create’ button.
4.2. Customized permissions
You can also specify all permissions from scratch. Here’s an overview of all the modules you can specify permissions for in AssetSonar:


4.3. How are new or existing custom roles priced?
When a user creates new or edit permissions for existing custom roles, the ‘Priced as’ field shows how the role will be priced.

Each role can be priced according to the permissions selected. Here are all the permission criteria for pricing:
| Base role | Permission criteria | Priced as |
| Staff user or Agent | One or more Administrator level permissions are selected. | Administrator |
| Staff user or Agent | One or more Agent-level permissions and one or more Administrator-level permissions are selected | Administrator |
| Staff user | One or more Agent-level permissions and one or more Administrator-level permissions are selected. | Agent |
| Staff user | NO Agent or Administrator-level permission selected. | Staff user |
| Agent | NO Agent or Administrator-level permission was selected. | Agent |
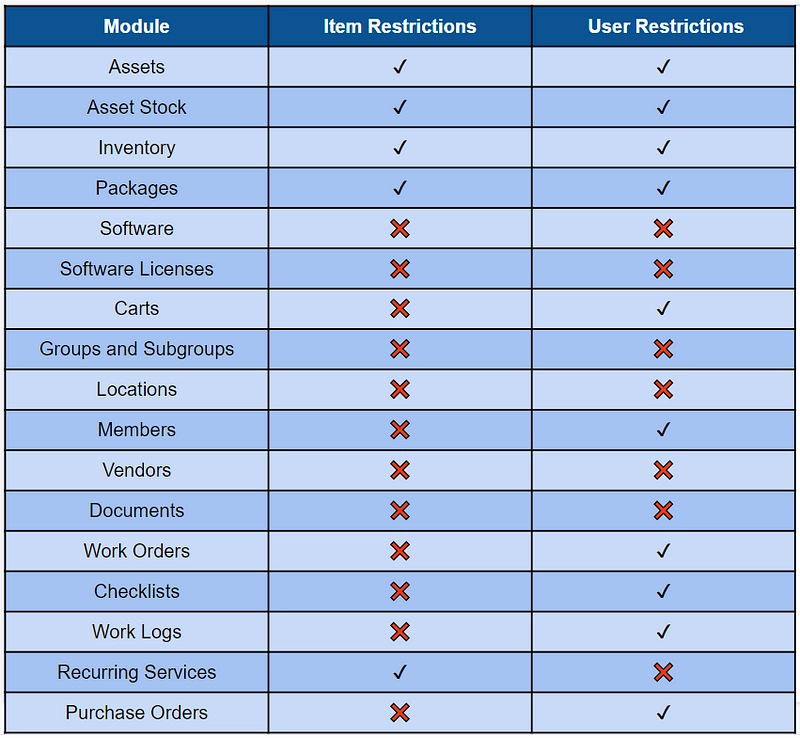
5. Overview of restrictions within all modules
To get a better understanding of which modules have User and Item Restrictions and which don’t, here’s a simple overview:
6. Permissions for Assets, Asset Stock, Inventory, Packages
To get comfortable with the permissions available, let’s look at an expanded view of the Assets module:


The Assets module contains both Users and Item Restrictions. This means you can limit the role to work with certain users carry out actions for them, and take actions on certain items.
An understanding of the Assets module will also apply to the following modules since they have similar permissions:
- Asset Stock
- Inventory
- Packages
Note: The permissions for check-in, checkout, transfer custody, reserve, and service and maintenance for Assets also extend to Packages. Therefore, what you choose for these permissions under Assets will also map to their corresponding Packages automatically.
6.1. ‘Within Item Restrictions’ vs. ‘Without Item Restrictions’
Let’s say you’re creating a Custom Role that needs to have the authority to delete all Assets. In such a case, you will select the ‘Without Item Restrictions’ checkbox as shown below:

This enables the Custom Role to delete any Assets irrespective of what group or location they’re in. If you want the Custom Role to only delete Assets within the specified Item Restrictions, select the ‘Within Item Restrictions’ checkbox instead.
Keep in mind that you can only choose one checkbox in a row out of the two for ‘Within Item Restrictions’ and ‘Without Item Restrictions’.
If you choose both for ‘Within Item Restrictions’ and ‘Without Item Restrictions’, preference is given to ‘Without Item Restrictions’.

Therefore, in the above case, the ‘Within Item Restrictions’ checkbox is disregarded and the Custom Role is given the right to take the action without Item Restrictions.
6.2. What does ‘Assigned To This User’ mean?
For certain permissions, you will be able to see an ‘Assigned To This User’ column. Here’s a visual of one such instance:

This column lets you take actions on Items or Packages that are assigned to the Custom Role user. In the above visual, if you select the ‘Assigned To This User’ checkbox, the user will be able to view all Assets that have been assigned to them.
In case you select ‘None’ when specifying Item Restrictions, the role will be able to view all Assets without any limitations. However, in case you select the above option of ‘Assigned To This User’, then preference will be given to this option. This means that the user will be able to only view Assets assigned to them, even if the role has no item restrictions applied to it.
However, when either ‘Within Item Restrictions’ or ‘Without Item Restrictions’ are chosen, then preference is given to ‘None’ as chosen above when specifying Item Restrictions.
6.3. Understanding the ‘For This User’ column
When scrolling through the list of permissions, a new column ‘For This User’ emerges in some instances. Here’s a visual of one such instance:

This may look confusing but is fairly simple once you get the hang of it. Whenever the ‘For This User’ column is introduced, it means that in addition to carrying out the action for other users, the user can now also do so for himself.
Let’s break the above visual into two parts to better understand the set of actions it allows the role to take:

The first set of actions available to the role are highlighted above. The role can take any of the two actions, in this case, using the ‘For This User’ column:
- Check-in items for themselves within the set Item Restrictions
- Check-in items for themselves without being limited by Item Restrictions
Moving on to the second set of actions that are highlighted below:

This set of actions is just the regular permissions as explained above in section 6.1. Instead of ‘For This User’, these actions affect other users.
Similarly, let’s look at the set of permissions available when checking out Assets for better understanding:

Here are the possible actions the role can take using the permissions within the ‘For This User’ column:
- Checkout items for themselves within Item Restrictions.
- Checkout items for themselves without being limited by Item Restrictions.
Here are all the other possible actions the role can take within with the permissions above:
- The role can checkout items for those users who exist within the set team restrictions. The items checked out must be within set Item Restrictions.
- The role can checkout items for those users who exist within the set team restrictions. The items checked out do not have to be limited by any Item Restrictions.
- The role can checkout items for any user without being limited by team restrictions. The items checked out must be within set Item Restrictions.
- The role can checkout items for any user without being limited by team restrictions. The items checked out also do not have to be limited by any Item Restrictions.
7. Permissions for Software and Software Licenses
AssetSonar also enables you to specify permissions for taking actions on On Premise and Cloud Software, and their corresponding licenses.
Note: Only members with default Administrative permission can take actions on Software and Software Licenses. Staff Users cannot take action on Software and Software Licenses as this requires authorized privilege.
As mentioned in section 5, these modules are not bound by Item or User Restrictions so specifying custom permissions is straightforward.
7.1. Specifying permissions for Software
Let’s begin with defining role permissions for Software. Start with either ‘None’ or ‘Administrator’ default permission and check or uncheck each of the boxes as you prefer.
You can assign a Custom Role the permission to take the following actions:
- Create software
- Update software
- Detect cloud software
- View software
Here’s what it should look like:

7.2. Specifying permissions for Software Licenses
Follow the same protocol as in section 7.2. to specify permissions for Software Licenses.
You can assign a Custom Role the permission to take following actions on Software Licenses:
- Create
- Update
- Delete
- Reconcile
- Manage payments
- Assign
- View
Managing Software Licenses is a serious business. Therefore, make sure that you’re assigning role permissions only to authorized personnel like IT Admins and Senior Product Managers, etc.
However, there may be cases when you’d want a specific user to be able to only view your software data. Let’s say you have added an external auditor in AssetSonar to review your data and verify license compliance.
You can assign them the Custom Role of an Auditor and give them customized permission.
Specify ‘None’ in default permissions and select only the ‘View all’ checkbox under the Viewing Software Licenses section. This shall automatically give auditor Administrative privileges, however, only with the view access.


This way, you can make the data available to your auditors without giving them access to make changes to it.
Note: We do not give Staff Users the ability to view or update software information.
8. Permissions for Carts, Members, Purchase Orders, Work Orders
To get comfortable with the permissions available, let’s look at an expanded view of the Carts module:

The Carts module does not contain any Item Restrictions. However, it does contain User Restrictions. This means you can restrict who the role can work with, carry out actions for, etc. Here’s an example:

Let’s assume there is a custom role called IT Support. This role is also a part of two teams — Network Team and Hardware Team. With these permissions, you can choose whether IT Support users will have:
- The authority to update Carts that were created by any IT Support user.
- The authority to update Carts created by other users within team restrictions, i.e. other users that exist within the two teams, Network Team and Hardware Team, that IT Support is also a part of.
- The authority to update Carts created by all other users without any limitations.
In case you select ‘None’ when choosing user restrictions, then the user can update all Carts. However, let’s take an example from the above options. In case of the option ‘Update Carts created by this user’, if you select ‘Authorized’, then preference will be given to this option. This means the user will be able to update only those Carts that have been created by them, irrespective of whether you have chosen ‘None’ in user restrictions.
The same is applicable in all the conditions where the following phrases are used:
- Created by this user
- Assigned to this user
- Reviewed by this user
- Approved by this user
- Requested by this user
However, in case you select two options as shown below, then preference is given to the ‘None’ you selected above in User Restrictions:

An understanding of the Carts module will also apply to the following modules since they have similar permissions:
- Members
- Purchase Orders
- Work Orders
- Work Logs
- Checklists
Read More: Carts in AssetSonar: ITAM for Jobs and Events
9. Permissions for Groups & Subgroups, Vendors, Locations, Documents
To get comfortable with the permissions available, let’s look at an expanded view of the Groups and Subgroups module:

The Groups and Subgroups module does not contain Item or User Restrictions. Instead, all the permissions have to do with basic actions such as the ability to create, delete, update, and view Groups and Subgroups.
Let’s look at an example:

With this permission, the custom role you are creating simply gets the authority to create Groups and Subgroups.
An understanding of the Groups and Subgroups module will also apply to the following modules since they have similar permissions:
- Vendors
- Locations
- Documents
Read More: Types of Members in AssetSonar
Note: Within the permissions for Documents, you can restrict whether the Custom Role can attach a document or not. If this permission is left unchecked, it means the role will not be able to attach documents anywhere within the system, with any module.

10. Assign the Custom Role to a Member
Method 1: Via Member Details page
Once you’ve created the Custom Role, it’s time to assign it to a Member. To do so, either create a new Member from the ‘Members’ tab or open the existing one you wish to update.
From the Member Details Page, click on ‘Edit’. Then choose the Custom Role you just created from the Role dropdown menu as shown below:

All you have to do then is scroll down and hit ‘Submit’ to assign the new Role to the Member.
Method 2: Via Role Details page
You can also assign a Custom Role to a Member using another method. To do so, go to Members → Roles and open up the Custom Role you want to assign. Click the ‘Add or Remove Users’ button shown below:

This opens up the following overlay. Here, you can choose which member you want to assign the role to from a list of available users. Once you’re done, simply hit the ‘Change Custom Role’ button to save your changes.

Note: You can assign several members to the same Custom Role.
11. What happens when you disable Custom Roles?
When you disable Custom Roles, the following dialog box appears:

The concerned user must be assigned some role now that the custom role has been disabled. As the dialog box clarifies, each concerned user will be assigned a role according to the selected permissions.
Keep in mind that the Default Permissions you chose from the dropdown menu does not decide what role the system will assign to the user after you disable Custom Roles. Instead, the permission checkboxes do. If all the permission checkboxes selected are blue, the user will be assigned the role of a Staff User. However, if you select even a single pink box, the user will be assigned the role of an Administrator.
Let’s look at an example. Here, the Default Permission from the dropdown menu is set to Staff User but an Administrator action is selected from the permission checkboxes:


The custom role is authorized for one Administrator-level action. Therefore when the Custom Roles are disabled, the user will be assigned the role of an Administrator.
12. Importing users to Custom Roles
You can also import your users and their respective roles in a way that their hierarchy is reflected in AssetSonar using our third-party integrations. To do so, select the ‘Import Users to Custom Roles’ option under each of the following settings:
- LDAP Server integration
- G Suite integration
- SCIM-based integrations with OneLogin, Azure AD, and Okta
Below, we use LDAP as an example.

Once you have checked the setting, the following options would appear on the attribute and column mapping table:

Note: If the data values for Roles and Teams are not already specified in AssetSonar, the users belonging to these Roles and Teams will not get provisioned into AssetSonar. You will receive an email listing the users that could not be provisioned.
Read more: [How-to] Use Custom Fields in AssetSonar


