
AssetSonar enables more flexibility and control over your team with enhanced Members settings options. Making it easier to manage teams efficiently, Account Owners can separately control the default Members settings and Alerts for user provisioning applications, including Google Workspace, SCI,M and LDAP.
What has changed?
Before these enhancements, you could set the default permissions for user provisioning apps from Company Settings → Member Settings as shown below:

With these updates, the Member settings for every provisioning application will be listed individually under Settings → Add Ons → Google Workspace Integration/SCIM Integration/ LDAP Integration.
Note: This enhancement will not affect your existing Member permissions and does not require a separate configuration.
1. Google Workspace
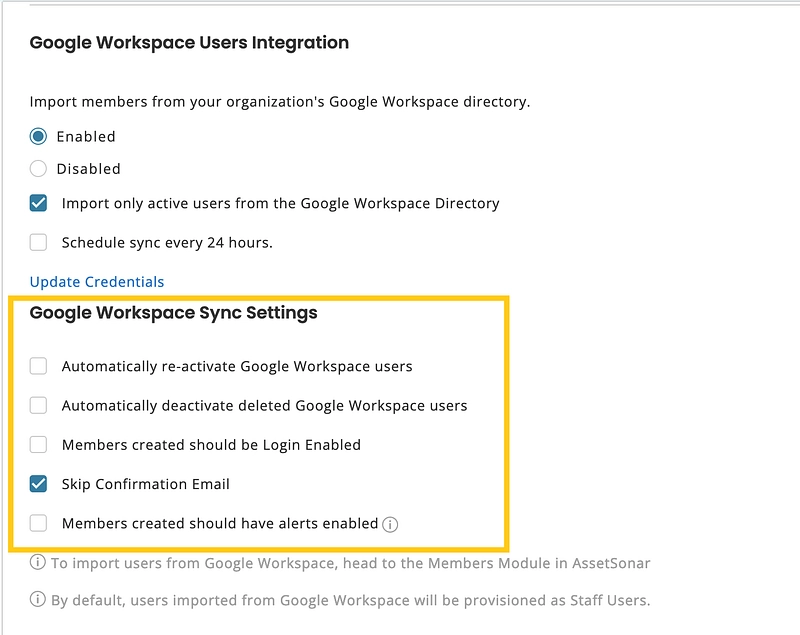
To enable the Google Workspace integration, go to Settings → Add Ons → Google Workspace Users Integration → Enabled.

Once you have enabled the integration, an overlay will appear from where you can set the default settings and Alerts for new Members.

Once you have checked all the relevant settings, click Save and update to enable these settings.
In case you want to change the settings later, you can do so by clicking on the ‘Configure Member Sync Settings’ option as shown below:

Clicking on this option will pop up the Google WorkSpace Sync Settings overlay again from where you can update the settings.
However, if your Google Workspace is already enabled, you will be able to view the settings in the following format:
Note: The Members settings for the existing customers will remain the same while these new settings will be applied on the new users.
2. SCIM
To enable advanced Members and Alerts settings for SCIM, follow this pathway: Settings → Add Ons → User Provisioning Via SCIM → Enabled.

Once enabled, an overlay will appear for default settings and Alerts for new users.

Click on Save and then Update to save these settings.
If you want to make any changes to these settings, you can do so by clicking on the ‘Configure Member Sync Settings’ button.

Once you click on this option, the overlay for SCIM Sync Settings will appear again from where you can update the settings.

3. LDAP
To configure settings for LDAP, go to Settings → Add Ons → LDAP Server Integration → Enabled.

Once enabled, an overlay will appear from where you can set the default Member sync settings.

Click on ‘Save’ and then update the settings.
For users who have already enabled LDAP member settings, the view would be as shown below:

4. Select member Alerts during Excel imports
You also have more flexibility to select Members settings while uploading members via Excel. Go to Members Listing page → Import Members→ Add New Members. Upload the Excel file to import new members from your system. While mapping the columns, you will be able to view the settings highlighted below.

These are the settings that you have already chosen for Members from the Company Settings page. These settings are locked by default and can be unlocked and changed from the ‘Click here’ button. Select your required options and apply.
Note: These settings and Alerts can be selected for every individual import separately and will take precedence over the default Company settings.
5. Disabling Alerts for Members
If you want to disable Alerts for multiple Members, you can do so from the Members Listing page. Go to the page and select the relevant Members. Then from the Actions dropdown, click on Disable Alerts. This action will disable the Alerts for the selected Members. In case you want to re-enable Alerts for those Members, you would be able to do so from the Members Details page.

Read more: Integrate Your Google Workspace Directory With AssetSonar


