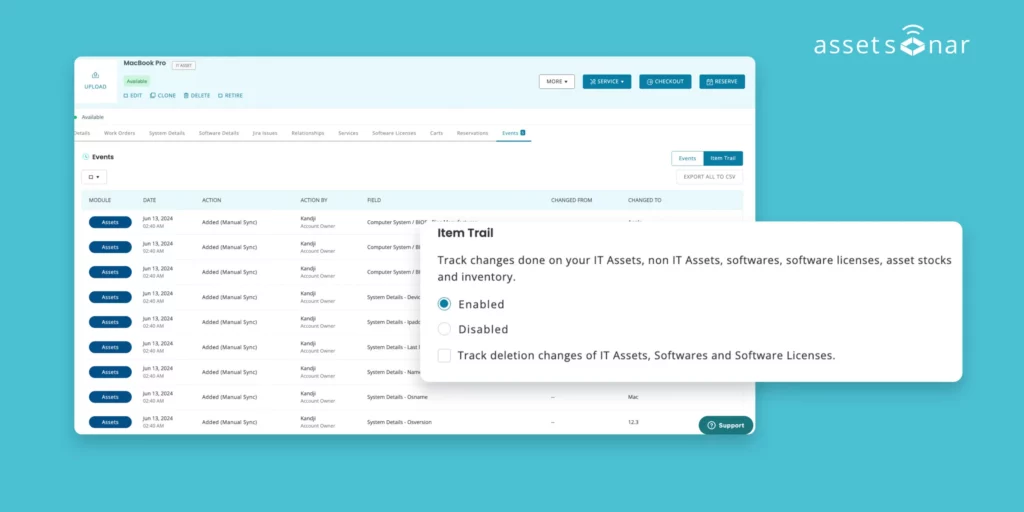
Organizations manage diverse ecosystems and work with multiple types of IT assets every day. Manually monitoring all actions performed on each asset can be challenging. AssetSonar has introduced the Item Trail capability to offer a comprehensive record of IT assets and the history of software and software licenses, allowing users to track every information update and action taken.
Having complete visibility into detailed records empowers your team to make informed decisions efficiently and enables your organization to ensure internal accountability for users.
Benefits of Item Trail
- Enhanced Accountability: Organizations can easily track every action and update on an item. Any additions, changes, or check-in and check-out details are updated in real-time to get visibility on asset ownership, status, and condition anytime and from anywhere.
- Improved decision-making: All-time visibility into an item’s history allows teams to access relevant information promptly. Users can make better-informed decisions regarding asset maintenance, utilization, or allocation by understanding the sequence of actions taken on IT assets.
- Auditing and compliance: A clear record of all changes and actions on each IT asset can be checked to ensure compliance with industry standards and internal policies. Any discrepancies can be identified for corrective measures. Software and licensing trails make it easier to track changes by enabling you to view which licenses are installed on which assets, how many user entitlements a license has, and whether license seats have been added or removed. This helps users ensure accountability and make changes as needed.
Let’s take a look at how Item Trail works for IT Assets, Software and Software Licenses:
1. Enable Item Trail settings
To enable Item Trail settings, please contact our support team at support@ezo.io
2. Edit an IT Asset
An Item Trail records all changes made to IT Assets. A user or source can take action on IT assets. You can see below the actions taken by the source – Kandji has updated some details on a laptop in AssetSonar. To view these changes, go to the Asset details page, click the Events tab, and select the Item Trail button.
The laptop has been manually synced with the Last Source Sync Date, Name, Product model number, State, and Disk and Drive name fields. The description can be seen in the ‘Changed to’ column below.
The details of any IT assets updated through the discovery source can be synced automatically or manually. IT assets can be manually synchronized from the settings, asset details, or asset listings pages using any discovery source. The IT asset’s trail will automatically display all syncs and their actions for all-time visibility.

Similarly, the actions taken by a user, Bob, on a laptop are shown below. The laptop name, location, and group have been added.

3. Edit Software assets
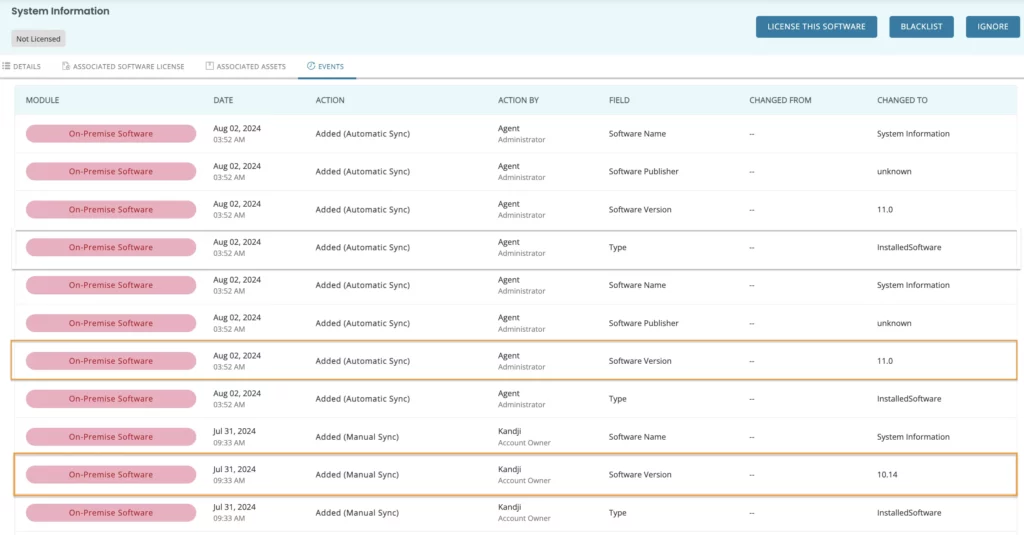
Below is an Item Trail record for software. Here, you can see different actions, such as adding the Software name, publisher, and type. The details of any software assets updated through the discovery source can be synced automatically or manually.
In the example below, software version 10.14 was previously synced manually via Kandji, and later, another software version, 11.0 was automatically synced via Agent.
4. Edit Software Licenses
The user can easily track the number of seats added, removed, activated, or terminated from the item trail record of software licenses. They can also view changes in user machine entitlements and other information reflected in the item trail record.
In the example below, the user has added two seats—the ‘Changed from’ field shows 5 seats, and the ‘Changed to’ field shows 7 seats.

5. Edit an Asset Stock
Below is an Item Trail record for Asset Stock. Here, you can see different actions, such as when the Asset Stock was created, the price changed from $0 to $100, and the warranty date was added.

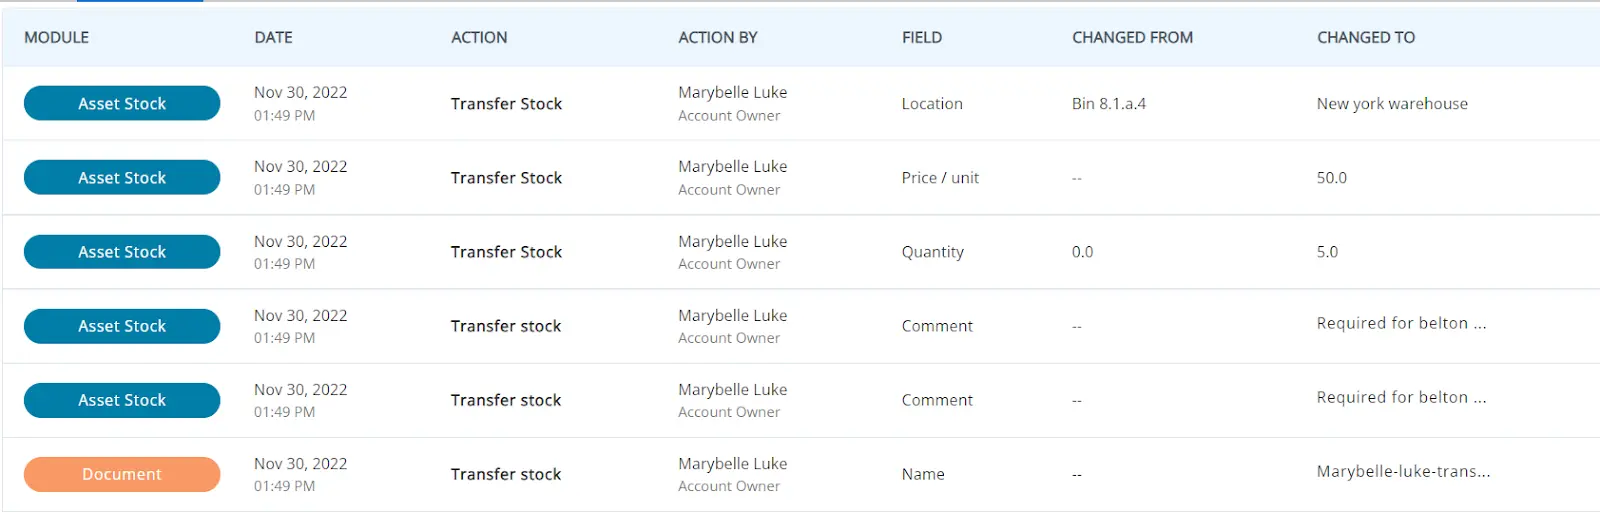
Next, let’s suppose you want to transfer some stock to another location. Go to HDMI cable cords Asset stock details page → More → Transfer Stock.

The quantity changed from 0 to 5 at the New York Warehouse. The Item Trail will be displayed in the same order as the actions taken on Inventory Items.
6. Check in/out an IT Asset
You can auto-checkout items based on their source or integrations. To do so, go to the More →Provisioning → Auto Checkout tab and choose Agent as the last sync source.
The laptop below is listed as a device imported via AssetSonar ITAM Agent. It is checked out to Joy Pepper.


The checkout details for the item trail appear below. You can also view asset custody as verified, changing status from audited to checked out.

When Joy checks in the laptop, the item trail will display check-in actions and the asset status will be changed to available.

7. Quick actions on Item Trail
Hundreds of actions can get populated under the Item Trail tab over time. For this reason, there is an option to apply filters to view specific actions for an IT Asset:

Let’s select the Action Filter. To filter out uploaded documents, select Documents in Module and Uploaded in Action.

The applied filter is shown below:

You can even filter item trail for a specific period by adding the dates and times in the Time Frame filter.


