
Accurately discovering and tracking peripherals, especially monitors, pose a major challenge for IT teams. In most organizations, IT administrators track these assets manually via spreadsheets, making this entire process time consuming and prone to errors. AssetSonar’s automated peripheral discovery feature empowers IT teams to better track and manage these devices, resulting in improved efficiency and accuracy in overall IT asset management.
AssetSonar’s peripheral discovery capabilities are most helpful for organizations with larger IT infrastructure containing a diverse range of peripheral devices.
Benefits of peripheral discovery
AssetSonar’s peripheral device discovery feature empowers companies with automated identification and tracking of monitors. This enhances visibility, reduces manual effort, and ensures efficient resource utilization, ultimately optimizing IT asset management for scalability, leading companies to improved automation in IT workflows. Here is how this capability can bring value to your organization:
- Automated Inventory Management: Automatically identifies and catalogs all monitors connected to the IT assets network, saving time and reducing errors compared to manual inventory processes.
- Enhanced Security: By identifying all monitors connected to a network, it helps in pinpointing unauthorized or unknown devices that could pose security risks. This enables quicker response to potential vulnerabilities.
- Enhanced Operational Efficiency: By having a clear view of all monitors, IT teams can more efficiently manage and troubleshoot devices, leading to reduced downtime and better overall operational efficiency.
- Data Accuracy and Reporting: Offers accurate and up-to-date information on the state of monitors, supporting better decision-making and facilitating detailed reporting for internal or regulatory purposes.
- Proactive Maintenance: With detailed information on each device, organizations can transition from reactive to proactive maintenance, addressing potential issues before they disrupt business operations.
Now let’s learn how we can enable this integration and utilize the feature for discovering and tracking peripherals on your network.
Enabling peripheral discovery
To enable the setting, follow the pathway: Settings → Company Settings & Addons → Peripheral Device Discovery. Now click on ‘Enabled’.

Click on the ‘Update’ button to finish enabling the setting. Please note that you won’t be able to view the monitors in the peripherals tab right away. Once successfully enabled, you’ll be able to discover the monitors after the next ITAM agent sync.
Please note that this feature discovers the monitors through AssetSonar’s ITAM agent so make sure that you have already enabled the agent and is installed on all devices within the organization.
Provisioning for peripherals
From the left navigation bar on the app, click on More and then click on ‘Provisioning’. Under the ‘Detected Devices’ tab, you’ll see two more tabs named ‘Assets from Network Agent’ and ‘Peripherals’. Click on the later one.

Monitors are detected on the basis of their serial numbers and all detected monitors will be categorized as either of the following:
| Category | Categorized based on |
| New | Monitors that are discovered by AssetSonar for the first time would fall into this category. For example, if your IT department has procured a new monitor that hasn’t been added to the database manually, it will be shown under the ‘New’ category. |
| Matches Found | If the newly discovered monitor is an exact match of a non-IT asset in the system, it would be classified under this category. |
| Shared | If a monitor was already discovered with an IT asset but is discovered again with a different IT asset, it would fall under the shared category. For example, multiple employees connecting to the same monitor in a meeting room will make it discoverable with multiple IT devices. |
| Unknown | If the serial number of the discovered asset matches the AIN number of an asset in the system, it would fall under the Unknown category. |
If there hasn’t been a sync yet, no devices will show up in this tab. However, if peripherals are discovered through a recent sync, they’ll appear under this tab as shown below:
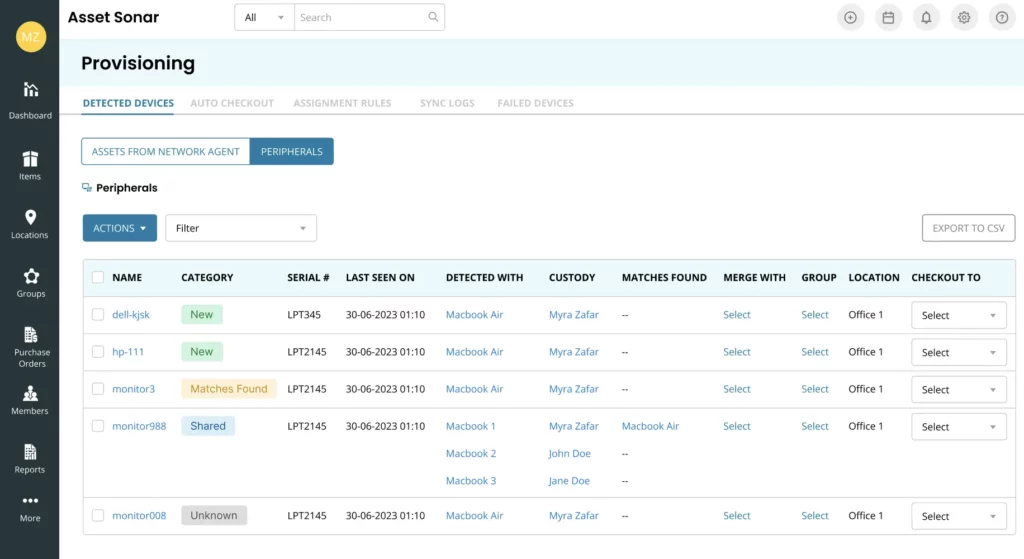
Here is the breakdown of other fields and information discovered through this feature:
- Name: This field will contain the name of the monitor that is being discovered.
- Serial #: The serial number of the discovered monitor.
- Last seen on: The sync date when the monitor was last discovered/tracked.
- Detected With: This is the IT asset that is attached to the discovered peripheral. For example, if a Macbook Air user has connected a monitor, that Macbook Air’s information will be fetched for this field.
- Custody: This field will give information on the user that IT asset was assigned to. In our case, it would give the name of the user that Macbook Air is checked out to.
- Matches found: It would show the non-IT asset that matches the discovered asset on the basis of serial numbers.This field would be blank for all new monitors.
- Merge with: This is a dynamic field and if there is a match found of the discovered monitor with a non IT asset, that match would be auto-populated in this column.
- Group: This field allows the IT administrators to choose the group they want to classify the detected peripheral as. For example, an organization can choose to categorize monitors as peripherals, monitors, wires, PCs, etc.
- Location: This is a dynamic field and it has prioritization. If there is no match found for the discovered monitor, this column will have the location of the related IT asset. However, if a match is found, the location column will show the location of the matching asset.
- Checkout to: This is also a dynamic field and has the same prioritization rule as the location column. If there is a match found for the user, then the asset’s custodian’s name will be populated here. However, this rule only applies if the asset is in an available state and hasn’t been checked out to any user.
Actions on peripherals
You can filter the discovered monitors based on their categories. On the peripheral listing page, click on the Filter tab and a new dropdown will appear as shown below:

Choose an option from the dropdown and a new filtered list will appear:

You can also choose a single or multiple monitors from the peripherals listing page to take an action. You can either add them as an asset or ignore them. If you choose to ignore an asset, it would not show up in discovery anymore.

If you choose some monitors and want to add them to the system as assets, then clicking on the option will open up a new overlay as shown below:

Click on the ‘Add Monitors as Assets’ button to continue and the selected monitors will be added as assets to your AssetSonar database.
If the addition is successful, you won’t see those monitors on your provisioning tab anymore. You’ll get a message on the screen confirming the merging of these assets.
Account owners, checked out users, and admins will also receive an email notifying them of these actions taken on the peripherals.
These peripherals will start showing up on the assets listing page. Click on a monitor to open its asset detail page. You’ll see that there is a peripheral tag attached to it and the monitor would be checked out to the user with the associated IT asset.

Click on the Relationships tab to view the dependency of this monitor and you’ll be able to view the same information in the ‘Connected to IT asset’ table.

Detection History
From the asset detail page, click on ‘More’ and then choose ‘Detection History’.

It will show you a list of all IT assets that this monitor was detected with previously. Here is a snippet of how the history appears:

Frequently asked questions (FAQs)
How can I check out the monitor to a user whose IT asset wasn’t associated with the monitor previously?
If you want to check out the monitor to a user whose IT asset wasn’t associated with the monitor previously, you’ll get a prompt reiterating that you are checking out the asset to a new user. Here is a snippet of the prompt:
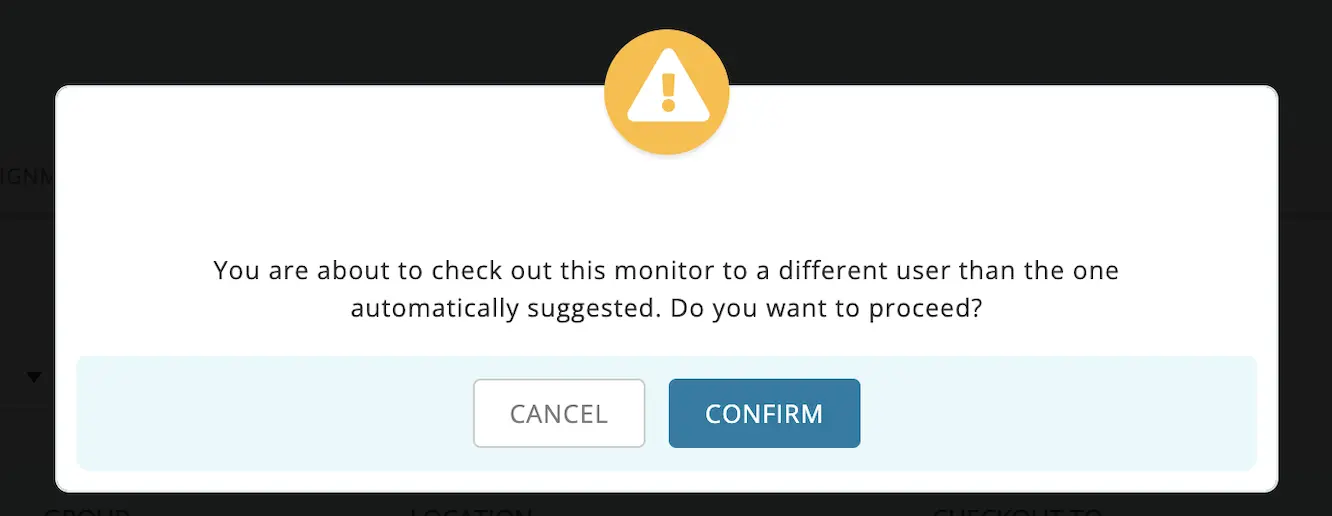
Click on ‘Confirm’ to check out the asset to a new user and the previous selection will no longer be valid.
What are the limitations of the Peripheral Device Discovery feature?
Peripheral discovery has the following limitations for now:
- Is not supported with Linux and Mac OS.
- Discovers personal monitors as well.
- Applicable only if the user has ITAM agent installed on their IT devices
- Only discovers monitors for which the serial number information is available in the monitor.
Does this feature allow you to discover all peripheral devices?
No, you can only discover monitors that are connected to the IT assets. Rest of the peripherals will be added later.


