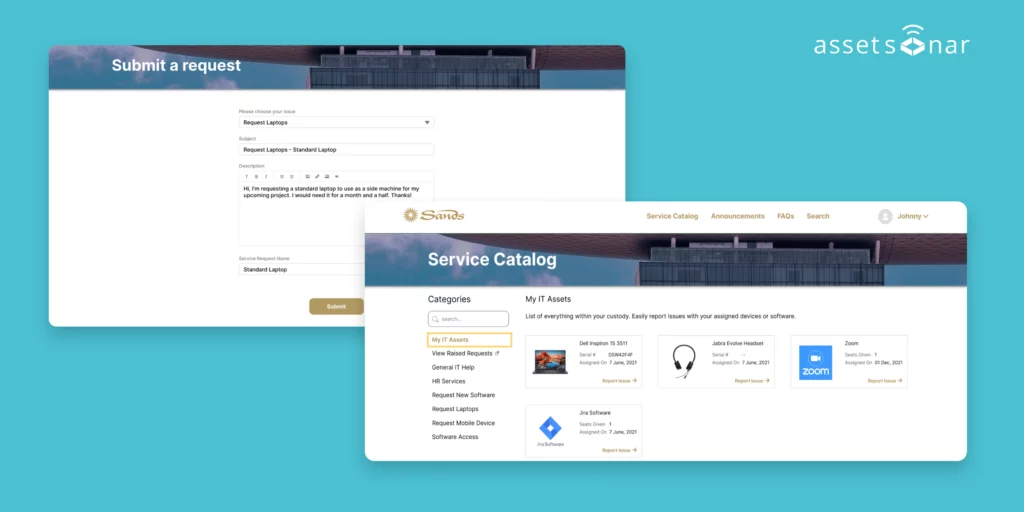
Introducing an all-new Service Catalog for AssetSonar’s Zendesk customers! Transform your IT service management with AssetSonar’s innovative self-service portal, designed to streamline and automate manual workflows while empowering your organization with enhanced asset intelligence.
Our Service Catalog isn’t just a new feature—it’s a game-changing module for businesses looking to streamline IT service requests, boost operational efficiency, and enhance employee experience.
By combining asset intelligence and self-service capabilities, we aim to redefine request and incident management and onboarding/offboarding workflows for IT departments everywhere. You can now say goodbye to inefficiencies and delays in service delivery, unclear SLA monitoring, budget woes, and inefficient resource allocation.
Excited to get started? For a limited time, we are offering complimentary setup and implementation of Service Catalog, along with a detailed walkthrough of relevant use cases, workflows, and more. Email us at support@ezo.io and we will help you set it up. You can choose to set up the Service Catalog module on your own by following the steps below, or if you prefer hands-on assistance, our Customer Success team is here to support you every step of the way.
How can Service Catalog benefit your organization?
If organizations are looking to improve IT operations efficiency and provide exceptional employee experience, then here’s how Service Catalog can add value:
1. Enhanced self-service
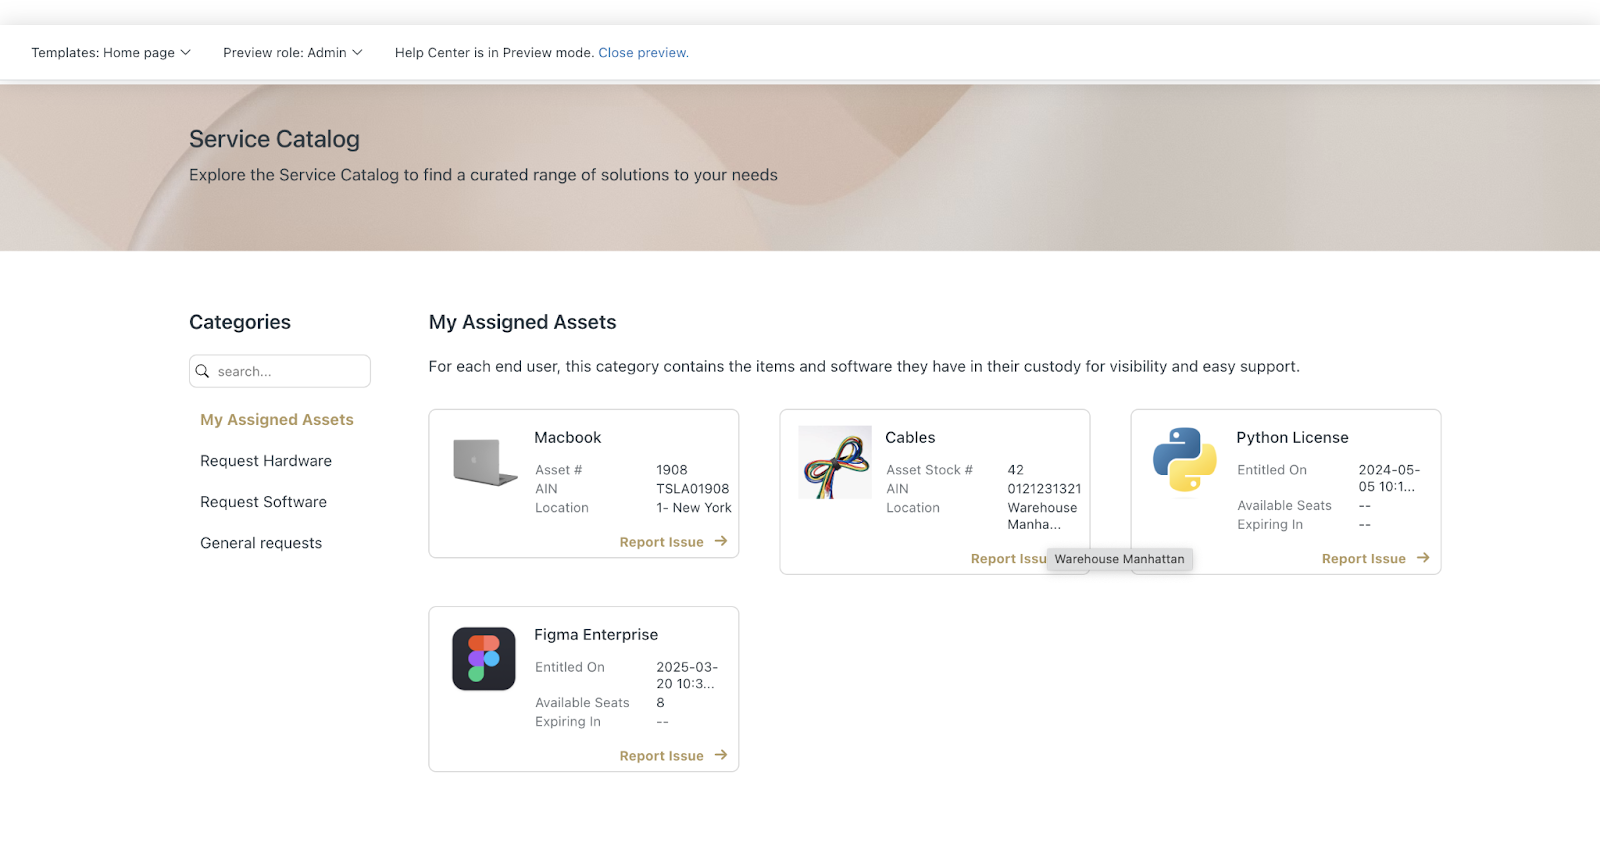
The service catalog allows end users to quickly resolve issues without assistance, promoting self-service and a better experience through easy-to-use portals and help guides.
2. Faster service delivery
A well-structured approach to service delivery for IT teams to swiftly resolve tickets. Automated approvals and fulfillment processes speed up service delivery, enhancing productivity and efficiency.
3. Real-time visibility and analysis
Employees have real-time visibility into ticket progress and how early the request can be fulfilled. Similarly, service agents can approve or deny tickets based on real-time information. Additionally, they can generate reports on which services are frequently used to analyze asset utilization and make informed decisions.
4. Enhanced employee experience
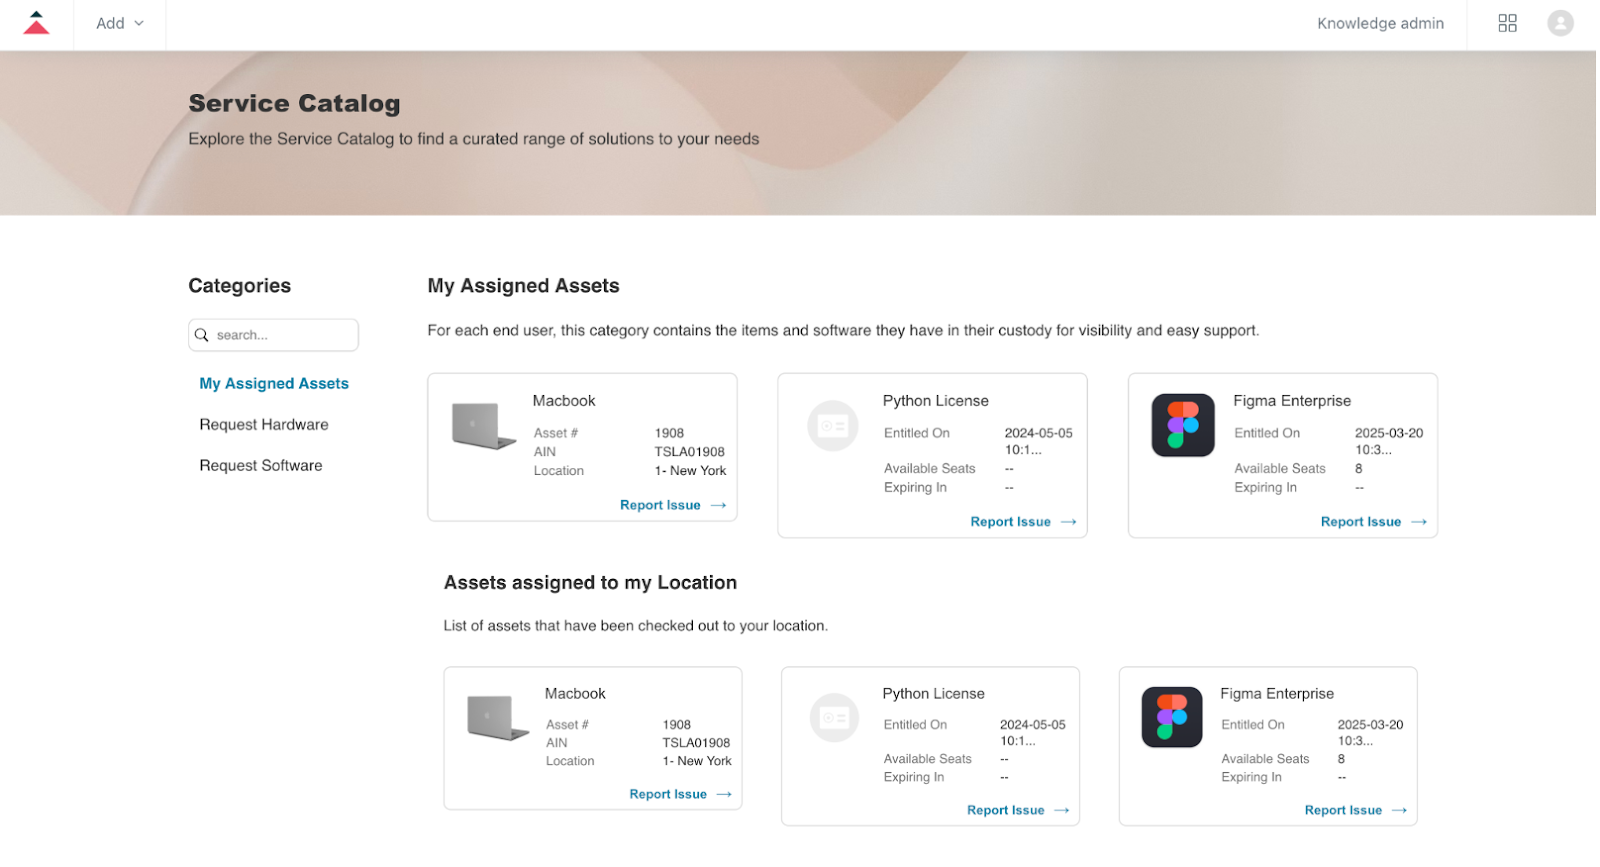
An interactive and user-friendly interface allows employees to view, request, and track all service listings in one place, eliminating back-and-forth with IT teams and relying on the service catalog for all their IT service queries.
Please note that you need to set up a Service Catalog on both AssetSonar and Zendesk before starting to use it. Now, let’s get started on setting up the Service Catalog builder:
Setting up Service Catalog Builder on AssetSonar
If you are an IT administrator, you can get started with Service Catalog by following this pathway: Settings → Integrations → Zendesk Integration and click on Enabled.

Now, add your Zendesk credentials to set up the integration. Here is a complete guide on integrating Zendesk with AssetSonar.
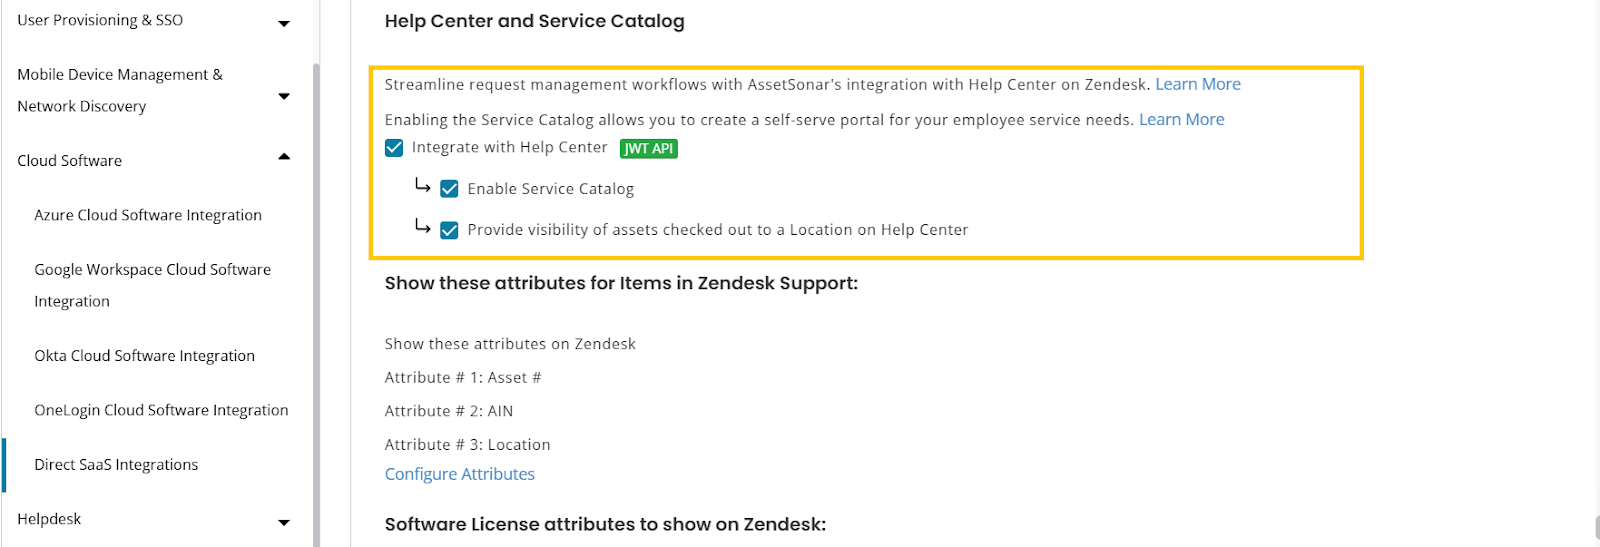
Once you have successfully integrated with Zendesk, click on Integrate with Help Center. You will need to integrate with Zendesk Help Center before you enable Service Catalog.
After you click Integrate with Help Center, you can also enable: Provide visibility of assets checked out to a location on Help Center.
When this is option is checked, the Assets displayed to the end-users include both the items checked out to them and their locations.
Note: This checkbox appears under Integrate with Help Center and is greyed out if Help Center is disabled. For details, you can take a look at our blog on Zendesk Help Center Integration.
It also requires that Checkout to Location is enabled in your company settings. You may enable it from Company Settings → Locations → Allow Locations to have custody of items. For details, check out our blog on enabling asset checkout to a location.
Now, check the Enable Service Catalog option before saving the setting.
Note: To enable Zendesk, please make sure that:
- Your Zendesk account is connected.
- You have access to either Help Center JWTs API Support, or Sunshine.
Learn more about integrating with Zendesk Help Center here.
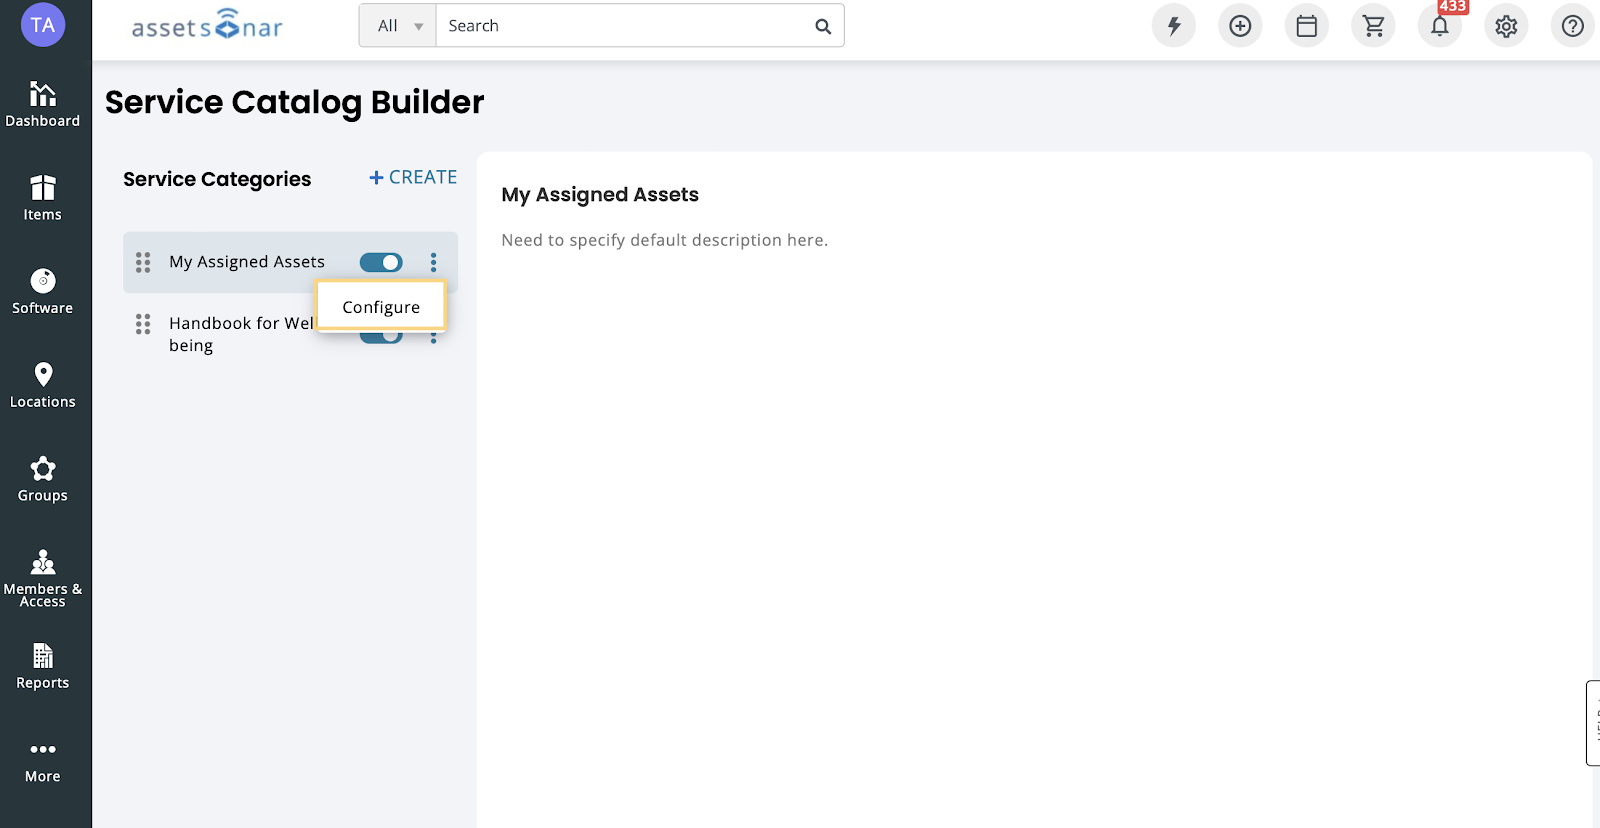
Once you have successfully created the integration, click More from the left navigation bar and then go to Service Catalog.
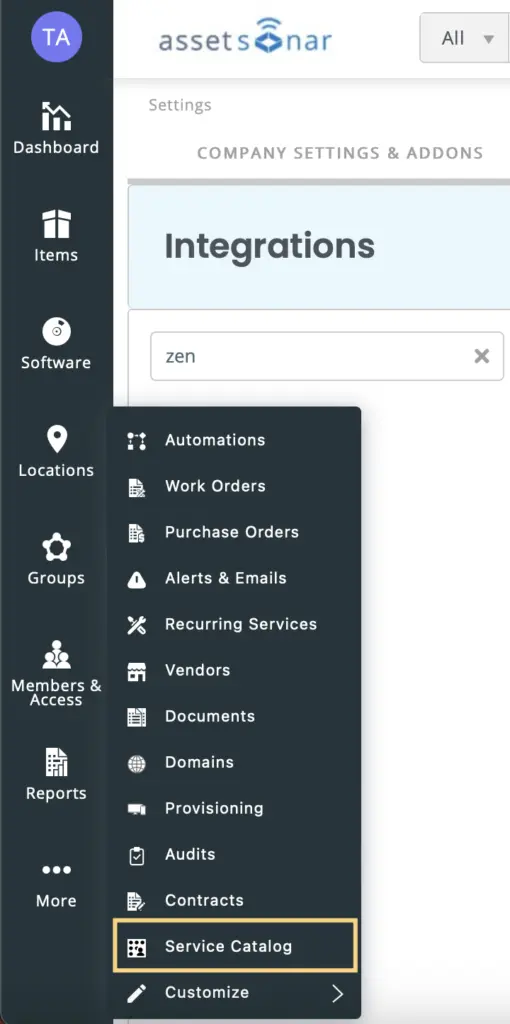
You can view the Service Catalog Builder, where you can create service categories and configure service items.
In order to create Service Categories and Service Items, we need to set up Service Catalog on Zendesk Help Center beforehand. Here are the steps you can follow to set up the Service Catalog:
Setting up Service Catalog on Zendesk Help Center
Now, you need to set up the Service Catalog from your Zendesk Help Center. To do so, log in to your Zendesk account by using your Administrator or Agent credentials.
To start, you’ll need ezoFieldID and ezoServiceItemFieldID. When employees create tickets, the assets and Service Items will be linked to their respective fields automatically. This would help the agent instantly know the context of the issue reported. Follow these steps to get values for these fields:
For ezoFieldid
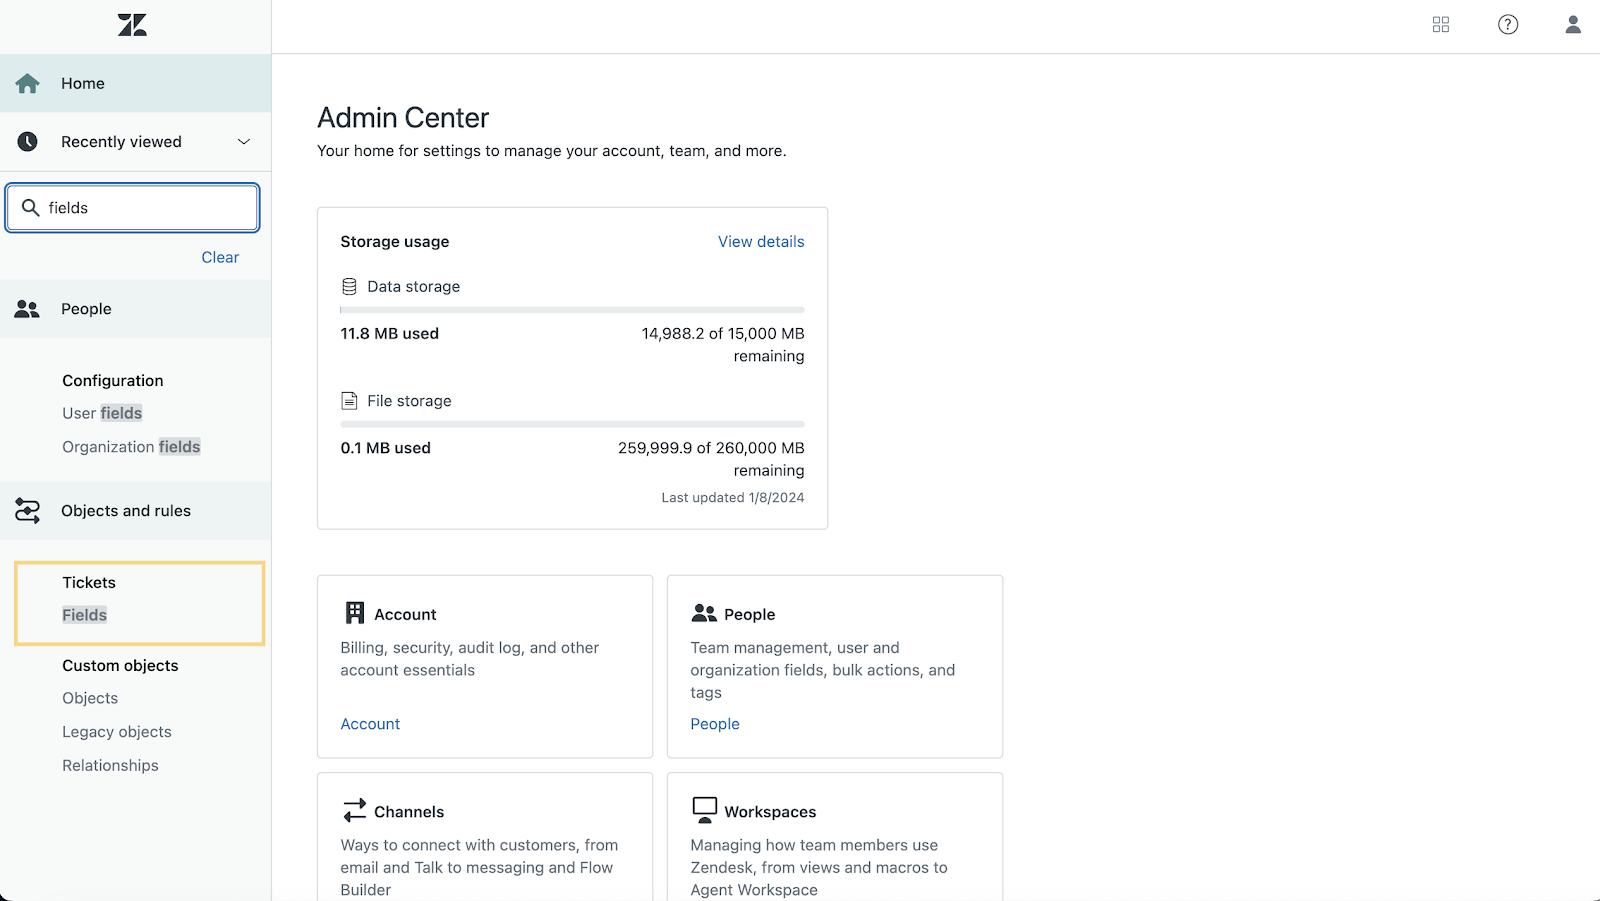
- From Zendesk’s main page, go to the Admin Center from the dropdown on the right as shown below:
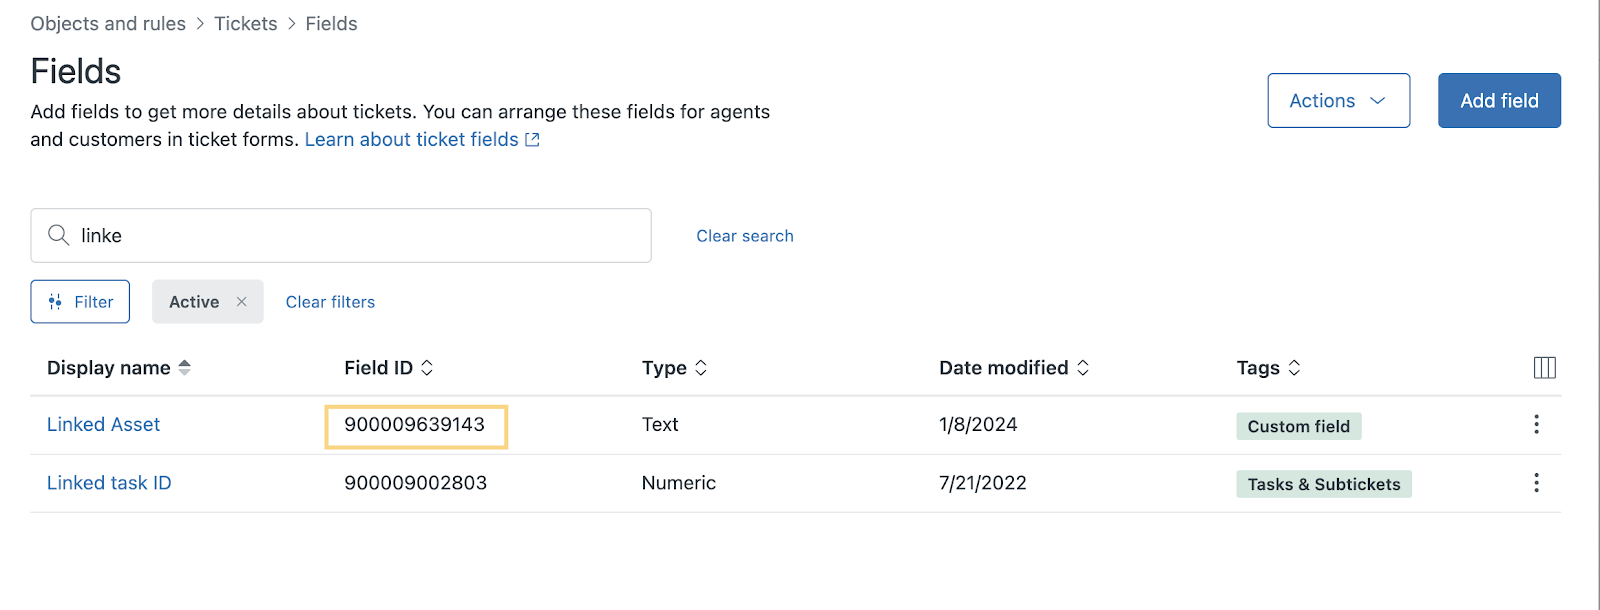
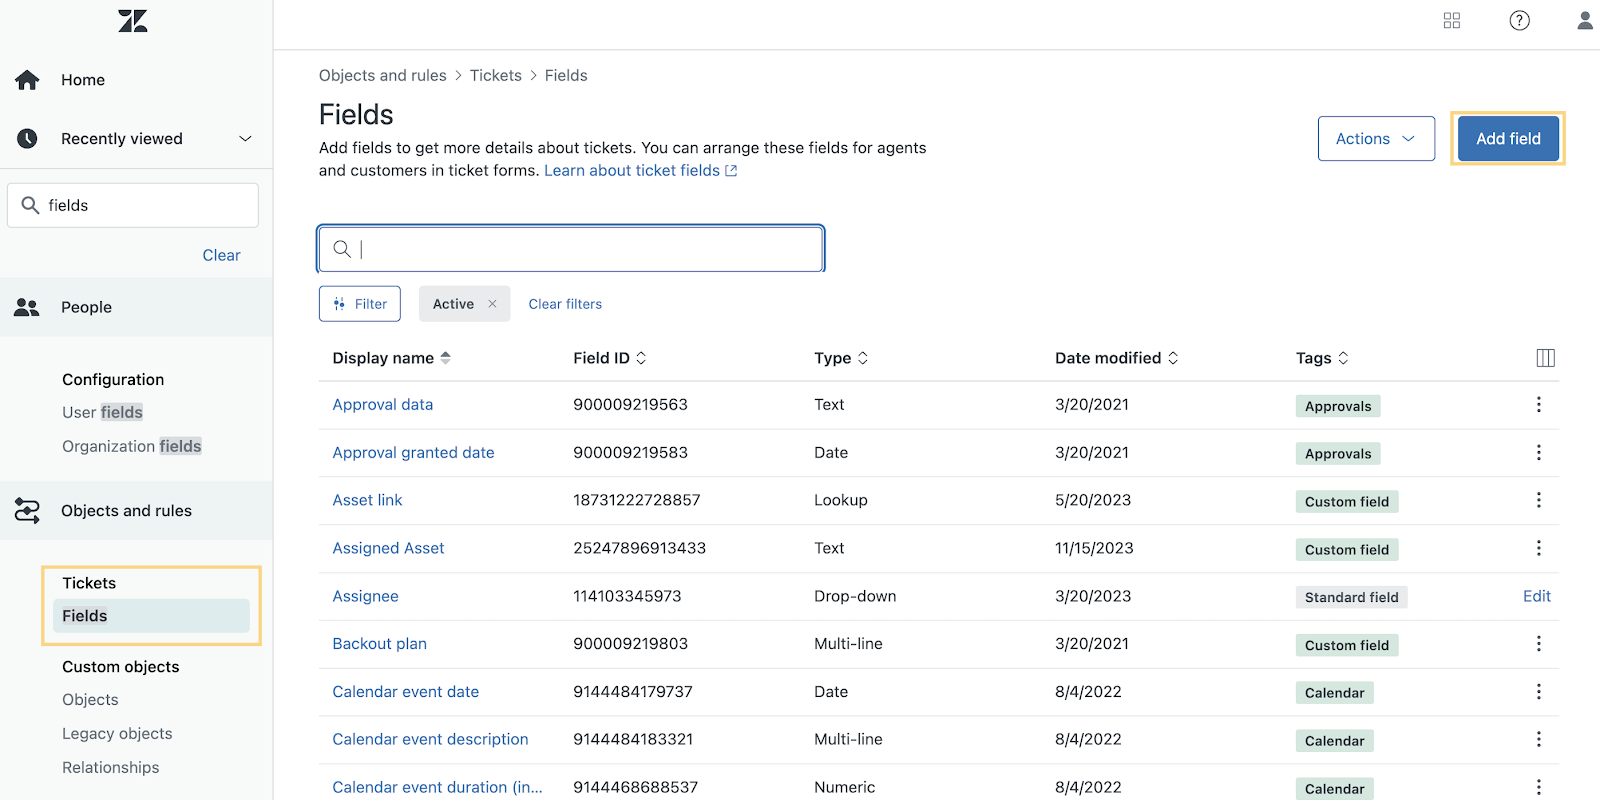
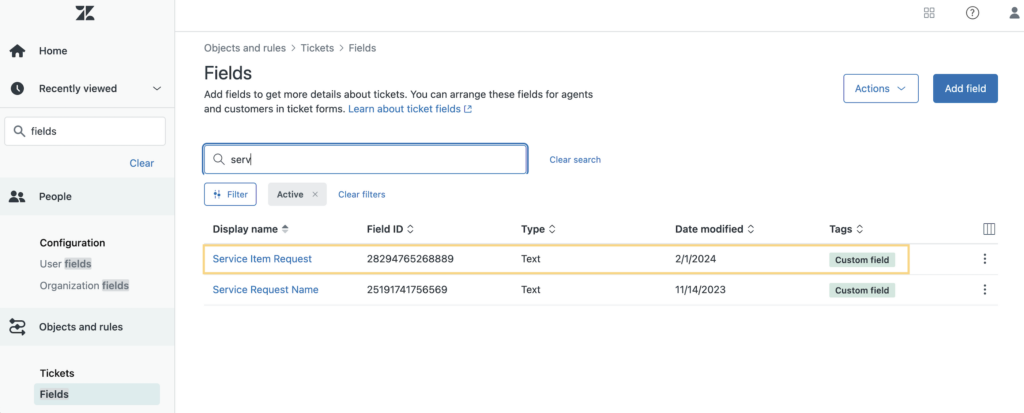
Now search for ‘Fields’ under the Tickets tab.
2. Create a new field by clicking on the Add Field option and fill out the form as shown below:

Please note that the checkbox for Required to Submit a Request should remain unchecked as shown below:
3. Click on Save, and you’ll be able to view the Field ID of the newly created custom field. Save this Field ID for later.
Now, let’s create another custom field that can be used later as ServiceItemID.
For ezoServiceItemFieldId
1. From Admin Center, go to the Fields page and click on the Add Field button on the top right.
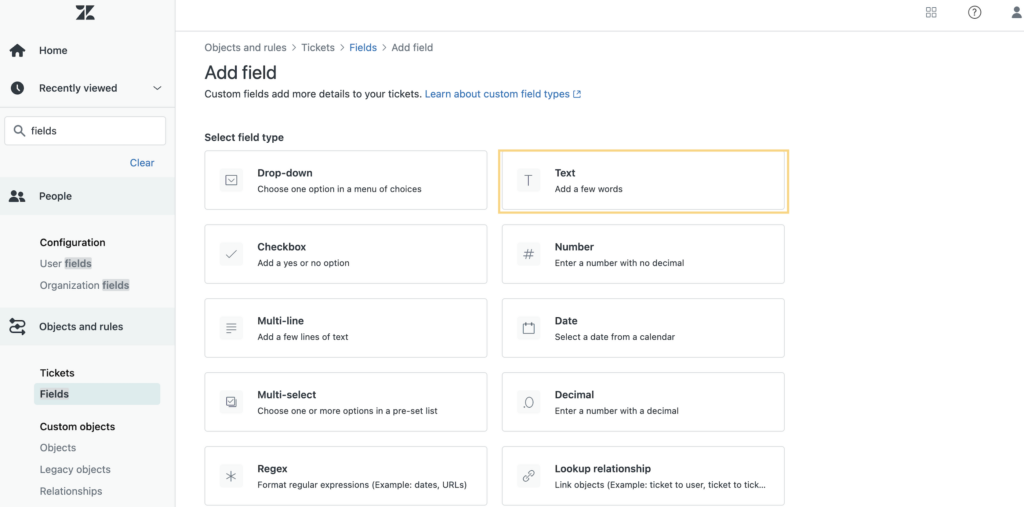
2. An Add Field detail page will open up. Click on the Text tab.
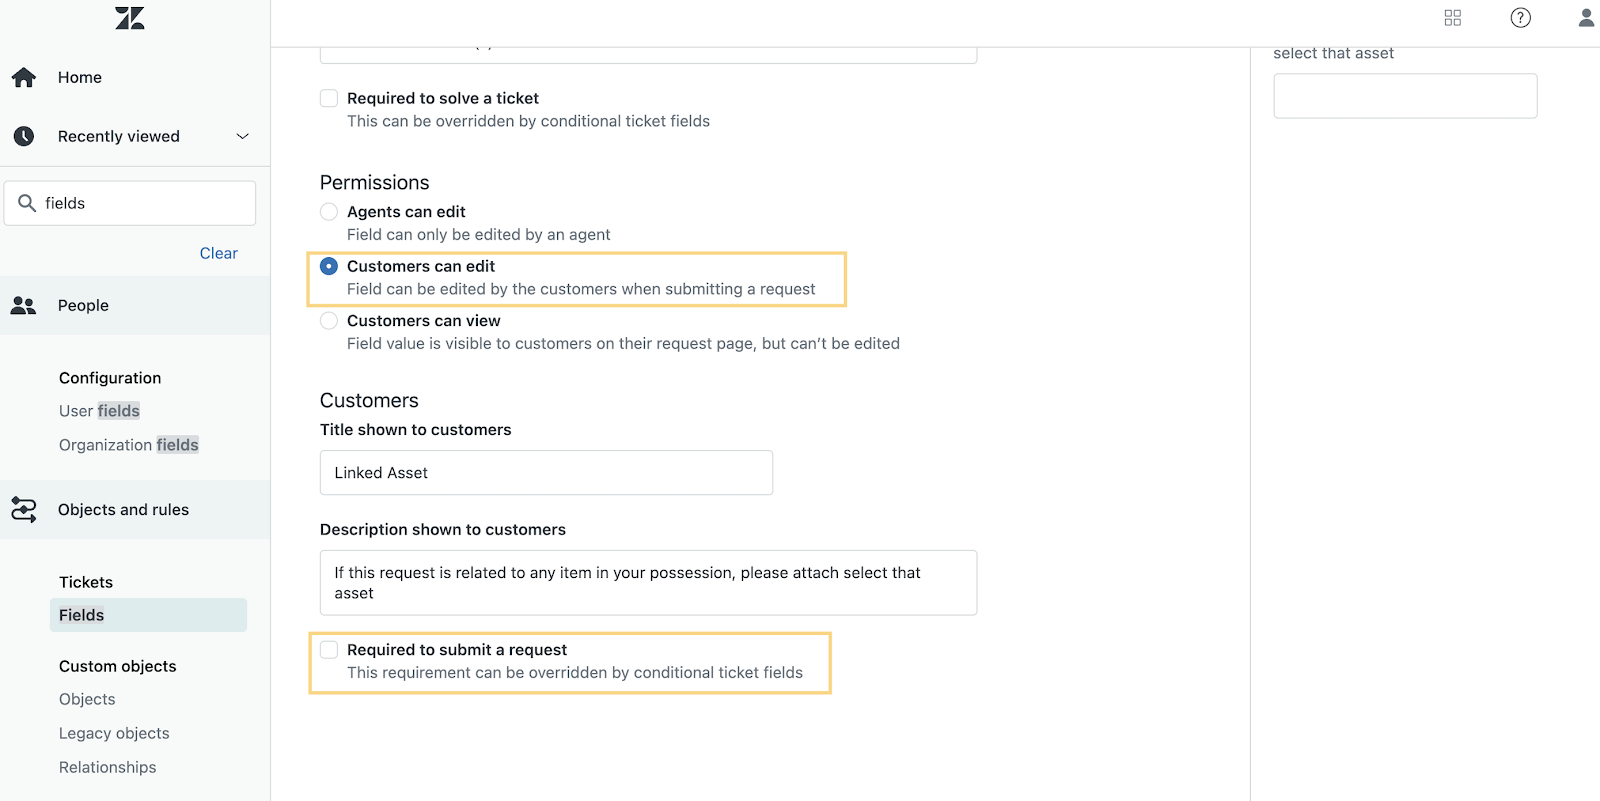
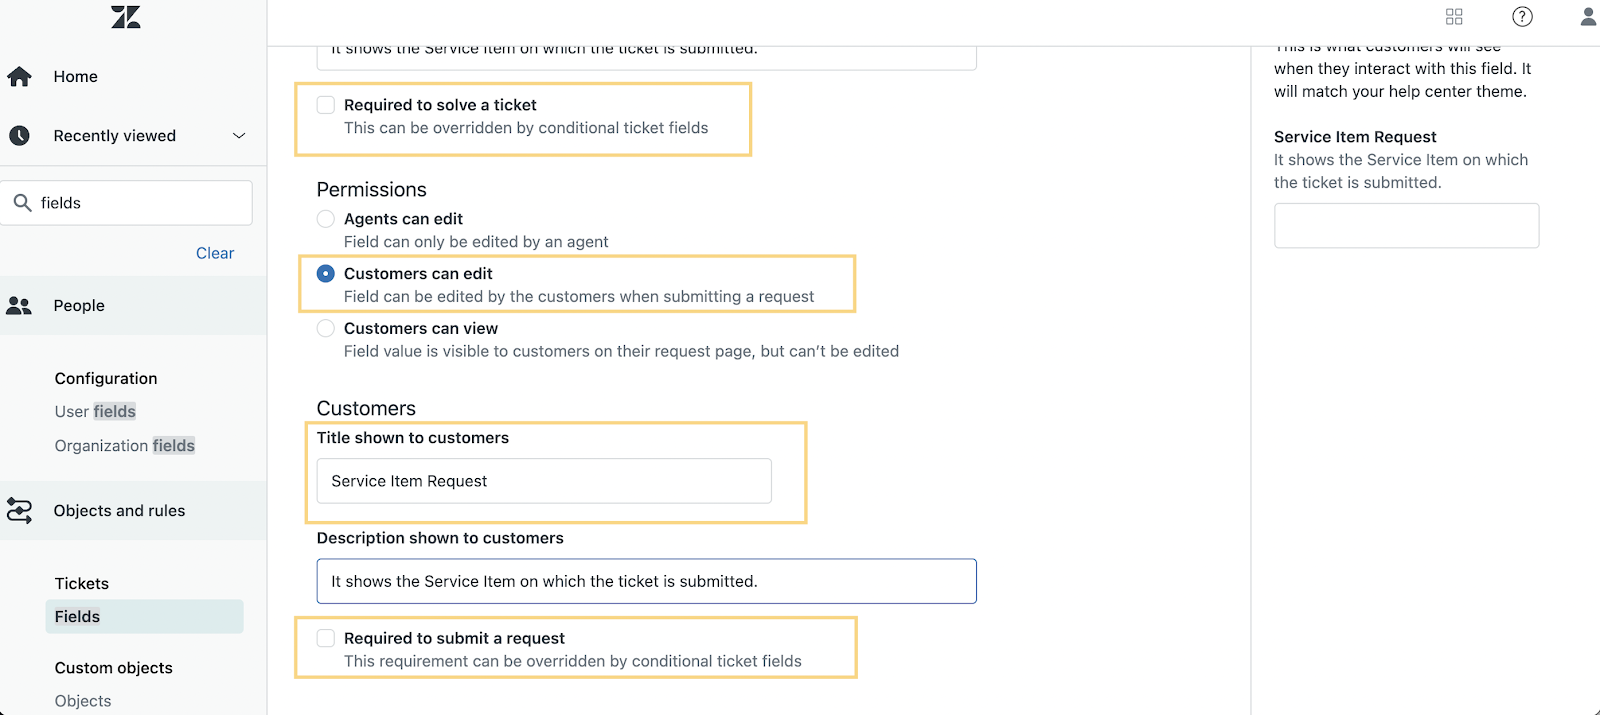
3. On the new page, enter the Display Name and Description of the service field. Please make sure that you don’t check the Required to resolve a ticket checkbox. In permissions, select the Customers can edit option as shown below:
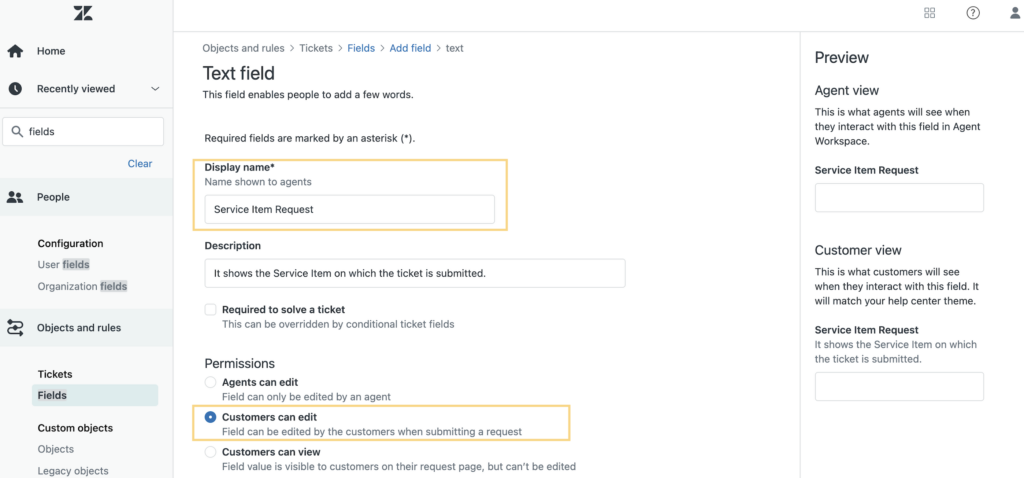
4. Scroll down the page to finish creating the service field ID. Do not check the option Required to submit a request. Please note that the Title shown to customers is a compulsory field, so you’ll have to fill it to continue. Click Save, and you’ll be redirected to the Fields listing page.
Now save this newly created service field ID for later.
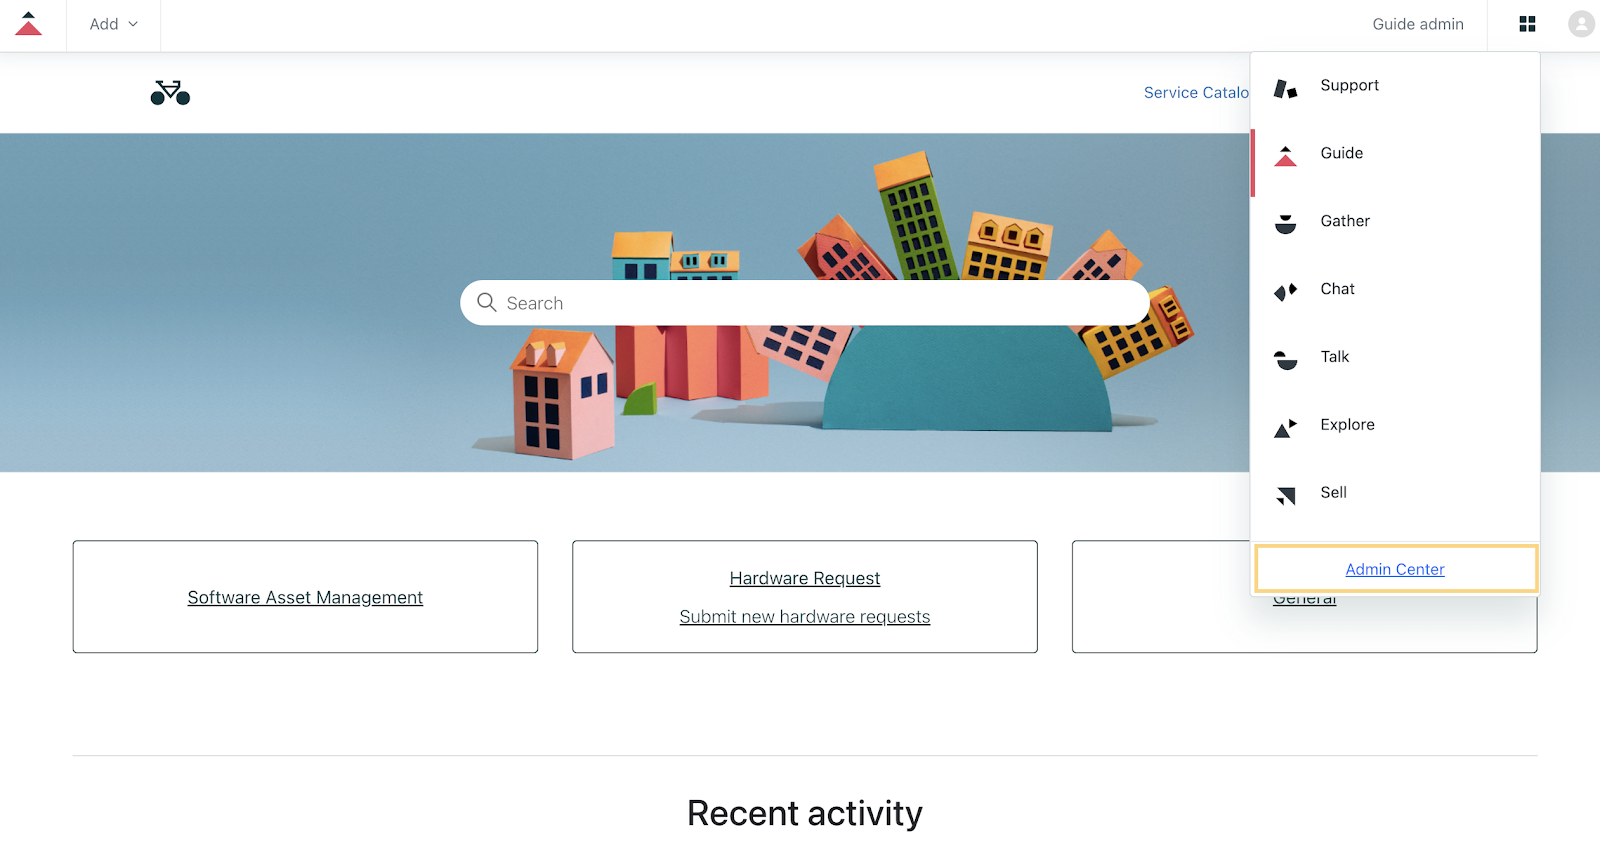
Access Zendesk Guide and Customize the Theme
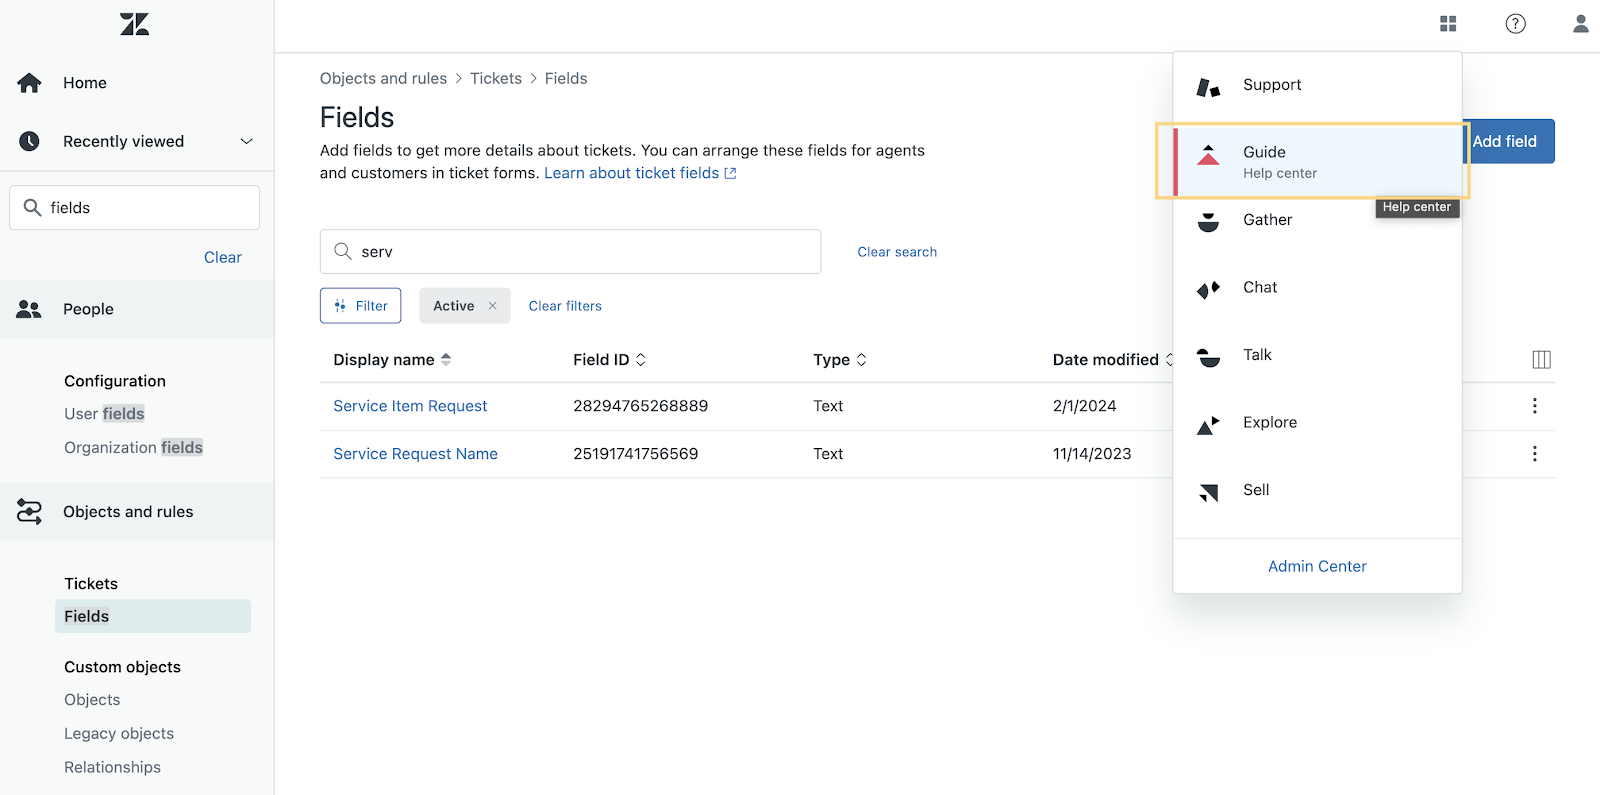
Now, hover your cursor over the Zendesk Products icon on the top-right navigation bar and choose the Guide icon as shown below:
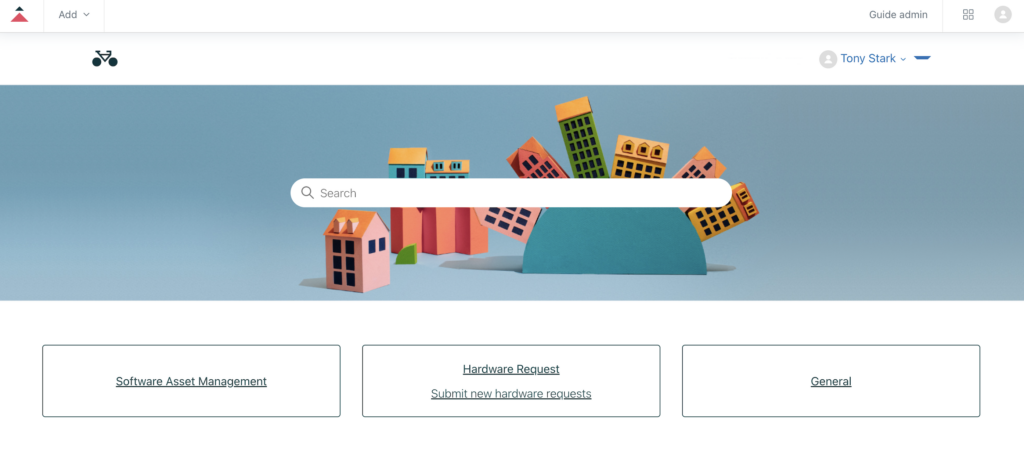
A new window will open up. Here is a snippet of the new window.
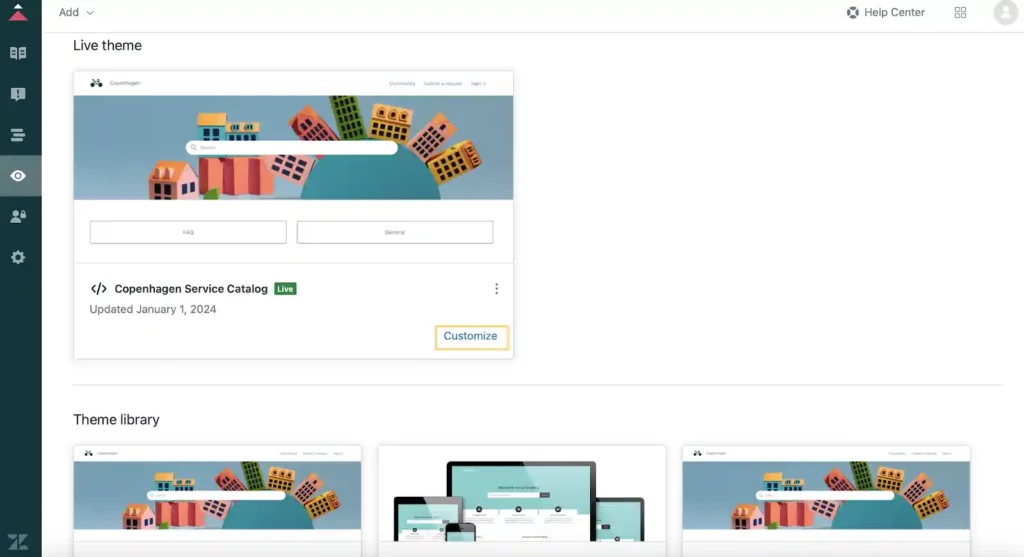
Click the Guide Admin button on the top right to open a new page. Now, click the Customize Design icon on the left navigation bar.
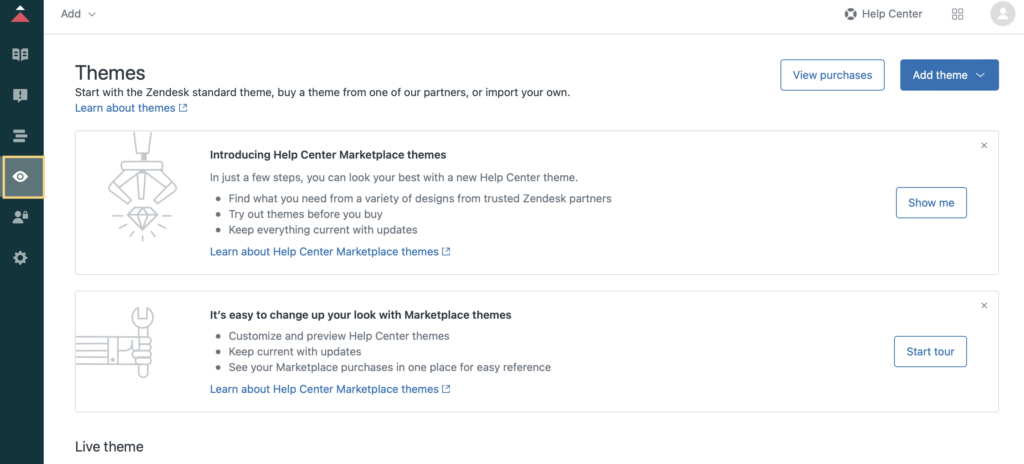
Next up, click Customize next to the Copenhagen Service Catalog theme. From here, you’ll be able to modify your Help Center theme.
Choose how you’d like to embed the Service Catalog:
- If you can add a custom page, jump to Option A below.
- If not, or if you’d rather embed it on your existing homepage, skip to Option B.
Either method gives you the same Service Catalog experience—pick whichever fits your Zendesk setup best.
Embed the Service Catalog on Your Zendesk Help Center
Depending on your Zendesk configuration and permissions, you can embed the Service Catalog using one of two methods. If your account supports adding a custom page, you can follow Option A. Otherwise, Option B allows you to display the catalog on your homepage instead.
Once you’ve integrated AssetSonar with Zendesk and set up the necessary field IDs, you can embed the Service Catalog on your Zendesk Help Center using one of the two options below:
Option A: Add Service Catalog via Custom Page (for users who can create one)
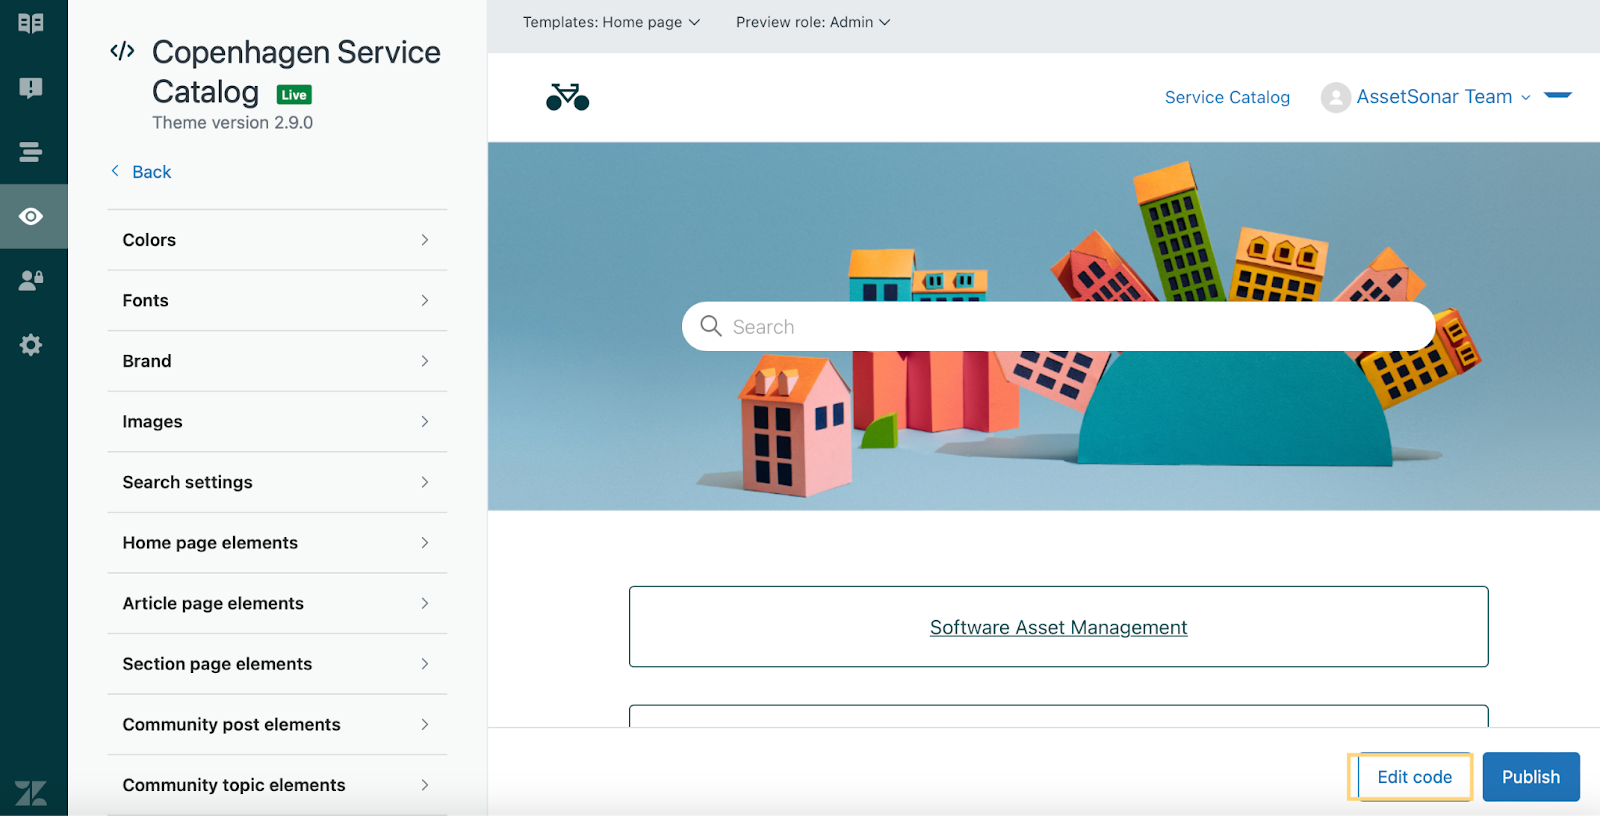
- In the Customize Design section of your Zendesk Guide, click on the Edit Code button.
- From the left menu, click Add → Custom Page.
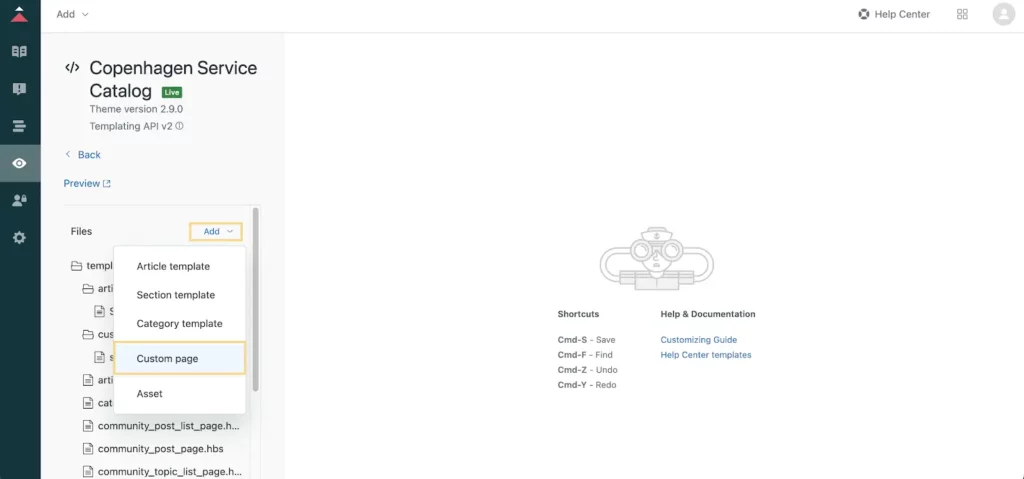
- In the pop-up, enter the page name as service_catalog (use this name exactly). The URL is pre-filled. Leave it unchanged. Then click Add custom page.
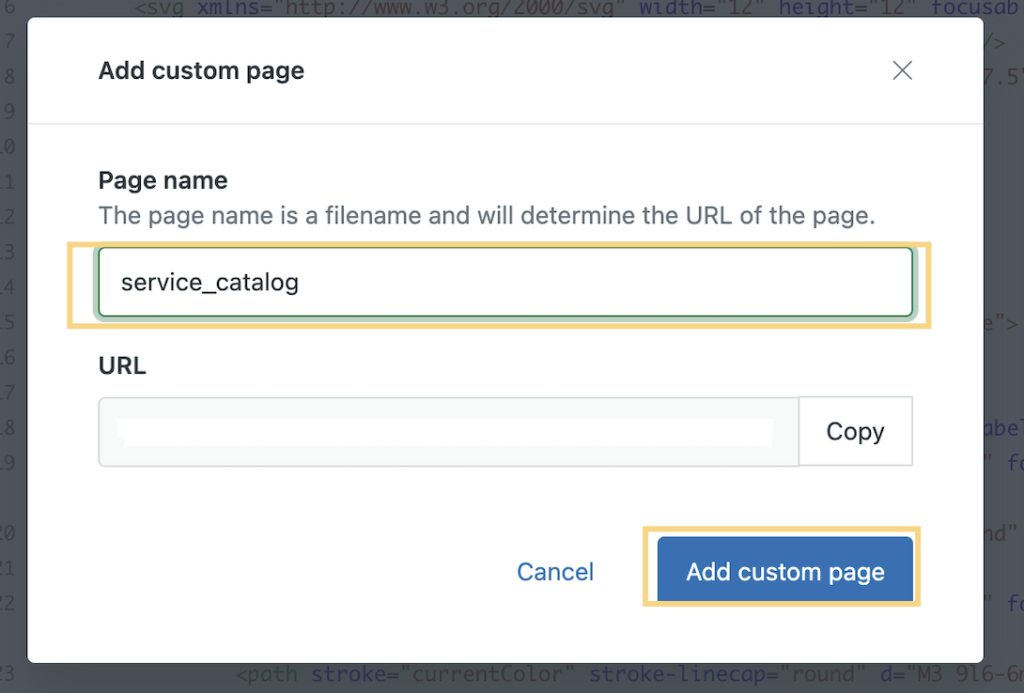
- Leave the custom page content empty for now.
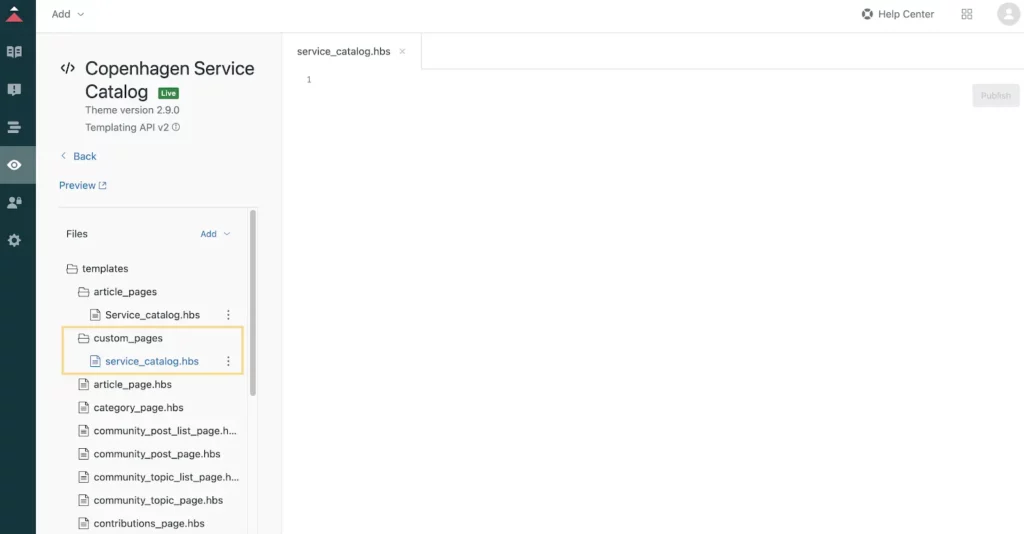
- From the list of files on the left, open document_head.hbs.
- Scroll to the bottom of the file and paste the following script:
<script>
 document.addEventListener('DOMContentLoaded', function () {
    const timestamp = new Date().toISOString();
    const scriptSrc = `https://cdn.ezassets.com/shared/service_catalog/dist/bundle.min.js?${timestamp}`;
    // Create a script element
    const scriptElement = document.createElement('script');
    scriptElement.src = scriptSrc;
    // Append the script element to the document head
    document.head.appendChild(scriptElement);
    scriptElement.onload = function () {
      const initializationData = {
        timestamp: timestamp,
        ezoFieldId: '<field_id>',
        ezoSubdomain: '<subdomain>.assetsonar.com',
        ezoServiceItemFieldId: '<service_item_field_id>',
        integrationMode: 'custom_objects'
      };
      new ServiceCatalog.min.js.ServiceCatalogManager(initializationData);
    };
  });
</script>
In this script:
- Replace <subdomain> with your own AssetSonar subdomain
- Update <field_id> and <service_item_field_id> with the IDs you generated
- Set integrationMode to custom_objects or jwt depending on your integration method (you can view this in AssetSonar > Settings > Zendesk Integration)
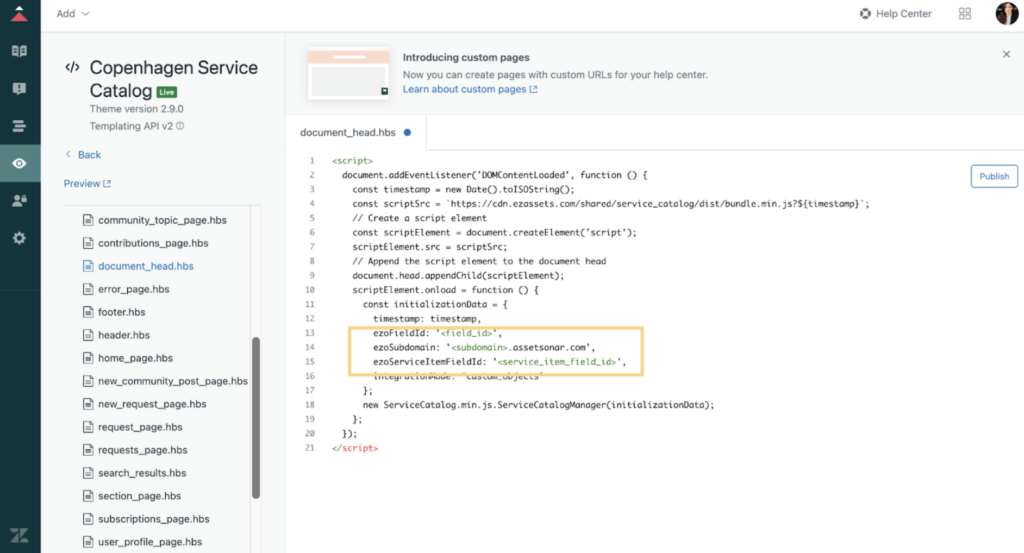
- Click Publish to save your changes.
Optional: To apply theme styling to the Service Catalog in the Copenhagen theme, add the following variables to your style.css file:
  :root {
  --ez_text_font: $text_font;
  --ez_text_color: $text_color;
  --ez_link_color: $link_color;
  --ez_brand_color: $brand_color;
  --ez_heading_font: $heading_font;
  --ez_background_color: $background_color;
  --ez_brand_text_color: $brand_text_color;
  --ez_visited_link_color: $visited_link_color;
}
These $ variables are specific to the Copenhagen theme. You can modify them as needed for other themes.
Option B: Embed Service Catalog on Homepage (Recommended for Most Users)
If you cannot or prefer not to create a custom page, you can still embed the Service Catalog directly on your Zendesk Help Center homepage using the script below.
- In the Customize Design section of your Zendesk Guide, open the file document_head.hbs.
- Scroll to the bottom and paste this alternate script:
<script>
  document.addEventListener('DOMContentLoaded', function () {
    const timestamp = new Date().toISOString();
    const scriptSrc = `https://cdn.ezassets.com/shared/service_catalog/dist/bundle.min.js?${timestamp}`;
    const scriptElement = document.createElement('script');
    scriptElement.src = scriptSrc;
    document.head.appendChild(scriptElement);
    scriptElement.onload = function () {
      const initializationData = {
        timestamp: timestamp,
        ezoFieldId: '<field_id>',
        ezoSubdomain: '<subdomain>.assetsonar.com',
        ezoServiceItemFieldId: '<service_item_field_id>',
        integrationMode: 'custom_objects',
        renderCatalogOnLandingPage: true
      };
      new ServiceCatalog.min.js.ServiceCatalogManager(initializationData);
    };
  });
</script>
In this script:
- Replace <subdomain> with your own AssetSonar subdomain.
- Update <field_id> and <service_item_field_id> with the IDs you generated.
- Set integrationMode to custom_objects or jwt depending on your integration method (you can view this in AssetSonar > Settings > Zendesk Integration).
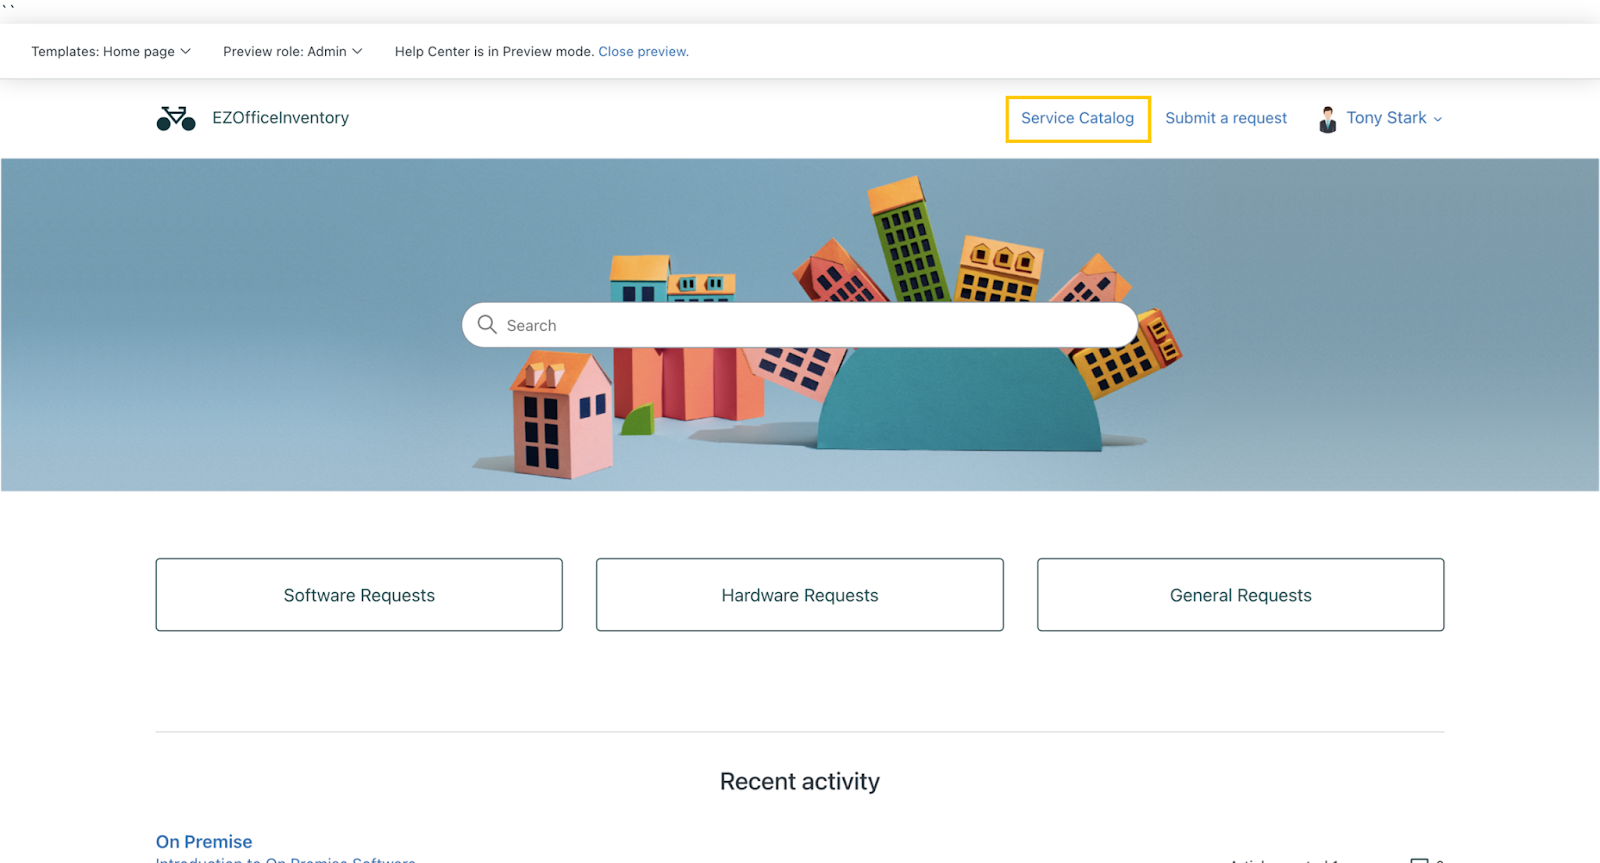
Once added, this will:
- Display the Service Catalog as a new section at the bottom of your Help Center homepage.
- Redirect users to this section when they click the Service Catalog button in the top navigation.
You’re all set!
Once either embedding method is set up, your Service Catalog will be fully live and visible on your Zendesk Help Center. Whether you add a custom page or embed it on the homepage, the Service Catalog delivers a seamless self-service experience. Click the Service Catalog button on your Help Center’s top navigation to view it in action.
Want to tailor your catalog further? Learn more about editing and updating the Service Catalog here.

Need help setting it up? Contact us at support@ezo.io — we’re happy to assist.

![[How-to] Enhance IT Support With Service Catalog Workflows in AssetSonar](https://cdn.ezo.io/wp-content/uploads/2024/11/26132116/Service-catalog-workflows-scaled-1.webp)


