Picture this scenario: A router on the second floor of your office building malfunctions and disrupts network access to endpoints on the entire floor. Your service desk is swarmed with hundreds of tickets stating that the network disruption is delaying critical office operations and must be fixed urgently.
Alternatively, the anti-malware in one of your office laptops warns you of an unknown threat that may potentially harm the entire network, requiring prompt action. As an IT Administrator, both of these situations are high-risk for you and need immediate attention and resolution.
Without visibility into your IT infrastructure — where assets are located, who uses them, and how they impact the performance of other assets — it’s difficult to pinpoint and resolve issues in a timely and effective manner.
To help increase this visibility, AssetSonar introduces the new CMDB, with asset dependency views that record, track, and edit relationships between IT assets such as computers, network devices, and other configuration items (CIs), including software licenses, locations, employees, groups, etc. CMDB helps you get a consolidated view of dependencies within your organization.
Get in-depth visibility into how your IT assets interact with each other, and take prompt actions with maximum efficacy. Identify and fix high-risk areas or bottlenecks with an interactive graphical representation of your IT environment — for reduced ticket resolution time, quick service delivery, improved employee satisfaction, and seamless change management. Furthermore, access to a consolidated IT asset landscape map reduces compliance risks and helps simplify planning for audits.
Contents
- Types of CMDB relationships
1.1. Pre-existing
1.2. Default
1.3. Custom - Viewing CMDB relationships
2.1. By list view
2.2. By graph view - Actions on CMDB relationships
3.1. Exporting
3.2. Deleting - CMDB Permissions for Custom Roles
1. Types of CMDB relationships
AssetSonar supports three main types of CMDB relationships to map your endpoints and associated CIs, as follows:
1.1. Pre-existing
These refer to relationships that already exist between Assets and CIs in your AssetSonar account. Examples include:
- Asset-Member (Checked Out to)
- Asset-Location (Located at)
- Asset-Group (In Group)
- Asset-Software Licenses (Entitlements to Software Licenses). Note: Only for Assigned Installations of User-Machine based entitlements
- Asset-Vendor (Supplied by Vendor)
- Asset-Package (Part of Package)
- Asset-Bundle (In Bundle)
Let’s say, you had checked out a Macbook to a Staff User, this is how it will appear as a CMDB relationship.

1.2. Default
The second type of CMDB relationship is the default. The AssetSonar team has curated some of the most commonly used Asset-CI relationships that you can readily add to items from the Asset Details page. These include the following, with their outgoing and incoming relationships:
- Item-Item (Connected to item)
- Item-Domain (Hosts domain ⇄ Hosted by item)
- Item-Item (Depends on item ⇄ Supports an item)
- Item-Item (Used by item ⇄ Uses item)
- Item-Item (Sends data to item ⇄ Receives data from item)
- Item-Item (Backs item ⇄ Backed up by item)
- Item-Item (Virtualizes item ⇄ Virtualized by item). Note: This refers to an IT Asset-Virtual Machine relationship.
- Item-Member (Managed by user ⇄ Manages item)
- Item-Item (Contains item ⇄ Contained by item). Note: This refers to an Item-Bundle or Item-Package relationship.
- Item-Member (Maintained by user ⇄ Maintains item)
Suppose, the aforementioned router provides network access to laptops on the second floor. You can create an Item-Item relationship between a laptop and the router using the following steps:
- Go to the Relationships tab from the Details page of the laptop. Click ‘Add Relationship’.

2. Select ‘Depends on item ⇄ Supports item’ as the Relationship Type.

3. Select the relevant item type and item. Then, hit ‘Create’.

This shall create the relationship as illustrated below.

1.3. Custom
AssetSonar also gives you the option to add custom relationship types to meet the unique workflow needs of your business. Let’s say, you sent the malfunctioned router to Ubiquiti for repair. You can create a custom ‘Serviced by vendor ⇄ Services item’ relationship type to map this phenomenon.
To add a custom relationship type, go to Settings → Add Ons → Relationship Type and click on ‘Add Relationship Type’.

Enter the relevant details and hit ‘Create’.

Note: AssetSonar only allows you to create an outgoing CI relationship from the Items module.
Once a custom relationship has been created, it will show up in the default relationship dialog.
To apply the custom relationship to the router, go the relevant Asset Details page and add it from the Relationship tab → Add Relationship.

Now, you have a custom relationship added to your CMDB.

2. Viewing CMDB relationships
You can view all outgoing CMDB relationships from the Relationship tab on an Asset Details page.
Incoming relationships can be viewed from the Details page of the following modules:
- Members
- Locations
- Groups
- Software Licenses
- Vendors
- Domains
- Packages
- Bundles
For instance, you can view all the Assets in the custody of the IT Admin who has the primary responsibility of managing them. Look at the incoming relationship below:

You can either view CMDB relationships in a list or grid view.
2.1. By list view
The list view enumerates all the relationships associated with an Asset as shown.

Clicking on each relationship section expands the view to reveal additional information.

2.2. By graph view
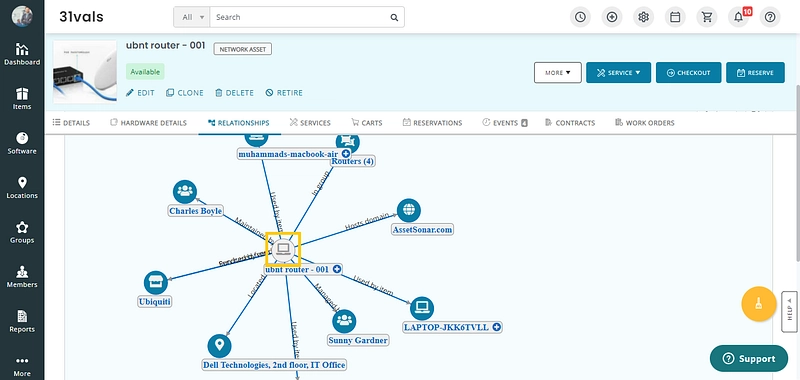
You can also see an interactive graphical view of your CMDB relationships with an Asset by selecting the ‘Graph view’ option.

You can zoom in and out of the image by clicking on the ‘+’ and ‘-’ icons respectively. Alternatively, you can also pinch the image in and out or drag it up and down to adjust the graph according to your screen. Clicking the ‘Reset’ button or the ‘⎌’ icon will reset the graphical view to its original dimensions.
By hovering over a configuration item (CI), you can see its relationship with other CIs in detail.

Note: You can create additional relationships for CIs that are Assets, from within the graphical view by clicking the highlighted icon.

3. Actions on CMDB relationships
AssetSonar also gives you the ability to take action on your CMDB relationships.
3.1. Exporting
Let’s say, a technician needs access to device details in order to fix a broken laptop. You can export the CMDB relationships of the laptop as a PDF document and email it to the technician.
Just head to the relevant Asset Details page and hit ‘Export to PDF’.

This is how the end-user (technician) will be able to view the CMDB relationships.

3.2. Deleting
If a relationship no longer applies to an Asset, you can delete it by clicking the ‘Delete’ icon as illustrated below.

4. CMDB Permissions for Custom Roles
If you are using Custom Roles, you can also utilize Role Permissions for CMDB. While creating or updating a Custom Role, click on ‘Advanced Permissions’ and the ‘Relationships’ module will appear so you can modify its permissions.

Click on ‘Relationships’ and you’ll be able to view two further sections for Relationships and Relationship Types.
- In the Relationships section, you can authorize the custom user to view, create, or delete a CMDB relationship. You can view this permission on the description page for any asset or member type.

- The second section enables you to authorize custom users to view, create, or delete Relationships Types. Custom users with the granted permissions can view the relationship type from an item’s detail page, can create a new relationship type from either the default options or can create a custom relationship type, and they also get the option to delete a certain relationship type.

These CMDB actions help you standardize permissions for Custom Roles and ensures that your custom users are complying with the CMDB permissions.
Read more: Simplify ITAM Workflows: Set Rules That Auto-Assign Devices To Groups
About AssetSonar
AssetSonar is a powerful ITSM tool used by tech organizations and businesses all over the globe. Sign up today for a free 15-day trial.
For more assistance, drop us an email at support@ezo.io. You can also visit our blog for detailed support posts.


