![[How-to] enable the Dell warranty integration](https://cdn.ezo.io/wp-content/uploads/2023/09/How-to-enable-the-Dell-warranty-integration.jpg)
[How-to] Enable the Dell Warranty Integration
AssetSonar automates the capturing of warranty information for Dell devices. Now, IT teams have clear visibility into the warranty information for these devices and can use this data to track and manage all warranties.
With AssetSonar’s Dell warranty integration, IT managers can take proactive decisions regarding asset servicing, hardware compliance, warranty renewal, and the clearance of bills.
Automate Warranty Tracking Across Top OEMs
AssetSonar provides native integrations with major hardware manufacturers to keep your entire IT fleet’s warranty data automatically up to date. If your organization manages a mixed-device environment, you can configure seamless tracking across all your endpoints.
Explore our dedicated setup guides for your specific hardware vendors:
- HP Devices: How to Automate HP Warranty Tracking with AssetSonar
- Lenovo Devices: Automate Lenovo Warranty Tracking
1. Benefits of the Dell warranty integration
Prior to the Dell warranty integration with AssetSonar, IT managers and administrators had to manually transfer warranty information from their Dell service account to AssetSonar. But since AssetSonar serves as a centralized platform for the management of all your IT assets, it is crucial to have updated warranty information of all your Dell devices. Here is how this integration can benefit you:
- Achieve better vendor management leading to reduced vendor related incidents
- Gain visibility into the state of Dell assets and clearly identify assets that are covered under warranty
- Schedule timely renewals
- Schedule device servicing and maintenance activities
Here is how you can set up the Dell warranty integration from your AssetSonar account.
2. Enabling the Dell warranty integration
To enable the Dell warranty integration, go to Settings → Add Ons → Dell Warranty Integration → Enabled.
Click on ‘Connect’ and a new window will appear as shown below:

Note: You can get the API Key and Secret Key from Dell service and set the contract type to Warranty. The “Fulfillment Vendor’ options is set to Dell by default but you can click on the Plus sign to add details of any third-party vendors you procure your Dell devices from.

To do so, fill out the form that pops up after you click on +. Click on ‘Create Vendor’ to save the details of the new vendor.
Note: The vendor you choose at this stage will remain default until you manually go back to the setting to choose another vendor. Choosing a different vendor will disable updates for the contracts applicable to previous vendors.
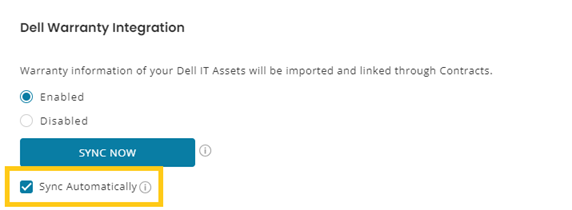
Once you have added all the relevant information, click on ‘Add’ to save the information. Click on the ‘Sync Now’ button and then wait for a couple of minutes for the sync to process. Also check the ‘Sync automatically’ box to ensure that timely syncs happen in the future.

Click on ‘Update’ to enable the Dell warranty integration feature.
3. Linking a purchase order
After a successful integration, you’ll be able to view the warranty information of a Dell device from its asset detail page. From the detail page of a Dell device, click on the ‘Contracts’ tab to review the existing warranty contract.

The contract information imported from Dell cannot be manually updated by the IT admins, but they get the option to delete a contract if needed. Clicking on the contract number will take you to the contract’s detail page and you’ll be able to view the warranty details as shown below:

Please note that the contract start date will be the date of the asset’s shipping while the end date will be the date on which the hardware warranty ends.
Click on the Purchase Order tab to see if there are any existing purchase orders linked to the Dell asset.

You can also link a new purchase order or view the linking history of an existing one as shown below:

5. Warranty reports
There are two reports that you can generate where Dell warranty information can be helpful.
- Warranty Expiring in 90 Days: This report gives you details on the upcoming warranty expires so you can proactively plan to renew or extend these warranties. Based on this report, you can set up alerts and notifications and take actions accordingly.

- Expired Warranties: This report shows you the expired warranty contracts for your assets and you can get the start and end date of the warranty of your Dell devices from this report.

Read more: [How-to]Enhance Enterprise Network Management with the Cisco Meraki and AssetSonar Integration
About AssetSonar
AssetSonar is a powerful ITAM solution used by tech organizations and businesses all over the globe. Sign up today for a free 15-day trial.
For more assistance, drop us an email at support@ezo.io


