
AssetSonar’s integration with Microsoft 365 simplifies license management by directly importing licensing data from Microsoft 365 Admin Center into AssetSonar. You can connect and manage multiple Microsoft tenants simultaneously, giving IT admins a consolidated yet tenant-aware view of all Microsoft license data in AssetSonar. This includes plans, total seats, entitlements, and start/end dates, while supporting automatic suite creation for licenses tied to multiple applications. This integration reduces manual tracking, improves compliance readiness, and enhances visibility into license usage and costs.
AssetSonar’s Microsoft 365 integration supports all major Azure Cloud Environments, including US Government and China (21Vianet) clouds, ensuring seamless setup for organizations hosted outside the global Azure Public Cloud.
Benefits of Microsoft 365 and AssetSonar Integration
This integration brings the following benefits to your organization:
- Centralized License Management: Consolidates all Microsoft 365 license data, plans, and entitlements in one place.
- Proactive Cost Optimization: Identifies unused seats to reduce spending and improve license allocation.
- Compliance Made Simple: Provides audit-ready, real-time license data to ensure governance.
- Streamlined Suite Management: Automatically groups multi-app software into suites for easier tracking.
Now let’s see this integration in action:
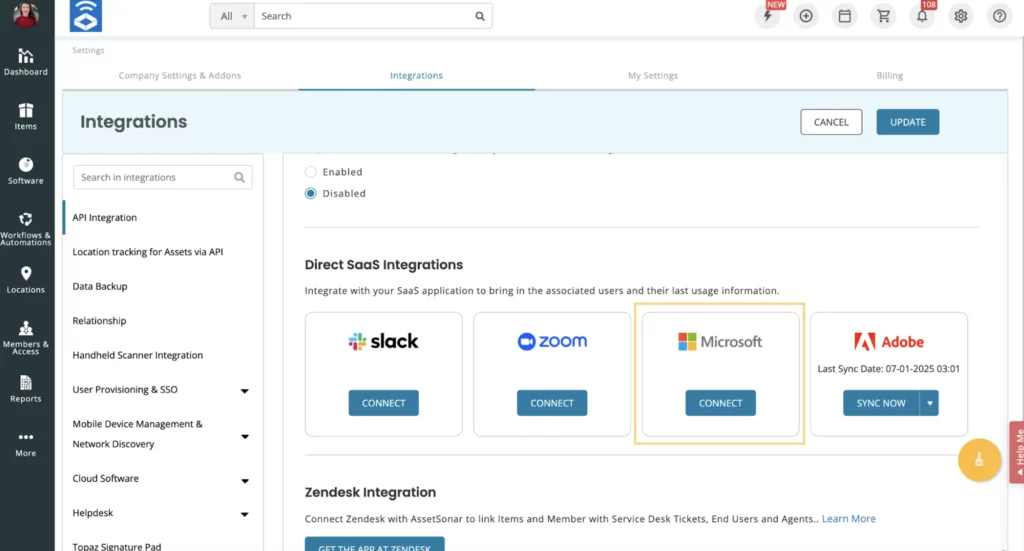
Enabling Microsoft 365 Integration
Follow this pathway to enable the integration: Settings -> Integrations -> Direct SaaS Integrations. Now click the ‘Connect’ button under the Microsoft logo.
A new popup will open up where you’ll enter your Microsoft credentials to enable this integration.
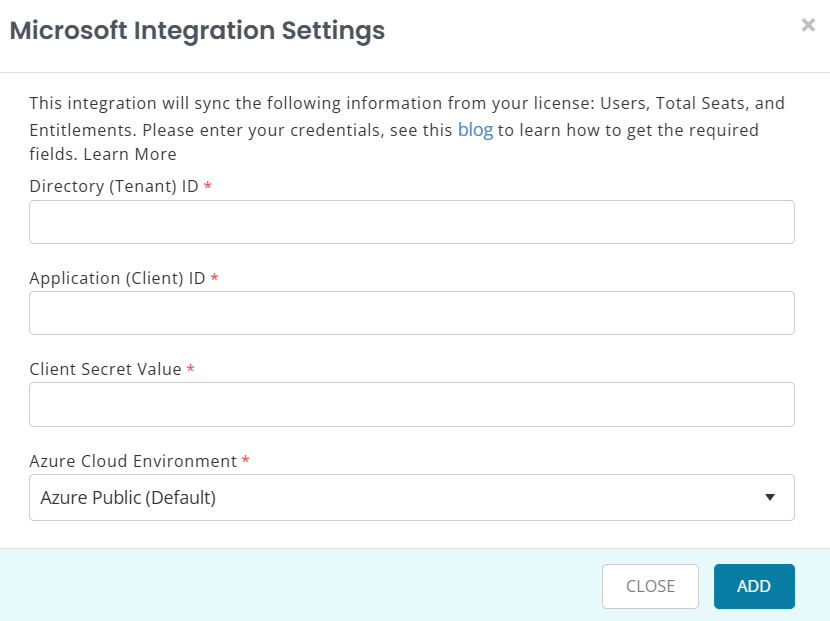
Note: When setting up your Microsoft 365 integration, you’ll now see a new field called Azure Cloud Environment at the bottom of the connection form.
Use this dropdown to specify which Azure environment your Microsoft tenant is hosted on.
The available options are:
- Azure Public (Default)
- Azure US Government L4
- Azure US Government L5 (DoD)
- Azure China (21Vianet)
By default, Azure Public is selected. This applies to most organizations and if you don’t know which Azure environment applies to you, keep it as is. If, however, your Microsoft tenant is hosted in a government or China-specific Azure cloud, select the corresponding option.
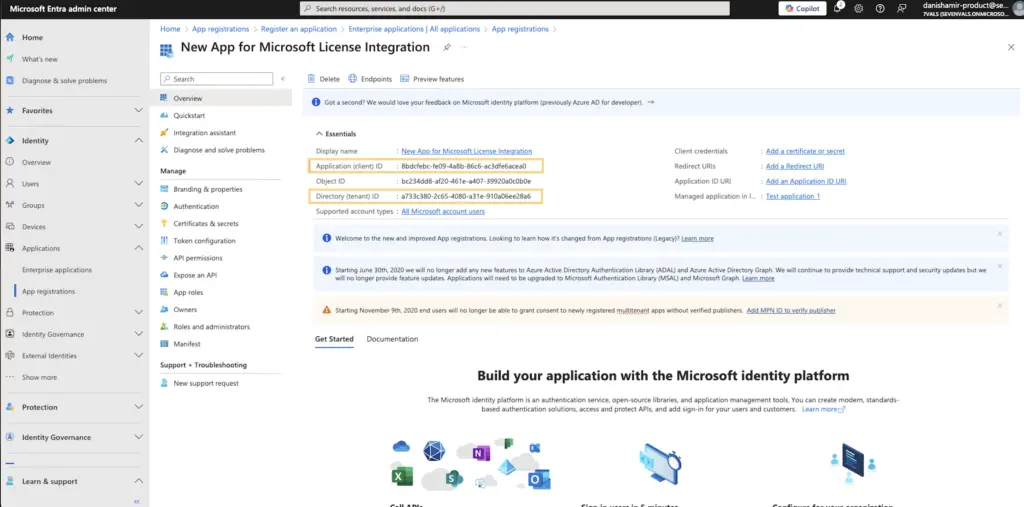
Here is how you can extract this information from your Microsoft 365 account:
- Login to the Microsoft Entra ID at https://entra.microsoft.com/.

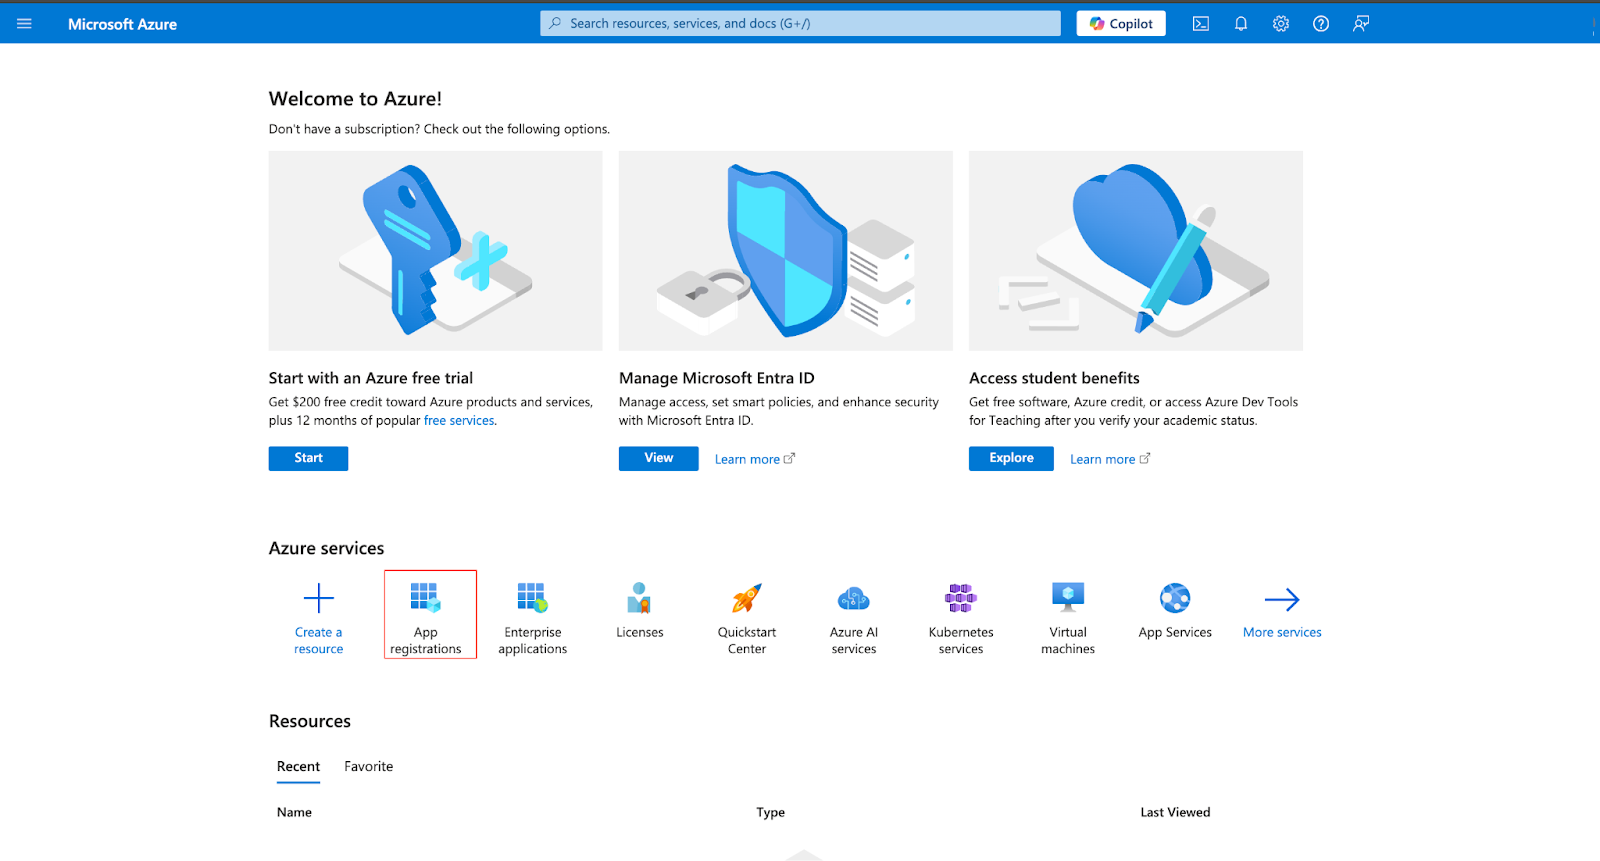
2. Once logged in, click on the Applications → App Registrations tab in the left navigation bar.

3. Click on the ‘New Registration’ button on the top left to register a new application.

4. Enter the Name and select the Supported account types and click the ‘Register’ button.

5. The application will be registered and the Application (client) ID and Directory (tenant) ID will be generated.
6. Click ‘Certificates and secrets’ to generate the Secret key.
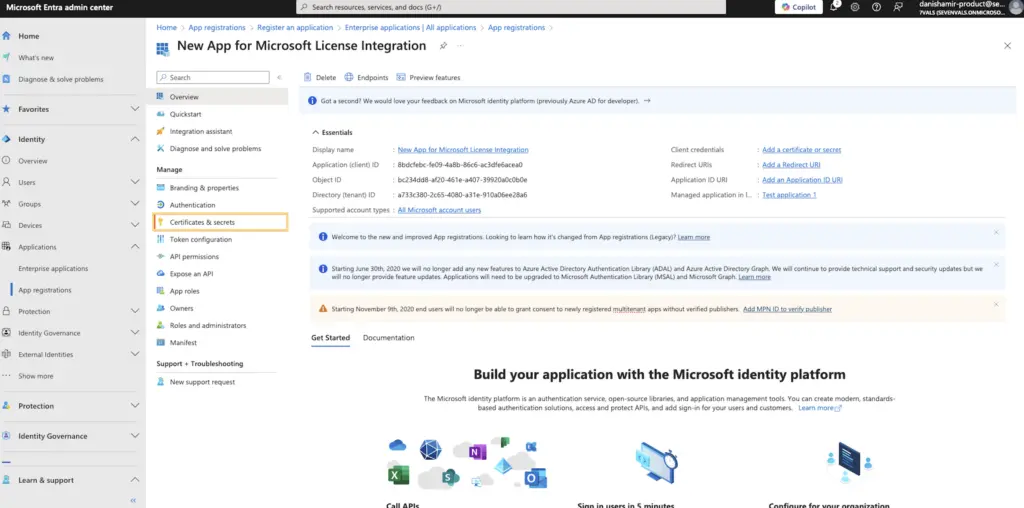
7. Click the ‘New Client Secret’ button and add the description and fill out the ‘Expires’ field. Then click ‘Add’.

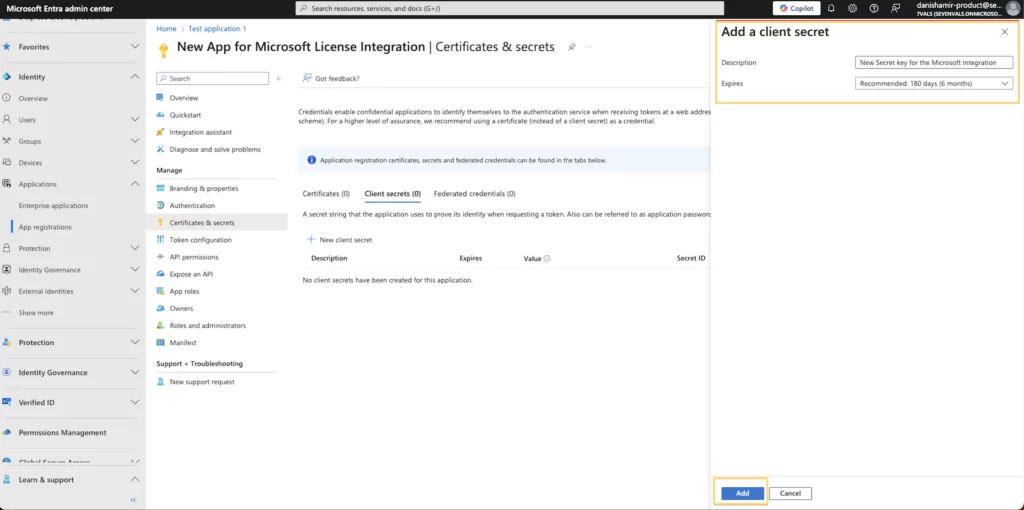
8. You’ll get the value for Client secret Key. Copy it.

Copy and paste these credentials into the Microsoft Integration setting on AssetSonar.
Once you have successfully filled out these fields, click the ‘Add’ button to finish creating the integration.
Before setting up the integration, please note that following permissions would be required for the integration to work:
| Application Permission | Description |
| AuditLog.Read.All | Enables you to read the user sign-ins for your tenant |
| Reports.Read.All | Enables you to read the user access event details in your Microsoft account |
| Directory.Read.All | Enables you to read the list of users in your Microsoft account |
| LicenseAssignment.ReadWrite.All | Enables you to manage (assign, update, and remove) license assignments for users and groups in your Microsoft account or tenant. |
How to Grant Permissions in the Azure Portal?
- Log into https://portal.azure.com/
- Click on App registrations on the home page
- Click on All Applications and search for the app to which permissions are to be assigned. For example, ‘’Assetsonar.’
 ’
’
- Click on API permissions in the left navigation bar. Once the page opens, click on Add a permission.

- Click on Microsoft Graph and then click on “Application Permissions.’’
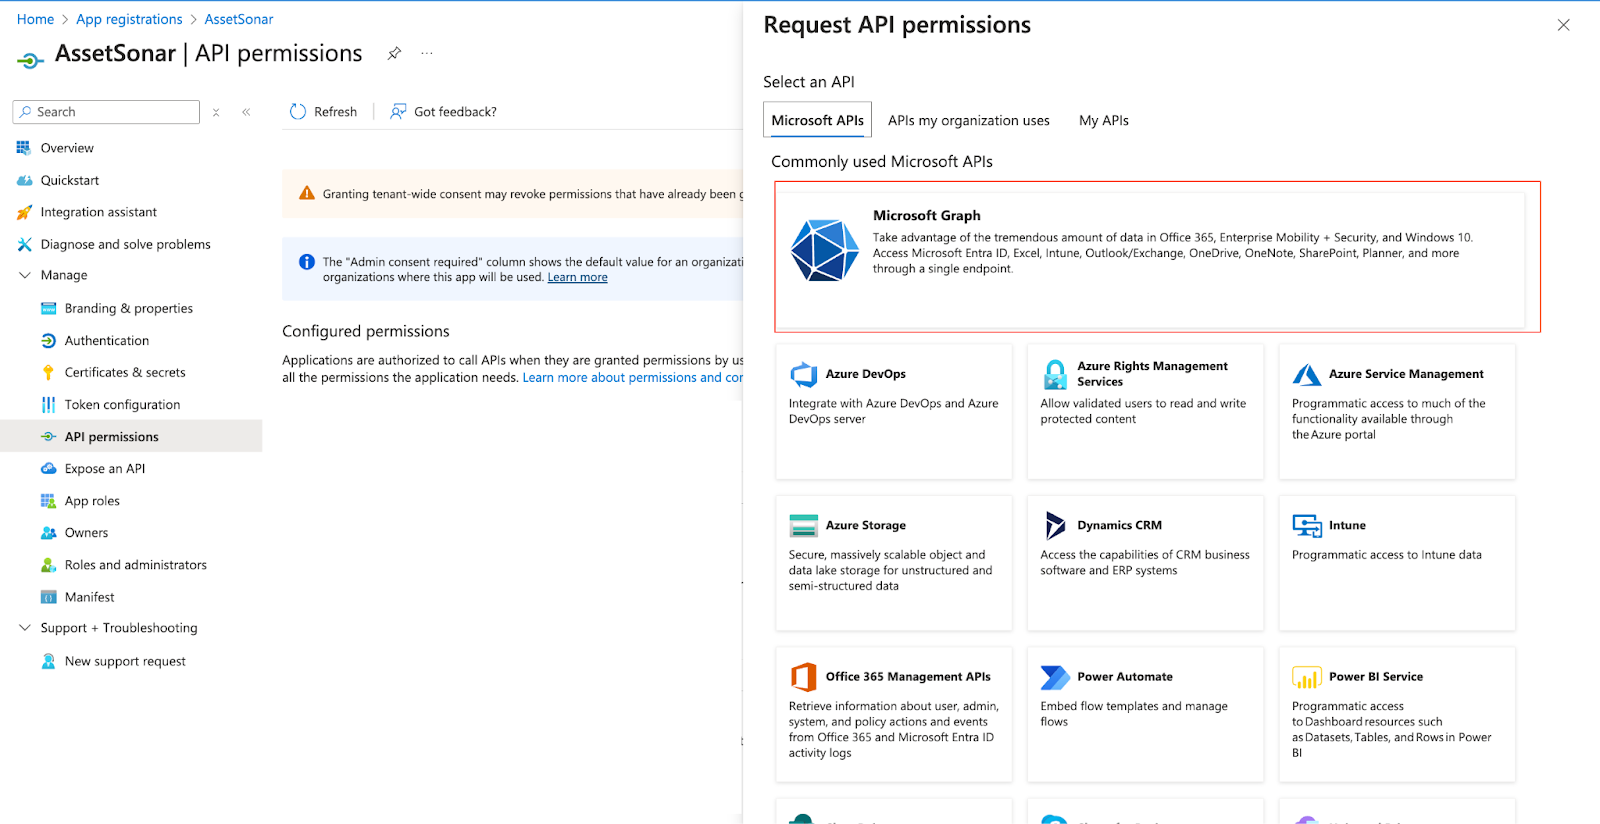

- Give the following permissions and click on Add permissions
- AuditLog.Read.All
- Reports.Read.All
- Directory.Read.All
- LicenseAssignment.ReadWrite.All
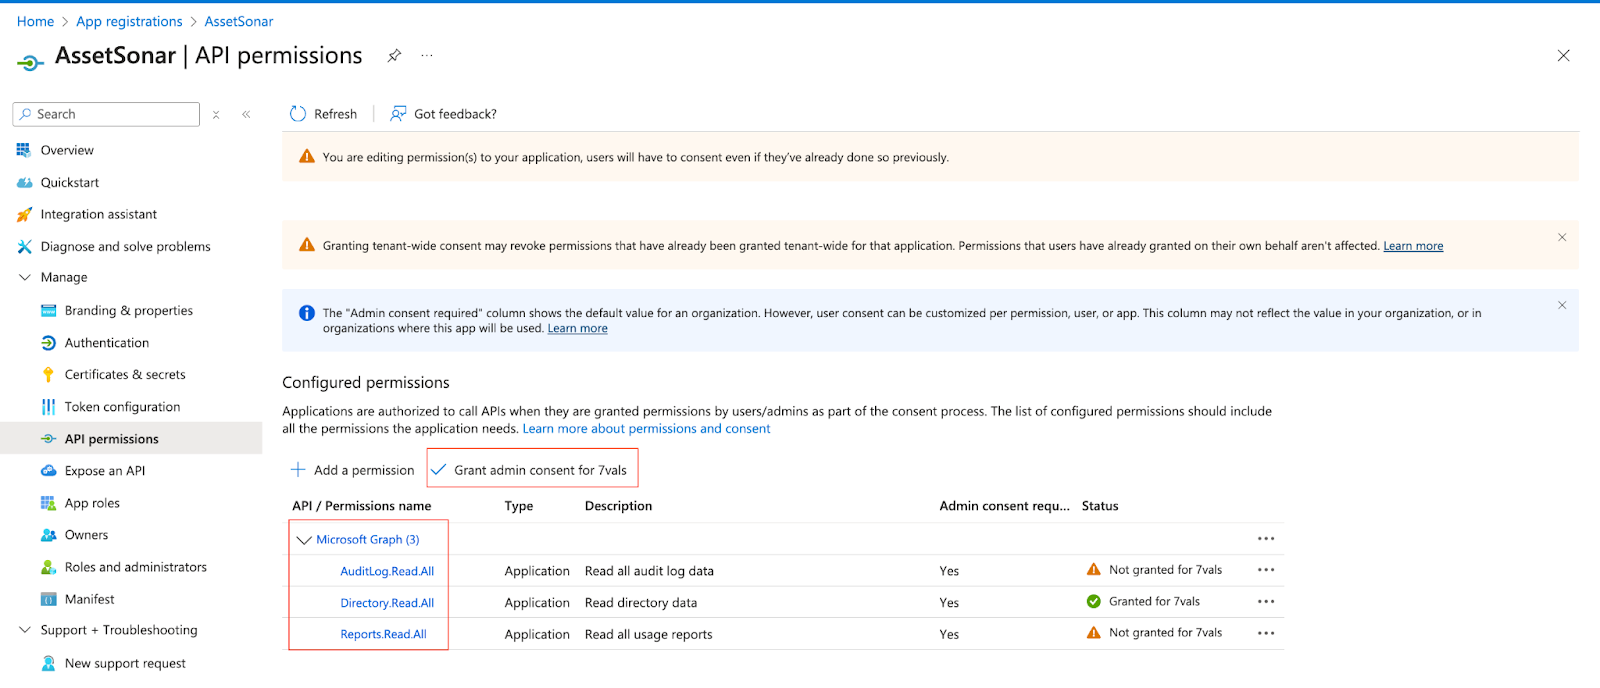
- Click on Grant admin consent for 7vals.
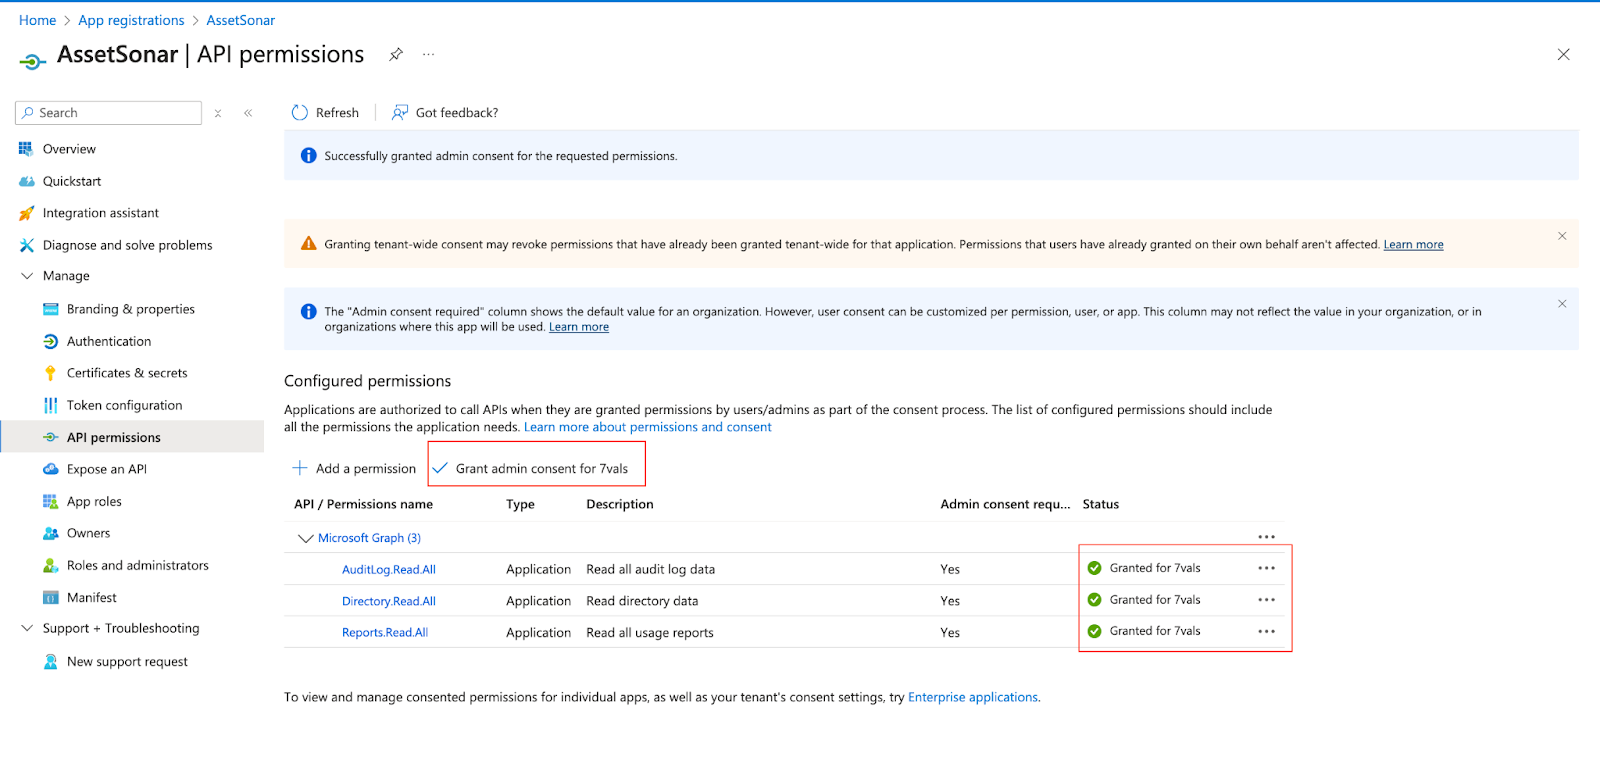
The permissions are granted successfully.
Adding Multiple Microsoft Tenant Connections
You can connect more than one Microsoft tenant to AssetSonar for license imports.
Once you’ve connected the first tenant successfully, the integration card under Settings → Integrations → Direct SaaS Integrations → Microsoft 365 will show a Manage Connections button instead of Connect.
Click Manage Connections to open the Manage Microsoft Connections modal.
This modal lists all connected tenants as individual cards showing:
- Tenant Name
- Tenant ID
- Last Sync Date
Each tenant card includes the same actions available for a single connection:
- Import Licenses
- Sync
- Update Credentials
- Remove Connection
To add a new tenant, click Add Another Tenant Connection. This launches a new authentication flow identical to the first one.
Once completed, the new tenant will appear as a separate card under the Manage Microsoft Connections modal.
Note: Scheduled syncs automatically run for all connected tenants. Removing all but one tenant reverts the integration card back to the original single-tenant view.
You’ll see that the previous ‘Connect’ button will now be changed to a dropdown. Choose the ‘Import Licenses’ option as shown below:

Importing Software Licenses
When multiple Microsoft tenants are connected, AssetSonar displays each tenant separately in the Import Licenses dropdown.
You’ll see entries such as:
- Microsoft (Tenant 1 Name)
- Microsoft (Tenant 2 Name)
Select the tenant whose licenses you want to import.
Once you have chosen the ‘Import Licenses’ option, you’ll be redirected to the software licenses listing page. Here, you’ll be able to access the Import Licenses modal from where you can view the licenses that can be imported to AssetSonar.

Choose the licenses you want to import into AssetSonar and click ‘Next’.

Clicking the the ‘Next’ button will enable you to bring the details of every license’s entitlements and total seats from your Microsoft account.
Now you’ll see a new popup where you can enter details for the first software licenses from your import list. If you are bringing in all software licenses from the list, you’ll have to fill out this information for every single license.
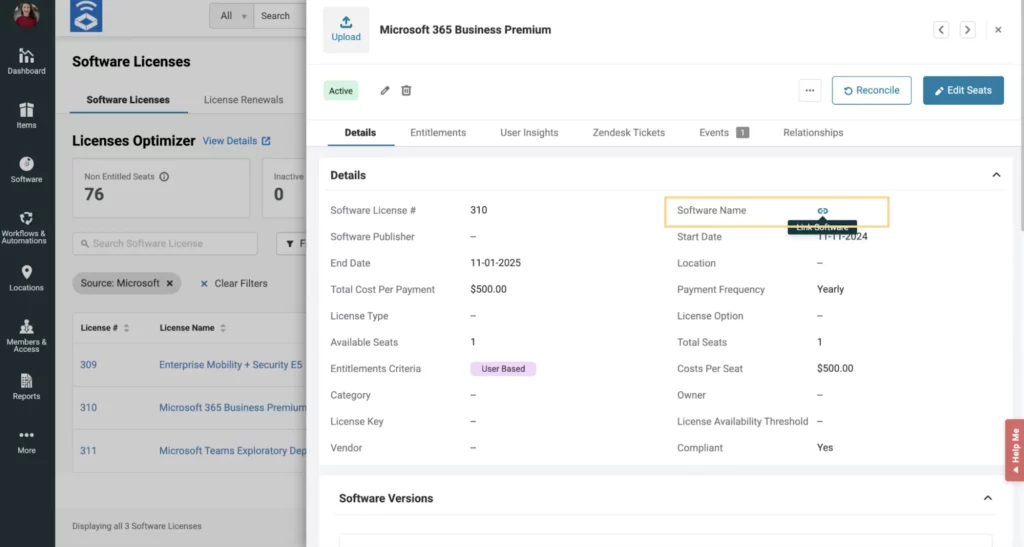
You’ll be required to add the cost, payment frequency, start date, and end date details in the form as shown below:

Please note that here you can also merge the perviously added custom software licenses with the ones that are now being discovered through Microsoft.
Click the ‘Next’ button and repeat the same process for all other licenses that you are bringing in the system. From here you can also link the software if they are normalized to these imported licenses. However, if you link more than one application to a single license, you’ll be able to form a software suite and the suite name will be the same as the license name being imported. A software suite contains multiple software applications, usually from the same vendor.

After adding all the details to the importing licenses and linking them to the existing software, you can then see a list of software licenses you just brought in AssetSonar. Click ‘Done’ to import the licenses. Here is how that snapshot looks like:

You’ll be able to view the recently imported software licenses on the license listing page. A filter will be applied by default on ‘Source = Microsoft’ to view these licenses.
For licenses imported from Microsoft, the License Detail Page now shows two additional fields:
- Tenant Name
- Tenant ID
These fields help you identify which Microsoft tenant the license originated from in case of multi-tenant setups.

Software Suite Actions
You can connect multiple software and group them together to form a software suite. For example, let’s suppose that we want to link Microsoft 365 Business Premium with multiple applications to create a software suite. We’ll go to Microsoft 365 Business Premium’s detail page. Click on the ‘Link’ icon to start creating the suite.
A new popup will appear with a list of recommended software for you to choose from. Please note that only. normalized software will be shown on this list. Here is a snapshot:

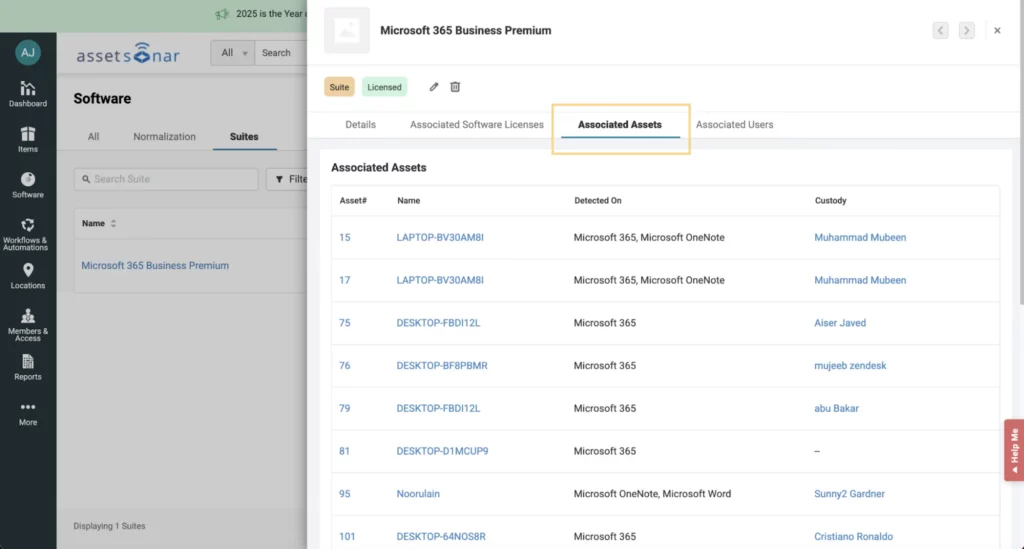
Click the ‘Link’ button and you’ll see a message indicating that the applications have been linked successfully. You can view the details of this suite from the ‘Suites’ tab on the software listing page. You’ll be able to view the number of components in the suite and the User Count and Install Count for each component.

Click the ‘Associated Users’ tab to view the details of the users accessing the applications in the suite.
Similarly, you can also view associated licenses as shown below:

Click the ‘Associated Assets’ tab to view the assets linked to this suite.


![[How-to] Automate Software Tracking with Slack Integration in AssetSonar](https://cdn.ezo.io/wp-content/uploads/2025/01/20124914/Zoom-integration-scaled-1.webp)
![[How-to] Effectively Manage Adobe Licenses with Adobe and AssetSonar Integration](https://cdn.ezo.io/wp-content/uploads/2025/01/13082508/Adobe-Integration-scaled.jpg)
![[How-to] Track Software Subscriptions With Zoom Integration in AssetSonar](https://cdn.ezo.io/wp-content/uploads/2025/01/13054438/Zoom-integration-scaled.jpg)


