![[How-To] Simplify IT Asset Requests with the Request Portal Featured Image](https://cdn.ezo.io/wp-content/uploads/2025/10/02093812/How-To-Simplify-IT-Asset-Requests-with-the-Request-Portal-scaled-1-1024x512.webp)
Managing IT asset requests across a growing organization can quickly turn chaotic: long email chains, unclear request status, and no central view for admins. This slows down IT operations and frustrates employees who just want the right tools to do their job.
With EZO AssetSonar’s Request Portal, you get a dedicated, user-friendly site where employees can request assets, track their request status, and stay connected with IT, without needing access to the full product. Admins, in turn, gain a streamlined way to review, approve, or deny requests, ensuring faster fulfillment and tighter control.
Note: The Request Portal is designed to handle IT asset requests only. It cannot be used to manage or track software assets.
This guide will show you how to:
- Enable the portal and publish it to a URL
- Customize branding, layout, and themes
- Control what items appear
- Apply access rules and agreements
- Set up reservation and request policies
You may also reach out to us at support@ezo.io for more information and assistance.
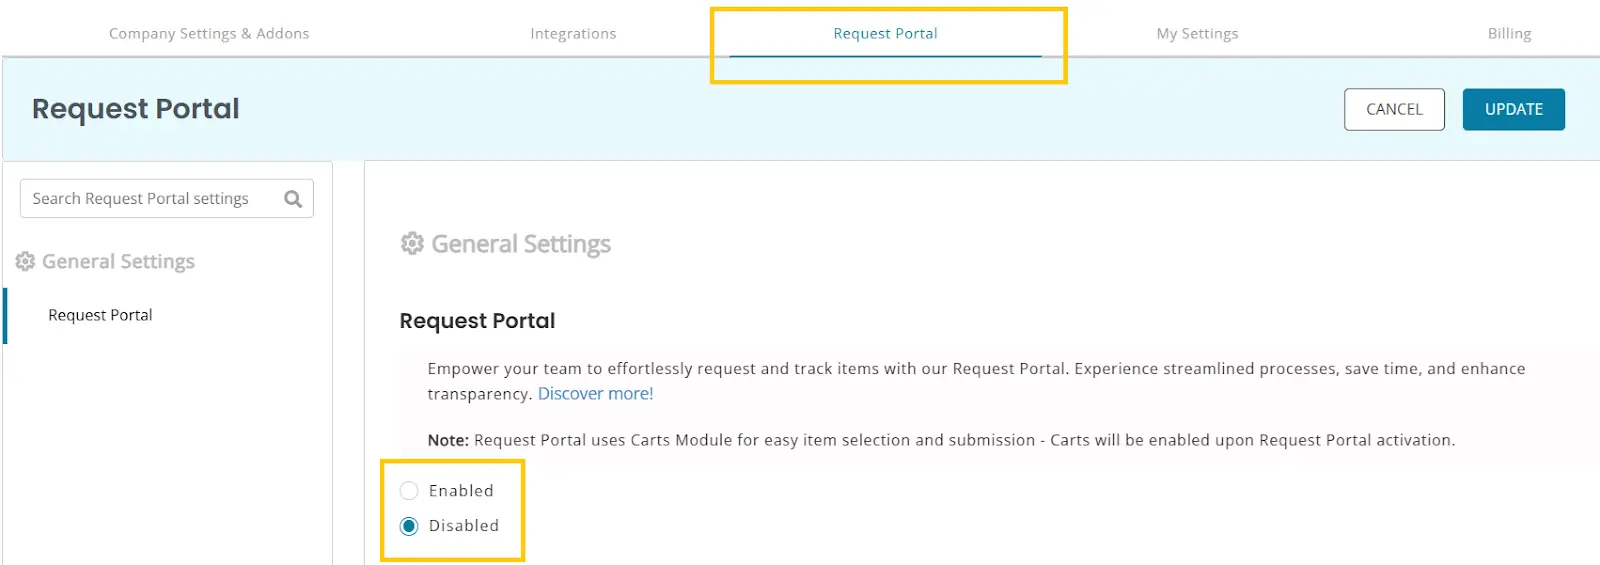
1. Enable the Request Portal
Go to Settings → Request Portal → Enabled and then click Update.
That’s it, the items in your system will start showing up in your request portal based on the Item Display Setting (see the sections below) but the requestor can already access it Request Portal from the unique portal URL provided after you click Update (e.g., https://company.ezoitportal.com).
1.1. Set Your Own Request Portal URL
In case you want to use your own subdomain (e.g., itrequests.company.com)? In the Request Portal URL section, click on the Edit button and then enter and validate your URL.
Note: DNS updates may take several hours to take effect. Contact support@assetsonar.com if you need an SSL certificate for your custom domain.
The Request Portal will start functioning after the above step but there are a variety of ways in which you can configure and customize it through the different settings in Settings → Request Portal once you have enabled the request portal.
Note: The Request Portal displays only the items that already exist in your Items module. Make sure your account is populated with the right assets before enabling the portal. For more information on adding or importing items to EZO AssetSonar, go here.
You can find the details for these below:
2. Customize Branding and Layout
Make the portal familiar for employees by applying your company’s look through Settings → Request Portal → Theme & Customization:
- Upload a logo and favicon.
- Add a default image for items without photos.
- Choose a banner: none, single, slider, or video.
- Apply themes: adjust button colors, menu colors, and backgrounds, or use advanced CSS for full customization.
- Fill in the About Us section with IT contact details, custody policies, or portal usage notes.
- Replace default labels (e.g., “Cart” → “Request List”) to match your process.
- Add disclaimers, configurable headers/footers, or scripts that run once a request is confirmed.
3. Customize Your Item View
You can also select what your requestors see from Settings → Request Portal → Item Display Settings. There you can
- Choose how many rows to show per page and what fields to display (e.g., Item #, Group, Location).
- Whether to show the quantity of available items to users.
- Add filters (e.g., Location, custom dropdowns) to make browsing easier.
- Choose whether to hide blank fields and set a default sort order.
Note: You can customize the user-level visibility of items through the custom roles and user scope.
4. Configure Navigation
Tailor the portal navigation from Settings → Request Portal → Navigation Settings
- Enable or disable menu tabs (e.g., Items, My Reservations, Bundles).
- Add external links as menu tabs (e.g., to your company’s IT policy).
- Set the homepage requesters land on.
- Use Page Builder to create additional portal pages with text, images, or custom layouts.
5. Apply Access Rules and Agreements
You can restrict access to the request portal from Settings → Request Portal → Access Control & Agreements
- Restricted Access: If you enable it, a user will only be able to access the Request Portal after they log in.
- On the other hand, if you are want to create specific users to only access the Request Portal, you can create specific Custom Roles for them.
- You may also require acceptance of Terms & Conditions or a Data Privacy Policy before submitting requests.
6. Define Reservation Policies
Fine-tune how requests work and establish reservation policies at Settings → Request Portal → Reservation Settings:
- Configure the Reservation Listing view (Requester, Status, Item list, etc.).
- Decide whether requesters can edit reservations, and until which stage (Requested, Reserved, etc.).
- Allow requesters to add a description with their reservation.
- Enable Request Communication so they can respond to IT messages inside the portal.
- Permit attachments: users can upload documents/screenshots when submitting requests.
- Choose which line item columns to show on the reservation detail page.
- Control reservation durations: allow indefinite reservations, set defaults, or enforce maximum periods.
- Enable General Requests for things outside catalog items (e.g., password reset, software install).
- Apply Auto-Logout to enforce timeouts after inactivity.
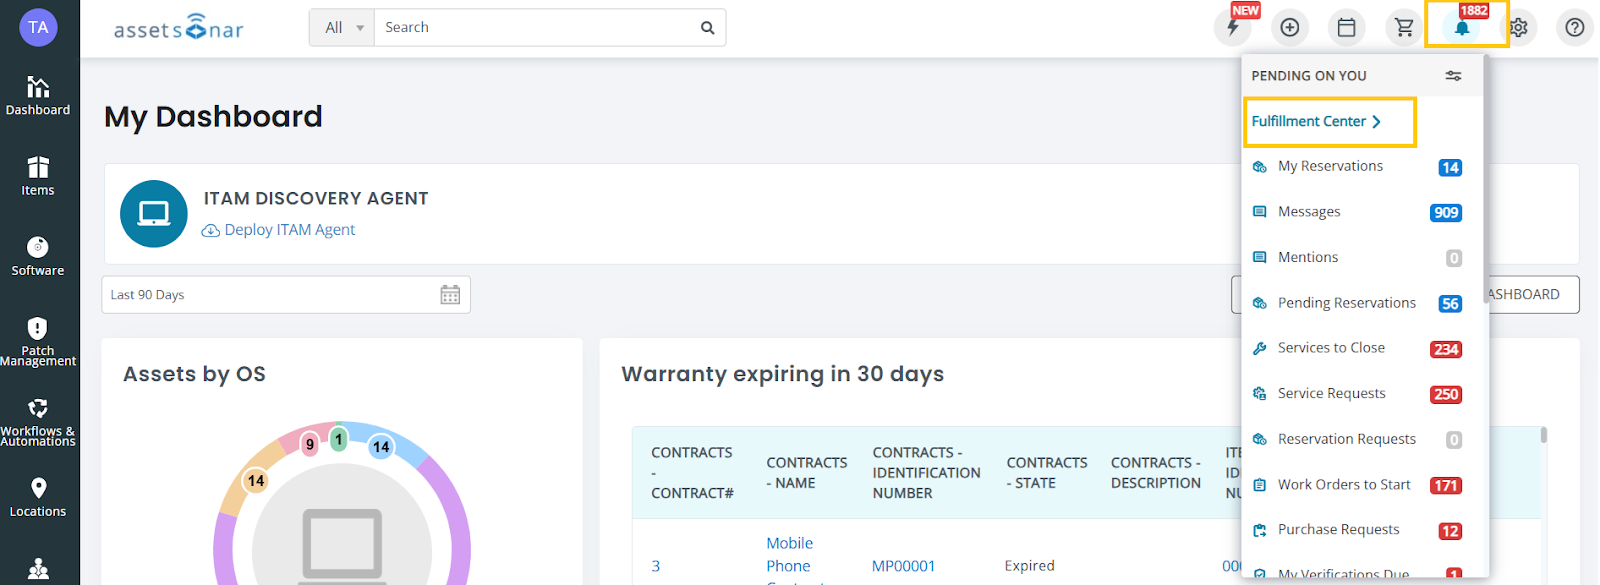
7. Actions on Reservations/Requests
Once a reservation has been made by a requester, it is displayed under the Notifications bell icon. The Account Owner/Admin can view the requests by, hovering their mouse over the icon and then clicking on Fulfillment Center as displayed below:
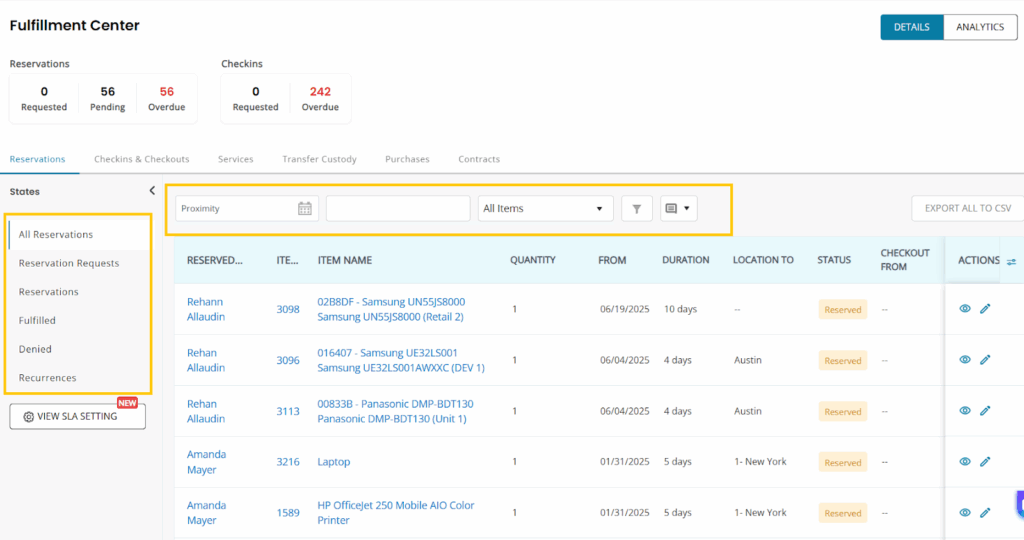
The Reservation tab displays all the reservations made as well as the relevant KPIs as displayed below.
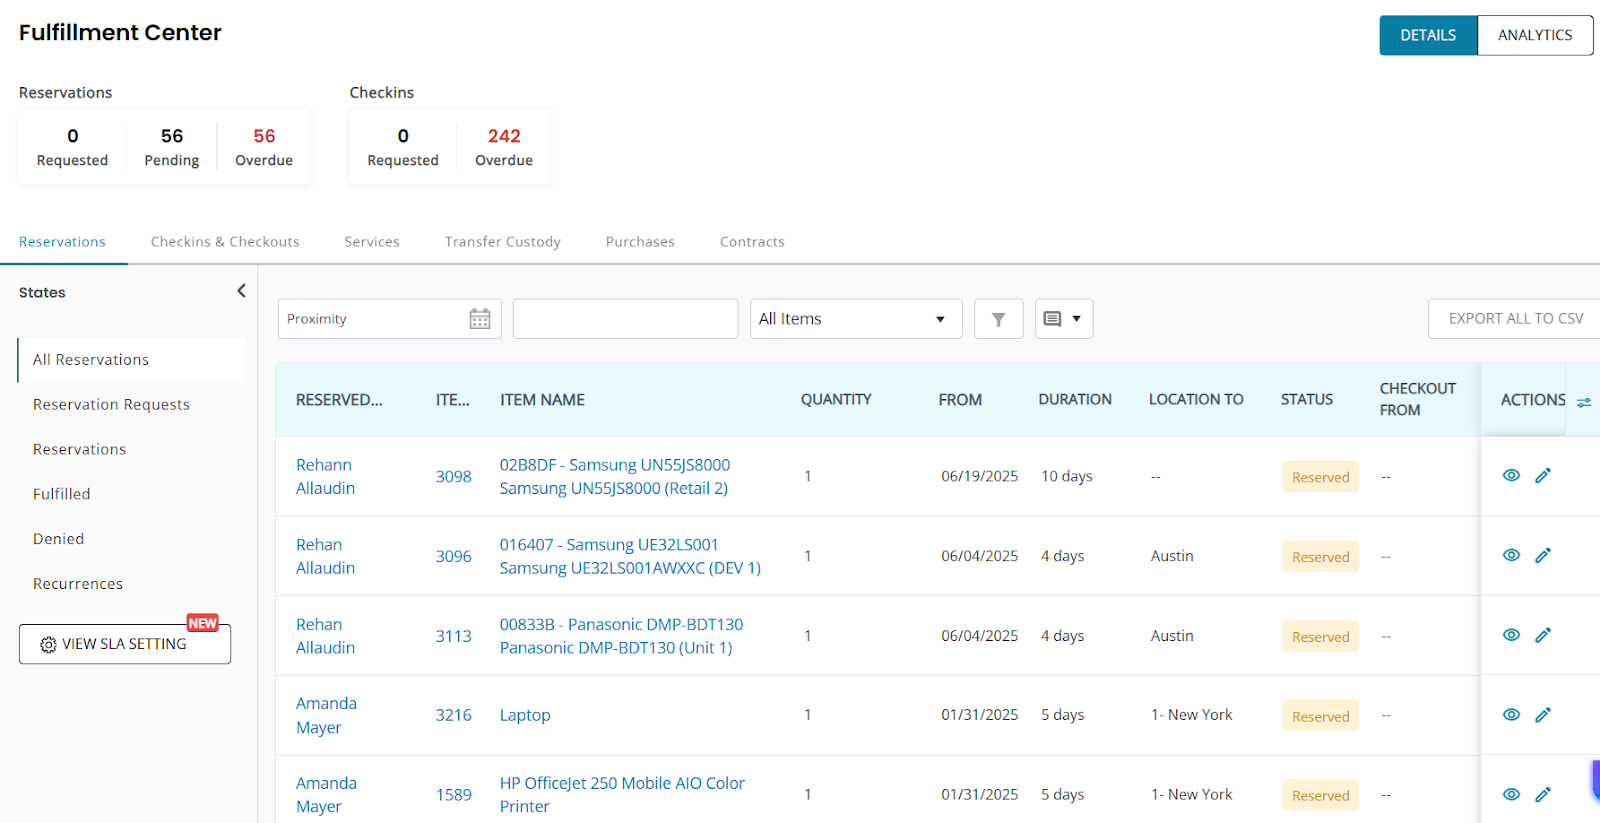
From here the user may Edit or View the reservations by clicking on the relevant icon as outlined below:
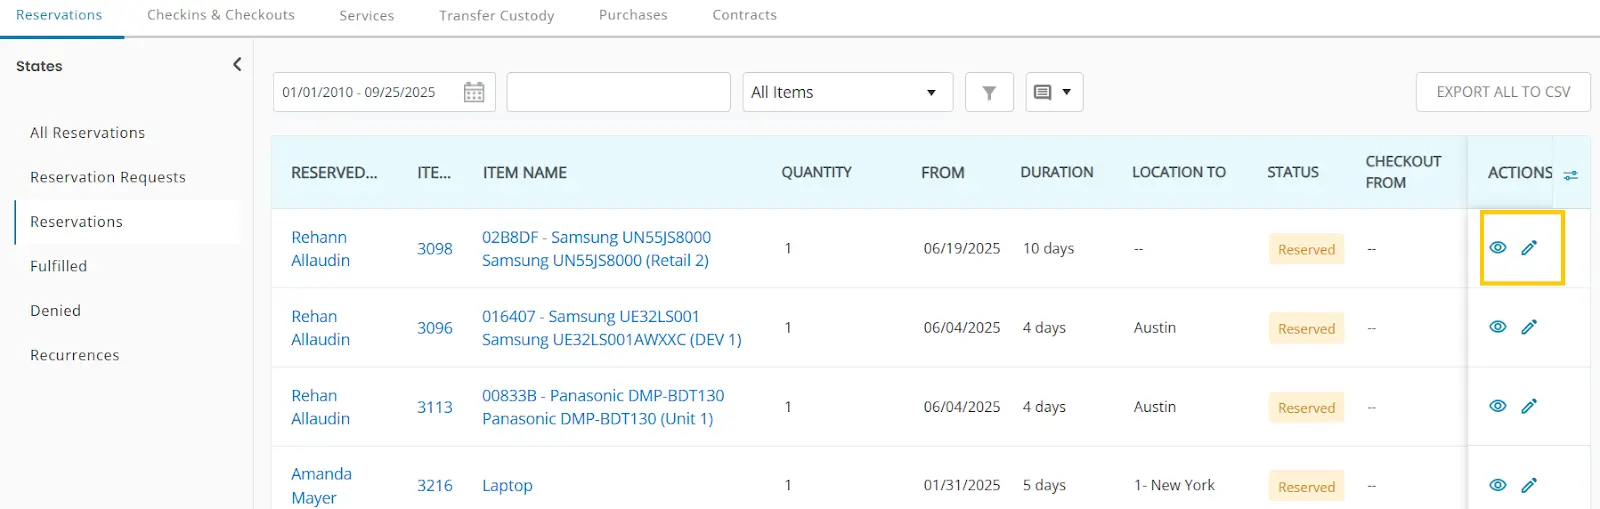
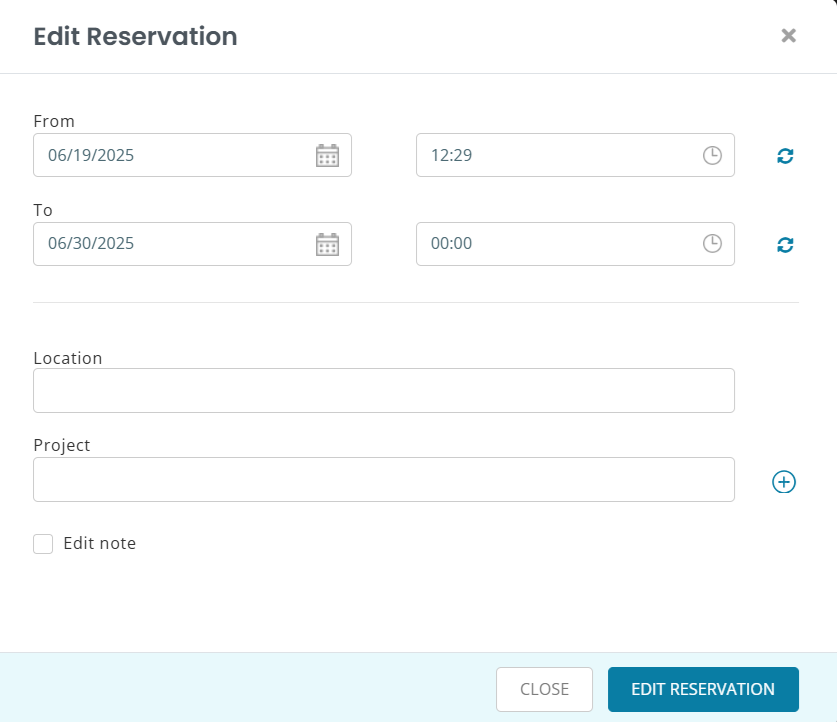
Edit Reservation allows the user to change some of the details of the reservation like its time, date, location or project.
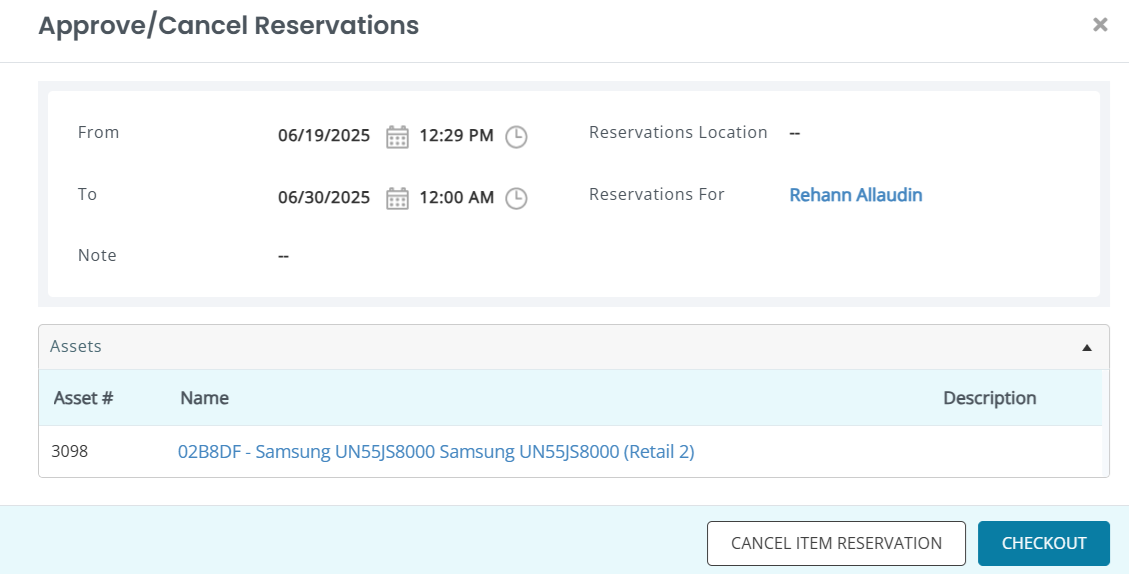
Meanwhile the View icon allows the user to view and approve or cancel the reservation. Click on Checkout to approve the reservation.
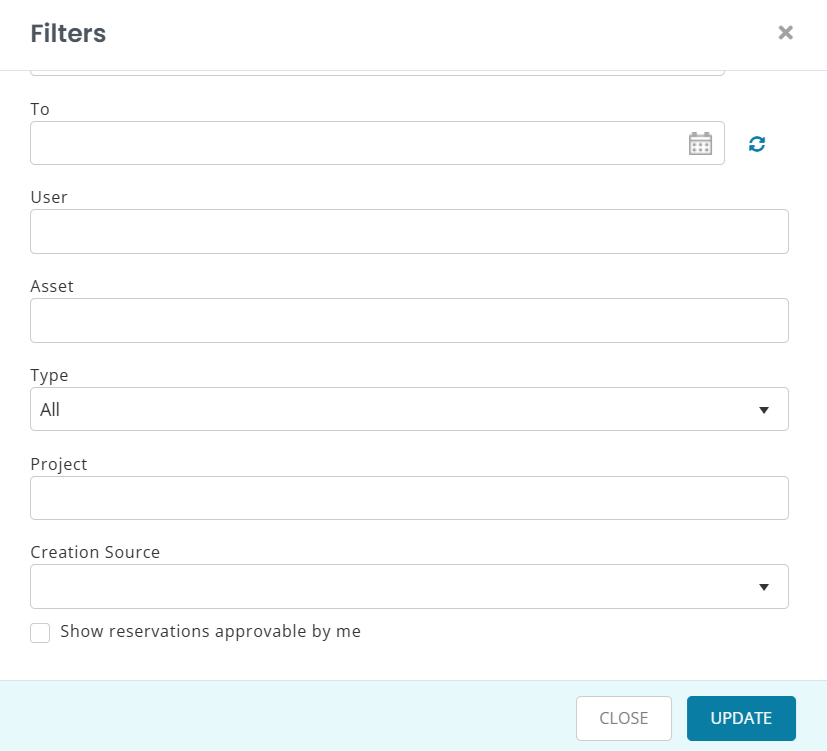
You may filter the reservations clicking the various kinds of States, Proximity, Users, Items or a number of other filters:
Smarter IT Requests with EZO AssetSonar
By configuring the Request Portal, you make it simple for employees to request what they need, while IT maintains complete control over branding, policies, and access. Whether you’re setting default reservation durations, requiring T&Cs, or customizing the look and feel, you can shape the portal to fit your workflows exactly.
Need assistance setting up your Request Portal? Contact support@ezo.io — we’re happy to help.