The software normalization feature in AssetSonar organizes and standardizes diverse software entries into a consolidated, manageable view. It merges various instances of the same software across cloud, on-premises, and custom configurations. AssetSonar’s normalization flow ensures consistent naming and categorization of software and the standardization of software metadata, which streamlines license tracking efforts, addressing the growing complexity of IT asset inventories.
Benefits of AssetSonar’s Software Normalization
Software normalization enables organizations to reduce costs through license management, minimizes compliance risks, and helps bolster security. With a clearer view of the software that normalization provides, IT teams can make strategic decisions that enhance governance and prevent shadow IT from disrupting the organization’s software landscape. Here are a few ways how normalization can streamline software asset management for your organization:
- Simplified License Management: Normalization groups different versions and instances of software under a single record. This consolidation means IT teams can track one entry instead of many, allowing for smoother license management and fewer chances of duplication or non-compliance.
- Consistent Data for Smarter Decisions: Having all software data standardized (with unified naming, versions, and categories) makes it easier for IT and finance to understand what is in use and where there is potential overlap. This insight drives more strategic decisions around renewals, upgrades, and software rationalization.
- Operational Efficiency for IT Teams: Normalization significantly reduces the time IT spends organizing software inventory, particularly for larger teams with hundreds (or thousands) of licenses to track. Consolidated records mean fewer redundancies and a simpler, more navigable inventory.
- Risk Reduction in Compliance and Audits: By standardizing and consolidating software data, normalization makes it easier to produce accurate, audit-ready reports. This lowers the risk of compliance issues by ensuring all software is accounted for under the correct licenses and titles, simplifying preparation for audits and regulatory reviews.
- Cost Optimization Through Visibility: By unearthing redundancies and unused softwares, normalization enables organizations to cut down on unnecessary expenses. It helps pinpoint underutilized assets, making it easier to cancel unused licenses or avoid purchasing duplicates.
Now let’s dive through normalization’s functionality and workflow to see how it works:
How to Normalize Software
From the left navigation bar in AssetSonar, hover your cursor over ‘Software’ and then click the ‘Software’ button.
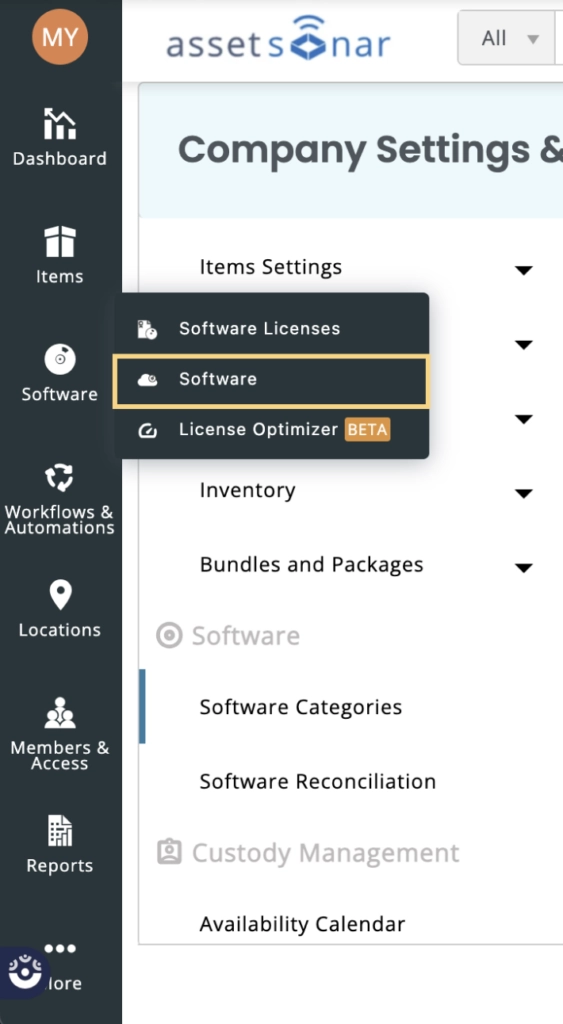
You’ll land on the main software listing page, where you’ll be able to view details on all software, their status, user count, and more. Let’s take a look at all the fields on the main software listing page:
- Name: This field shows the name of the software application. For example, Adobe Illustrator, Slack, Adobe Photoshop etc.
- User Count: This field shows the number of cloud users for a specific application
- Install Count: This is a total number of assets from which the installed software applications were detected
- Source: This field contains the source through which the software was detected i.e. AssetSonar Agent, any MDM etc.
- Discovery Type: This field shows whether the software is cloud-based or installed on the assets.
- State: This field shows whether the software is licensed, unlicensed, blacklisted, or ignored.
From this software listing page, click on the ‘Normalization’ tab.

This new Normalization page will show you all the software instances identified by the system as potential duplicates. Through the normalization functionality, you’ll be able to sort through these software instances, merge them, and clean up the software inventory.
To make this process more accessible, users landing on the detail page of any unnormalized software can see a banner that links directly to the relevant entry in the Normalization → Pending Review tab.
Additionally, on the detail page of any normalized software, users can click on “Update Components”. This takes you back to the Normalization tab with the software pre-selected, making it update components as needed.
In AssetSonar, we maintain our own software catalog as a directory for software applications with all standardized metadata. The normalization functionality works through matching the software in the customer instance with the software in the catalog and showing it to the users for merging.
To make things easier, let’s take Okta as an example of software that needs to be normalized. Okta is an existing software with multiple discoveries and editions in the customer instance of AssetSonar. In the screenshot below, you’ll see that within the user accounts, there are different instances of the same Okta software.
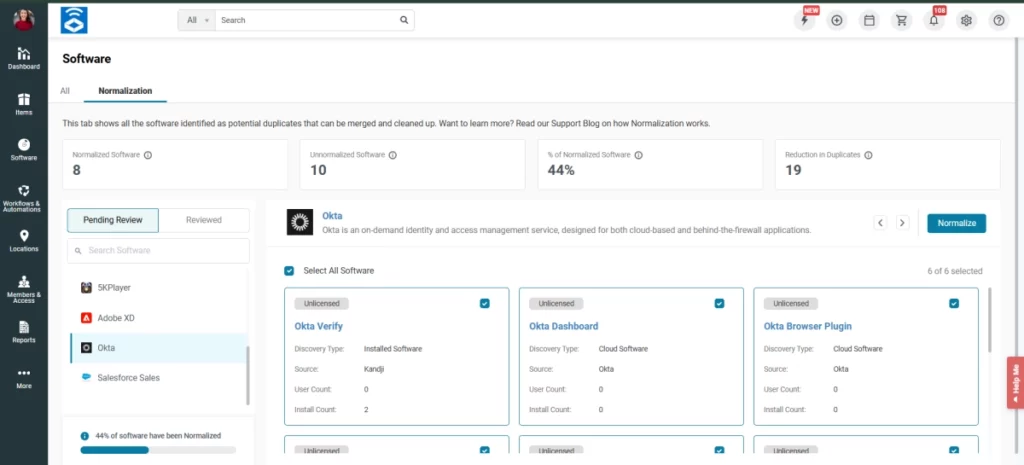
In this screenshot, users can view the ‘Pending Review’ and ‘Reviewed’ tabs on the left. Let’s see what these tabs mean:
- Pending Review: This tab contains a list of potential normalized software from the software catalog in AssetSonar.
- Reviewed: This tab contains software that is normalized from the ‘Pending Review’ tab.
1. Pending Review Tab
On this page, you can see all the components of Okta that are automatically recommended by the system and can be matched with the software entry in our catalog to be merged into one. Users can select the components before clicking on ‘Normalize’ to include these instances as part of the Okta software.
Now, let’s go through the KPIs listed on the normalization tab:
- Normalized Software: number of software applications that are standardized
- Unnormalized Software: number of software applications that are not yet standardized
- % of Normalized Software: percentage of software applications that have been standardized out of the total number of software
- Reduction in Duplicates: number of software components that have been clubbed into a parent software
2. Reviewed Tab
Once you have normalized the software components, they’ll be moved from the ‘Pending Review’ tab to the ‘Reviewed’ tab. Click on ‘Update’ to complete the normalization process.
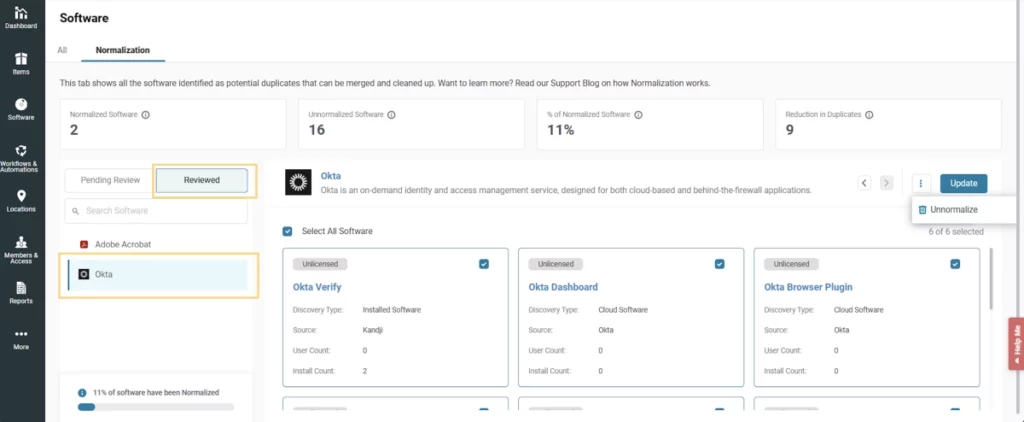
Updating Components in Normalized Software
If new instances of an existing software are discovered, you can update the normalization for that software application. Here is how the new detections will appear on the normalization tab:

AssetSonar Software Normalization also allows users to normalize custom software components that the system hasn’t recommended. Click on the Add Software Component button under the reviewed components as shown below:

A new popup will appear from where you’ll be able to manually search for components to club with the existing normalized software. Here is a screenshot of the popup:

Once you have chosen the software components you want to normalize, click ‘Add’, and the components would be normalized. You’ll be able to view these components in the ‘Reviewed’ tab.
You can also view all the relevant information of the normalized software. This information is picked from the software catalog in AssetSonar. Here is a screenshot of the popup:

Removing Normalization for a Software
If a user wants to remove a normalized software and revert its components back to the individual view, it can be done from the normalization tab. From the Reviewed tab, click on the three dots on the top right and then hit ‘Unnormalize’.
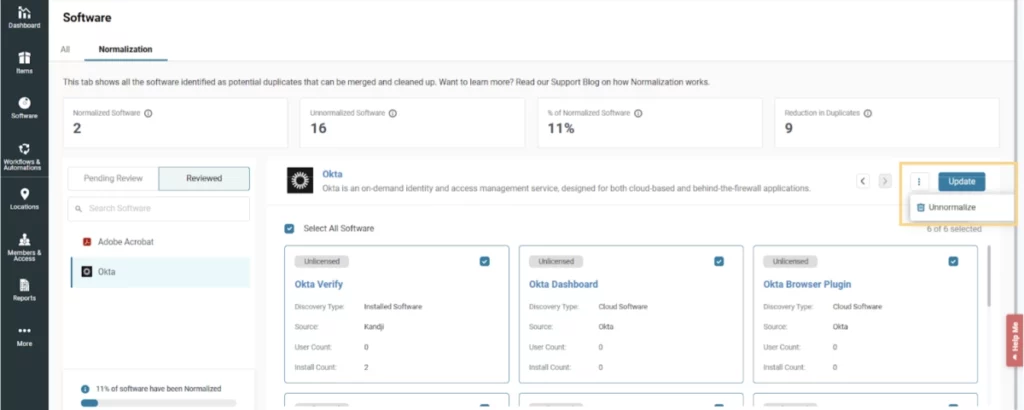
A popup will appear as shown below:

Please note that this step is only applicable if the normalized software is unlicensed.
If a user tries to remove normalization from a component that is licensed with other software components, the user will have to remove the software component from its associated license to proceed. Here is a warning popup that shows up when you try to remove a licensed component from normalized software:

Licensing of a Normalized Software
If you want to license a normalized software, you can do so from the detail page of that application. Here is a snapshot of the detail page of the normalized software:

On this detail page, you’ll be able to view a message which indicates that this software is normalized.
Please note that the ‘Creation Date’ field shows the date when the normalized software was added to AssetSonar while the ‘Updated Date’ field indicates the time when a new software instance was added to this normalized software.
Click the ‘License This Software’ button to license this normalized software. Here is the workflow for licensing a normalized software.
Disabling Software Normalization
Software normalization functionality is enabled in AssetSonar by default. To view the setting, go to Company Settings & Addons -> Software Normalization.
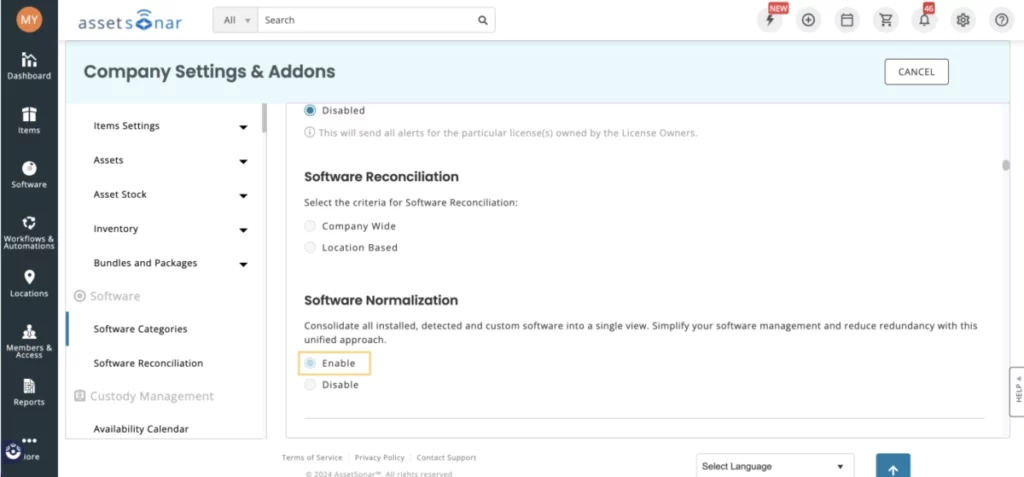
If you want to turn the setting off, click the ‘Disable’ button, and the following popup will appear:

Click on ‘Disable Setting’ to continue. If you already have normalized software in your AssetSonar account, the system will show you another warning screen as shown below:

You’ll be able to disable the Normalization setting only once you have deleted the normalized software licenses from your system.
Email Alerts for Normalization
To help IT teams stay on top of software normalization efforts, AssetSonar provides email alerts to customers with the Software Normalization setting enabled.
To manage these alert preferences, go to More > Alerts And Emails > My Alerts > Software and toggle them on or off based on your needs.
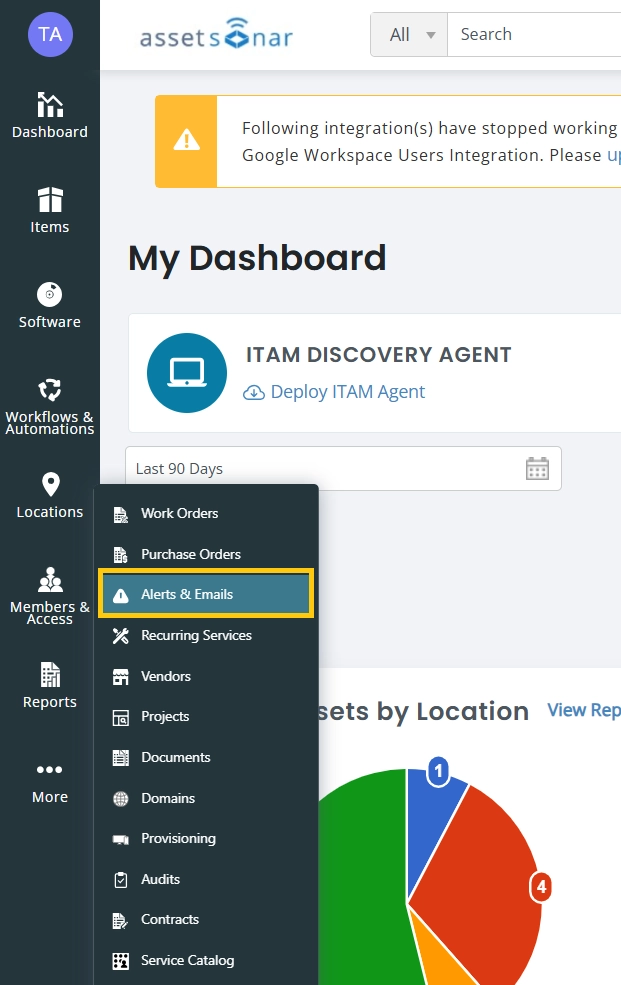
You will find two types of normalization alerts:
1. Review Software for Normalization
You receive this alert when there are software entries pending review for normalization.
- Default status: Off
- Trigger frequency: Recurs based on a user-defined interval (default: 7 days)
- Recipients: Admins and agents (per role permissions); available for custom roles
2. New Software Component Detected for Normalization
This alert notifies users when a new component is found for an already normalized software.
- Default status: Off
- Trigger: One-time email per component on detection
- Recipients: Admins and agents (per role permissions); available for custom roles
- Content: Lists the component, its source, and recommended normalized software
3. Daily Digest & Service Desk Alerts
These notifications are also included in:
- Daily Digest Emails
- Service Desk Alerts


![[How-to] Automate IT Workflows in EZO AssetSonar](https://cdn.ezo.io/wp-content/uploads/2024/09/04125918/Automate-IT-Workflows-in-AssetSonar-1.jpg)
![[How-to] Track Software Subscriptions With Zoom Integration in AssetSonar](https://cdn.ezo.io/wp-content/uploads/2025/01/13054438/Zoom-integration-scaled.jpg)
![[How-to] Manage Software Licenses And Ensure Compliance With AssetSonar](https://cdn.ezo.io/wp-content/uploads/2019/06/13115346/software-licenses--scaled.jpg)


