AssetSonar integrates with Adobe to enable seamless management of Adobe licenses, including license plans, total seats, and entitlements. This integration supports automatic suite creation for multi-application licenses like Adobe Creative Cloud. It also helps organizations streamline license tracking.
Benefits of Adobe and AssetSonar Integration
Here are the benefits IT managers can get by utilizing this integration:
- Simplified license management: Automatically imports Adobe license data, enhancing accuracy and reducing manual effort.
- Cost efficiency: Tracks seat utilization to help organizations optimize their spending and justify license purchasing costs.
- Audit-ready data: Centralized license tracking for accurate, compliance-friendly reports.
- Suite support: Automatically groups softwares into suites like Creative Cloud, aligning with workflows.
Now let’s dive deeper into the integration to see how it works:
Enabling Adobe Integration
Go to Settings -> Integrations -> Direct SaaS Integrations. You’ll see a ‘Connect’ button under the Adobe logo. Click it to enable the integration.
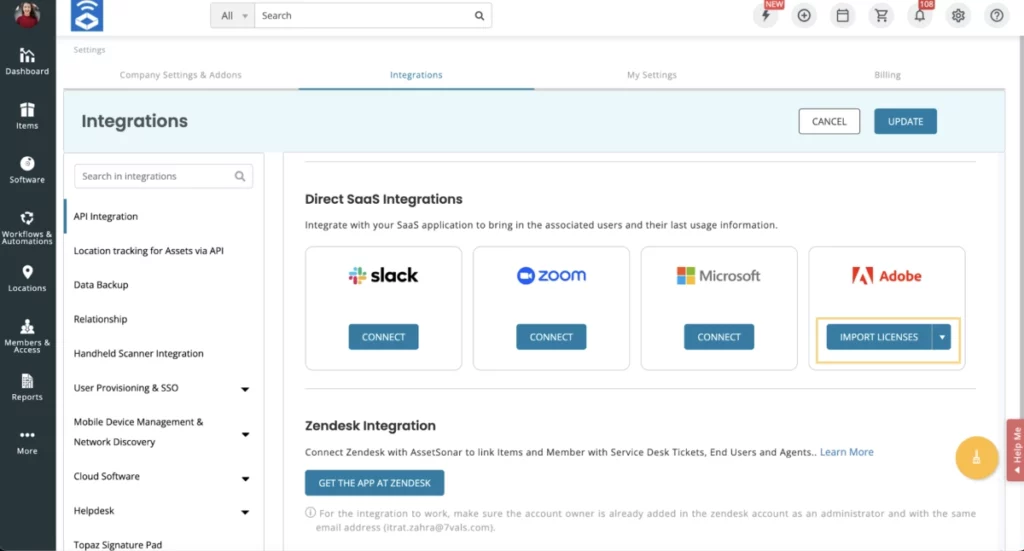
Clicking it would open up a new popup where you’ll be asked to enter your credentials to build this integration. Extract the Organisation ID, Client ID, and Client Secret from your Adobe account and fill in the relevant fields.

Follow these steps to extract the relevant details:
- Log in to your Adobe Developer Console at https://developer.adobe.com/console.
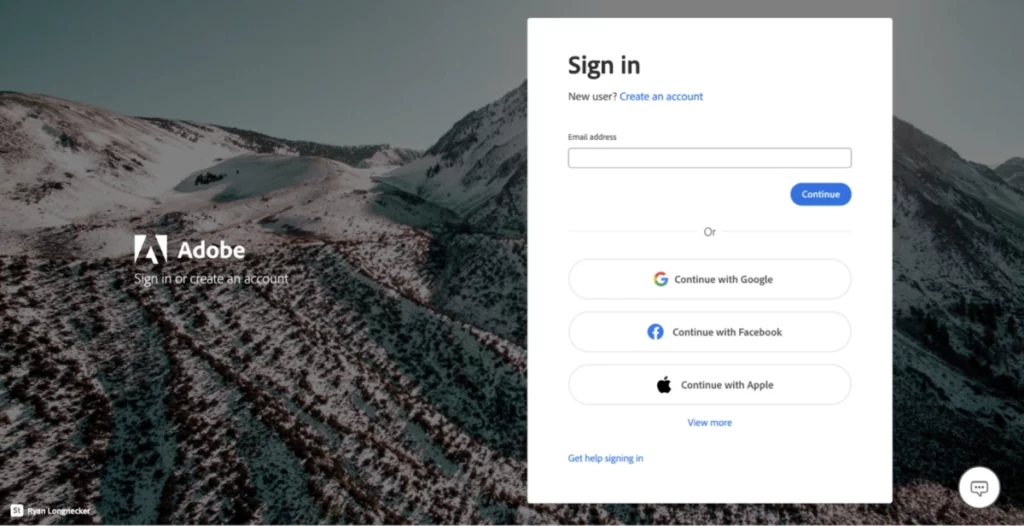
2. Click the ‘Projects’ button from the top navigation bar. Now click the ‘Create new project’ button on the top right of the window.

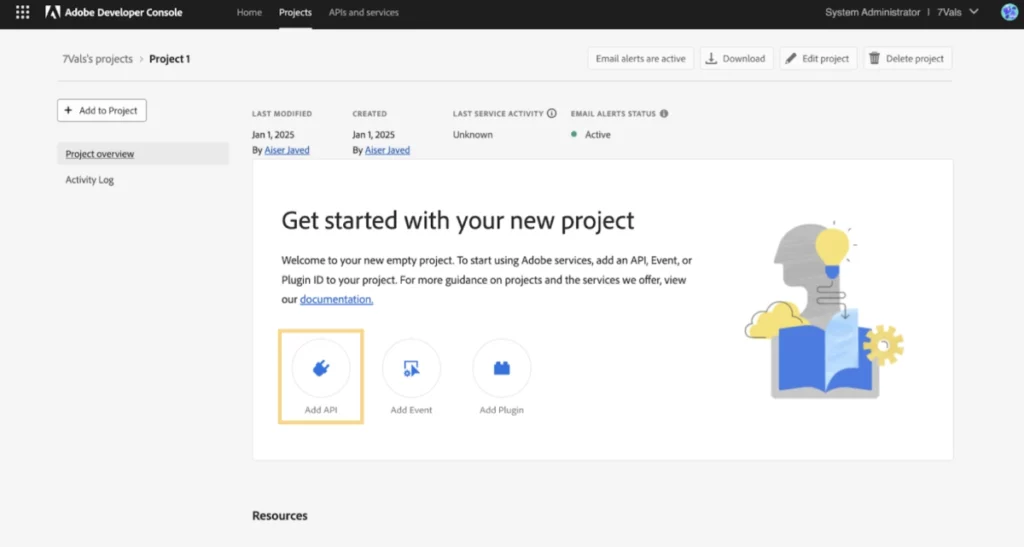
3. A new Projects Overview page will open up. Click the ‘Add API’ button to proceed.
4. A new ‘Add an API’ dialog box will open up. Click the ‘View by’ dropdown and select the ‘Available to you’ option.
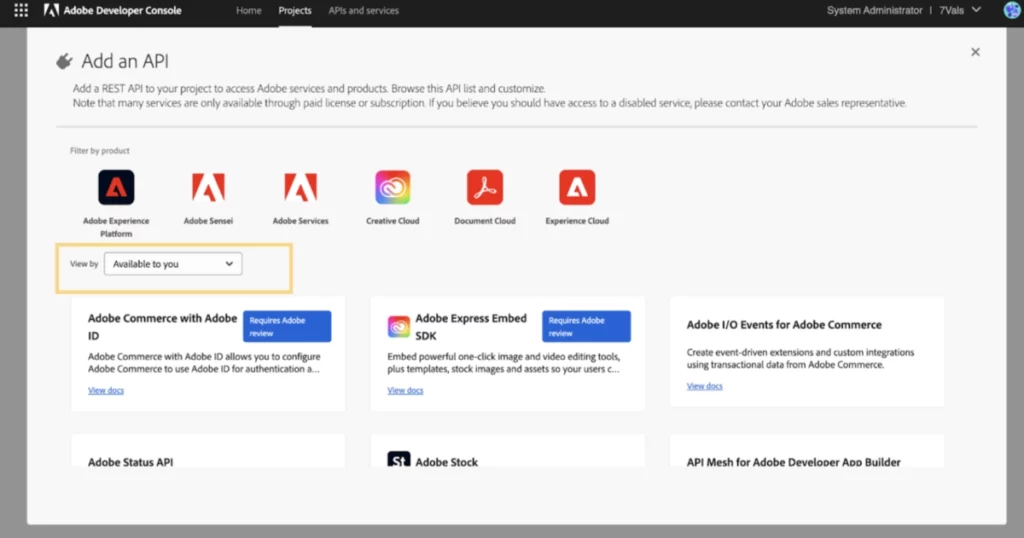
5. Now choose the ‘User Management API’ service and hit ‘Next’.

Please note that many Adobe services require a paid license or subscription. If the User Management API is not available, reach out to your Adobe sales representative for assistance.
6. On the Configure API page, select the ‘OAuth Server-to-Server Authentication’ box and then click ‘Save Configured API’ as shown below:

7. Now from the Projects Overview tab, select the OAuth Server-to-Server tab. Scroll down to locate the Client ID, Client Secret, and Organization ID.

8. Copy and paste the Adobe Creative Cloud credentials into the Adobe integration setting on AssetSonar.
Click the ‘Add’ button and your AssetSonar account will be connected to the Adobe account. You’ll also be able to view a successful integration confirmation on your screen.
Now click on ‘Import Licenses’ dropdown under Adobe integration to bring your data into AssetSonar.

Importing Software Licenses
Clicking on ‘Import Licenses’ will redirect you to the software licenses listing page where the Import Licenses modal will already be open for you. Here you’ll be able to view the licenses that you can import to your system.

You can now select the licenses you want to bring into AssetSonar and click ‘Next’.

Please note that the details of your license’s entitlements and total seats will be automatically fetched from your Adobe account.
When bringing in licenses from Adobe, you will also get the option to merge the imported licenses with an existing software license. Checking the option will show you the following warning message:
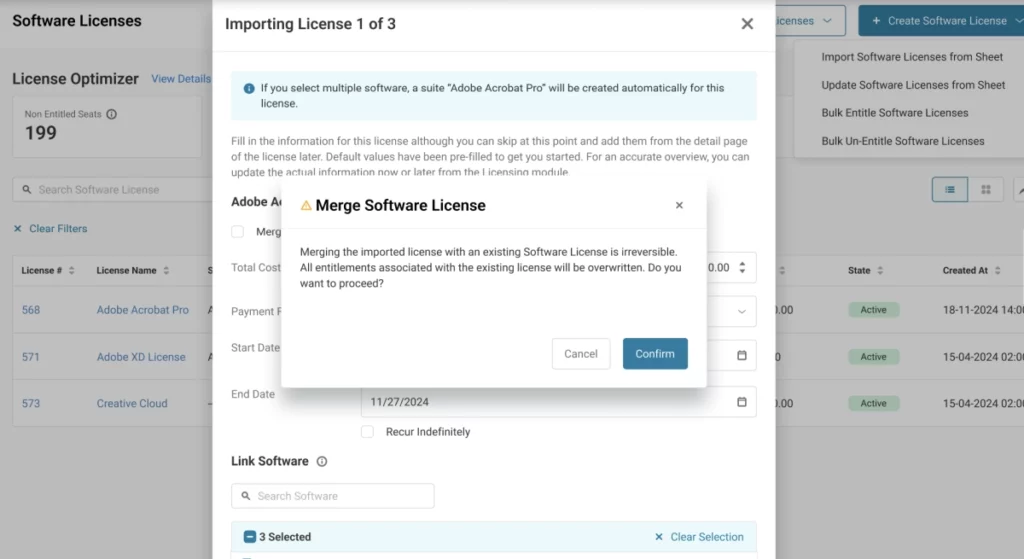
Click ‘Confirm’ to go ahead with the merging.
If you are importing more than one software licenses, click the ‘Next’ button to add the same details for the rest of the software licenses you want to import. Please also note that you can link these imported software licenses to the existing software in your system if they are normalized. Linking more than one application to a single license will result in the creation of a software suite containing multiple applications.
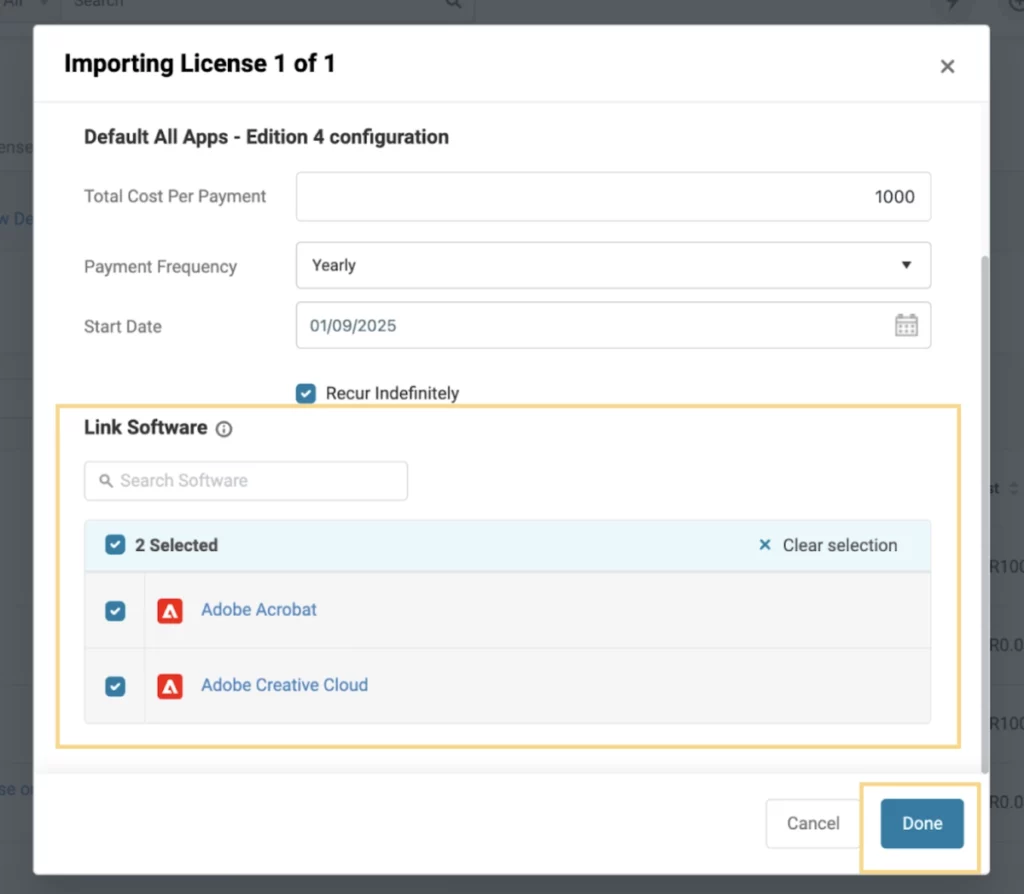
When bringing in licenses from Adobe, you will also get the option to merge the imported licenses with an existing software license. Checking the option will show you the following warning message:

Once you have successfully added the relevant details to the importing licenses and have linked them to the existing software applications, you’ll be able to see a summary of the details you just entered. Here is a snapshot of the details summary:

Hit ‘Done’ to finish the import process.
These imported software licenses will start showing up on the licenses listing page. You can sort them by applying the source filter and setting it to ‘Adobe’ as shown below:
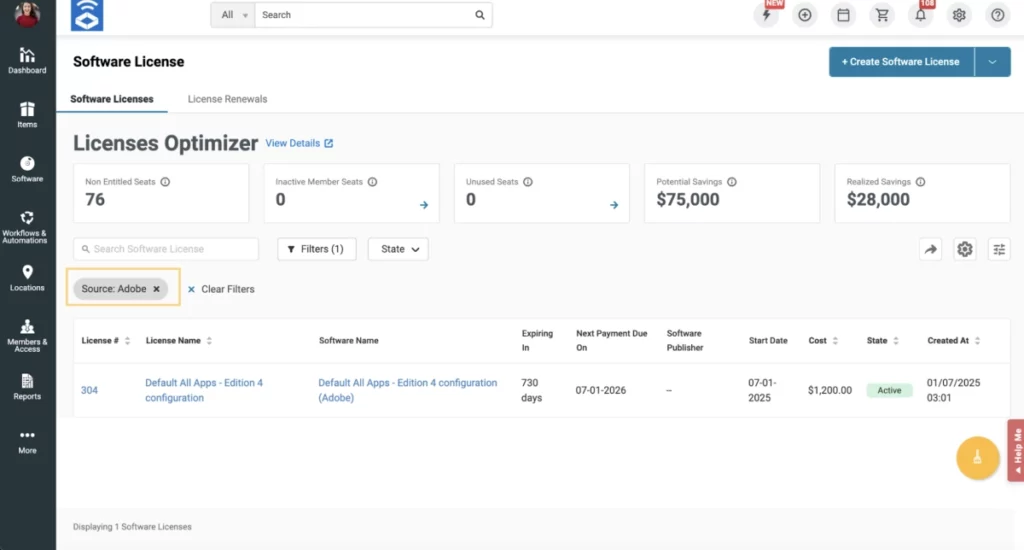
You’ll also be able to see a popup message confirming the successful import of the software licenses.
You can sync data through this integration from the software listing page by clicking on the ‘Sync software Licenses’ button on the top right as shown below:
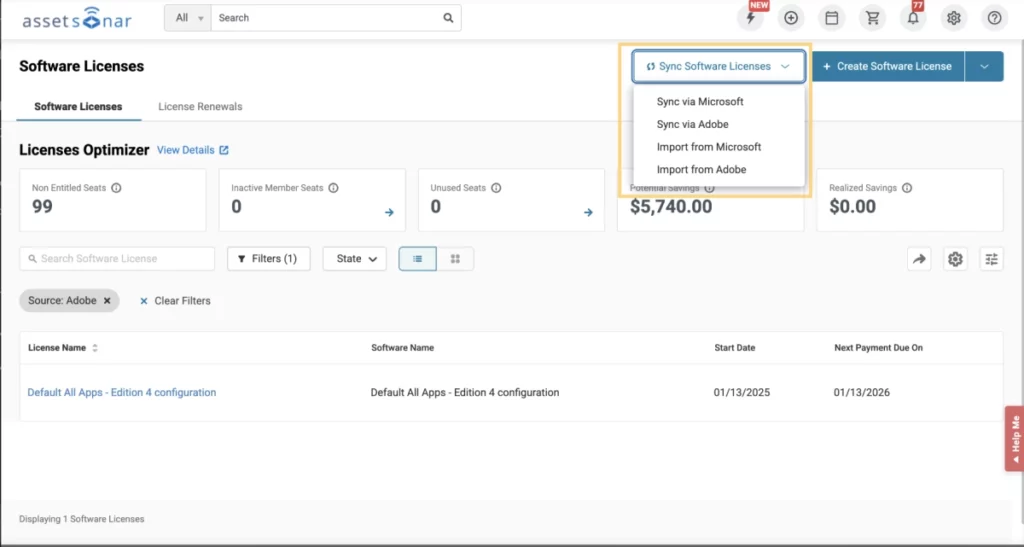
2-Way User Provisioning with Adobe Integration
With 2-way Adobe integration, you can not only view and import Adobe licenses into AssetSonar. You can now provision and deprovision users directly from AssetSonar, which will automatically update your Adobe Admin Console.
Assign a User to an Adobe License
- Go to Software → Software Licenses and open the relevant Adobe license.
- Open the Entitlements tab and click Update Entitlements.

- You will see a modal where you can select the user and the Adobe Product Profile for the user. Product Profiles define which applications/features are enabled for that license (e.g., Creative Cloud – Design Team vs. Marketing Team).

- Select the profile, then click Update.
The user is automatically added to the selected Product Profile in Adobe, and AssetSonar reflects the entitlement.
Note: A user can be part of multiple profiles for a single Adobe product. If so, AssetSonar will display all assigned profiles in the Entitlements table.
You may remove the entitled users from the same modal as well and that will also update in Adobe.
Import/Update via Sheet
- When updating entitlements through bulk sheets, you can an additional Adobe Product Profile column.
- Enter the exact Product Profile names to map users correctly.
Software Suite Actions
You can also link applications from the detail page of the imported license. For example, let’s suppose that you want to link Creative Cloud with multiple applications to create a software suite. You’ll go to Creative Cloud’s detail page. Click on the ‘Link’ icon to start creating the suite.
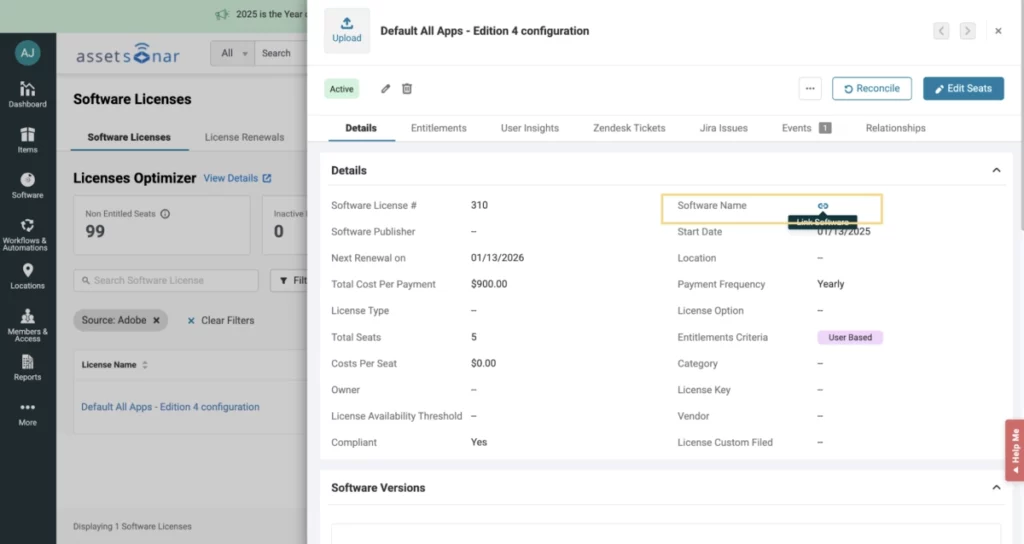
A new popup will appear with a list of recommended software for you to choose from. Here is a snapshot of the list:
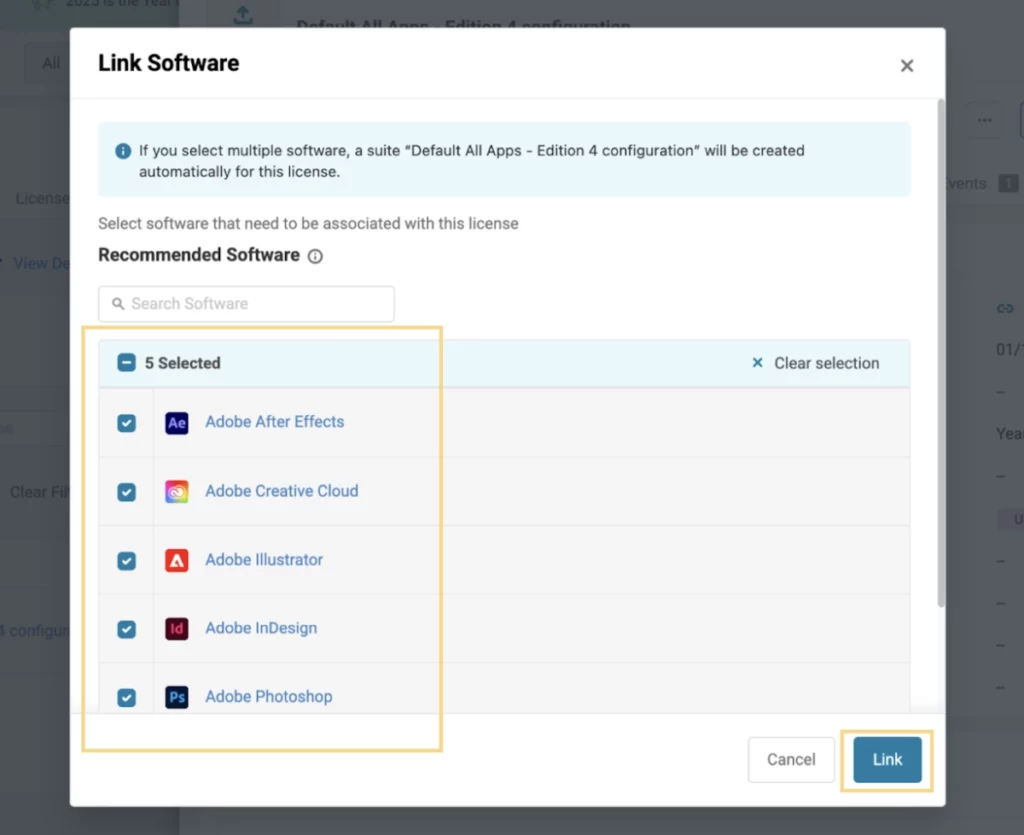
Click the ‘Link’ button and you’ll see a message indicating that the applications have been linked successfully. You can view the details of this suite from the ‘Suites’ tab on the software listing page. You’ll be able to view the number of components in the suite and the User Count and Install Count for each component.

Click the ‘Associated Users’ tab to view the details of the users accessing the applications in the suite.

Similarly, you can also view the associated assets, associated licenses, and events details from the relevant tabs.
If you want to edit the software suite, click the ‘Edit’ icon on the top and a popup will appear. Here you can edit the core suite information or the the components information as shown below:
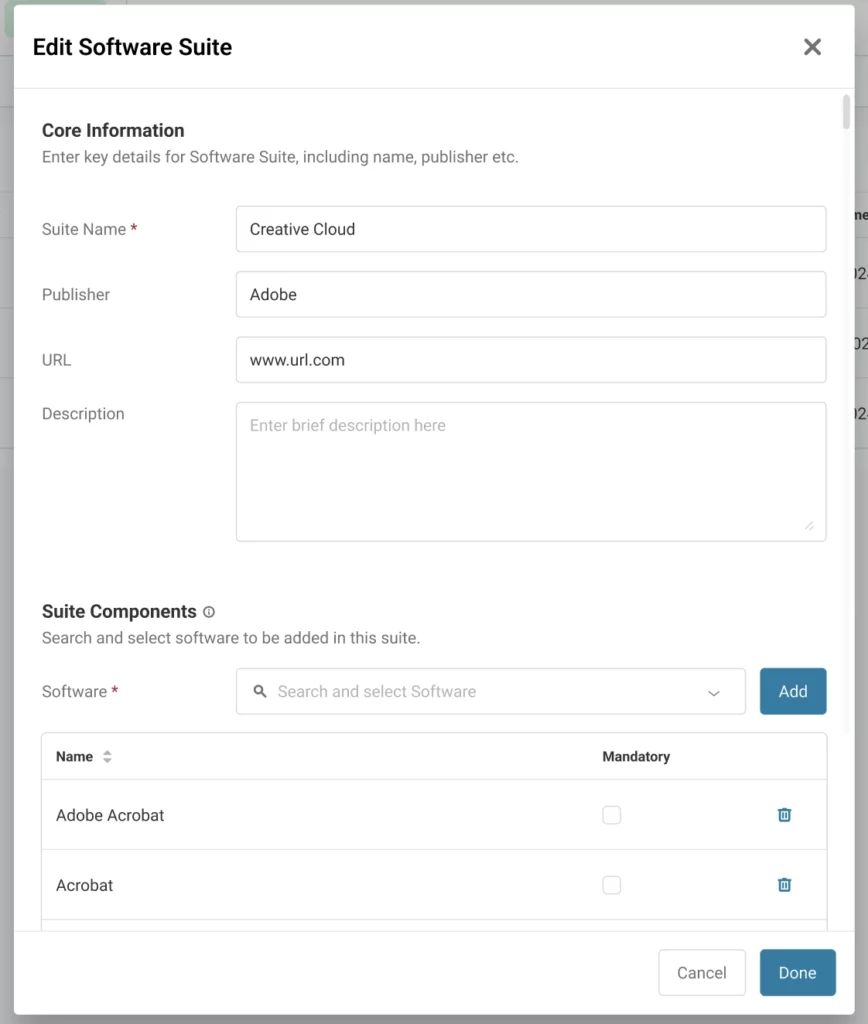
If you want to remove a suite component, you’ll get a warning message as shown:
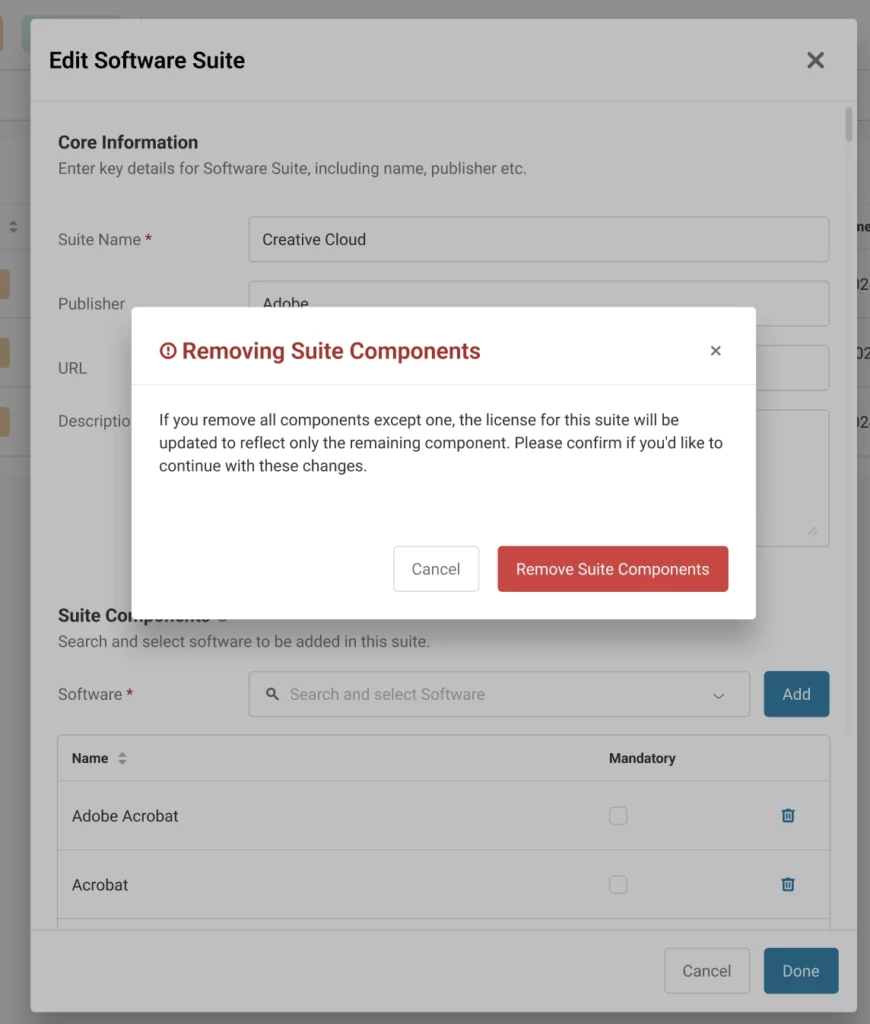
Hit ‘Remove Suite Component’ to proceed.
Please note that removing all components of a suite will result in the removal of an entire suite.


![[How-to] Manage Software Licenses And Ensure Compliance With AssetSonar](https://cdn.ezo.io/wp-content/uploads/2019/06/13115346/software-licenses--scaled.jpg)
![[How-to] Track Software Subscriptions With Zoom Integration in AssetSonar](https://cdn.ezo.io/wp-content/uploads/2025/01/13054438/Zoom-integration-scaled.jpg)
![[How-to] Normalize Software Instances in AssetSonar](https://cdn.ezo.io/wp-content/uploads/2023/06/13072228/Normalization-scaled.jpg)


