IT-intensive companies have a diverse range of hardware and software assets to work with. When it comes to managing software, what businesses dread the most is unforeseen software licensing audits by vendors.
Put simply, they’re oblivious to such violations until a third party discovers them. This typically bleeds from the failure of businesses to track software licenses, monitor asset usage, and prevent illegal software downloads.
For this reason, it is crucial to implement a dedicated software license management system that helps you stay compliant and saves you from a tarnished brand image.
AssetSonar makes Software License Management a breeze
AssetSonar takes stock of all your compliance challenges. It comes equipped with a Software Licences module. This module keeps an exhaustive account of Software License details associated with all of your IT devices.
With AssetSonar by your side, you can keep tabs on license expiry and warranty renewal dates. It also enables you to monitor the usage of relevant software systems in line with their subscribed licenses.
This way, you can upsize and downsize your software assets based on their utilization and activity. AssetSonar helps you stay compliant with vendor agreements and pay only for software systems that add value to your business.
But the question remains! How do you go about Software License Management in AssetSonar?
This article serves as a detailed guide for you to set up and reap the benefits of SLM using AssetSonar.
Set up ITAM Discovery Agent
Agent-based discovery helps trace down and monitor all IT devices that are used in your organization. All you need to do is download the ITAM discovery agent from AssetSonar and install it on each of your devices.
Once installed in a device, the Agent can pull up hardware and software details of the device whether it is on or off the company network. The system runs an auto-scan every 6 hours to update the device details as necessary. You can also choose to manually sync and update the data if needed.
To learn more about how to set up the ITAM Discovery Agent, click here.
Once you have installed the ITAM Discovery Agent and run the sync, the Agent will populate all the software details of your devices in the system. You can view these details in your AssetSonar account by following the pathway, Assets → Asset Name → Software Details.
Here’s a glimpse of what you should see in the Software Details tab of an Asset:

Creating Software Licenses
AssetSonar enables you to create Licenses against each of the Software identified in your Software Details tab. Let’s start!
Create a new license
To generate a new license, go to Items → Software Licenses → Add Software License. Configure the core details for the license as shown below:
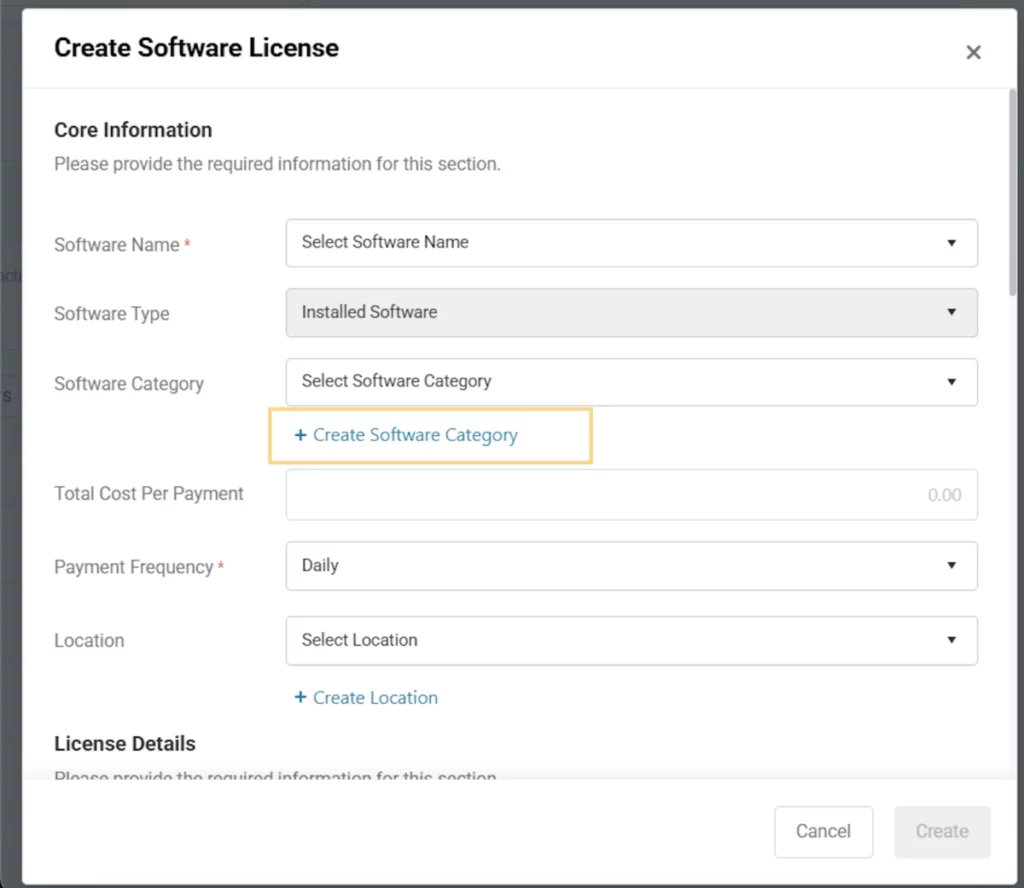
You can also create a new software category from the ‘Add’ button icon highlighted above. An overlay will appear asking you to name the software category and click ‘Create software category’.

To edit or delete software categories, go to Company Settings & Addons → Software categories → Edit or delete. Please note only IT admins or members who can edit software categories can create new ones.

Once you have filled in the core details, the system scrolls below to reveal data fields of Installed Software Information and Version Details. Fill these up and click ‘Done’. This will generate the Software License.
You may have noticed that some of the data fields mentioned above are not too mainstream. Thus, we have dedicated the next section to familiarize you with these fields.
Create a new license with normalized software
To create a license for a normalized software, you can select the software components as well. If the selected components contain one or more detected cloud softwares, then you can also select the softwares with which the auto-entitlement will work.

Create a new license while viewing software
To license a software while viewing it, click on the ‘License This Software’ button and the license details page will open up.

Fill up the details on the license details page and hit ‘Done’. The software will be licensed.
License Data Fields
Here’s what a few of these data fields entail.
- Software Category denotes the function for which a specific software shall be used e.g. Customer Support, Marketing Automation etcetera.
- Software Type refers to Installed or Cloud software. We support creating licenses against both software types.
- License Key is a unique number you get from the vendor, indicating that you have actually purchased the license for the software.
- License Type indicates various categories of software licenses. Each type has different usage conditions, and purchase and renewal terms. These are explained further in step 2.1.2.
- License Options is a data field that gets populated based on the License Type you have selected.
- Payment Frequency refers to how often you’re supposed to pay for license renewals. The system automatically generates a payment history based on this frequency.
- Start Date specifies when you purchased a Software License. It also initiates the Active status of the license.
- End Date suggests the time when a Software License will expire.
- Software Name represents the software against which a license is created.
- The Approver is the person who authorizes the purchase of a Software License. This, by default, is the person who has created a new license.
License Types
Here are the different license types that AssetSonar contends with:
- Client Access License is a commercial software license. This enables clients to use software across different users/devices that are connected to a single server.
- Concurrent License is based on the number of simultaneous users accessing the program via a network. The system prohibits more users from using the software once the specified concurrent user limit has reached.
- Enterprise License usually permits unlimited use of a product or system throughout an enterprise. It eliminates the need to register a software program every time it is installed on a new device or used by a new person in the enterprise.
- Free License is royalty-free, non-exclusive, and perpetual. It allows you to reuse another vendor’s software without any payment.
- Named User License is exclusive licensure of rights assigned to a single named software user.
- Node-Locked License is assigned to only one computer or dongle i.e. one node.
- OEM License is purchased on a per-system basis. It normally applies to software that has been pre-installed in an ITAM device when you purchase it.
- Trial License refers to a Software License that you can try out for a specified period before you actually purchase it.
- Volume License is where you authorize one software program to be used on multiple devices by multiple users. You can specify the volume of devices or users that are authorized to use the software.
Edit a software license
Once you have created a software license, you can also edit it by clicking on the ‘Edit’ button on the Software License Details page.

Manage Software Licenses
Once you have created licenses for each of the software programs in your IT devices, AssetSonar populates them under the Software Licenses tab on the Items page as illustrated below:

You can now track renewal dates and recurring payments for each of your Software Licenses. AssetSonar also enables you to keep tabs on the software versions that you’re using and update them accordingly. Learn more here.
Manage Payments
You can maintain a detailed ledger of payments for each software license in AssetSonar, giving you complete financial traceability across your license portfolio.
To access it, go to Software (Navigation Menu) → Software Licenses and click on any license for which you want to view the payment details. On the License Details page, scroll down to the Payments section.
Here you will see a detailed ledger that logs each relevant payment for that license:
To add a payment
- Click on Ellipses (…) and then click Add Payment.
- Enter the payment details in the Add Payment modal.
- Click Confirm. If a duplicate (same amount and date) exists, you’ll see a warning before submission.
To void a payment
- Click the Void icon next to the relevant payment in the ledger.
- Optionally, enter a Reason.
- The payment will be marked as voided and appear with a strikethrough in the table.
Voided payments are retained for audit purposes and cannot be edited after voiding.
Note: All payment actions—including new and voided entries—are tracked in the Events tab of the relevant license for full traceability. This is especially valuable for tracking recurring SaaS spend and preparing for internal or external audits. You can also build custom reports that include payment data.
Manage Versions
When you create a Software License, you can choose to apply it to a set of versions of a specific software application.
Create a Software License as mentioned above. As you scroll below while creating a Software License, you can see a Version Management section.
The drop-down button in Version Management enables you to either apply the license to all versions, a single version, or versions starting with a certain digit. For instance, you can create a license against all versions of software that start with the digit 10.

You can even verify the total number of versions you have installed in your system by clicking on ‘Show Matched Versions’. This pops open an overlay that lists all the possible installed versions based on the conditions you have specified.

In case you have purchased a new version and want the license to apply to that, you can ‘Add Version’.
Software License States
Each Software License has 4 states. These are as follows:
- Drafted: A license before its Start Date begins is in a Drafted state.
- Active: A license is in the Active state if it falls anywhere between its Start and End Date.
- Expired: A license enters the Expired state after the End Date.
- Terminated: A license when ended manually and voluntarily by an Approver enters the Terminated state.
Filtering Software Licenses
The Software License Listings page catalogs the entire inventory of your licenses once you’ve added them to your AssetSonar account. You can filter through this catalog to only view relevant information.
AssetSonar gives you the ability to apply filters by the following fields:
- State (Active, Expired, Terminated)
- Usage (Underused, Overused)
- Expiring in ______
- Payment Due in ________
- Updated Time
- Entitlements Criteria
- License Owner
- Software Publisher
- Software Name
- Software Type
Let’s say you want to see how many licenses are the responsibility of a certain employee. You can do so by applying the filter of that License Owner. Here is how the filters on license listing look like:

In our case, the license owner is Tony Stark. Apply the filter and you’ll be able to view the results that have been filtered by Tony Stark as the License Owner.

Alternatively, you can view the license ownership of each employee from the Member Details page by going to the License Ownership tab as shown.

Software License Overview Page
AssetSonar now includes a Software License Overview Page that provides you a high-level view of your organization’s license compliance, spend, and utilization trends, all in one place.
This dashboard sits next to the existing Licenses Listing tab and consolidates critical KPIs and visual insights for faster decision-making.
1. KPI Summary Cards
At the top of the Overview Page, you’ll see four key performance indicators (KPIs):
- Total Active Licenses
Shows the total number of active software licenses in your account, with a month-over-month comparison. - Utilization %
Displays the percentage of purchased seats currently assigned to users. - Unassigned Seats
Indicates the number and percentage of unassigned seats across all licenses. - Annual License Spend
Displays your total annualized spend across all active licenses.

2. Graphs and Trends
Below the KPI cards, the Overview Page includes interactive graphs that visualize license utilization and spending trends over time.
- License Seats Availability: Shows seat availability per license (entitled vs non-entitled seats), sorted by non-entitled seats in descending order.
- License Usage: Breaks down entitled seat usage into active, unused, and unknown usage per license.
- Total License Spend: Displays total monthly spend trend across all active licenses normalized month by month.

3. Filters
At the top right of the Overview Page, you can filter the KPIs and charts. Filters apply to all KPIs and charts simultaneously, helping you drill into spend and utilization for specific software or time frames.

View Connected Sources for a Software License
You can now view all integration sources connected to a software license along with their last sync time.
Note: This table appears only when more than one source is connected to the license. If there is only a single source, its details are shown in the Last Sync Source field on the license instead.
To do this, on the License Details page, scroll down to the new Connected Sources table.
This table includes:
- Source – The name of each connected source.
- Last Sync At – The most recent sync timestamp for that source.
Custom fields in Software Licenses
Suppose as an IT Admin, you wish to add and track details regarding Software Licenses that are not added in AssetSonar by default, for instance, the Purchase Order number (PO #) of a Software License.
You can track such data values by creating custom fields in the Software License module. To do so, go to More → Custom Fields → Software Licenses → Add Custom Field.

This pops open an overlay. Here, you can configure details for the relevant custom field. Click ‘Add’ when you’re done.

You can also select preferences for a custom field from the following:
- Mandatory on Create/Edit (cannot be selected if linked to the module is checked)
- Save History
- Editable by a staff user
- Restrict visibility to Administrators
Apart from the Number Field, you can also create custom fields for these types:
- Dropdown
- Checkbox
- Date field (alert)
- Date Time Field (alert)
- Multiple choice
- Paragraph text
- Single line text
Actions on Software Licenses
AssetSonar lets you take multiple actions on a Software License once you’ve created it. However, you can take these actions only when a license is in its Active state.
Reconcile
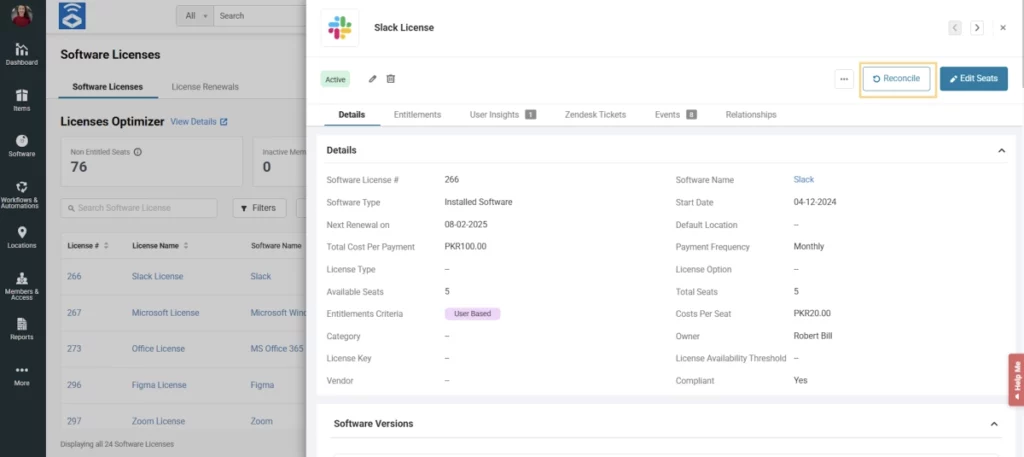
You can reconcile a license to update all relevant data fields pertaining to it. Let’s say, you have downloaded a new version of a specific software application or have multiple devices using the software, you can click the ‘Reconcile’ button to refresh the Software License details regarding version management and usage.
Go to the Software License Details page and hit ‘Reconcile’. This will update all information including the concurrent users using a software system at a time. The action will also check out the concerned software on the devices it is being used on.
Here’s what it shall look like:
Terminate
A User can terminate a Software License when it is in the Active state. This generally happens in three instances:
- When a User is dissatisfied with the performance or features of an Installed Software and does not want to use it any longer;
- When a User has upgraded a Software License from a lower to that of higher value;
- Or when a User has entered incorrect details pertaining to a Software License and wants to delete the license as a whole.
To end a license in the system, go to the Software License Details page and click ‘ Terminate’.
The following overlay will appear. Specify the reason and click ‘Confirm’.

This action will terminate the Software License.
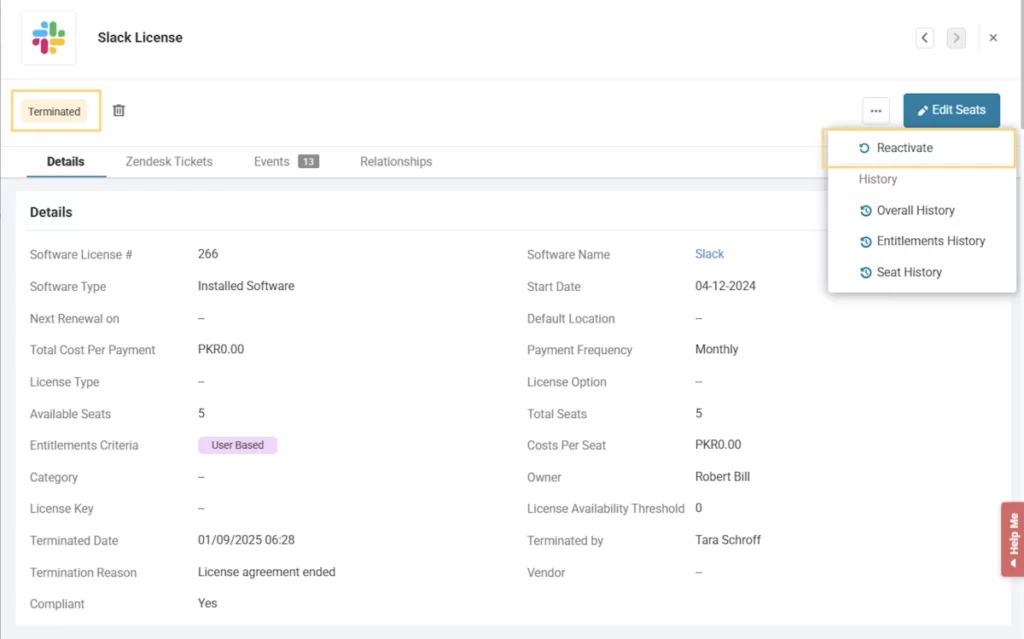
Note: You can reactivate a terminated Software License as long as its End Date has not passed. To do so, click on the ‘Reactivate’ button as illustrated.
Delete
You can even choose to ‘Delete’ the Software License to permanently remove it from the system logs.

Note: Deletion is an irreversible action. Once a Software License has been deleted, you cannot recover its details back into the system.
This action removes the relevant Software License and its information from the Software Licenses tab. We do not recommend license deletion until it is absolutely necessary for you.
Add Users to software licenses
AssetSonar gives you the ability to add or remove users to software licenses and monitor software utilization with its Software License Entitlements and Reconciliation feature. To do so, go to the relevant Software License Details page → Entitlements -> Update Entitlements.

Select from the Available Users and click ‘Update Users’.

Things to note:
- All the employees that have IT Assets checked out to them will show up in the Available Users list.
- If a user is added or entitled to an existing license of a software application, they will not appear in the Available Users list of a new license of the same software.
Once updated, the added users will show up in your Entitlements tab.

With Software License Entitlements, you can entitle, authorize, or give user rights of the licensed software to specific users or machines. This means that as an IT Admin, you can allocate a software license for use only on authorized devices and by authorized employees. To learn more about license entitlements, click here.
Note: You can add users up to the Total Seats limit that you’ve specified while creating the Software License.
Software License History
A major benefit of AssetSonar is its ease of use and flexibility. Unlike most ITAM software, AssetSonar gives authorized users in your account the ability to edit Software License details.
It also keeps track of the changes made by your employees for oversight purposes. To view these changes, click on the ‘Overall History’ button on the Software License Details page.

This pops open an overlay illustrating any updates made to a Software License by a specific user.

Alert for License Availability
Let’s say, your company is actively hiring new graphic designers and needs to purchase licenses for Adobe Photoshop to accommodate its new hires. Oftentimes, the purchase of new licenses may get delayed because you did not know you were running short of a certain license.
You can overcome this by specifying a License Availability Threshold and setting up a License Availability Alert. The License Availability Threshold refers to the minimum amount of licenses available, which if reached, should trigger the purchase of new licenses.
You can specify this threshold while creating a new license as shown:
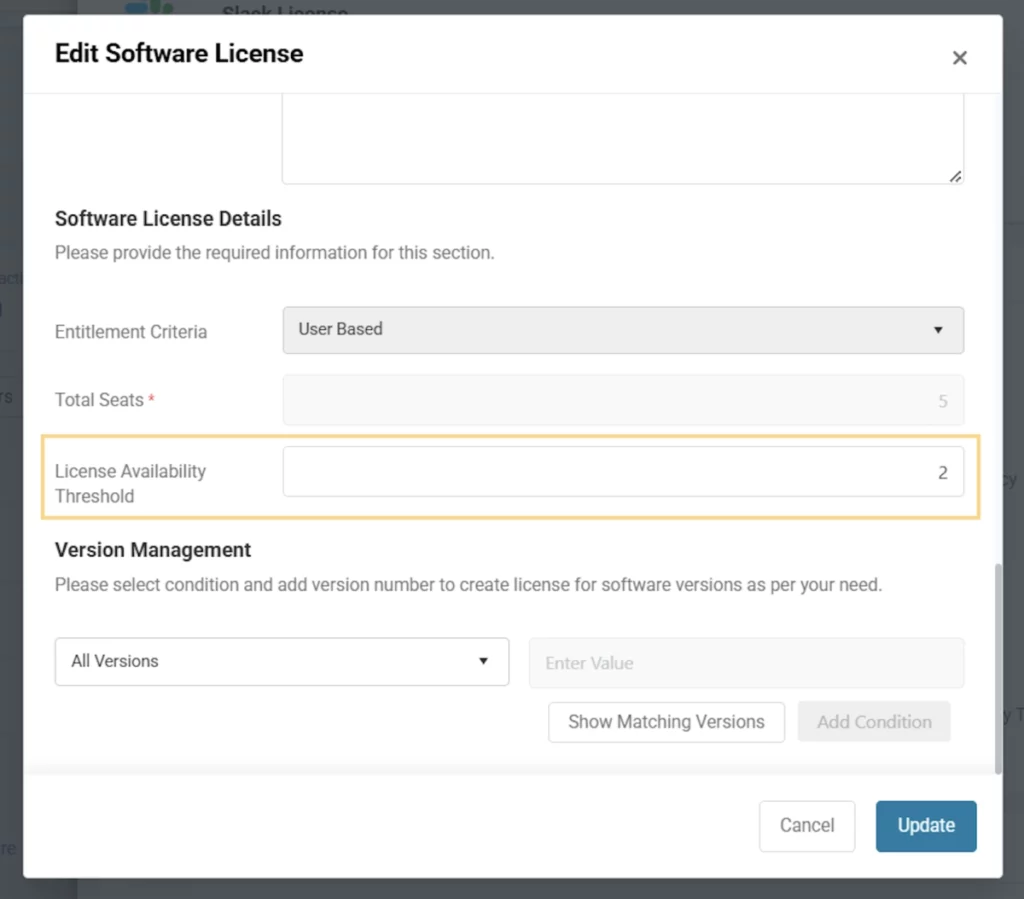
The field ‘Total Seats’ refers to the number of individual users who have access to a certain software application, for instance, Adobe Photoshop.
Note: License Availability Threshold can only be set for License types for which you can specify the number of Total Seats. These include:
- Client Access License
- Concurrent
- Volume
You can view the number of different licenses that meet this threshold by going to the ‘Notifications’ bar in the top panel.
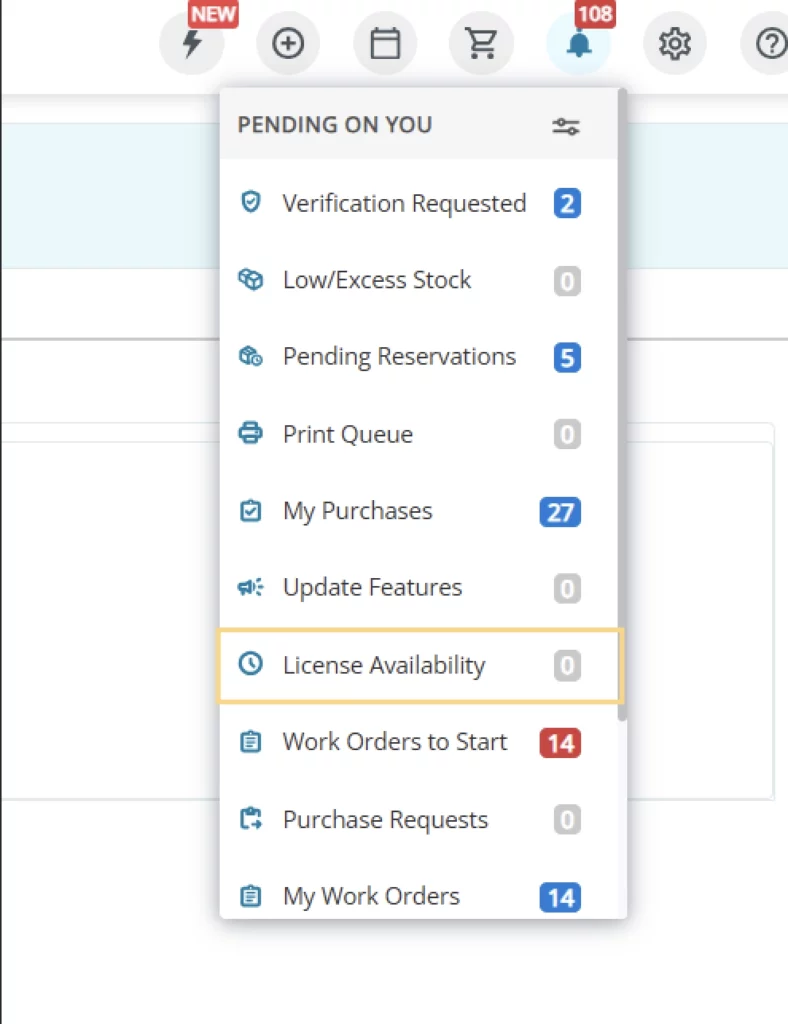
Once clicked, this tab directs you to the ‘License Availability’ page. Here you can view all such licenses that you need to purchase.

Purchase Orders for Software Licenses
Our Purchase Orders (PO) module streamlines the process of procuring Software Licenses.
As an IT Admin, you can draft Purchase Orders for acquiring additional seats of an existing Software License or new seats of software that does not currently exist in your license catalog.
The PO module enables you to track procurement details of licenses and automatically updates your license inventory when you receive licenses associated with a Purchase Order. It also maintains a log of your purchases for audit purposes.
Purchasing additional seats for an existing license
To create a Purchase Order for a Software License, go to More → Purchase Orders → Add Purchase Order, select ‘Software’ as the PO Type, type in Vendor details, and hit ‘Create’ as shown:

Now, search and add the existing Software License that you want to acquire additional seats for from the details page of the Purchase Order. We use the license for Microsoft Windows as an example below.

When you receive a Purchase Order, additional seats associated with the PO will be automatically added to the Software License. To do so, click on the ‘Receive License/Seats’ button from the PO Details page.

This pops open a dialog box where you can specify the actual number of license seats received, the amount paid, and the payment method.

Once the PO is marked Complete, the Software License gets updated for the added quantity. You can view the updated data from the Associated Software Licenses tab.

AssetSonar updates the following data fields:
- Purchase Order #
- Total cost per payment
- Total and available seats
- Cost per seat
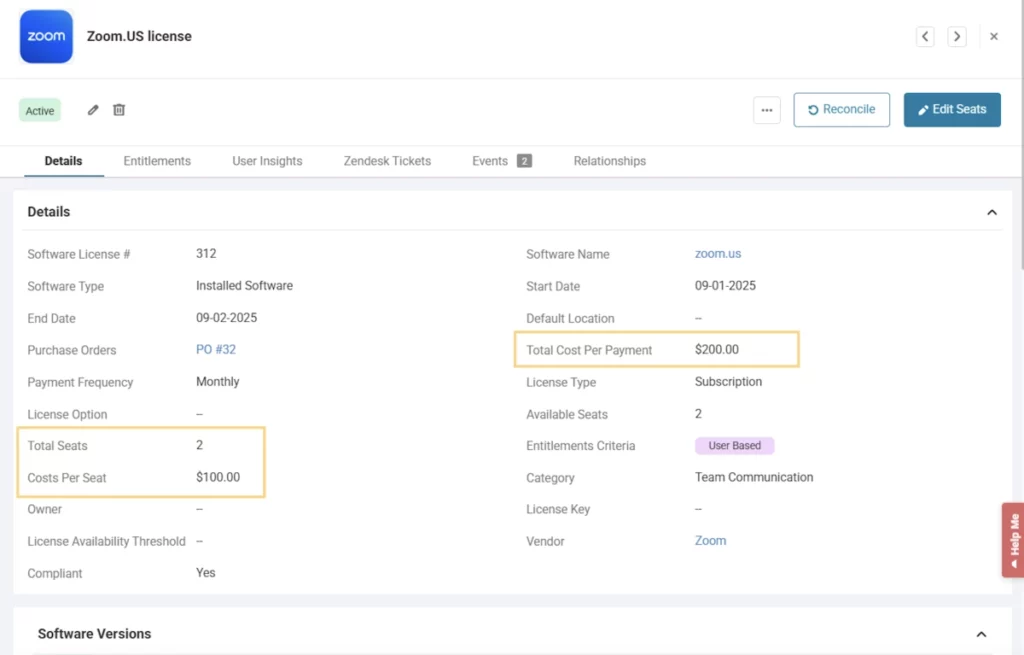
Note: The payment you make for additional seats of an existing license gets added to the payment table during the upcoming payment cycle.
You can view all the actions taken on the Purchase Order from the Events tab of the PO or the Software License.

Purchasing a new license
To create a PO for a new Software License, click on the ‘Add Software Licenses not in product catalog’ button as shown.

Enter details of the new license in the dialog box and hit ‘Create’.

Edit the number of seats you want to procure and their respective price. Then, confirm the PO and receive license seats as mentioned in above.
The new license gets created as soon as you confirm the Purchase Order.

The initial payment made to purchase the new license gets added to the payment table as illustrated.

Custom Reports for Software POs
You can also create Custom Reports for Software POs to track your overall software expenses. For this purpose, follow these steps:
Step 1: Select Purchase Orders as the primary module.
Step 2: Add columns for PO Type, Paid Amount, and other relevant data fields that you want to track.
Step 3: Apply a filter of ‘Software’ to the PO Type data field.

Now, run the report and you’ll get a detailed overview of your total software expenditures.

Technology Spend Report
Let’s say that you are an IT Admin and want to be able to identify financial software information for each user. AssetSonar allows you to generate reports with financial software information so you can optimize and regulate individual budgets and project future expense requirements.
To generate a report, go to the Reports → Member Reports and click on ‘Technology Spend per Member’.

Here you can create reports to get insights into the software cost for each user. You can apply filters as follows:

Once you have applied the relevant filters, you will be able to generate a report.

Average Cost per Entitled Software = Total Cost of Entitled Software per Member/No. of Entitlements
If your average software cost per member exceeds the amount you’ve budgeted for a member, you must take corrective measures to reduce that cost.
Conclusion
AssetSonar takes Software License Management up a notch. It helps you glean data regarding license allocation and usage. With it, you can track license purchases and warranty renewals, and get software upgrades in a timely manner.
To add to this, AssetSonar flags up instances of illegally installed software. It is your surefire weapon to help maintain license compliance across your organization and save you from the wrath of regulatory agencies.
AssetSonar is the leading software license management tool that offers comprehensive software license tracking. It enables companies to ensure license compliance, optimize software spend, and become audit-ready.


