
Installing the AssetSonar ITAM Agent gives you full visibility into hardware, software, and security risks across your organization, enabling effortless tracking and reporting from a single platform.
Whether you’re setting up a single machine or mass-deploying across your entire device fleet, this guide walks you through the steps for Windows, macOS, and Linux — covering both individual installs and enterprise-grade deployments via scripts or remote command tools.
In case you are looking to mass deploy ITAM Agent on your computer using Microsoft Intune, please refer to the dedicated blog here.
1. Before you begin
1.1. Prerequisites
- The AssetSonar Agent is an application that runs on your PC and is supported on both Unix and Windows platforms. You will also need an active assetsonar.com (subscription/trial) account. If you don’t have a subscription or trial account, register here.
- Please note that the following versions are not supported by the AssetSonar agent:
- Windows 9X
- Windows Millennium Edition or Windows NT 4
- Windows XP and 2003R2
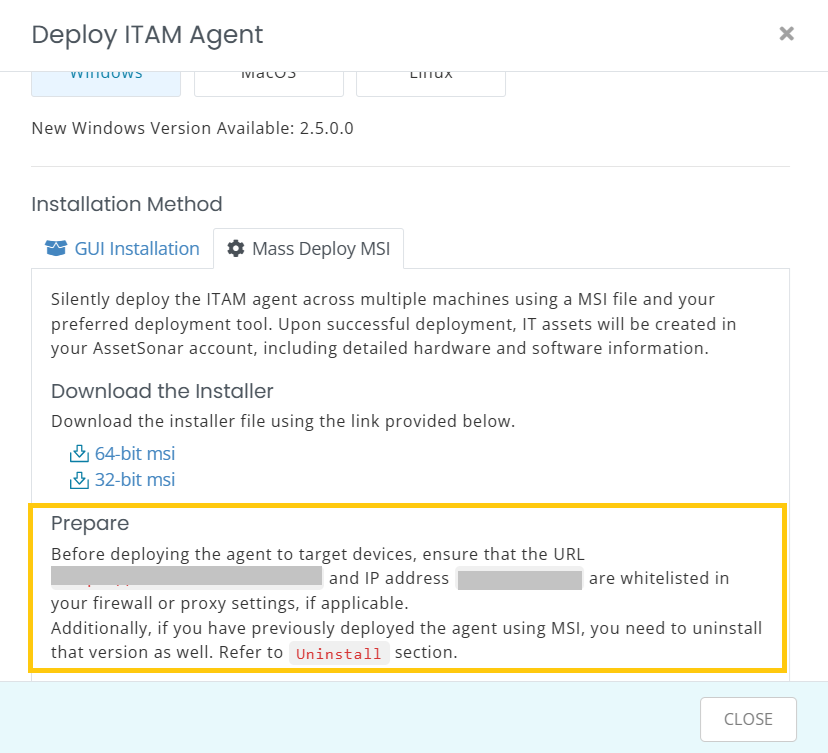
1.2 Network Whitelist
Before installing the ITAM Agent on any device, please ensure that:
- Port 443 is open.
- Your organization’s specific URL and IP—shown in the ITAM Agent Deployment modal (Dashboard → Deploy ITAM Agent)—are whitelisted in your firewall or proxy.
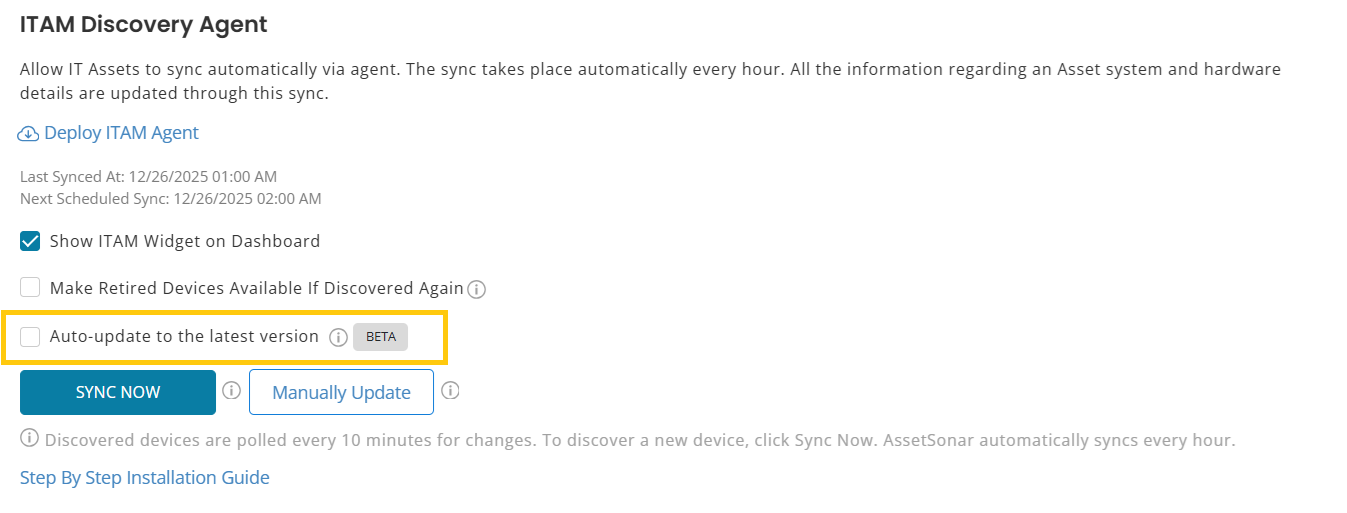
1.3 Turn On the Auto-updates
You can keep the AssetSonar ITAM Agent up to date in two ways: automatic updates or manual updates for selected assets.
Enable Auto-Updates
You can enable auto-updates for the AssetSonar ITAM Agent by selecting the Auto-update checkbox. When enabled, the agent updates itself automatically as new versions are released.
Auto-updates are supported for the following agent versions:
- Windows: 3.3.0.0 and above
- macOS / Linux: 3.0.0.0 and above
Manually Update the ITAM Agent (Selective Deployment)
If you prefer to control when updates are applied, you can manually deploy the latest agent version to specific assets.
- Go to Settings → Company Settings & Addons → ITAM Discovery Agent.
- Click Manually Update button.
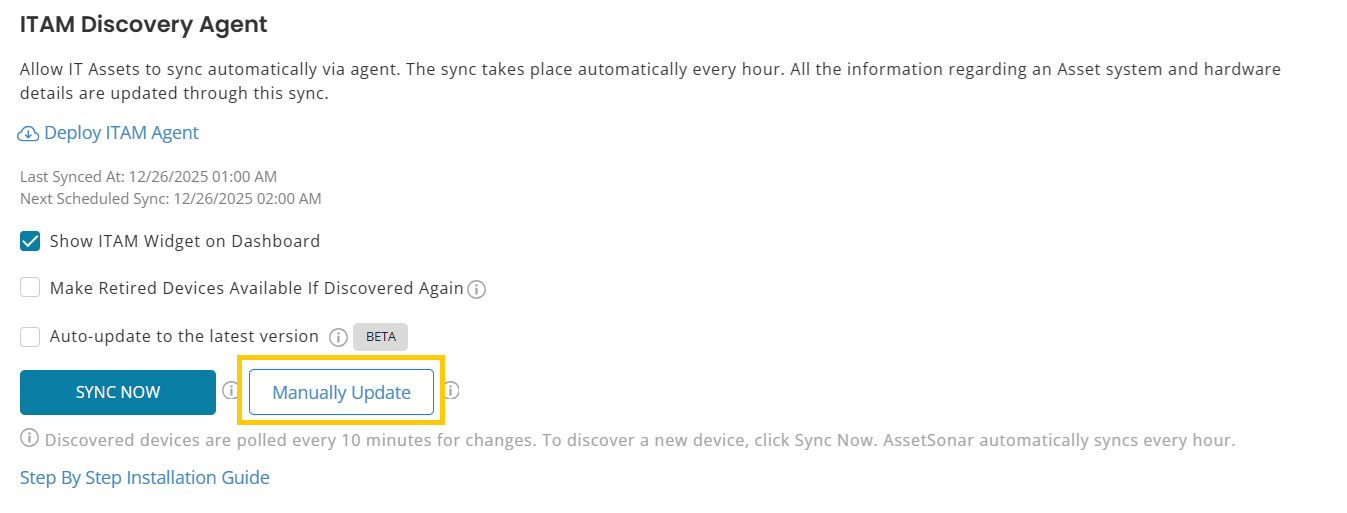
- This will open a modal showing all the relevant assets.
- You can:
- Select individual assets and click Update.
OR - Use Select All IT Assets to update all eligible assets at once and then click Update.
After selection, the latest agent version is deployed to the selected assets.

2. Windows Installation
Note: Refer to Section 1.2 Network Whitelist before running any installation.
2.1. Manual Installation (GUI)
In order to update and track the system and hardware details of all your IT assets, you can install the AssetSonar Agent onto each asset individually. Here’s how:
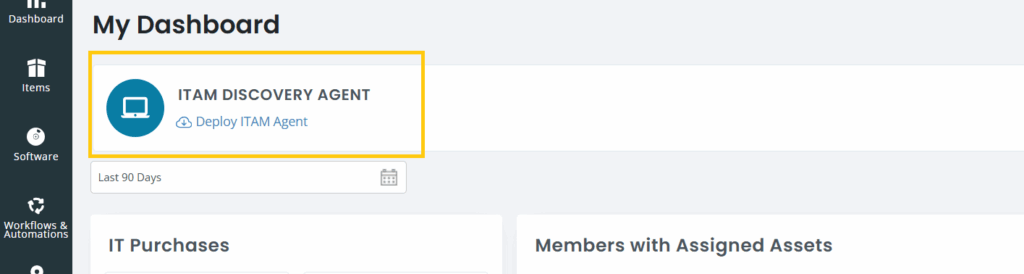
Step 1: Download the AssetSonar Agent application setup file for Windows and save it on your local computer. You can download the agent from Dashboard → Deploy ITAM Agent → Windows → GUI Installation on your AssetSonar account.

Step 2: Launch the AssetSonar Agent setup wizard from its destination on your PC.
Step 3: Follow the on-screen instructions.
Step 4: Each company with an active AssetSonar account will receive a Server URL and a unique TAG (screenshot below). Enter these into the dialogue box when prompted. These can be copied from the Deploy ITAM Agent modal or from Settings → Company Settings & Addons → Deploy ITAM Agent.
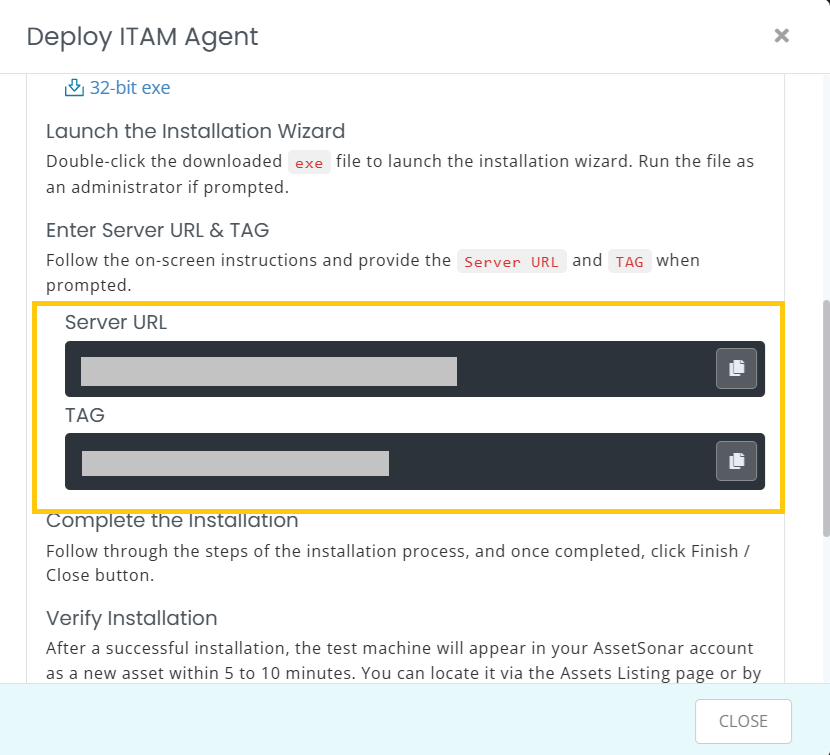
Note: The same Server URL and TAG must be used for all assets in a company.
Step 5: Once the installation is complete, your assets will start appearing in your AssetSonar account shortly. This is what you’ll see:

2.2. Manual Uninstallation (GUI)
Step 1: Go to your Windows search bar, type ‘Apps and Features’, and click ‘Open’.
Step 2: Select the AssetSonar Agent and click ‘Uninstall’.
Step 3: You will see the option to uninstall with or without the persistent files. You may select the following:
- NONE
- ONLY CONFIGURATION FILES
- All FILES
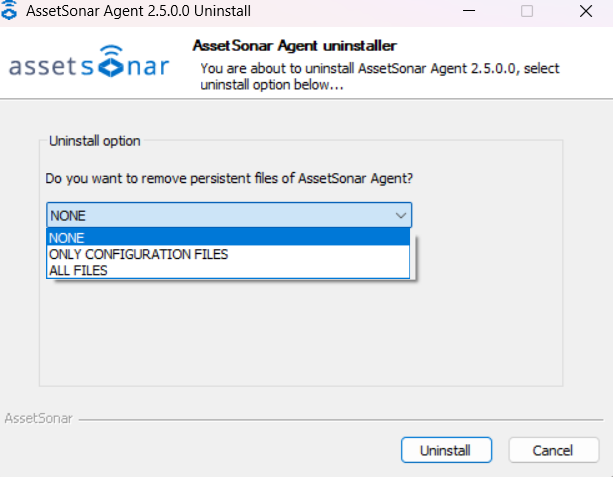
Please note: ProgramData/OCS Inventory NG will be automatically deleted if you select the ALL option when deleting the AssetSonar agent. If you wish to retain your configuration, please select NONE.
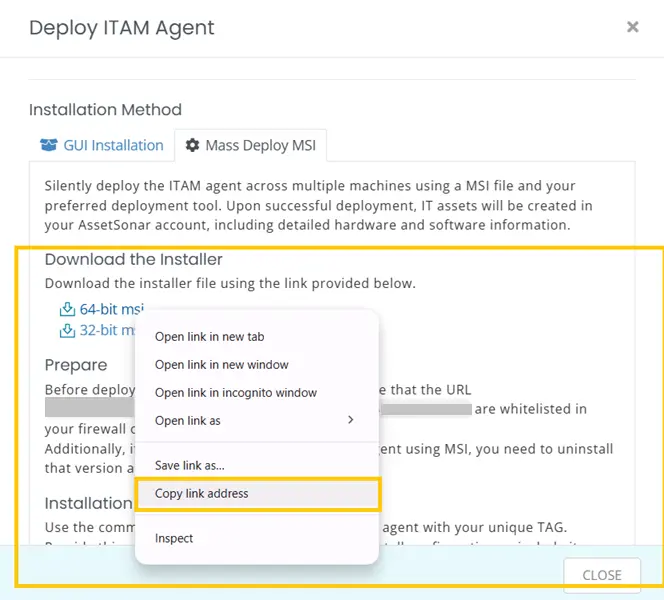
2.3. Silent Mass Deployment (MSI)
Note: In case you have an old version of MSI deployed, you will need to uninstall it first. Please refer to the uninstallation section for that.
Silently deploy the ITAM agent across multiple machines using an MSI file and your preferred deployment tool. Once installed, IT assets will be created in your AssetSonar account with detailed hardware and software information.
You can now access your company’s pre-configured MSI installers directly from your AssetSonar account—no need to request them manually.
Step 1: Go to Dashboard → Deploy ITAM Agent → Mass Deploy MSI
Or
Navigate to Settings → Company Settings & Addons → ITAM Discovery Agent → Deploy ITAM Agent → Mass Deploy MSI
Step 2: Choose your MSI version:
- 64-bit MSI
- 32-bit MSI
You may download the relevant file or copy the URL link in case your deployment tool requires a hosted build.
Step 3: Use the silent installation command from the Agent Deployment modal (as outlined below) in your deployment tool (e.g., Intune, SCCM, PDQ) or a batch/PowerShell script to silently install the agent. Please ensure the command is run with administrator privileges:

Step 4: After installation, the devices will appear in your AssetSonar account within a few minutes. This is what you’ll see:
2.4. Silent Uninstallation Command
To silently uninstall the agent (e.g., during a mass redeployment), use:
msiexec /x "{84EB0910-9437-4822-B4CA-7EEBDB7801E0}" /q2.5. Troubleshooting for Windows
If the device doesn’t appear in your AssetSonar account after installation:
- Confirm the device has an active internet connection.
- Double-check that port 443 is open and that your organization’s AssetSonar URL/IP is whitelisted as explained in Section 1.2 Network Whitelist.
- Ensure that the Server URL in C:\ProgramData\OCS Inventory NG\Agent\ocsinventory.ini is the same as mentioned on the ITAM Agent Deployment modal.
- Check the TAG value in the config file at: C:\ProgramData\OCS Inventory NG\Agent\Admininfo.conf using the following command in the command prompt:
type %programdata%OCS Inventory NG\Agent\admininfo.confIf the issue persists, email the following to support@ezo.io
- OCSInventory.log
- Admininfo.conf
- ocsinventory.ini
- Device name or serial number
The above files can be found in the following folder: C:\ProgramData\OCS Inventory NG\Agent\ We’ll help you resolve the issue from there.
3. macOS Installation
Note: Refer to Section 1.2 Network Whitelist before running any installation.
AssetSonar’s macOS agent allows you to track detailed hardware and software data for Apple devices used across your organization. You can either install the agent individually using the GUI installer or silently deploy it across multiple machines using a PKG file and a post-install script.
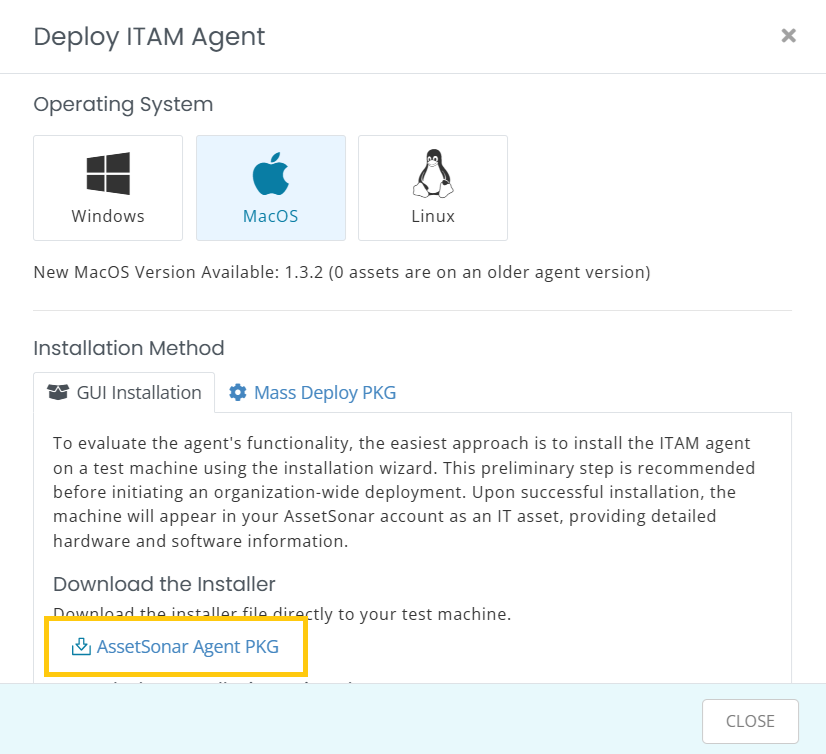
3.1. Manual Installation (GUI)
To test the agent or deploy it manually on a few devices, follow these steps:
Step 1: Go to your AssetSonar account and navigate to Dashboard → Deploy ITAM Agent → macOS and download the .pkg installer.
Step 2: Launch the Installer and follow the on-screen instructions.
Step 3: Enter your TAG from: Settings → Company Settings & Addons → ITAM Discovery Agent → Tag
Note: The same TAG must be used across all company devices.
Step 4: When you finish the setup, the device will show up in your AssetSonar account within 5-10 minutes. An example view is shown below:

Note: The Mac version currently does not support the following hardware features: Input devices, monitors, and ports.
3.2. Uninstalling AssetSonar Agent on Mac
To uninstall the AssetSonar Agent on Mac, you must carry out the following steps:
Step 1: Open the Terminal.
Step 2: Run the following command:
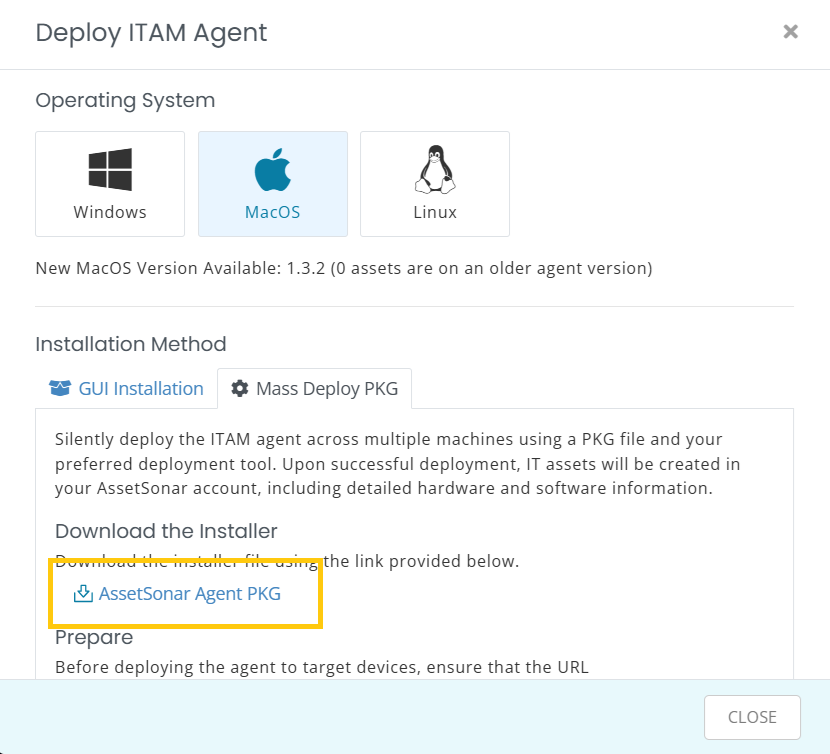
sudo /Applications/AssetSonarAgent.app/Contents/Resources/uninstaller.sh3.3. Silent Mass Deployment (PKG + Script)
To deploy the AssetSonar Agent across multiple Macs:
Step 1: Download the pre-configured .pkg installer from your AssetSonar account. Go to Dashboard → Deploy ITAM Agent → macOS
Step 2: Use the following post-installation script with your deployment tool (Jamf, Munki, Kandji, etc.):
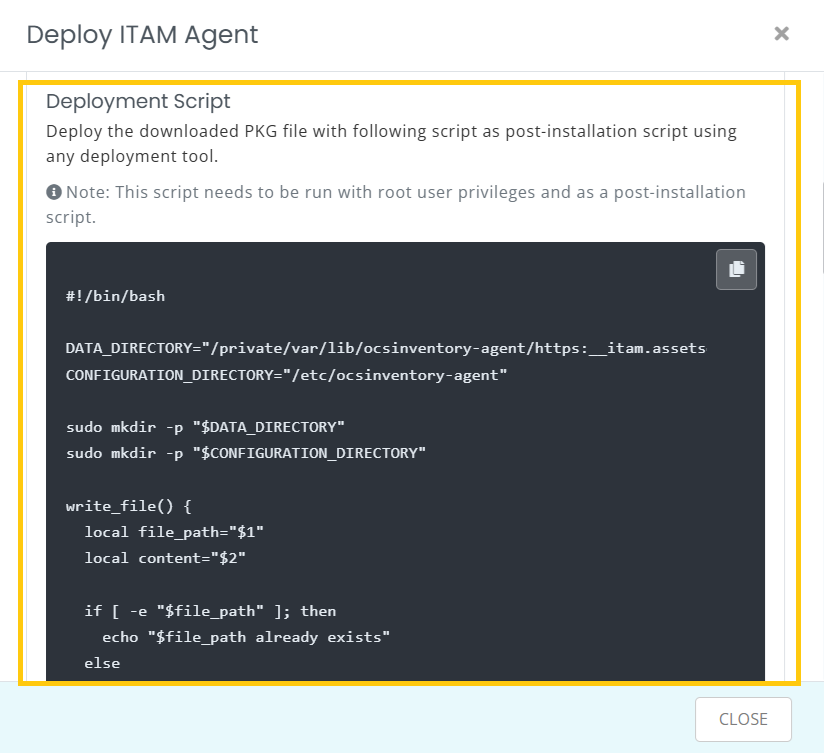
Start with one machine. Once successful, roll out to the rest of your fleet using your deployment tool of choice. Ensure the script runs with root privileges.
Note: Each time you download a new version of the agent, please copy the latest script again from the step above.
Step 3: After deployment, devices will appear in AssetSonar within minutes. This is what you’ll see:

3.4. Silent Uninstallation Command
To uninstall the AssetSonar Agent silently across multiple Mac devices, you can reuse the uninstall command provided in Section 3.2 with your deployment tool (e.g., Jamf, Munki, Kandji, or another MDM solution).
Use the following command for silent uninstallation:
sudo /Applications/AssetSonarAgent.app/Contents/Resources/uninstaller.shOnce the command is successfully executed, the AssetSonar Agent will be removed from the target devices.
3.5. MacOS Troubleshooting
If the device doesn’t appear in your AssetSonar account after installation:
- Double-check that port 443 is open and that your organization’s AssetSonar URL/IP is whitelisted as explained in Section 1.2 Network Whitelist.
- Confirm the device has an active internet connection.
- Check the log file at: /var/log/ocsng.log
- Confirm that the correct TAG was used during installation. To verify the TAG, check the config file /etc/ocsinventory-agent/ocsinventory-agent.cfg
- Reinstall the agent if the device fails to appear or the log shows critical errors.
If the issue persists, email the following to support@ezo.io:
- ocsng.log
- Config file /etc/ocsinventory-agent/ocsinventory-agent.cfg
- Device name or serial number
We’ll help you troubleshoot further from there.
4. Linux Installation
Note: Refer to Section 1.2 Network Whitelist before running any installation.
AssetSonar supports software and hardware tracking for Linux devices. Currently, Linux installation is available for Debian-based distributions (e.g., Ubuntu). Follow these steps to install the AssetSonar Agent.
4.1. Manual Installation (Terminal)
To deploy the agent on individual Linux machines:
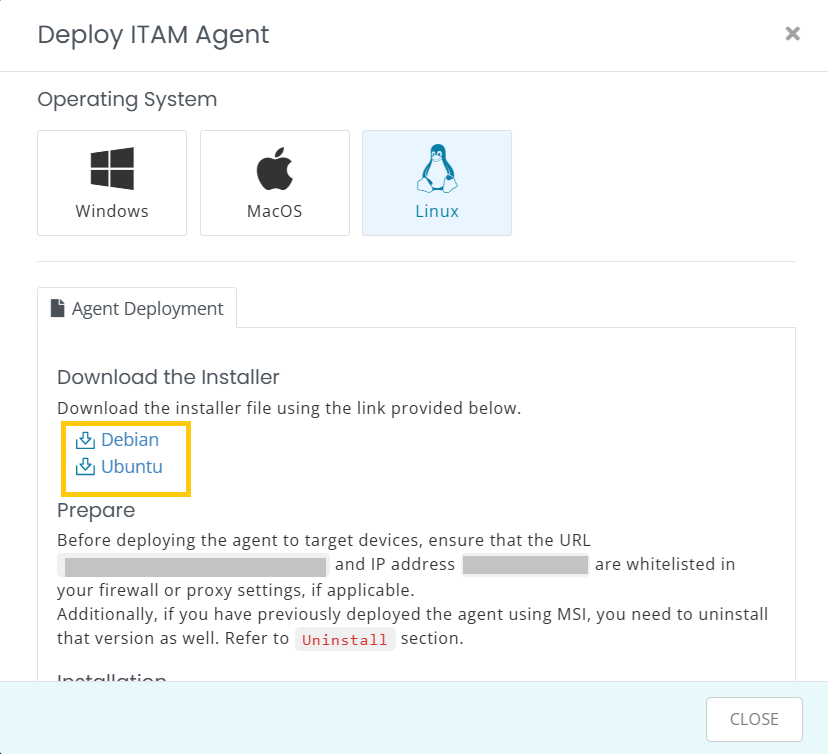
Step 1: Log in to your AssetSonar account and go to Dashboard → Deploy ITAM Agent → Linux → Agent Deployment
Download the .zip file for your distribution (Ubuntu or Debian). In case you require a build for any other distribution, you may reach out to us at supprt@ezo.io
Step 2: Unzip the downloaded file and navigate to the extracted folder:
unzip /path/to/assetsonar-agent.zip && cd /path/to/assetsonar-agent/Step 3: After unzipping the package, you should see two files inside the extracted folder:
- install.sh (the installer script)
- agent.tar.gz (the actual agent package)
Grant execution rights to the installer script:
chmod +x install.shStep 4: Now, run the installer using the following command:
sudo ./install.sh agent.tar.gz [TAG] [SERVER]Replace [TAG] and [Server] with your actual TAG and Server URL from: Settings → Company Settings & Addons → ITAM Discovery Agent → Tag
Note: Ensure that agent.tar.gz is located in the same folder as install.sh. If it’s missing or placed elsewhere, the script will not execute properly.
Step 6: If the installation is successful, the Linux asset will appear in your AssetSonar account within a few minutes. An example view is shown below:

4.2. Troubleshooting for Linux
If you are having trouble setting up your ITAM agent, email the following to support@ezo.io:
- ocs_agent.log file
- TAG used
- Device hostname or serial number
If the agent fails to connect to the server, double-check that port 443 is open and that your organization’s AssetSonar URL/IP is whitelisted as explained in Section 1.2 Network Whitelist.
4.3. Uninstallation – Linux
To uninstall the agent from your Linux machine:
Step 1: Navigate to the directory containing uninstall.sh
Step 2: Grant execution rights:
chmod +x uninstall.shStep 3: Run the script:
sudo ./uninstall.sh5. More on syncing data
Any device that has the AssetSonar Agent installed will be synced to its associated AssetSonar account. This association is created via TAG.
5.1. Sync frequency
Syncing occurs every 6 hours for Windows, every 5 hours for Linux, and every 10 minutes for macOS. Meanwhile, AssetSonar fetches inventory data every hour.
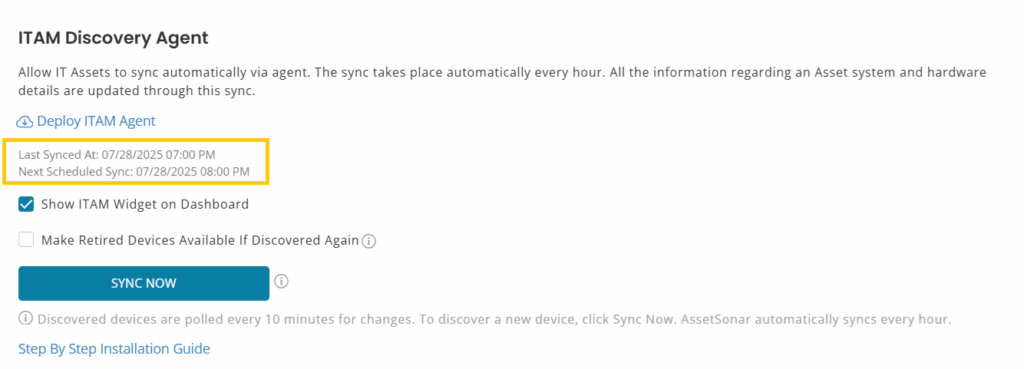
Go to Settings → Company Settings & Addons → ITAM Discovery Agent to see when the last sync took place, and when the next one is scheduled.
5.2. Email-based alerts after sync
After every sync, AssetSonar also sends email-based notifications to IT Admins in case there are changes in any of the following aspects of a device:
- Memory
- Storage (1% of total hard disk space change)
- Network
5.3. Mark retired assets active
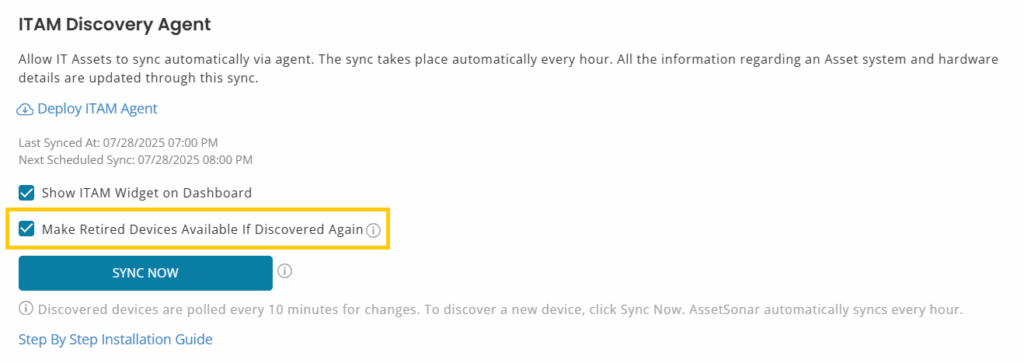
In case previously retired assets in AssetSonar are discovered again through the ITAM Discovery Agent sync, AssetSonar makes those devices available again. Check the box for the ‘Make Retired Devices Available if Discovered Again’ setting to enable this option, as shown below:
5.4. Logical delays in the sync
Once the hourly sync has run, it takes some time for the AssetSonar system to fetch updated device data.
Please contact the Support team if the delay takes longer than expected.
5.5. What happens when an IT asset misses syncing?
Admins should receive an email alert for any missed syncs. A common use case for this is IT Assets that remain inactive for two or more days. When this happens, the system sends an alert that notifies the Admin(s) and lists down IT Assets that were not synced in the past two days.
6. Additional integrations
You can also use our out-of-the-box integrations with Jamf Pro, Microsoft SCCM, and Intune to import Mac, Windows, and Android devices into your AssetSonar account.
6.1. Discovery source
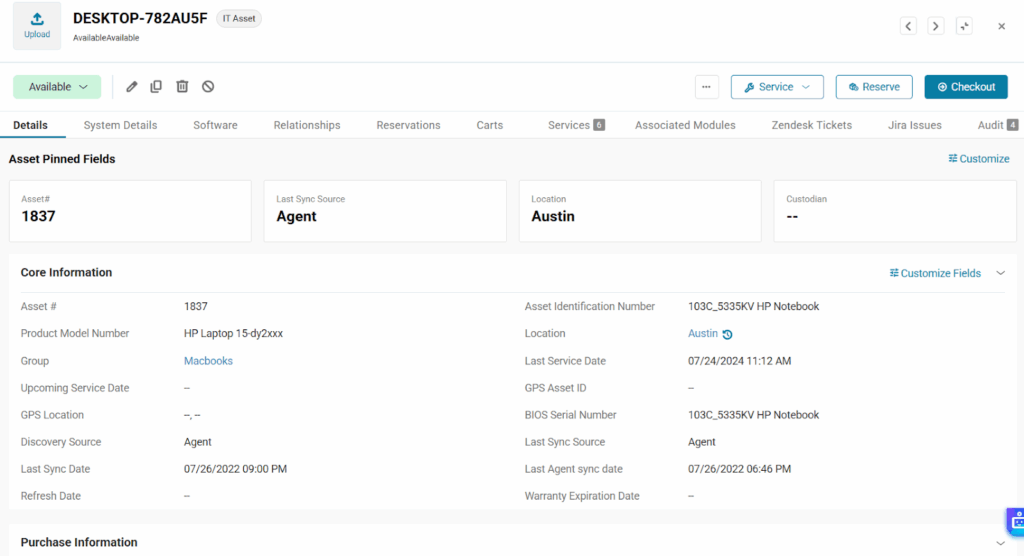
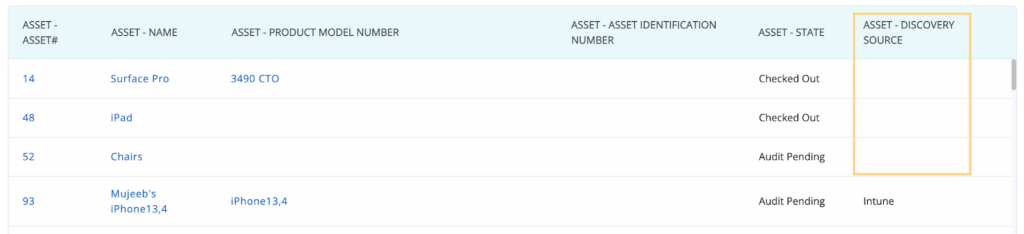
Once imported, AssetSonar shows an additional field by the name of ‘Discovery Source’ on the IT Asset Details page. For instance, in the image below, the Source of the discovered Asset is the AssetSonar Agent.
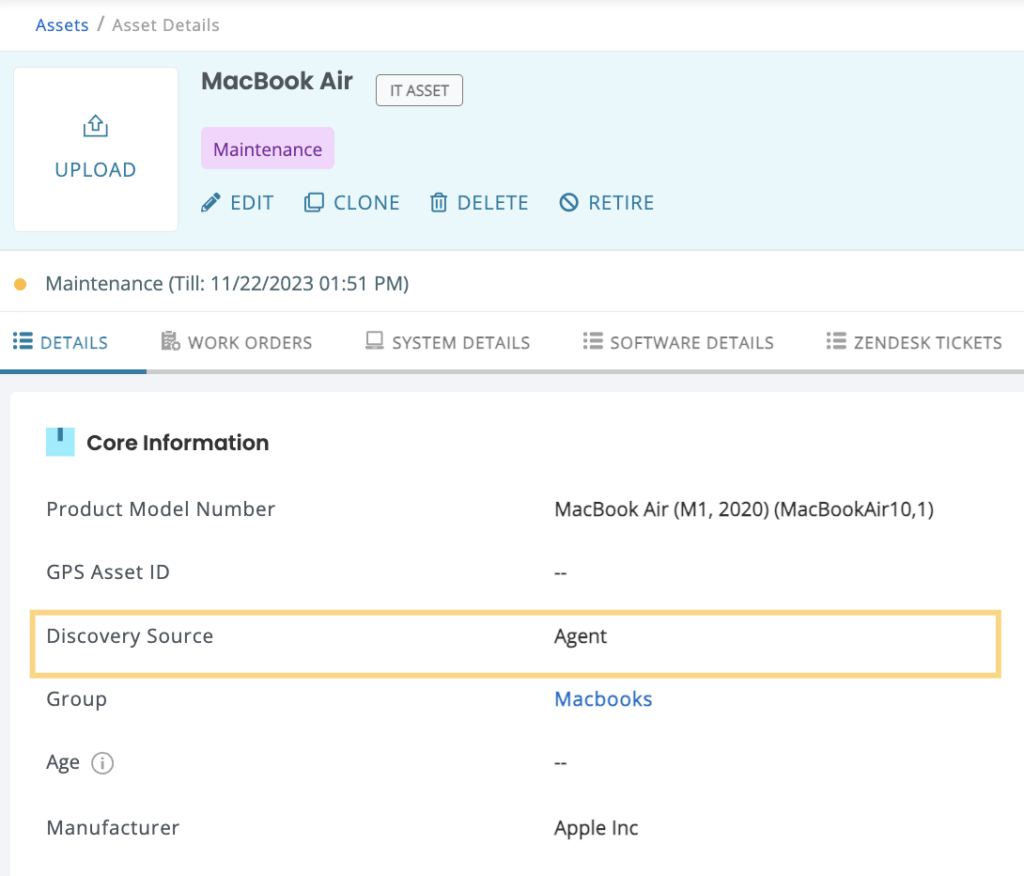
This field maps the discovered IT Asset with its discovery source. It also makes it easier for IT Admins to filter out and group IT Assets by their discovery source.
6.2. Filtering by Source
To filter IT Assets by their source, go to the Asset Listings page → Filter → Discovery Source → Select the relevant source, and apply the filter.
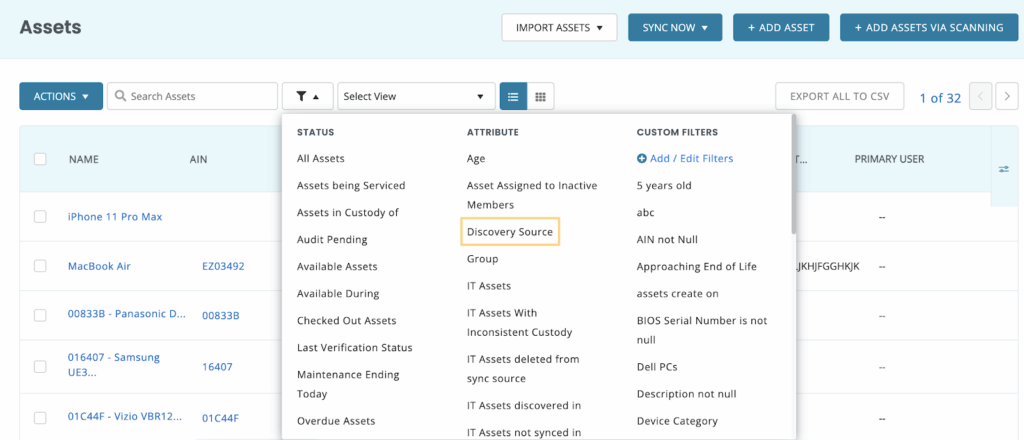
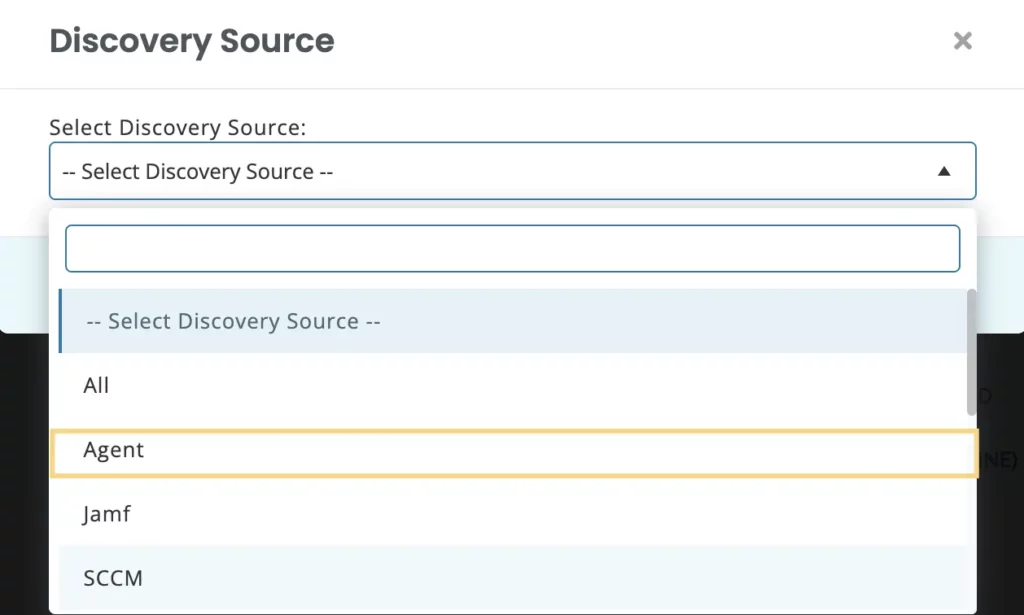
This will list all the IT Assets discovered by AssetSonar’s ITAM Agent.

6.3. Running custom reports using Source
Let’s say you want to run a maintenance service on all the Windows devices owned by your company. While some of these are available, some may be in the custody of employees. You can run a custom report to list all Windows devices by choosing ‘Asset — Source’ as a column and specifying the agent as the ‘Asset — Source’ for the filter.


The report now lists Windows devices on which you can run maintenance events.

Note: For non-IT assets, the Asset-Discovery Source column is blank, as shown below.
Note: We also support Debian-based Linux devices. To learn more about how you can install the AssetSonar Agent on Linux devices, click here.
Frequently asked questions
Can I install the AssetSonar Agent silently?
The Agent can be installed silently. The command depends on the type of installer you are using. To install the agent silently via EXE file, use the following flags: /S /NOSPLASH. On the other hand, if you are using an MSI file, refer to Section 2.3.
How often does the syncing take place?
Syncing occurs every 6 hours for Windows, every 5 hours for Linux, and every 10 minutes for macOS.
When I install the agent, how long does it take before the device starts appearing in my instance?
After successful installation or setup of the agent, your devices will appear in a few minutes.
What is the difference between AssetSonar GPO Agent and AssetSonar Agent?
The AssetSonar Agent is the core app responsible for syncing device data with your AssetSonar account. You can install it using either an EXE or an MSI file. When installed via MSI, an additional app called AssetSonar GPO Agent appears. This isn’t a separate syncing tool; it is simply a wrapper we use to support silent MSI-based deployments. It does not independently sync any data.
Why do I see version 1.0.4 for the GPO Agent when using the MSI?
This is expected. The GPO Agent is just a wrapper that installs the latest version of the actual ITAM Agent. While the MSI installer itself appears as Version 1.0.4, the agent running on your device will always be the most recent version available.
Note: The wrapper’s version number does not reflect the version of the installed ITAM Agent.
What is the OCS Inventory Agent?
The AssetSonar Agent is built using both in-house and open-source components. One of these is OCS Inventory, an open-source tool we use to scan information from the device.


