Unauthorized or high-risk software slips onto company devices and exposes you to audit, security, and cost risk. With AssetSonar, you can remotely uninstall such on-prem software from monitored Windows endpoints—without leaving the platform.
This guide shows you how to enable uninstallation, find targets, run removals in bulk or on specific devices, and track results.
Note: Uninstallation currently supports Windows devices with the EZO AssetSonar ITAM Agent installed. Actions are processed at the next agent check-in. Devices must be online and have sufficient local admin rights. Please test the uninstallation process on a single device first to ensure it works as expected and does not cause any unintended issues.
1. Enable On-Prem Software Uninstallation
Before taking action, ensure the On-Prem Software Uninstallation setting is turned on for your organization.
To enable it:
- Go to Settings → General Settings → On-prem Software Uninstallation (Beta)
- Click Enable and then Update.

2. Uninstall from Software Details Page
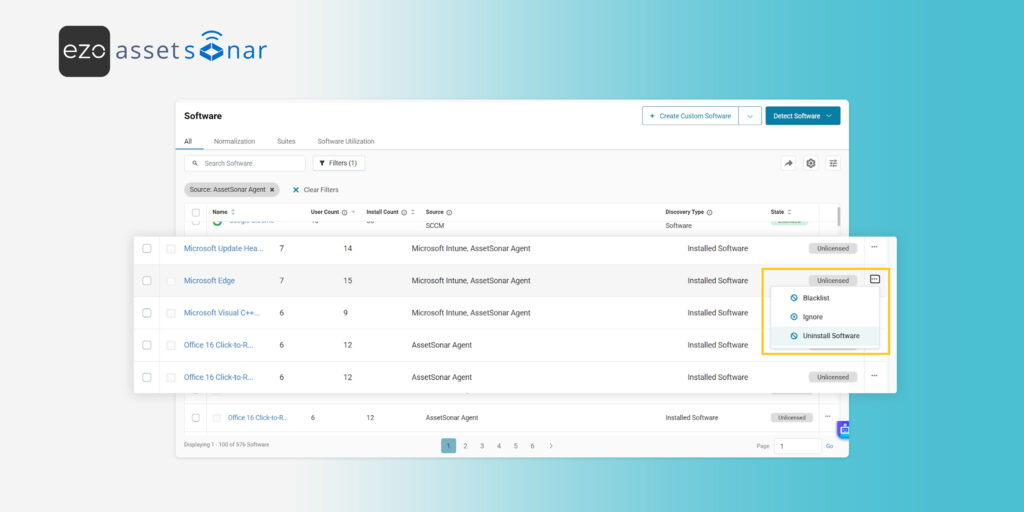
- Go to Software (Navigation Menu) → Software. On the listing page, for the on-prem software detected by the AssetSonar Agent, you will see an option to uninstall it, as displayed below:

- Click Uninstall Software to see a list of all the devices on which the software is installed.
- You may search and select some of the devices or click on Select All.
- You will also see the option to uninstall the software on future detected Assets.

- Then click Confirm to proceed with the uninstallation.
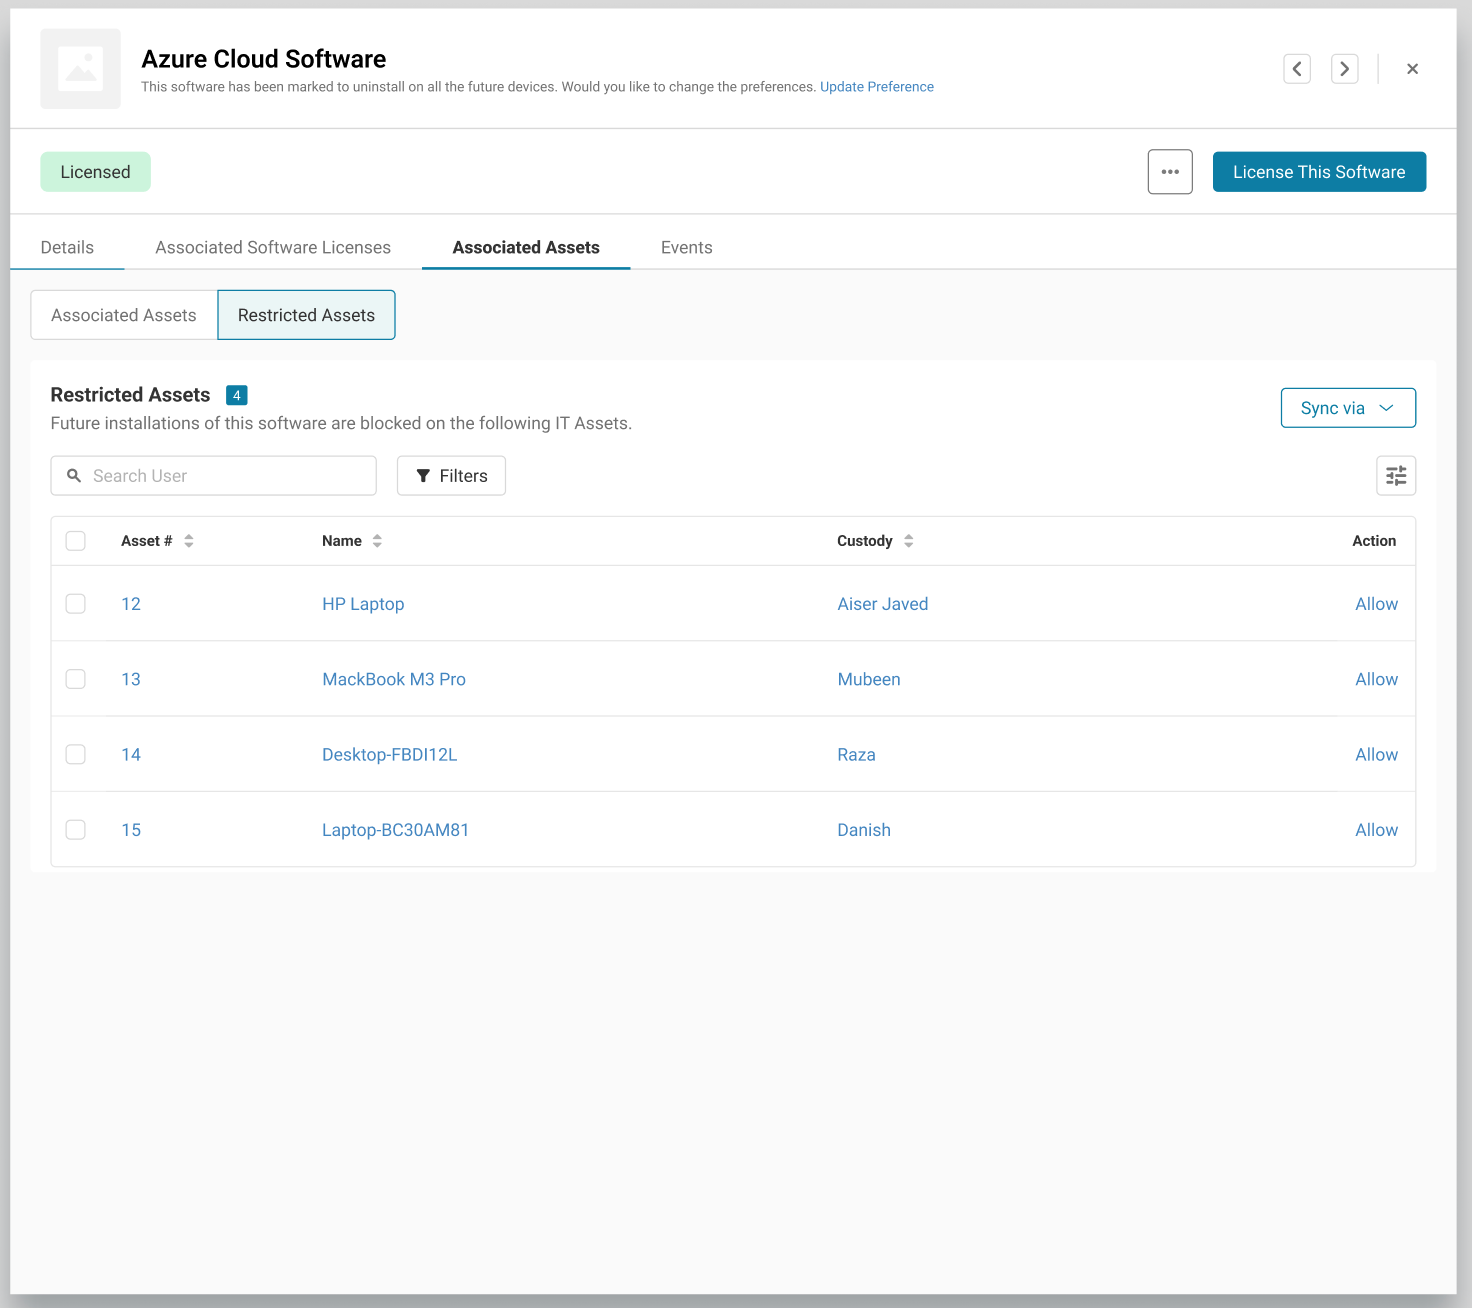
All assets where future installations are blocked will appear under a new Restricted Assets sub-tab within the Associated Assets tab of the software detail page. Each asset listed here includes an Allow action that lets you lift the restriction after confirmation.

Note: By default, AssetSonar uses the silent argument /s. You may change the silent argument, however, do so only if you know the correct vendor-specific arguments — incorrect arguments may cause failures.

Please note that if the application is running when you uninstall it, the user may view a confirmation popup before the app is uninstalled. Additionally, if the silent argument is incorrect, the uninstallation may show a visible prompt to the users.
2.1. Uninstall Normalized Software
You can also uninstall normalized software that includes on-prem components. When uninstalling such software, all applicable on-prem components are removed from the selected assets while following the same workflow as above. Learn more about AssetSonar’s normalization feature here.
2.2 Uninstall Software from Associated Assets
You may also view and uninstall the software on specific assets by opening the details page of the software and clicking on the Associated Assets tab to view all the assets on which the specific software is installed and uninstall any of them.
2.3. View Restriction Status
You can view the current On-Prem Access Restriction status for each software under the software details page:
Unrestricted – The software has never been uninstalled.
Partially Restricted – The software was uninstalled on selected assets.
Completely Restricted – The software was uninstalled on all associated assets.
If the “Restrict future installation” option was not selected and a new installation is later detected, the status will automatically revert to Partially Restricted.

Enforce Software Compliance with Confidence
3. Uninstall from the Asset Details Page
- Go to Items → Assets → [Asset Name] → Software → Discovered Software
- Against the software list, click the Uninstall icon for the specific app you want to remove.
4. Track Uninstall Status
After triggering uninstalls, you can track progress using the Events tab across both the modules: Software and Asset.
- Queued: Command sent, awaiting device response.
- Success: Software was uninstalled.
- Failure: Uninstall attempt failed (e.g., due to permission issues).
Note: Uninstall actions currently sync every 60 minutes. We’re working to shorten this interval so uninstall responses appear faster.
Uninstallation reports are also emailed to the admins at the Time for Alerts (from Company Settings → Alerts & Emails) containing progress breakdown of the uninstalled software.
5. Receive Alerts for Software Reinstallation and Uninstallation Reports
EZO AssetSonar will notify you when previously uninstalled software is detected again. Enabled by default, this option alerts admins when software previously uninstalled reappears on assets.
Each rediscovery report lists Software Name, Asset Name, Custodian, and whether the reinstall is Queued for Automatic Uninstallation.
Admins can choose to act directly from the email by selecting Uninstall Now where applicable.
This option is enabled by default but you can disable it by going to More → Alerts & Emails → Software.
6. Custom Report Fields for Uninstall Analysis
New fields have been added to the Custom Reports module to track on-prem access restrictions and whether or not the future installation of the software is blocked through the following fields:
- Software – On-prem Access Restriction
- Software – On-prem Future Installations Block
Ready to Take Control of Unauthorized Software?
With AssetSonar’s On-Prem Software Uninstallation feature, you can remove high-risk or unused applications at scale — helping you stay compliant and reduce security risks across your IT landscape.
Need help enabling it? Reach out to us at support@ezo.io — we’re happy to assist.


