


Using the EZRentOut mobile app, you can scan QR Codes and Barcodes for efficient item tracking and order management. With EZRentOut’s scanning capabilities, you can:
- Scan items using a Camera Scanner or a Handheld Bluetooth Scanner
- Scan items to add them to Drafted Orders
- Verify items in Orders
- Scan Locations, Bundles, and even Users to retrieve information and perform actions
Note: Learn more about Recommendations and Best Practices for Barcodes and QR Codes in EZRentOut.
Let’s help you understand the above functionalities in detail.
1. Scanning items
You can scan individual items from the EZRentOut mobile app. Press the menu icon on the bottom right and click Scan Center → Items.

Scan an item’s associated QR Code or Barcode and the system will pull up details of this item:

If you click on the Item name, you will be taken to the Item Details Page. Here, you can edit the item, add it to an order, print its label, and take other actions listed in the dropdown menu under the three dots.

2. Adding items to an order
One of the best parts of scanning with the EZRentOut mobile app is being able to add items to an order quickly! There are two ways to go about it:
- Simply scan an item —> select it —> go to the Item Details Page and click “Add to Order.”
- Click the “+” sign on the dashboard of your mobile and select “Order.”

Once you have created the order, select “Items” and click “Add Items.” You will be taken to the following screen, where you can click on the scanning icons to add items via scan using a handheld scanner or a mobile camera.

Scan the items and click “Select.”

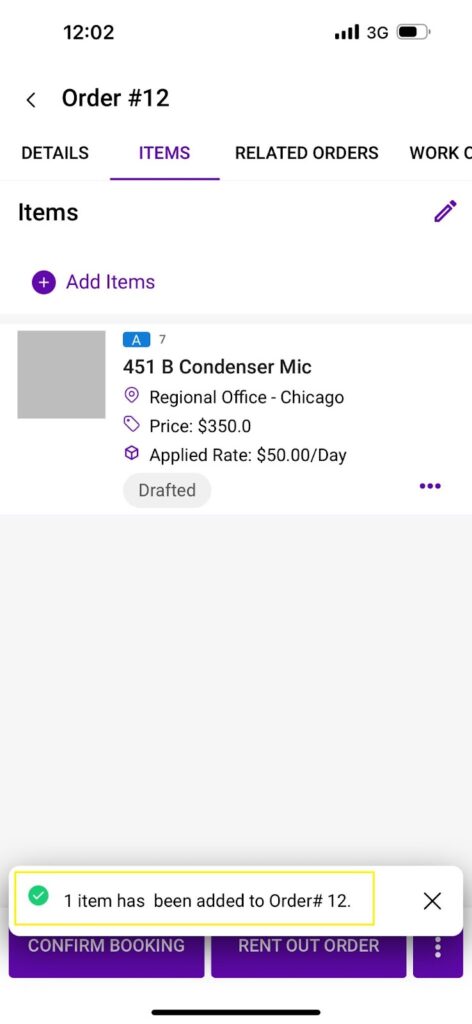
The items will be added to the list and you can select “Add to Order” to add them.

The item will be added to your order and the following prompt will appear notifying that the selected item(s) have been added to the order.
3. Order verification
You can also verify the items in your order by scanning them. Item verification helps ensure that the item is in good shape before it’s checked out to the client.
To verify items, go to your selected Order —> Select Items —> Click on the three dots or vertical ellipses on the bottom right and choose “Verify by scanning.”

Scan the item and click “Verify.”

Once you are done verifying, you will get the following prompt notifying you that the item has been scanned.

Note: Make sure the setting, “Item verification for Order” is enabled from your company settings for you to be able to verify items.
4. Scanning bundles
You can also scan bundles using the EZRentOut mobile app. Go to the scan center and select “Bundles” from the navigation bar. Each bundle has a unique print label pre-built in the app. Fetch that code or the one you assign to your bundles and scan it with the mobile app. Click “Add to Order” to add the bundle to any order.

5. Scanning locations
You can also scan a location’s QR Code or Barcode to activate or deactivate it. Click on “Locations” from the top navigation bar, scan the location code, and select the action you want to perform on the location.

6. Scanning by role
The following table lists the scans Administrators and Staff Users can perform.
| Items | Bundles | Locations | Users | Verify by scan | Add Items to Order via scanning | |
| Administrator | ✓ | ✓ | ✓ | ✓ | ✓ | ✓ |
| Staff User | ✓ | ✓ | ✓ | ✕ | ✓ | ✓ |
That’s it! You are all set to use the scanning feature in EZRentOut, our rental asset management software, and make the most out of it.

![[How-to] Get Started with the New EZRentOut Mobile App](https://cdn.ezo.io/wp-content/uploads/2020/04/06105946/How-to-Get-Started-with-the-New-EZRentOut-Mobile-App-e1775473186887.png)
![[How-To] Use EZRentOut Offline Mobile App](https://cdn.ezo.io/wp-content/uploads/2024/11/22115902/EZR-app-blog.jpg)
![[How-to] Leverage Hardware Integrations for EZRentOut](https://cdn.ezo.io/wp-content/uploads/2019/01/What-are-Recommended-Hardware-Integrations-for-EZRentOut.png)


