

EZRentOut caters to companies of all sizes, from small businesses to big retail houses. As these businesses grow, customers, employees, and departments increase as well. There is a need to enforce group-based access control to better manage asset visibility and utilization within the organization. There are two ways to achieve this:
- Have separate accounts: Create separate accounts when each department and its employees are independent, or when you have multiple stores and their customers have different buying habits. For every account, you can have different policy settings and run independent reports. This works well when there is no sharing of items or employees across departments, or regions when retail companies are involved.
- Utilize Multi-store Listings feature: This feature enables companies to manage departments, multiple stores, and divisions from a single EZRentOut account. Keeping a single account enables aggregate reporting and consistent settings across all departments and stores.
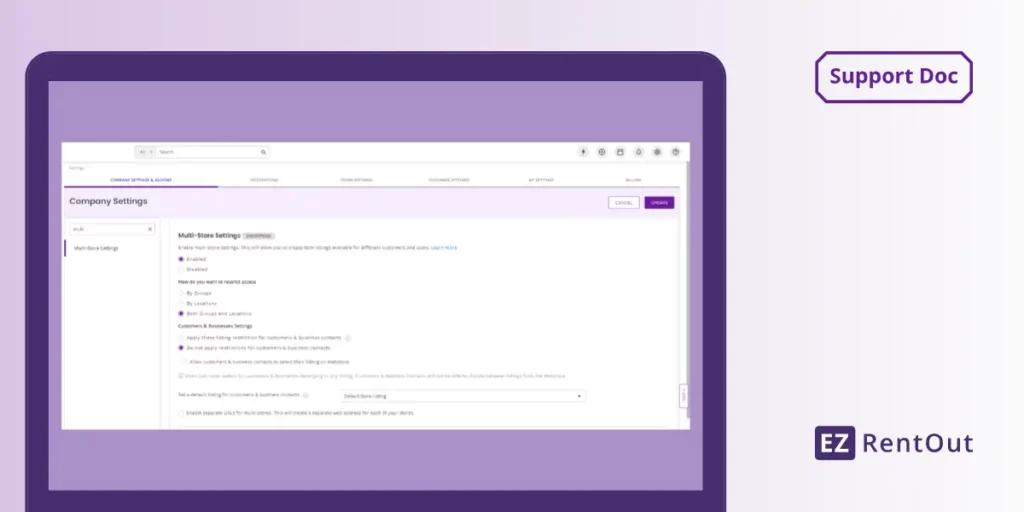
If you’re interested in utilizing this feature, go to Settings → Company Settings → Policy → Multi-store Settings. Now, enable Multi-store and save!

This feature will allow you to create item listings available for different Customers and users.
You will see that there are three ways to restrict access to users:
- by Groups
- by Locations

However, we’ll discuss Customer Settings later in this blog.
Within the same blog, we’ll also take you through the process of setting up store settings for different Multi-Store listings if you have enabled the Webstore in Settings → Store Settings.
1.1. Restricting access to Items by Group
This will allow members of certain user listings to only view items in groups they have access. Let’s say you have three departments at your company; IT Support, Accounts, and Operations or store outlets in three different countries. Each department or store outlet works independently, however, there is limited sharing of assets across the departments or store outlets.
To start off, you need to create a User Listing from More → Multi-store Listings → Add Multi-store Listing. A Default User Listing already exists and contains all item groups. Employees associated with the Default User Listing can, therefore, see all items.

Note: At present, there are no members in any user listing, therefore no Staff User or Admin can see any items.
You now need to create a User Listing to enable employees of different departments or store outlets to access relevant items. Let’s start by creating a User Listing named ‘Australia Outlet’ for employees in this country. Click on ‘Add New Multi-Store Listing’. Assign Asset Groups to this User Listing. Once done, hit ‘Done’.

Once you have created the User Listing for Australia Outlet, add employees in this store outlet using the ‘Add or Remove Users’ button.

A dialogue box will appear. Here, you can select multiple users to add or remove from this user listing. Hit ‘Change User Listing’ when you’re done.

After adding employees and groups, this is how the Australia Outlet User Listing looks.

In this example, Abed, Annie, and Britta can only see assets and inventory items in In-Store Equipment and Packaging groups. They do not have access to items in other groups.
From the Settings tab, you can also enable Staff Users in this user listing to schedule service and start maintenance on items (associated with the Groups added) in this user listing.

If a user is a supervisor for Australia Outlet User Listing. This means they are an Administrator but only for the users and groups in their User Listing. Within the Australia Outlet User Listing; they can run reports, add Assets, print labels, and add or remove employees.
In the same way, you can add user listings for your Accounts and Operations department, if adding a store outlet isn’t your target.
As an Administrator, you can edit a member to change their role and/or User Listing. With Multi-Store Listings enabled, you can choose either of the following roles: Administrator, Supervisor or Staff User.

To summarize:
- A new User Listing needs to be created for each access control group
- Users can belong to at most a single User Listing. If a user from a previous user listing, say ABC, is added to another one called XYZ. This action will remove that user from the ABC user listing automatically.
- Any number of asset groups can belong to a User Listing i.e. items can be shared across departments.
- Staff Users have visibility to only those items that belong to one of the groups in their User Listing.
- Supervisors are like Admins but only for their own User Listing. They do not have access to items and members outside their User Listing.
- Administrators are not associated with any User Listing and have full access to all items and users.
- Users not associated with any User Listing only see Assets checked out to them.
- Default User Listing contains all Groups.
- A user cannot be associated with multiple user listings at a time.
1.2. Restricting Access by Location
You can restrict access by locations instead of groups when setting up User Listings. Make sure to have this setting checked from Settings → Company Settings → Policy → Multi-Store Settings → How do you want to restrict access to items → By Locations. Hit ‘Update’.

You now need to create a new Multi-Store Listing if you haven’t already or assign locations to existing Multi-Store Listings. Now that you’ve chosen ‘By Location’, you must choose at least one location to view items.
Let’s say we want to assign locations to our existing Multi-Store Listing ‘Australia Outlet’. Go to More → Multi-Store Listings and select the Multi-Store Listing ‘Australia Outlet’. Once you’ve selected the Multi-Store Listing, go to the ‘Locations’ tab and click on ‘Add or Remove Locations’.

Here, you can add/remove locations. Based on the selected location, users added to this Multi-Store Listing will only view items associated with the selected locations.

After adding your locations, this is what your Australia Outlet Multi-Store Listing should look like:

In the above example, all users in the Multi-Store listing ‘Australia Outlet’ can access items in the locations Darwin Retail Store and Darwin Warehouse.
1.3. Restricting access by groups and locations
In case you have multiple offices or outlets in different locations, you may want the users or even your customers (if you have configured the Customer settings) to access relevant items (associated with groups) at their location only. For example, you want people in the Darwin retail store to only have access to items grouped as ‘In-store Equipment’ in Darwin.
To enable restrictions by groups and location make sure to check the settings: Settings → Company Settings → Policy → Multi-Store Settings → How do you want to restrict access to Items → Both Groups and Locations. Hit ‘Update’.

After enabling the settings, you can update the groups and locations set for your Multi-Store listings by going to More → Multi-Store Listings.

In the above example, the 3 users in the Multi-Store Listing ‘Australia Outlet’ can see everything that is in the 2 groups selected AND at the locations selected. For example; a group of Cameras has some items in NY and the rest at Darwin. The ‘NY Folks’ will only see the Cameras in NY. The camera group must be in the Groups tab on the ‘NY Folks’ User Listing.
The Add/Remove button to update users, groups, or locations has been enhanced. You can now select multiple groups in one go by using the Ctrl+Click keys on your keyboard. To select a range of groups, click on the first one and then Shift+Click on another to select all groups in between. The same is true for users and locations.
Changing Title of Multi-Store Listings: The label of a Multi-Store Listing can be changed when you click the ‘Edit’ button. This label/title will also appear on the Webstore (if enabled). For example, you can define names based on regions or departments.

1.4. Managing Customers based on Multistore Listings
You can choose to either not apply the Multi-Store listings restrictions for customers added to your EZRentOut account or apply these listing restrictions for your customers as well as you have done for your users.
1.4.1. Apply Listing Restriction for Customers
When enabled in Settings → Company Settings → Multi-Store Settings → Customer Settings, users in your EZRentOut account can only make orders for customers within their own Multi-Store Listing. At the same time, customers are restricted to their assigned listing and can only access items belonging to it.
Here, you can also define which Multi-Store Listing you want to apply for all customers as a default listing e.g. Australia Outlet or New York Outlet. However, the default listing selected here will be used for customers who:
a) Have no listing assigned
b) Have self-signed up
c) Are viewing WebStore as guests without logging in.

Please note, the setting where you restrict access to items (by group, by location, both groups, and locations) applies for both i.e. users and customers.
Once you apply listing restrictions for Customers, a Customer tab will appear in every Multi-Store Listing.

Here, you can add or remove customers to this listing and restrict the added customers to only access items belonging to their assigned listing.

After adding Customers, this is how the Australia Outlet Multi-Store Listing looks (by group).

You can also change the default Multi-Store listing to Customers from the Customer Details page. Useful when you want to restrict specific customers to certain listings only. Remember, that the default listing you choose in the Multi-Store Listing applies to all customers in your EZRentOut account till you assign them another listing.
1.4.2. Do not apply restrictions for customers
On enabling this, users can make orders for customers belonging to any Multi-Store Listing, regardless of which items can be accessed by the customers. Under the same setting, you can enable your customers to choose between multiple listings on the Webstore by checking ‘Allow customers to select their listing on the Webstore’. If this option isn’t checked, you restrict your customers to viewing the Multi-Store listing that’s assigned by the admins to them only.
Before going into choosing between multiple listings on the Webstore, below we’ll explain how you can configure store settings based on different Multi-Store Listings.
1.5. Store Settings for Different Multi-Store Listings
In the scenario where you have enabled a Webstore, the Store Settings page will work as per the default Multi-Store listing. To change the Store Settings for a specific Multi-Store Listing, go to More → Users → Multi-Store Listings → Choose a listing. Learn more about setting up a Webstore in EZRentOut.
Note: If you haven’t enabled Webstore in Settings → Store Settings, you can still make use of Multi-Store listings as explained at the start of this blog.
1.6. Configuring Store Settings for Specific Multi-Store Listings
To do this, go to the Multi-Store listing page and choose a listing you want a Webstore configured. For every Multi-Store listing, you can edit its Store Setting. What you will configure in these store settings will reflect on the Webstore viewable by customers. It’s similar to what you do when setting up a Webstore. What’s the difference?
- You can choose to restrict one store for a specific region or set of customers.
- You can enable customers to choose between multiple listings on the Webstore.
- You can change the view of one store based on demand in the US and another store based on demand in Australia.
With Multi-Store Listing and Webstore enabled you’ll see a Store Setting tab here.

On this tab, you can make changes to a Multi-Store listing that will appear on the Webstore, say, Australia Outlet Webstore. Based on these store settings in addition to the Multi-Store settings, Australia Outlet Webstore will reflect the changes you make here.
You can edit all the settings for this specific Webstore, except a few that will remain the same as configured in your default Webstore Settings. They are:
- SAML Settings
- Default Payment Gateway
- Google Analytics/Tag Manager
- Custom Domain Settings
Coming back to allowing your customers to choose between different listings on the Webstore in Multi-Store Settings. If the setting is enabled, customers can choose between different listings on the Webstore (including the guest customers).
1.6.1. Where can customers change the Multi-Store listing?

At the bottom left of the Webstore (see image). A dialogue box will appear where customers can choose a listing.
Warning: Changing a Multi-Store listing on the Webstore will empty your current cart which cannot be undone.
1.6.2. Changing the Title of Multi-Store Listings on the Webstore
The label of a Multi-Store Listing can be changed when you click the ‘Edit’ button. This label/title will also appear on the Webstore (if enabled). For example, you can define names based on regions or departments.

We’re EZRentOut, the online rental software used to manage customers, orders, and payments from one centralized location.
For more assistance, drop us an email at support@ezo.io.


