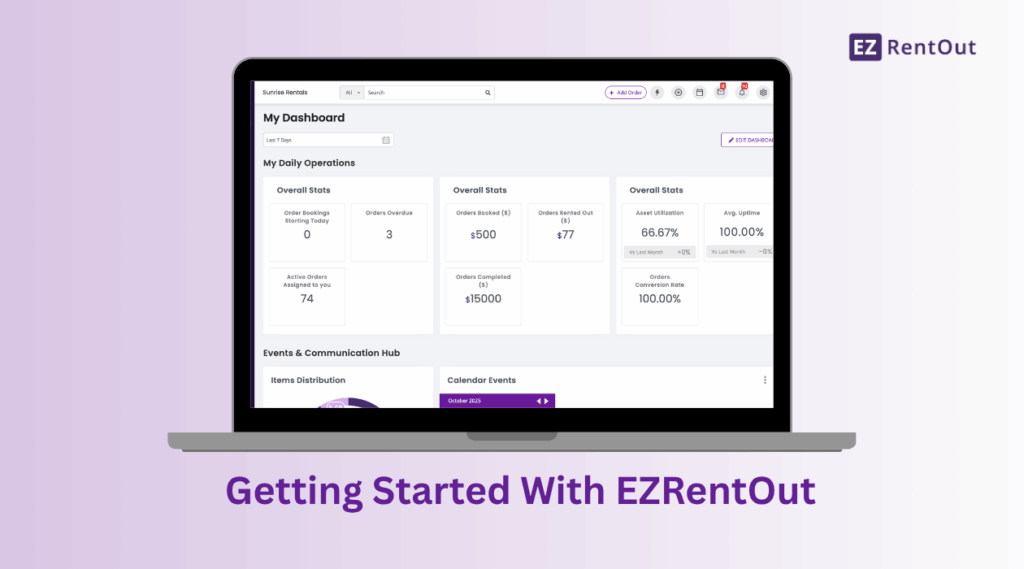
EZRentOut is a comprehensive rental management software solution for equipment rental businesses. It helps you manage rental orders and online bookings, track equipment and inventory, monitor availability, manage customers, handle payments, and keep your rental operations organized across multiple locations.
Whether you run a small or mid-sized rental business or manage a growing fleet across multiple job sites, EZRentOut gives you the tools to manage your rental operations from one place. You can also use the EZRentOut mobile app to manage equipment, orders, customers, and other rental activities while working in the field.
Core Rental Workflows in EZRentOut
EZRentOut connects the main workflows involved in running an equipment rental business, from managing equipment and customers to creating Orders, scheduling maintenance, collecting payments, and tracking rental performance.
1. Orders and Workflow Management
- Order management: Create and manage rental orders, convert quotes into orders, track order status, and manage the rental lifecycle from booking through return.
- Equipment availability: Check equipment availability and manage bookings to help prevent scheduling conflicts and double-booking.
- User management and dashboard: Add users, assign roles and permissions, and get visibility into rental operations through the dashboard.
- Tailored workflows and automations: Automate repetitive tasks, set up custom triggers, and configure workflows to match your rental processes.
- Mobile scanning: Use barcode and QR code scanning to quickly check items in and out and update equipment information from the field.
2. Customer Management
- Customer records: Maintain customer and business records, view rental history, and keep customer information organized in one place.
- Customer communication: Manage customer-related information, send emails, and keep track of rental activity and orders.
- Pricing and promotions: Set rental pricing, offer discounts, and configure pricing options based on your business requirements.
- Rental Webstore: Give customers a way to browse your catalog, check item availability, place rental orders, and make payments online.
3. Asset and Rental Equipment Management
- Asset lifecycle management: Track rental equipment throughout its lifecycle, including its current status, location, maintenance, and service history.
- Asset availability and tracking: Keep track of where your equipment is and whether it is available, rented out, or undergoing maintenance.
- Maintenance management: Schedule and track equipment maintenance and service activities to help keep your rental fleet in working condition.
- Asset Stock and Inventory: Manage multiple quantities of the same asset type as Asset Stock and track consumable items through Inventory.
4. Business Growth and Intelligence
- Reports and insights: Analyze rental activity, equipment usage, revenue, customers, orders, maintenance, and other operational data with built-in and custom reports.
- Rental performance: Use reporting and dashboard data to understand equipment utilization, rental activity, and business performance.
- Sales management: Track rental leads, assign leads to users, and monitor sales opportunities to help manage the process from lead to rental.
5. Integrations
- Accounting integrations: Connect EZRentOut with accounting platforms such as QuickBooks and Xero to help manage financial data and rental transactions.
- Payment integrations: Connect supported payment gateways to collect payments from customers online and through rental orders.
- Scanning and asset tracking: Use barcode, QR code, and RFID integrations to identify and manage rental equipment more efficiently.
- Other integrations: Connect EZRentOut with supported third-party applications and services to extend your rental workflows.
6. AI-Powered Assistance With Zoe
- AI rental assistant: Use Zoe, the EZRentOut AI assistant, to find information, get guidance, and complete tasks without having to navigate through different areas of the application.
- Natural-language queries: Ask Zoe questions in natural language to get insights from your reports and find relevant information without manually navigating through different report options.
- Asset management assistance: Use Zoe to add assets using their specification sheets, get maintenance guidance, and create work orders for maintenance tasks.
- User management: Upload an ID card to Zoe to extract the relevant information and create a new user.
Let’s get you started with setting up your EZRentOut account so you can start managing your rental operations from one place.
Note: We recommend keeping your EZRentOut account open in a separate tab so you can follow the instructions below and set it up as you go.
Learn more about the core features of EZRentOut in the following video:
Step 1: Understand the navigation bar
The navigation bar gives you quick access to the main modules used throughout your rental workflow, including Items, Orders, Customers, Reports, and other account tools.
Whether you are adding rental equipment, creating an Order, checking customer information, or reviewing reports, you can use the navigation bar to move between the relevant modules without searching through the system.
Here’s how the navigation bar and dashboard help:
1.1 Quick access to core modules
Get quick access to the main modules in EZRentOut from the navigation bar. Each module supports a specific part of your rental workflow, making it easier to find and manage the information you need.
1.2 Follow the Rental Workflow
The modules are structured around common rental activities. Here’s what you can do:
- Start by adding or managing assets in the Items tab.
- Create and manage rental bookings under Orders.
- Add and manage customer and business profiles through the Customers module.
- Monitor rental and business performance with Reports.
- Use the More section to access additional features such as Printout Templates, Alerts, Custom Fields, Work Orders, and more.
You can use the navigation bar throughout EZRentOut to move between these modules as you manage your rental operations.
Step 2: Adding Items
To get started with EZRentOut, add the items you rent, sell, or manage to your account. EZRentOut supports three different types of items: Assets, Asset Stock, and Inventory. Choosing the right item type helps you track your rental equipment, quantities, and consumable items correctly.
Here’s what each item type means:
| Item type | What it represents | How it is tracked | Example |
| Asset | An individual physical item that you rent out or manage | Each item has its own record and can be tracked by identification number, status, location, maintenance history, and other details | A specific excavator, camera, or power tool |
| Asset Stock | Multiple identical units of the same item | Units are managed as a quantity of the same item type rather than as separate individual assets | 20 identical folding chairs or 5 identical generators |
| Inventory | Consumable items that are generally used up and do not need to be returned | Tracked by quantity | 1,000 metal pipes or other consumable supplies |
In short: Use Assets when you need to track individual items, Asset Stock when you need to manage multiple identical rental units as a group, and Inventory when you need to track consumable quantities.
2.1 Adding items
You can add items individually or add multiple items in bulk. To add an item manually, go to the relevant item listing and select the option to add an Asset, Asset Stock, or Inventory item.
When adding an item, provide the relevant details such as its name, identification information, pricing, and other fields required for your rental workflow. For individual Assets, you can also add information such as location, status, and maintenance details.
Refer to the following video to learn how to add Items to your rental catalog:
2.2 Importing items
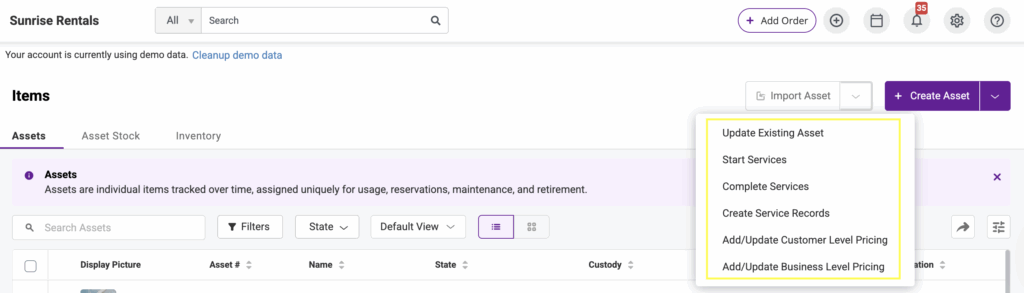
If you have a large number of items to add, you can import them in bulk instead of creating each record individually. You can also use imports to update customer records or add pricing details in bulk.
To import items, go to the Asset Listings page and click Import Asset.
When importing items, map each column in your spreadsheet to the corresponding field in EZRentOut. Refer to the data dictionary to understand what each available field means.
If you need to capture information that is not available as a standard field, you can create a Custom Field. Go to More → Customize → Custom Fields and click Add Custom Field.
To learn more, refer to the Import Items support blog.
2.2 Add items via scanning
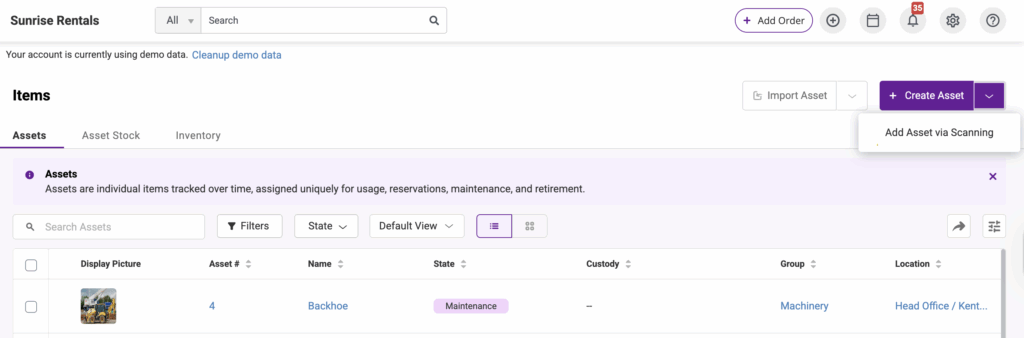
You can also add Assets by scanning asset labels with a barcode scanner. This is useful when you need to add or identify multiple physical items quickly.
To set this up, go to Integrations → Handheld Scanner Integration and enable Barcode Reader. Then go to Items → Asset and select Add Assets via Scanning in the top-right corner.
You can scan existing labels or create and print new labels using the label designer. Labels can be created in different sizes, styles, and formats.
To create labels, go to More → Printout Templates → Add Print Label Template. You can create labels for Items, Bundles, Users, Orders, and Locations.
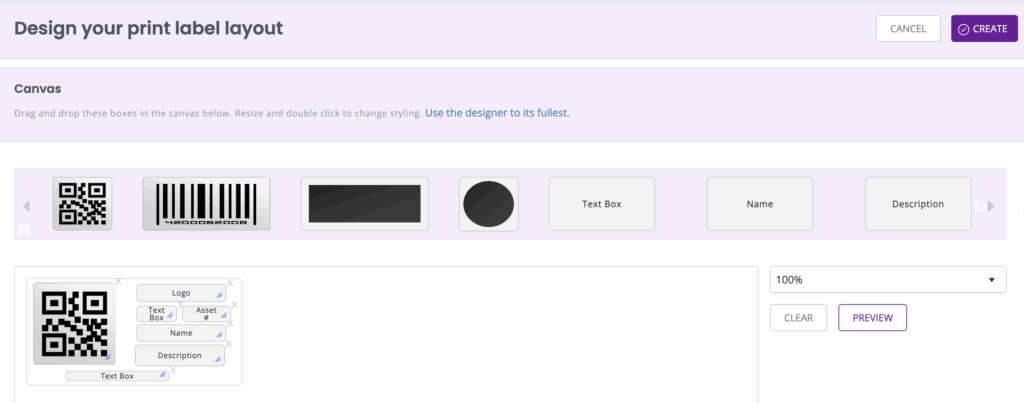
Note: When using barcodes, you must enter an Identification Number or barcode number for your items.
Step 3: Add Users and Configure Access
Users are the people who work within your EZRentOut account. Assigning the appropriate roles and permissions helps determine which rental records, locations, modules, and actions each person can access.
EZRentOut supports four default user types:
| User type | Typical access |
| Account Owner | Has the highest level of account access, including administrative settings, users, account ownership, and other account-wide controls. |
| Administrator | Can manage rental records, users, Items, Orders, settings, and other operational areas of the account. |
| Supervisor | Oversees users and operations within assigned Multi-Store Listings. This role is available when Multi-Store is enabled. |
| Staff User | Has access according to the permissions, locations, and actions assigned to them. |
For organizations that need more granular permissions, Account Owners and Administrators can also create Custom Roles based on specific responsibilities. For example, you can configure different access for rental counter staff, inventory managers, maintenance teams, or location managers without giving every user full administrative access.
3.1 Add users
To add a user, go to Users and click + Create User. Enter the user’s details and select the appropriate user role.
Once a User has been added, you can configure their permissions based on what they need to do in EZRentOut. This lets you give users access to the features and information relevant to their responsibilities without giving them unnecessary access to the rest of the account.
3.2 Configure role-based alerts
You can also configure alerts to keep users informed about rental activities that are relevant to them. Alerts can be set up based on user roles and the events or actions you want users to be notified about.
To learn more about the alerts you can create in EZRentOut, refer to the Alerts in EZRentOut support blog.
Step 4: Adding customers & businesses
Add your customers and businesses to EZRentOut to keep the contact, billing, account, and rental information you need to manage your rental relationships in one place.
You can create individual customer records, create business profiles, and associate contacts with businesses. Customer records also give you access to relevant rental and order history, making it easier to review past and current transactions.
4.1 Add individual customers
You can create an individual customer when you rent equipment or other items directly to a person.
To add an individual customer, take a look at the video given below:
Note: Any customer you add can be associated with a Business within your system. This is particularly helpful when you need to add contacts from the same business that are also your individual customers. For this, click on the ‘Add Customer’ or ‘Add Business’ buttons, or simply import from an Excel Sheet.
Once created, the customer’s record provides a central place to view their information and rental activity.
To learn more, refer to the Track Customers in EZRentOut support blog.
4.2 Add businesses and contacts
If you rent to companies or other organizations, you can create a Business profile and associate individual contacts with it.
A business profile lets you keep the organization’s information together while maintaining separate contact records for the people you work with. This is useful when multiple employees or contacts from the same company place rental orders or communicate with your team.
You can add information such as business and billing details, contact information, and other account-specific details to the relevant records.
4.3 Import customer records
If you already have a customer database, you can import customer records using a spreadsheet instead of adding them individually.
To import customers:
- Prepare your customer information in a spreadsheet using the fields supported by EZRentOut.
- Click on the Import Business or Customers button.
- Upload your spreadsheet.
- Map the spreadsheet columns to the corresponding EZRentOut fields.
- Review the information and complete the import.
Bulk imports are useful when you’re setting up EZRentOut with an existing customer database or need to add a large number of customer records at once.
Step 5: Create and Manage Your First Order
Orders are at the center of your rental workflow in EZRentOut. You can use Orders to manage customer bookings, rental dates, equipment, pricing, payments, and the rental process from booking through return.
5.1 Check Equipment Availability
Before creating an Order, check that the required equipment is available for the customer’s requested dates and quantities.
The availability view helps you identify:
- Available equipment
- Existing reservations
- Active rentals
- Equipment scheduled for maintenance
- Availability across locations
Checking availability before confirming an Order helps prevent scheduling conflicts and double bookings. To learn more, refer to the Use the Availability Calendar in EZRentOut support blog.
5.2 Create an Order
To create an Order, select or add the customer, enter the rental dates, and add the equipment required for the rental. Review item availability, quantities, rental pricing, discounts, taxes, deposits, and other Order details before confirming the booking or renting out the equipment.
Where configured, you can also add delivery or pickup information to the Order, including the relevant dates, locations, and time slots.
Take a look at the following walkthrough to learn how to create an Order:
After creating the Order, you can generate the required quote, rental agreement, invoice, or confirmation for the customer.
To learn more, refer to the Manage Orders in EZRentOut support blog.
5.3 Understand Order States
Orders move through different states as they progress through the rental lifecycle:
| Order state | What it means |
| Draft | The Order is being prepared and has not been finalized. |
| Booked | The Order has been confirmed for a future rental. |
| Rented Out | The items have been handed over to the customer. |
| Returned | The rented items have been returned. |
| Completed | The Order has completed its rental and payment workflow. |
| Cancelled | The Order has been cancelled. |
| Overdue | The expected return date has passed and the items have not been returned. |
These states let you track a rental from its initial booking through rent-out, return, and completion.
5.4 Modify or Cancel an Order
You can update an Order when rental plans change, including its dates, quantities, items, and other relevant details. If the rental dates change, review equipment availability for the new dates before confirming the change.
If a customer decides not to proceed, you can cancel the Order while retaining the Order record and its history.
To learn more, refer to the Manage Orders in EZRentOut support blog.
5.5 Manage Long-Term Rentals With Recurring Orders
For long-term rentals that require customers to be billed at regular intervals, you can use Recurring Orders instead of manually creating a new Order for every billing period. Once recurrence is configured, EZRentOut can generate subsequent Orders based on the recurrence interval while keeping them associated with the original rental.
Availability is considered across the recurrence period when recurrence is added to a Draft Order, helping you confirm that the required equipment can support the planned rental period.
To learn more, refer to the Manage Recurring Orders in EZRentOut support blog.
Step 6: Set Up Maintenance and Service Workflows
Keeping rental equipment serviced and available is an important part of managing a rental fleet. EZRentOut lets you put Assets into maintenance, record service events, create Work Orders, and keep a history of service activity.
6.1 Put an Asset into Maintenance
Use maintenance when an Asset needs to be taken out of circulation for repair, inspection, or other work.
To start maintenance:
- Go to Items → Assets and open the Asset you want to service.
- Click Service and choose start or schedule service.
- Enter the service details, including the service type, who will perform the service, and the expected completion date.
- Start the maintenance.
An Asset in maintenance is unavailable for rent, so it cannot be rented out during the maintenance period. You can still schedule a future booking if its dates do not conflict with the maintenance period.
6.2 Record a Service Event
If you only need to document service performed on an Asset and do not need to take it out of circulation, you can add a service ticket from the Asset’s details page.
Service records can include service details and costs and become part of the Asset’s service history. Unlike maintenance, adding a service ticket does not make the Asset unavailable.
6.3 Create and Track Work Orders
Use Work Orders when you need to assign and track a repair or maintenance task.
From the relevant service item, you can create a Work Order, assign it to a staff member or vendor, add a checklist, and track service progress and costs.
To learn more, refer to the Manage Work Orders in EZRentOut support blog.
6.4 Schedule and Monitor Services
For recurring or preventive maintenance, you can use the advanced Service and Maintenance features to schedule services and keep track of upcoming work.
You can also set an expected completion date and configure alerts for events such as a service being created, started, extended, or completed.
6.5 Review Service History
To review an Asset’s maintenance and service history, open its details page and go to the Services tab. This shows the service and maintenance events associated with the Asset.
Before confirming a rental, check the Asset’s availability and maintenance schedule to make sure it will be available for the requested dates.
To learn more, see the Service and Maintenance in EZRentOut and Service Workshop in EZRentOut support blogs.
Step 7: Explore the Dashboard
The EZRentOut Dashboard gives you a quick overview of your rental operations, including bookings, equipment, finances, and maintenance.
You can use it to monitor:
- Rental activity: Upcoming bookings, active rentals, returns, overdue orders, and Order statuses.
- Equipment performance: Equipment utilization, popular items, and current availability.
- Financial activity: Revenue, payments, and outstanding invoices.
- Operational activity: Maintenance activity, stock levels, and upcoming events.
Use the dashboard to quickly identify rental activity or other items that may need your attention.
You can find the entire list of available KPIs once the Dashboard is in ‘Edit’ mode. You can also view graphs on the Dashboard and track all ongoing and upcoming events, reservations, and maintenance services from the Dashboard Calendar.
To learn more, refer to the Advanced Dashboard support blog.
Step 8: Configure Payments and Accounting
Set up your payment and accounting options in EZRentOut to collect customer payments, manage deposits, and keep track of outstanding balances.
8.1 Set up a payment gateway
EZRentOut supports several payment gateways, including Stripe, Square, Authorize.net, PayPal, Braintree, PlugnPlay, and Moneris.
Payment gateway setup varies depending on the provider you use. Open the relevant payment integration from your EZRentOut settings, connect your payment account, and complete the provider-specific configuration.
Once connected, test the payment workflow before processing live customer transactions.
Note: Supported gateways, available payment features, and setup requirements can change. Refer to the dedicated support guide for your payment provider for the latest configuration steps.
8.2 Configure deposits and payment rules
Configure your payment settings to determine how and when customers are charged. Depending on your setup, you can require deposits or partial payments when an Order is created and collect the remaining amount according to your rental workflow.
8.3 Collect and track payments
Payments can be collected through Orders and, where enabled, through your Rental Webstore.
From your Orders and payment records, you can review completed payments, outstanding amounts, and other payment activity.
8.4 Connect your accounting software
If you use accounting software, you can connect EZRentOut with supported platforms such as QuickBooks, Xero, and Sage to sync relevant financial information.
For detailed setup instructions, see the following guides:
Step 9: Enable the Rental Webstore
The EZRentOut Webstore lets customers browse your rental catalog, check item availability, submit rental requests or bookings, and make online payments.
9.1 Set up your Webstore
Administrators can configure the Webstore to match their rental business and control what customers can see and do.
To get started:
- Go to Settings → Store Settings to enable and configure your Webstore.
- Customize the Webstore with your branding, colors, and other display settings.
- Select the items you want to make available online.
- Set the rental prices and available rental durations for your Webstore items.
- Configure how item availability is displayed.
- Enable online booking or rental requests according to your workflow.
- Connect a supported payment gateway if you want to accept online payments.
- Configure order approval settings if Orders need to be reviewed before they are confirmed.
You can also connect the Webstore to your existing website using the available Webstore options.
To learn more, see the EZRentOut Webstore support blog.
Step 10: Configure Documents and Alerts
EZRentOut lets you customize the documents used throughout your rental workflow and configure alerts to keep users, customers, and vendors informed.
10.1 Set up rental documents
Use Printout Templates to create and customize documents for your rental operations, including:
- Invoices
- Rental agreements
- Packing slips
- Asset labels with QR/barcodes
- Packing and delivery slips
- Acknowledgment forms
To create a template, go to More → Printout Templates and select the type of document you want to configure.
For detailed instructions, see the guides for Printout Templates and Label Designer.
10.2 Configure alerts
Set up alerts to notify the appropriate users about important rental and operational events, such as:
- Upcoming bookings and expected returns
- Overdue Orders
- Maintenance and service activity
- Payments and payment-related activity
- Low stock
- Customer or Staff User actions
You can configure alerts for Staff Users, customers, and vendors and, where supported, limit who receives them based on Groups or Locations.
To manage alerts, go to More → Alerts and configure the events and recipients relevant to your workflow.
For more information, see Alerts in EZRentOut.
Step 11: Creating Reports
EZRentOut provides reports to help you monitor rental activity, equipment performance, customers, payments, and operations across locations.
When getting started, consider setting up reports for:
- Orders: Active, upcoming, completed, and overdue rentals
- Equipment: Availability, rental utilization, depreciation, and item activity
- Revenue: Revenue by period and rental activity
- Maintenance: Equipment due for service and maintenance history
- Customers: Customer rental and Order history
- Payments: Completed payments and outstanding balances
- Locations: Orders, equipment, utilization, and other activity by location
You can use standard reports or create Custom Reports when you need specific fields, filters, calculations, or groupings. Reports can also be saved for future use and scheduled to be sent to selected users.
To create a custom report, go to Reports → Custom Reports. For more information, see the Custom Reports and Scheduled Reports guide.
Step 12: Using the EZRentOut mobile app
The EZRentOut mobile app lets you manage key rental activities from your iOS or Android device, including equipment, Orders, customers, and locations.
You can use the mobile app to:
- Search for equipment and review its details, status, availability, and rental history.
- Scan QR codes and barcodes to identify equipment, add items to Orders, or verify items.
- Create and update Orders, rent out equipment, and process returns.
- Review customer and Order details while working in the field.
- Record payments where supported.
- Update equipment and rental records from a job site or other remote location.
- Work with relevant records when internet connectivity is limited. The offline functionality currently supports viewing and updating assigned Work Orders, with changes syncing when connectivity is restored.
Step 13: Add-ons and Integrations
You can connect EZRentOut with supported third-party services and add-ons to extend your rental workflows. Choose integrations based on the part of your rental operation you want to connect.
Common integration categories include:
- Accounting: QuickBooks, Xero, and other supported financial integrations to help keep financial information in sync and simplify reconciliation.
- Payments: Stripe, Square, PayPal, Authorize.net, and Braintree for online and in-store payments.
- E-Commerce: Shopify and WordPress to connect your rental inventory with your online storefront.
- Asset Tracking: Barcode and QR code scanners for faster equipment identification, check-ins, and checkouts.
- Tax Automation: Avalara to automate tax calculations and simplify tax management.
- Login and Access: LDAP Server and SAML Integration for secure authentication and organization-managed logins.
- RFID: Connect supported RFID readers with EZRentOut for quick equipment scanning and identification.
To connect an integration, open the relevant integration or add-on settings in EZRentOut and follow the setup instructions for that service.
Available integrations and configuration requirements can change over time. Refer to the EZRentOut Integrations page for the current list of supported connections, then follow the dedicated setup guide for the integration you want to configure.
Get Started With EZRentOut
You’re now ready to start managing your rental operations with EZRentOut. You’ve learned how to add equipment and customers, manage equipment availability, create and process rental Orders, configure maintenance and payments, set up your Webstore, create reports, and use the mobile app.
As you continue configuring your account, use the detailed guides linked throughout this article for workflows and settings that require more advanced setup.
Need help getting started or have a question about EZRentOut? Reach out to our support team at support@ezo.io. We’re always happy to help.


![[How-to] Get Started with the New EZRentOut Mobile App](https://cdn.ezo.io/wp-content/uploads/2020/04/06105946/How-to-Get-Started-with-the-New-EZRentOut-Mobile-App-e1775473186887.png)