The Order experience in EZRentOut is specifically designed keeping the Point of Sale in mind. This includes quick editing of Orders, constant feedback as to what’s available, barcode scanner integration, and credit card swipe.
The Credit Card Swipe is available with Stripe, Square, Moneris, Braintree, Paypal, and Authorize.net.
1. EZRentOut supports the following features on Stripe integration
Payment on Webstore
Payment via Mobile App
Payment via Broadband App
Payment via Customer Portal
Refund Payments
Pre-Authorize
Multiple Gateways
Card on File Payments
Automate Recurring Payments
QuickBooks Sync (Desktop and Online)
Xero Sync
2. Integrating the Stripe account
1. You’ll need a Stripe account to manage Credit Card payments. EZRentOut does not charge any commission/fee on a transaction. (Yes, we don’t want to steal from your share of the pie).
2. Integrate your Stripe account from Settings → Integration → Enable Payments through Credit Card → Use Stripe.
3. Once you click ‘Use Stripe’, you will see the option to Connect to Stripe.
4. When you Conenct with Stripe you will be redirected to the Stripe login page, where you can select and log into your account to connect it.
5. Once you’re all set, scroll to the top of the Settings page to click the ‘Update’ button and save the settings.
Note: We have provided the Stripe terminal support by BBPOS WisePOS E. You just have to enable the Stripe terminal, connect it with EZRentOut, and make POS transactions.
The steps to integrate withAuthorize.net are (almost) similar. Click here to view the step-by-step guide.
3. Setting up the hardware
If you’re looking to charge your customers remotely i.e. without an in-store credit card swipe, you can skip this section. However, if you charge your customers through an in-store credit card swipe, you have two options:
1. POS Terminal Hardware
You can conveniently connect via the internet or ethernet to Stripe terminal readers from BBPOS WisePOS E. This sophisticated PIN pad has maximum security for safe and secure payments with end-to-end encryption. The terminal readers can be used to charge payments and save the credit cards on file.
The credit card can be saved on the Business page, and the Order page, in 3 separate ways. Follow these steps for each workflow:
Save the credit card on the Business page
Business page → PAYMENT & BILLING → ADD NEW CARD Choose ‘Stripe Terminal‘ in ‘Payment Gateway‘. Choose the right ‘Stripe Reader‘ to connect the reader to EZRentOut. Once you get ‘Reader Connected’, you can ‘Insert, tap, or swipe to save card’. When you receive a ‘Thank You’ confirmation screen on the reader, the credit card has been saved. The Business page will reload. View the credit card you just saved under PAYMENT & BILLING.
Save the credit card on the Order page
Order page → Customer & Order Creation → Credit Card Choose ‘Stripe Terminal‘ in ‘Payment Gateway‘. Choose the right ‘Stripe Reader‘ to connect the reader to EZRentOut. Once you get ‘Reader Connected’, you can ‘Insert, tap, or swipe to save card’. When you receive a ‘Thank You’ confirmation screen on the reader, the credit card has been saved. The Order page will reload. View the credit card you just saved under Customer & Order Creation → Credit Card.
Charge the payment first, and then save that credit card on the Orders page
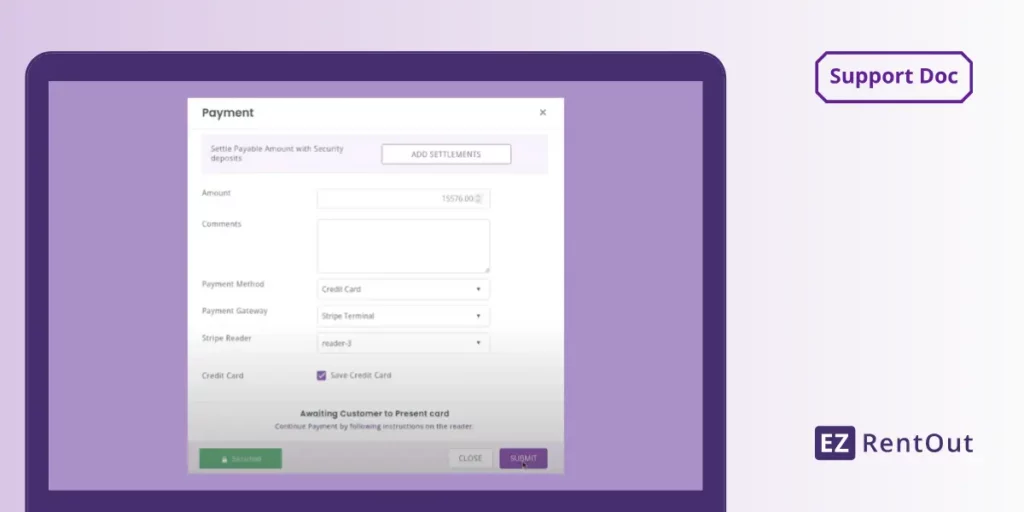
Order page → MORE → Charge Payment Choose ‘Credit Card‘ in ‘Payment Method‘. Choose ‘Stripe Terminal‘ in ‘Payment Gateway‘. Choose the right ‘Stripe Reader‘ to connect the reader to EZRentOut. You will get a ‘Reader Connected’ once the reader is connected to EZRentOut. Tick the ‘Save Credit Card’ checkbox in Credit Card. Then click on ‘SUBMIT’.
First, the reader will show you the payment amount that needs to be charged to the customer. Insert, tap, or swipe the credit card to charge the payment. You will get a confirmation ‘Payment Charged Successfully’ once the payment goes through.
Second, in the same payment successful confirmation popup, you will be able to save the credit card. Click on ‘SAVE CARD’. You can ‘Insert, tap, or swipe to save card’ on the reader. When you receive a ‘Thank You’ confirmation screen on the reader, the credit card has been saved. The Order page will reload. View the credit card you just saved under Customer & Order Creation → Credit Card.
For successful POS transactions from BBPOS WisePOS E, click here
2. Use a magnetic reader
Magnetic readers are fully programmable with Windows, Mac, and all versions. A simple plug-and-play without any installation required.
Note: The downside of an in-store credit card charge without using an EMV reader is the merchant’s liability exposure i.e. you having to pay for fraud. So if you’re anticipating such issues, this option is not for you. Furthermore, it requires close contact with the reader as it doesn’t work at a distance and there is always a risk of data damage due to stray magnetic fields. Therefore, it is not recommended to use a magnetic reader if you have a better option available.
4. Swiping the cards
On the Order Details page, with every Customer, you’ll see the Credit Card icon.
This is the form that pops open when the Credit Card (not on record) is clicked.
All you need to do on this pop up is swipe the card, and we catch all the details.
Once the Credit Card is swiped, it’s saved on file.
Now when Charging Payment on this order, you can choose to use the Credit Card
You can also choose to use a different card and update the card on file for this customer.
5. Charging mass payment for multiple Orders
You can charge payment for multiple Orders to the same or different Customers in one go. To do this, do the following:
Go to the Orders Listing pageand multi-select the Orders you need to charge a payment for.
Click on ‘Actions’ and select ‘Charge Payment’.
A dialog box will appear for Order Payments (see image below). Here you can configure details such as Payment Date, preferred Payment Gateway, order payment specifics, and comments. Note: CC payments can only be charged to Customers with their cards saved on file.
Hit ‘Charge Payment’ once done. You should see a ‘Payment Successful’ message next.
However, you should know a couple of tips before you start charging a payment for multiple Orders.
6. Pre-authorize or hold payments
Pre-authorizing a payment is also supported. Say, you want to hold an advance payment of $154 and when the payment date arrives, deduct the entire rental price e.g. $429, including the pre-authorized amount. You just need to choose ‘Pre-Authorize’ when charging payment.
You can then charge or cancel the hold.
If you charge the Pre-Authorized amount, your customer has to pay the remaining $275 via card or cash.
If you cancel the Pre-Authorized amount, your customer is entitled to pay the entire rental fee of $429 via card or cash.
7. New walk-in Customer
Add Order → Add your new Customer from the pop-up that appears → On the Order Details page, hit the Credit Card button to swipe a card.
Share your POS experience
We’d love to hear about your EZRentOut experience. Drop us an email at support@ezo.io.
Was this helpful?
Thanks for your feedback!
Rida Fatima
Senior Information Development Associate, EZO
She/her/hers
Rida works as a content marketing specialist at EZO. Her expertise lies in curating dynamic and meaningful content that is aligned with the trends of the SaaS industry. She defines professional success of a content marketer as “the ability to create engaging and evergreen content that addresses buyer pain points.” Her work is based on a broad variety of topics, ranging from rental asset to physical and IT asset management. Outside work, Rida loves to travel, try different cuisines, and engage in deep philosophical discussions.
30,000+ Signups by Rental Businesses Everything Your Rental Business Needs