What are Order Printouts?
Order Printouts help you communicate important information to customers and employees in a standardized format. They include documentation such as quotes, invoices, receipts, rental agreements, and packing lists. To use this feature, go to More →Customize→ Printout Templates.
Create an Order Printout Template
If you’d like to add extra information to your printouts or want to personalize or reorganize your templates in any way, you can easily customize them. To do this, go to More →→Customize→ Printout Templates → Order Tab. Then, click ‘New Printout Template’.
Next, choose the type of printout you want to customize, and click Start Designing Template.

Template Structure
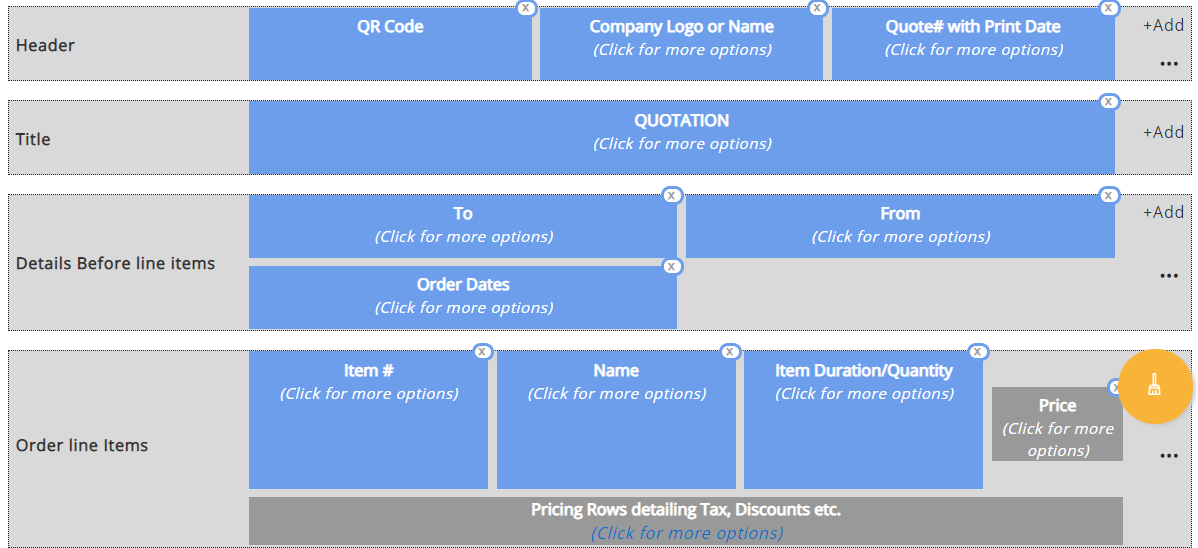
You can now pick a name and paper size for your Order Printout template and can customize it however you’d like. For all Order Printouts, such as quotes or rental agreements, the templates look largely the same. They are divided into a few component parts; main sections (gray), visual elements within them (blue), as well as customizing options. The 6 main sections include:
– Header
– Title
– Details Before Line Items
– Order Line Items
– Details After Line Items
– Footer


Note: control line spacing on rental agreement template
Customize Details Already on the Template
To start off, you can change the names of some of these elements as well as the text format. This can be done by clicking an element that shows ‘click for more options’, which will open a pop-up window allowing you to alter the element name, font style and size, and text alignment.

Invoice numbers are one of the most important aspects of invoicing as they ensure that income is properly documented for tax and accounting purposes; they also make it easier to track payments. Most of the companies today do not practice the standard of mentioning Order# on the invoices generated.
In EZRentOut, we allow account owners and admins to customize the prefix text of all printout template types i.e. Invoice#, Quote#, Receipt#, etc, instead of showing Order#. While an Order Printout will have the same sequence number as the Order it is associated with, it can be prefixed however you’d like. You can do this by clicking the Order# placeholder in the ‘Header’ details section in any existing printout template. For new templates, say an invoice template, you can do this by clicking the Invoice# placeholder. You can also choose to show/hide an order’s date and time with it.

Add or Remove Elements Within a Section
In a scenario where you require more elements within an order printout, you can add a specific number of elements per section e.g. the header can have up to 3 elements. Click the ‘x’ in the corner of any element you wish to remove from the template. Add new elements using the ‘+Add’ button; an overlay to add elements will pop up. These elements vary according to the section you’re viewing. For example, in ‘Order Line Items’, you could add the Item Identification Numbers, Item Vendors, and Display Images among many other options (see image below).

If you’ve custom fields set up in your account, you can even add those as elements! (Item custom fields can be added to the Order Line Items section, and Order custom fields can be added to the Details Before/After Line Items sections)
Embed Image in Order Printouts: You can now embed images directly within the order details page by creating a custom field (single text or paragraph text type). To do this, first, create a custom field (single text or paragraph text type) from More → Customize → Custom Fields. For this to work out, make this custom field mandatory. Once done, you can edit this custom field in the format {{dummy.png}} on an Order Details page. The image format can vary in extensions like {{dummy.jpg}}
These images can also then be printed directly through the Order Printout. You need to add this custom field as an element to an Order Printout template. Please note, embed images i.e. {{dummy.png}} can either be printed when added in ‘Details Before Line Items’ or ‘Details After Line Items’ as an element.

This is helpful in cases where store owners want to keep a record of an item’s condition, before and after its rental period. This enables them to show solid proof in the form of pictures attached to the invoice or rental agreement if an item is returned damaged.
Similarly, when you click ‘+Add’ against the Title section in any of the Order Printout Types, another overlay will appear, allowing you to play around with more elements (see image below).

Formatting Pricing Rows
Pricing rows that entail the item’s subtotal, tax information, discounts, or payable amount can’t be removed. You can, however, configure the way they appear by hitting “Click for more options” from the Order Line Items section.

Further Customization
As mentioned above, there is a limit to the number of elements you can add to each section, so be sure to pick only the most important ones! You can also click the three horizontal dots (…) to further customize the template. Choose between single or double columns, for example, combine similar assets into a single entry, or decide not to list all items within a bundle. You can also configure the line items’ sorting here.

Customize Order line items section in printout template:
You can also customize Order line items while designing printout templates. Click on the horizontal dots (…) on the right side of the Order line items section and an overlay will appear as below:

You can choose to print out templates as per the state of Order line items, such as:
- Rented out: Order line items in Rented out state will be displayed only
- Returned: Order line items in Returned state will be displayed only
- Swapped/Replaced: Order line items in Swapped/Replaced state will be displayed only
For example; 10 items are rented out in Order # 23. The customer has returned 3 items. Now if you want to see Order line items that are returned, you can choose the Returned option from above. The printout template will show all line items that are returned.
This customization is only available for Quote, Rental Agreement, and Receipt Print Label Templates.
Note: If you choose “All items except returned, swapped, or replaced” then all three options shown above will be disabled.
Further customization settings for the Order Line Items section

Add Custom Text
The customization doesn’t end here. In some printouts, the ‘Details After Line Items’ section will give you an option to add text of your own, up to a limit of 1 MB (use Free Text element. Also accepts HTML formatting tags). This could be a Rental Liability Clause, for example, or a place to put your Terms and Conditions.
Add Electronic Signatures
You can also add a signature pad to a printout template. This is useful in cases where you pull up rental orders for customers. You can choose an invoice with a signature pad added. The customers can use a mouse, trackpad, or even a jot pad to draw their signatures on the invoice, or simply use a stylus or their fingers in case of a tablet/iPad. Additionally, these printouts can be saved as a PDF. You can either print them or email them to the customers with their recorded signatures. Learn More.
Get customers to do signatures on Order Printouts
Add New Template Categories
If you don’t find a ready-made template for something – suppose you need printouts for specific seasonal deals, for example – you can create these from scratch using the template ‘Other’. These templates will then be found under this category on the Order Printouts page.
Once you’re done customizing your templates, simply click ‘Create’.
Select a Default Order Printout
You can assign the default template for each order printout type from More → Customize →Printout Templates → Order tab, using the radio buttons. For example, Calypso Rental Summer Deal Invoice now becomes your new default invoice template.

Note: You can also edit and delete templates from here.
Printing out for an Order
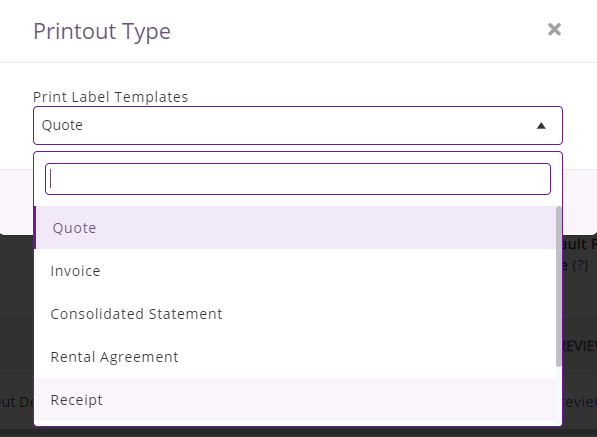
When you hit the ‘Print Order’ button from an Order’s details page, you can choose the printout type to use and the template to print (see image below).

You can also share these printouts with the customers using the “Generate Public URL” button for them to print out, or download a copy.
Consolidated Invoicing
By default, all invoicing on EZRentOut is done for single orders. However, there are clients that may have workflows that require for a single Business/Account to receive one invoice for multiple customer contacts or orders for a given period.
This feature will allow users to generate consolidated printouts for multiple orders – be it a recurring order, business or customer order. To access a consolidated invoice, say for a recurring order, go to Customers → Orders tab → Choose a recurring order → Hit ‘Print Consolidated Invoice’ to generate a single invoice for all or multiple selected recurring orders.

When you click the ‘Print Consolidated Invoice’ button, a downloadable PDF file will pop up. Below is a view of what you would see:

Similarly, you can generate consolidated invoices for Businesses as well.
Consolidated Invoice for a Business account

Note: External default invoice items and the refunded amount will also be consolidated in these invoices.
Cloning Custom Printout Templates
Designing new quotes and invoices can be time-consuming. Sometimes, companies want to preserve an old custom printout template while creating a new one similar to it.
In this case, they can clone an existing custom Printout Template and make edits to it without having to create a new one from scratch.
Go to More → Customize →Printout Template → Order Tab. Here, you can clone all Quote, Invoice, and Rental Agreement templates. There will be a Clone button with each of the templates.

If you click this, an identical template will be generated.
After you’re done with all the edits, scroll down and click the Create button to save your new template.
EZRentOut is equipment rental software you’ve been waiting for. For more assistance, drop us an email at support@ezo.io.
Was this helpful?
- What are Order Printouts?
- Create an Order Printout Template
- Template Structure
- Customize Details Already on the Template
- Add or Remove Elements Within a Section
- Formatting Pricing Rows
- Further Customization
- Add Custom Text
- Add Electronic Signatures
- Add New Template Categories
- Select a Default Order Printout
- Printing out for an Order
- Consolidated Invoicing
- Cloning Custom Printout Templates


