The Orders Module in EZRentOut is designed with ‘running a front desk’ in mind. It helps you draft an Order quickly and ensures that there aren’t any scheduling conflicts. All rental transactions (rentouts, returns, sales, bookings, and reservations) in EZRentOut happen through Orders.
1. Quick Editing

Click on any field in the Order to edit it. This makes things quicker and you don’t lose focus of the Order you’re working on. To see which fields can be edited, hover over the ‘Edit’ button on the top left of the Order and it will highlight all the editable fields. If you click the ‘Edit’ button, the highlighting is preserved until you click the button again.
For Asset Stock and Inventory, you can click on the Quantity to change it.

Prices in the last column are calculated based on the rates you’ve set for your rental and sales items. However, you can choose to edit these calculated rental prices, if you like from Settings → Company Settings → Pricing and Payments in Orders.

2. Adding Items to an Order
You can browse through the items listed under the Items module and add the required items to an Order.

Or use the quicker and better way of adding them right from the order page.

As you start typing in the item name in the ‘Add Items’ search bar, results are shown along with their availability status. This enables you to choose the Assets that are available or are expected to become available for the order duration. On the ‘Add Items’ field, select as many items as you need, and then add them to the Order.
Also, booked Orders can be edited on the fly. Items can be removed/added, giving businesses more control over their equipment. Enable the Bookings Module from Settings → Add Ons. You can now book more items at the last minute and update the Order. Say you booked a rental Order that consists of a Nikon DSLR Camera to cover an exhibition but then you realized you forgot to add the tripod. Now, adding the tripod is just a matter of looking it up and adding to the Order.
3. Availability Cues
The first cue is when you’re adding the items. But even if you add unavailable items, there are warning signs to show which ones are unavailable. The Yellow Sign warns that the item is not available during the dates you’ve selected for the order. You can, however, enforce conflict-free bookings for Assets and Asset Stock (This setting can be enabled from Settings → Add Ons → Bookings).

There’s also an Availability Calendar to forecast the availability of items over time. This add-on can be enabled from Settings → Add Ons → Availability Calendar. Once you’ve enabled the calendar, it appears on the top, next to the Search Bar.

Availability is determined based on the Order Rentout (i.e. From) and Return (i.e. To) dates.
4. Advanced options when adding items
When adding items to the Order, there are some Advanced Options with the ‘Add Items’ field on the Order. This is to add Assets to the Order in bulk e.g. 4 Assets named HP Pavillion.

There are also 3 checkboxes with the Add Items field:
1. Show only available … Check this option and only those assets will be shown in the Add Item field that are available in the selected order duration
2. Sort by proximity… Check this option if you want to sort assets such that the assets closer to the customer are shown toward the top. Asset Locations come from the Location Address (Items → Locations). If you give the right address, we add it to the map. Customer Address comes from the address with custom details. Again, if it’s a valid address, we get the coordinates from the map.
3. Show only available bundles… This option brings in only those assets from a bundle that are available in the order duration.
5. Order Details page – a glimpse


1 – Order #, Status, and the payment that’s due
2 – Action Buttons
3 – Your Customer! Save Credit Card on file. Send Emails.
4 – Order Dates
5 – Billing Dates
6 – Shipping and Order Locations
7 – The place to add rental and sale items
8 – A (Asset), S (Asset Stock), and I (Inventory)
9 – Click to change quantities or prices
10 – Customize Columns
6. Customize the Order Details page
To hide and customize the fields in the Order detail page, on the left-side panel, go to More → Customize → Custom Fields.

When there, click on ORDER to select the fields you want visible on the Order detail page in the System Fields section.

You can pick only the fields that are meaningful for your workflow and business.
7. Order states
Here are the different phases of an Order in EZRentOut:


A Note on Web Order States: The states ‘Web Order’, ‘Booked Web Order’, and ‘Booked Advance Due’ are exclusive to Web Orders. To learn more about the difference between these Web Order states, click this FAQ.
A Note on Payment States: When Payment Terms are enabled, additional states might be seen with Orders. These are the ‘Payment Pending’ and the ‘Payment Overdue’ states. To learn more, read about Payment Terms.
8. Order line items
You can customize the Order line items (the table having all the pricing details) by clicking on the vertical ellipsis. This opens up an overlay, from where you can edit the existing columns or add new ones.

The first 2 columns by default are Item# and Name and these are permanent, i.e. you cannot edit them.

You can also add a Free Text column here to record ‘Line Item Notes’.
There’s also an option of adding a Free Text row to record any ad-hoc sub-renting. You can add any name/price in this free text row. To enable the sub-renting feature, have a look at Settings → Add Ons → Sub Renting.
The Collapse View option on the top right of the order line items table combines the items with the same name into a single entry.
More Order fields can be added from More → Custom Fields → Orders.
9. Item recommendations for Orders (BETA)
Our Item Recommendation feature highlights missing rental Assets for specific workflows. You can make better-informed choices by pulling on previous company-level customer preferences and ensuring no rental item gets missed from an Order.

The recommendations will be shown when users add items to an Order.
Note: This feature is currently in Beta, available to users with Plus packages and above. To enable it, go to Settings → Add Ons → Item Recommendation for Orders → Enable.
10. Order printouts
Among many other actions, you can print Order invoices from the Order Details page. Invoices can be customized from Settings → Company Settings → Invoice Customization. You can also design your invoices using the Order Printout templates from More → Order Printouts (Settings → Add Ons → Order Printouts).
11. On the mobile app
Using the mobile app, in addition to standard actions on orders, you can scan items to add to an Order without the need for a dedicated barcode scanner. The app uses your phone’s camera to scan barcodes/QR Codes of rental/sale items. You can also scan the QR Code on an invoice to pull up an order and take action. Verifying items in an order is another cool feature that you should try out on the mobile app as well as the web app.
You can also do multi-level scanning and item verification on returned Orders. For example, when renting out from a warehouse, when loading it onto freight, when items arrive at the destination when they’re shipped back, and finally when they’re received.
To take action on Orders from the app, simply login to the application with your account credentials. The first thing you will see once logged in will be the Orders Listing page. From there, choose the particular order you want.
Here’s a snapshot of what the Order Details page looks like on the Mobile App:

12. Item verification and partial returns
Users can restrict Order rentouts if all items are not verified via scanning. Also, a warning appears when items are not verified via scanning on return. Enable Item Verification on Orders from Settings → Add Ons.

If all the items are not turned in when returning an Order, you can do a partial return.

Items that are pending return are added to a fresh order, which is in a rented-out state. The Return date for leftover items is asked and set as the Return Date for the new Order. The current Order is returned with the items that have been marked on this checklist.
There is now a better way to do this! You can do partial returns for one or more items in a Rented Out Order by using our Edit Rented Out Orders feature.
13. Actions on Orders
There are several actions that you can take on an Order. These action buttons are available on the right side of the Order. Some of the most used actions other than Rent Out, Book, and Complete order include Custom Entry (to record any price adjustment or service provided e.g. $10 extra for a guided tour, -$5 for issues in service, etc.), and Charge Payment ( to record Credit Card and other payments).
You can also add comments or documents to an order at the end of the Order Detail Page.
14. Comments and Mentions
Comments with mentions can be added to the order at the end of the Order Detail Page. Users will be able to mention other users in the comments section for ease of communication on Order processing. To enable, please go to AddOns → Mentions

The user will be notified of his mention from the bell icon on the dashboard. Click on mention from the dropdown and you will be directed to the mentions listing page for further details.

15. Orders Listing table
By default, the Listing Table under the Orders tab shows all the orders that have not been completed (called Active Orders). You can change the filter from the top right corner to get to the orders you want. This table can also be customized using the 3 vertical dots on the top right corner of the table. You can also export the orders to a CSV file by clicking the icon on the left side of the 3 dots.

16. Order Identification Number
16.1. Choosing Order Identification Numbers in place of Order #
EZRentOut uses Order# to help companies keep tabs on orders easily. However, if your workflow uses customized Order Identification Numbers (OIN) to keep track of orders, you can always use them instead of the Order# in Order listings. This can be changed from Company Settings → Advanced Settings → Order Identifier. Learn More.
16.2. Customizing Order Identification Numbers
Additionally, certain companies like their OINs to follow a particular format to include key information like Order# and Customer ID. OINs that follow a particular format are much more intuitive and help speed up processes.
You can design such Order Identification Numbers with fixed placeholders in EZRentOut for quick identification. Go to Settings → Advanced Settings → Order Identification Number Format.

Enable this setting and include as many Placeholders as you like but be wary of the sequence that you choose – the OIN for all of your orders will be in this very sequence. Here are the available Placeholders:

To demonstrate how formatted OINs would look like, we chose the format: Order Number – Customer ID – Location ID. In this manner, an order with Order Number 215 belonging to a customer with Customer 1D 301 and location ID 5 will have the following OIN:
215-301-5
Note: Even when in a particular format, OINs are still editable from the Order Details Page.
17. Cloning an Order
To clone an Order, go to the particular Order’s Details page and click on the ‘Clone’ button in the upper right corner.

Note: If an item in the Order has been retired, the cloned Order will not include that retired item.
18. Other Add-Ons
Here are some popular order-related Add Ons for you to try out.
– Order Assignment: To distribute the orders work among your staff and gauge their performance.
– Separate Billing Duration: If your Rental Duration and Billing Duration are different (rent out for a week but bill for 4 days), you can have these durations separated out
– Items Verification: To ensure that the items are in good shape before they’re sent out and also when they’re returned.
– Bundles: Combine different items that are regularly rented out together. Learn More
– Recurring Orders: For longer running orders with multiple billing cycles in between e.g. a year-long order that is billed each month. Learn More
– Sell Assets and Asset Stock: To sell rental items like assets and asset stock, and create separate sales orders for them. Learn More
– Swap Items in a Rented Out Order: Do you replace Rented Out equipment when it requires servicing or breaks down during the rental duration? Use the Swap Items feature to replace assets in a rented-out order. Enable from Settings → Add Ons → Swap Rented Out Items. Learn More
– Add or Return one or more Items in a Rented Out Order: Who hasn’t had to add or remove a few items in an already Rented Out Order? You can do this and have the quantities adjusted accordingly on the back end. Learn More
Note: Order Identification Numbers can also be created.
19. Separate payment from receiving of Orders
The payment of Orders is kept separate from the receiving of Items. Customers first receive Items, then later in the month make the payment. To enable this feature, go to Settings → Add Ons → Purchase Orders and deselect the option “Make payments at the time of receiving items”.
20. Set separate rental and billing durations for line items in an Order
You can choose separate order and billing dates for line items within an Order in case some of the items are to be returned before the actual return date.
To edit the Billing Dates at the item level, go to Settings → Company Settings → Flexible Billing Duration and enable ‘Billing Dates and Order Dates can be different’.
Enable the Order Dates and Billing Dates column on the Order detail page. Click on the individual details in the highlighted section as required.

This will open up a popup where you can change the Rental Duration and Billing Duration of that specific line item. Remember that these have to fall within the rental and billing timeframe of the Order itself.

If you return the entire Order before the return date, and it conflicts with the rental and billing date of a line item, you will be shown a conflict. You will be required to Reset Item-Level Dates.

Once you reset the item-level dates, the line item that has been reset to the Order rental and billing dates will be highlighted with a yellow icon as shown below.

21. Returning Items to Different Locations
Items can be returned to different locations at the time of check-in individually. To do so, make sure you enable the option to update item locations on a returning order individually. Please note that the “Mass update item location on Order Return” needs to be disabled for you to be able to check this checkbox.

While returning an order, select the following option to change the return location of the items.

Once you select the checkbox, the following overlay will appear where you can choose the location to which you want to return the item.

22. Staying on top of everything
The Dashboard calendar is the best place to look for orders that are due to be returned or have a booking that is about to start. It also shows how your business is doing in terms of revenue. You can also select alert emails from More → Alerts to get notifications for rentouts, returns, or Orders that are due.

23. Searching for Orders
We have now created a dedicated search module for Orders on the main Orders page. This enables you to quickly access and view the Order you want.

23.1 Search customers by Phone Number
You can search for a customer while adding a new order by simply typing their phone number into the search, as shown below. The system automatically fetches customer details based on their phone number.
24. Void or Add Missed Items in Returned/Completed Orders
To add a missing item or void an item in a Returned or Completed Order, go to Settings → Company Settings & AddOns → Edit Rented Out Orders and enable it. Choose who is allowed to do this to your Returned and/or Completed Orders; Administrators, Staff, or both.

As a rental business, you may want to add a missing item or void an item to a Returned or Completed Order, you can easily do this now.
These functionalities will enable you to accurately track inventory and billing, and take corrective measures even after the order has been completed.
It will help you keep everything aligned in terms of payments, bookkeeping, and accounting.
25. Customizing System Fields for Orders
Customizability is one of the supporting pillars of EZRentOut. To stay in line with the precedent, we have introduced the ability to show/hide System Fields. You no longer need to stick with the system-set settings. You can choose to manage the system fields as per your organizational needs to get a tailored view of your Order details page.
Go to Customize → Custom Fields → Order → System Fields and select the fields you want to display on your Order Details page.

You can also show/hide these fields directly from the Order Details Page. To do so, open an Order by going to Orders, and click the settings sign as shown below.

Select the fields from the following pop-up and hit ‘Update’.

26. Edit rented out orders
You can change the rental date of an order, the customer, or the items after the order has been rented out. To do so, go to Company Settings → Enable “Edit Rented Out Orders.”

To change the customer name, click on the customer name and you will see a small “edit” icon on the top right of the field. You can edit the customer easily by simply selecting a new one, as shown below:

To change the rental date, click on “Rent Out Date” and change the date as needed.
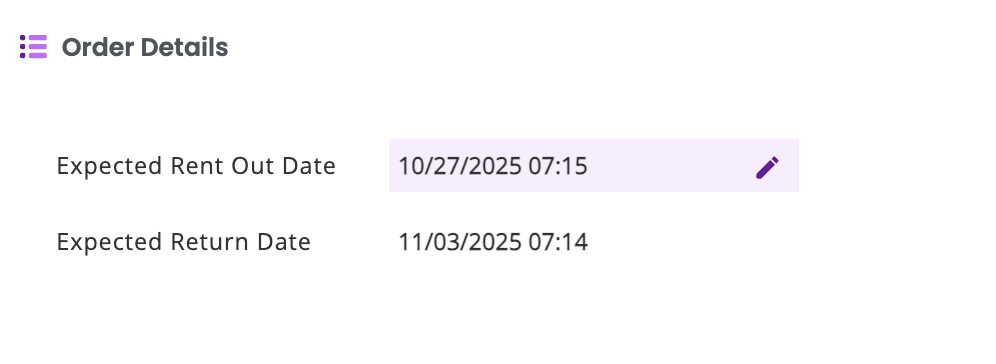

You can also edit the “Expected Return Date” in a similar way.
Note: Users should be able to change the customer type (e.g., from business to individual) even after a payment has been made. The system allows this action while retaining the full payment history.
27. Sub-renting items and setting procurement and rental rates
You can easily sub-rent items in EZRentOut, i.e., source your rental items from another vendor and still make a profit. Sub-renting helps you better handle emergencies when you have a reservation, but the equipment is not available.
Go to Settings → Order line items for sub-renting → “Enabled.”

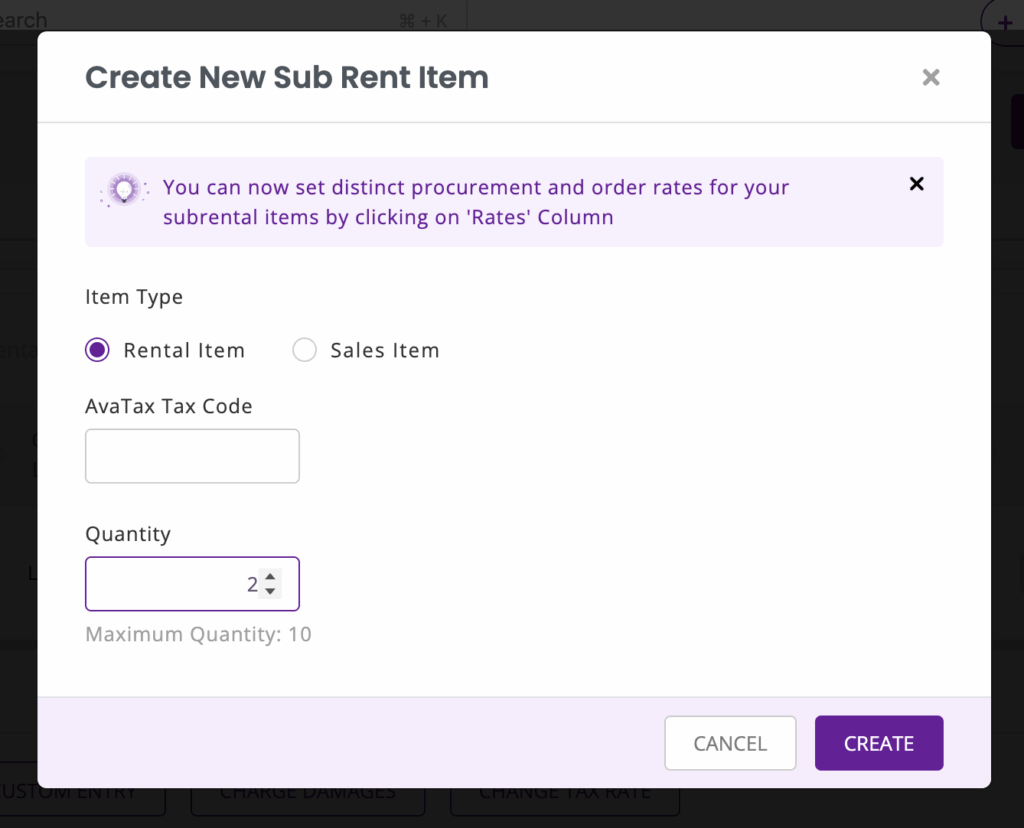
While creating an order, you can choose to sub-rent certain items. To do so, click on “+Add Sub-rent or ad hoc items” to sub-rent an item.

You will be taken to the following window, where you can adjust the quantity of the sub-rented item. Hit “Create.”
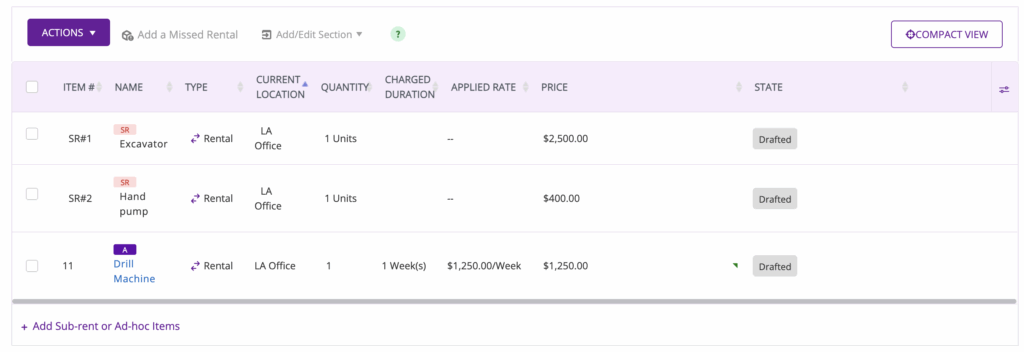
The sub-rented item would be added to your order. You can name the item, specify its serial number, its location, and set the price.

For instance, we assign the serial numbers “SR#1” and “SR#2” to the Excavator and Hand Pump.
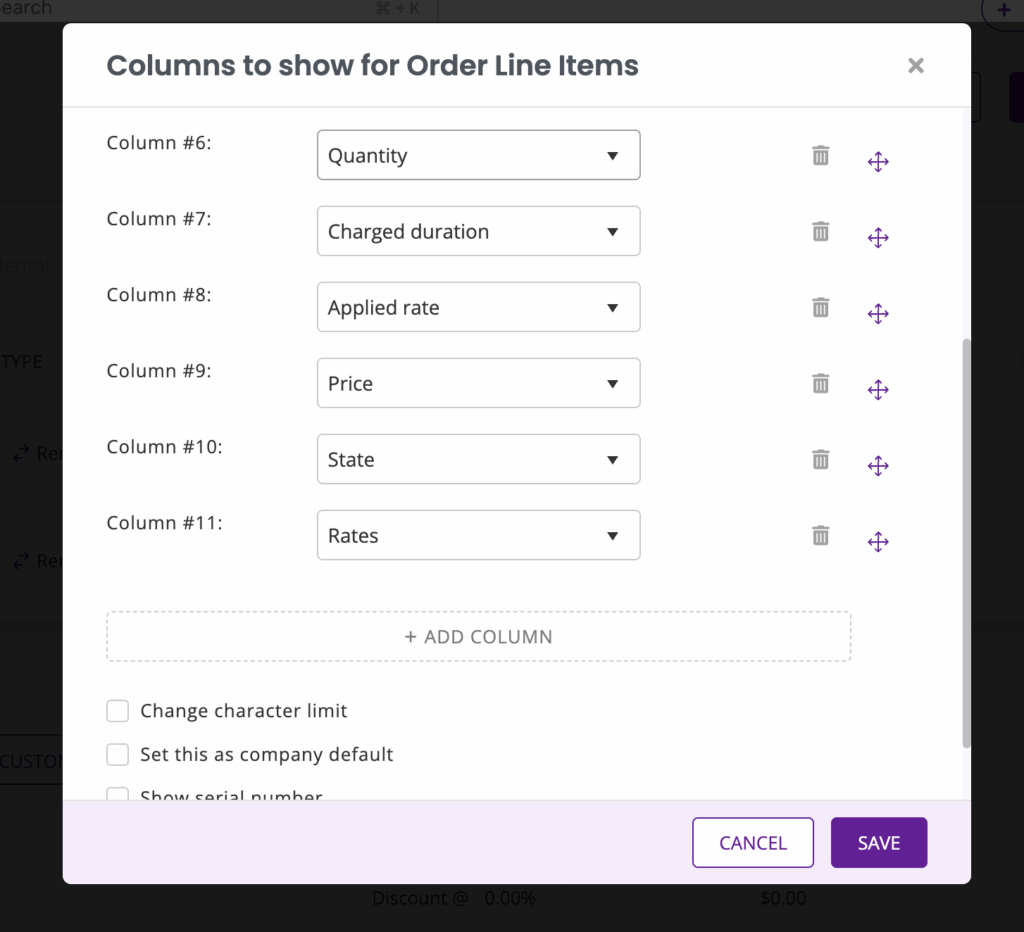
To specify the rental rate for the items, make sure that you have the “Rates” column selected from the columns option.
Select “Rates” and you will be taken to the following window where you can set the Procurement and the Order Rates.
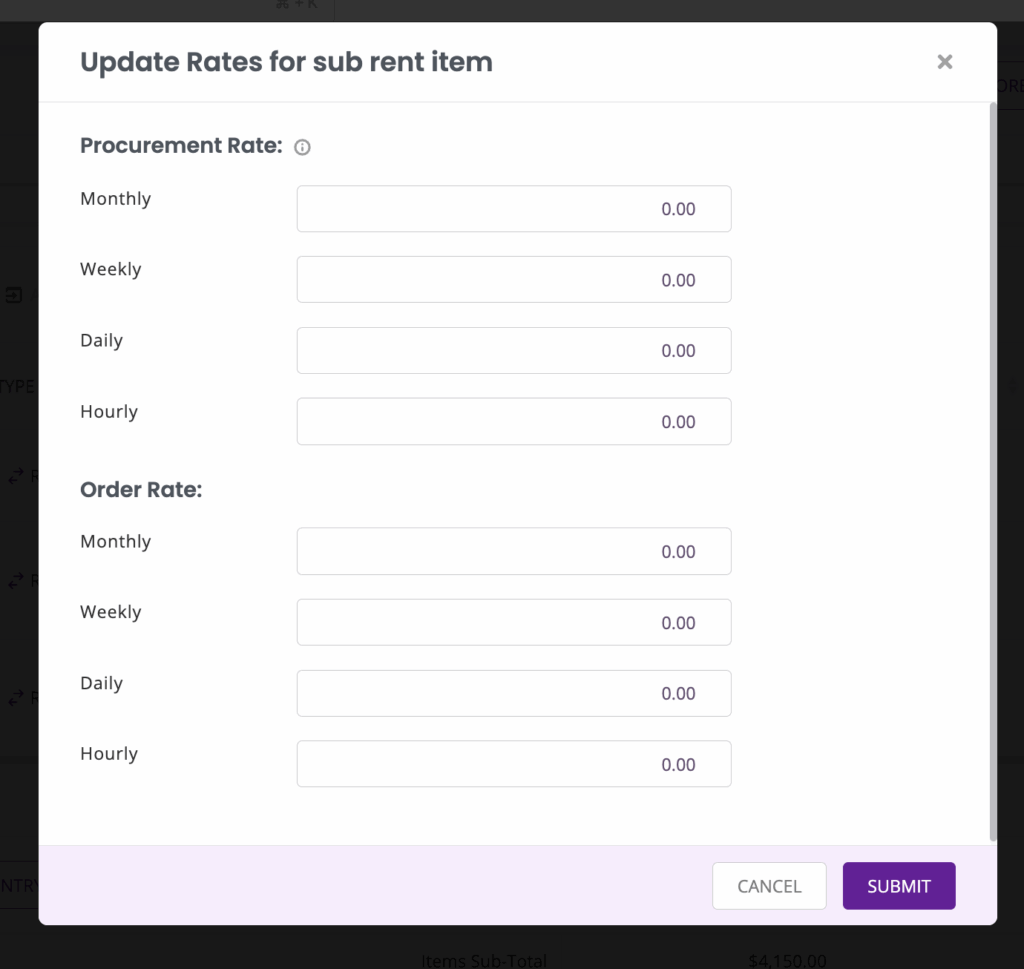
The rates would be visible for the selected item on the Rates column. Mark the Order “Complete.”

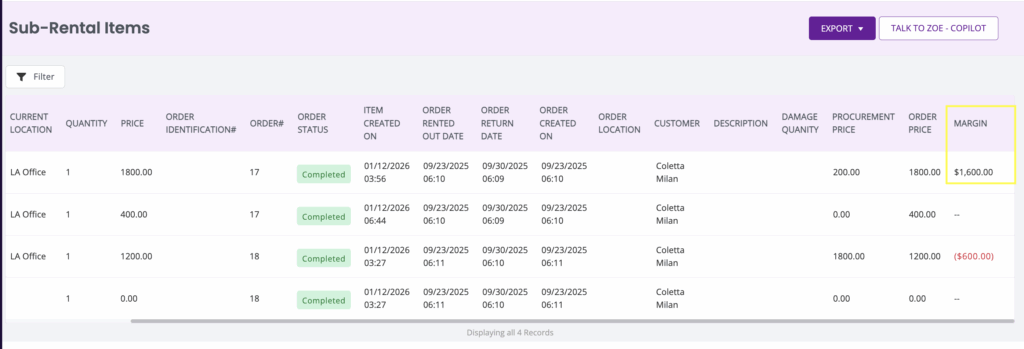
You can also check the amount of profit you are making from the sub-rental by accessing the “Sub-rental Items” Report from the Reports module. It will reflect the margin on the sub-rental as highlighted below.
28. Tracking KPIs
You can track KPIs related to your orders directly from the Order Listing Page. Clicking on the KPIs will take you to the specified state in the opportunity pipeline, where you can track the order in detail.

For instance, if you click “Collect Overdue Payments,” you will be taken to the “Payments Overdue” section, where you can view the orders with overdue payments.

Note: You can see KPIs for Payments Overdue and Stalled Orders only on the Order Listing Page.
Questions?
If you have any questions, write to us at support@ezo.io.
Was this helpful?
- 1. Quick Editing
- 2. Adding Items to an Order
- 3. Availability Cues
- 4. Advanced options when adding items
- 5. Order Details page – a glimpse
- 6. Customize the Order Details page
- 7. Order states
- 8. Order line items
- 9. Item recommendations for Orders (BETA)
- 10. Order printouts
- 11. On the mobile app
- 12. Item verification and partial returns
- 13. Actions on Orders
- 14. Comments and Mentions
- 15. Orders Listing table
- 16. Order Identification Number
- 17. Cloning an Order
- 18. Other Add-Ons
- 19. Separate payment from receiving of Orders
- 20. Set separate rental and billing durations for line items in an Order
- 21. Returning Items to Different Locations
- 22. Staying on top of everything
- 23. Searching for Orders
- 24. Void or Add Missed Items in Returned/Completed Orders
- 25. Customizing System Fields for Orders
- 26. Edit rented out orders
- 27. Sub-renting items and setting procurement and rental rates
- 28. Tracking KPIs
- Questions?


![Support Blog - [What-are] Orders in EZRentOut](https://cdn.ezo.io/wp-content/uploads/2015/06/Support-Blog-What-are-Orders-in-EZRentOut.png)


