
Digital assets are the most essential valuables for IT based firms. Carrying out regular IT audits allows administrators to better manage their IT assets while streamlining the operational processes. If you are an administrator in AssetSonar, location audit feature allows you to conduct in-depth inventory analysis so that you have a complete knowledge of the location of your IT assets, their condition and quantities. Regular location audits help develop transparency in records, identify the missing items and allow your organization to avoid heavy financial losses.
In addition, location audits make it easier for you to reduce asset downtimes and prepare for cyber risks in a timely manner. Since AssetSonar only allows designated Auditors to verify the Audit, it adds another layer of security as unauthorized access to assets is not possible.
Location audit feature in AssetSonar is divided into two main parts:
- Location audits: Allow you to reduce risk and strengthen control over your IT assets by keeping inventory stock in check at all times. By using barcodes and QRcodes, you can verify an item’s quantity while cross-checking its availability with the numbers on your AssetSonar account.
- Custody Audits: In order to verify that a checked out asset is in the custody of an assigned user, you can conduct a custody audit. This helps ensure that your assets are not misused or get misplaced, and you can easily track their usage to account for asset maintenance and safety.
Here’s how you can make use of the Location Audits feature in AssetSonar:
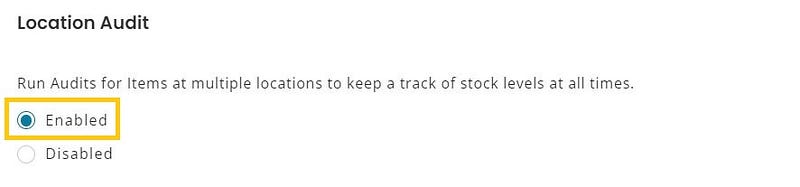
1. Enabling Location Audits
To enable Location Audits simply go to Settings → Add Ons → Audit Items
→ Location Audit and select Enable.
Once you enable the settings, you will be able to view Audits by clicking on More.

2. Creating an Audit

On the Audits Details page, click Add Audit.
Fill in the following fields, including selecting the Available Location and assigned auditor for the Audit:

Next, choose the Auditor and the Groups for your Audit:

Once you submit the details, you will be able to view your Audit on the Audit Listings page as Scheduled as shown below:

3. Starting an Audit
Go to the Audit details page and click on ‘Start Audit’. The following message will show:

Click on ‘Start Audit’. After the start of your start, you will see the following on the Audit details page:

Under the “Audit Items and Progress” tab you will find information pertaining to the total cost of Items within an Audit and the Assets selected for the Audit Location.
The Pending list shows all the Items waiting to be Audited. During an Audit you have the option to either Verify or Deny the Item present at the Audit Location. Flagged state includes any Items that the Auditor wants to highlight due to any issue at the site.
4. Verify, Deny and Flag Audit Items
You can verify an asset by selecting the checkbox next to its name and clicking on verify under the tab “Actions”. Once you verify the item, the following overlay will appear:

While verifying the Items, you can change the Quantity you want to verify for the Audit.
You can do similar actions while denying an Item in Audit:

When taking mass actions you will be able to verify individual quantities for all Items as shown below:

For Flagged Items you will be required to enter your comments and the Item quantity as shown below:

Results for verified, denied, flagged Items will be displayed as follows:

Note: After an Item is verified/denied/flagged from the Audit list, it will appear on the Listings page for Actions.
5. Scanning and verifying Audit Items
On the Audit details page, users can take actions on the Audit Items through scanning as well.

Once you click on Scan and Verify, select the Audit Location:

Once you have selected the Location for Audit, you will be able to scan Items:

The option to scan an Item will only appear after you have selected the Location for the Audit.
After entering the location, you will see the scanned items as follows:

If the scanned item is not present at the selected Location, the Item will be flagged as ‘Wrong Location’ and will be displayed in the results as follows:
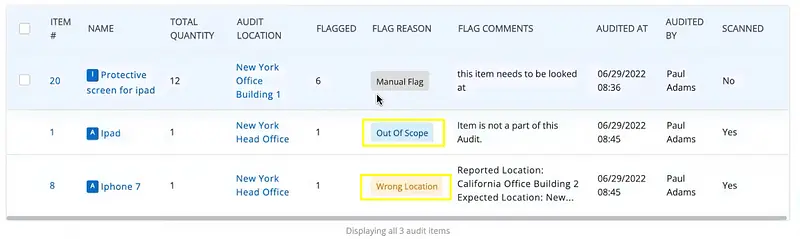
Any item flagged for being ‘Out of Scope’ means that the scanned Asset is not part of the Audit.
You can also scan and verify Asset Stock in Audits shown as follows:

When you scan a single unit of the Asset Stock, the scanned quantity will be displayed as 1. This will increase as you scan more units:

If you scan more than the quantity available at the Audit Location, the Item will be flagged for excess quantity as shown below:

6. Completing an Audit
After the Auditors taken relevant actions on items at the Audit Location and marked them as verified, denied or flagged, then the Account Owner can mark the Audit as complete.

The Account Owner will be required to take action for the pending items for the Audit to be completed.

Once action has been taken for all the pending Items, then the completed Audit appears as follows:

7. Audit Item details
For audited Items, you can view the related Audit information on its details page.

To view Audit history, go to the Item details page→ More→Audit History

Here, an overlay will appear where you can view all details of the Audit for the selected Item including whether it was verified/denied/flagged and the Audit Location:

8. Audit Alerts
To enable Alerts for Audits go to More → Alerts → Item Audit:

9. Audit Reports
You can run two reports for Audits namely All Audits and Audit Line Items.

Line Items Audit Report will appear as shown below:

You can also generate a Custom Report for Audits including Members and Line Items.
10. Dashboard KPIs
You can add a Dashboard KPI displaying all details for Audits in Progress as follows:

11. Custody Audit
Go to Settings → Add Ons → Audit Items → Custody Audit.

After this, when creating an Audit, you have to check the option ‘Include Checked Out Items’ when creating an Audit as shown below:

Once the Audit is in progress, you will be able to see two tabs for the pending items in the Audit:


For Items available at the Audit Location, you can simply verify, deny or flag them. However for checked out Items, a custody request will be sent as soon as you Start the Audit.
The custody verification request will be visible on the Item’s details page. The status of the Item is changed to ‘Audit Pending’ and the user will have the option to either Acknowledge Custody, Extend Checkout or Cancel Verification.

You can also view the verification requests under the Notifications Bell:

Here you can see custody verification requests for the Audit Location:

Checked out Items can only be verified or denied, not flagged and the action can only be taken once.
The owner will be sent an email requesting custody for all checked out Items.

When the owner acknowledges the custody you will be able to view the Item under Verified:
The status on the Item details page will be changed as shown below:

Note: You cannot verify/deny checked out Items by scanning them. Checked out Items cannot be flagged.
Read more: Location Management With Barcodes In AssetSonar


