This integration requires
This guide outlines the setup and workflows for our new EZO for Jira App. If you’re using an older version, read this quick guide for setup instructions and troubleshooting.
How does this integration complement EZO?
This integration provides support and ticketing capabilities that sync directly with the EZO asset tracking app.
1. Need for the integration
Companies using an IT service desk have to track dozens of tickets simultaneously to fend off delays in company tasks. Most IT service desks aren’t equipped to handle asset details in a comprehensive manner and thus, cross-referencing items with issues becomes a burden that keeps on stacking.
But imagine being able to extract all relevant asset details needed to resolve an issue without having to even switch between browser windows! EZO’s integration with the Jira Service Desk Cloud Instance ensures that all asset-related issues are resolved promptly. With quick issue resolution, you lower equipment downtime so your company’s productivity never falters.
2. Complete issue overview
Integrating EZO with Jira enables teams to quickly identify tasks at hand, issues associated with each item, and useful details such as item location and AINs.
With this integration, you can:
- Directly view the Assets and reporter linked with an issue in Jira. This helps employees quickly view relevant Asset details to understand the problem areas in depth. They can also associate additional items as per the requirements of the issue. Consequently, this enables more precise and thorough issue management.
- Track all Jira Issues related to an item directly from the Item Details Page in your EZO Account. A Jira Issues tab on the page references all the issues for the item so EZO users can easily view all relevant issues.
With a complete overview of issues, users can record equipment details,
Use our new integration to iron out operational workflows and cut down on repair time for a more productive office environment.
3. Common workflows
- An employee notices a broken printer and creates an issue for it. EZO tracks Asset details for the printer and Jira tracks the issue workflow.
- An on-field technician requires help with operating a forklift. The current user quickly views the issue on Jira and pulls the Asset details for the user.
- A customer requests memory extension for their laptop. The IT Helpdesk looks up the issue on Jira, pulls up the Asset details for the said laptop from EZO and identifies the upgrade required. All prior issues related to the laptop are also visible.
- An engineer wants to understand the maintenance requirements for your HVAC unit. He quickly pulls all the relevant issues for the unit from your EZO Account.
- An IT manager wants to update a software solution on all company laptops. She creates the issue on Jira and links all company machines to it. Employees in charge will pull up Asset details for all laptops from the service desk and carry out the updates. The issue will be tracked via Jira.
4. Installation process
Follow these steps to install and integrate Jira with EZO.
Note: For the integration to work, ensure that the Account Owner in EZO is present as an Admin in Jira. Ensure this is the case before you try integrating the two applications.
4.1. Install EZO For Jira Service Desk
First, set up the EZO App from your Jira Account.
1. Get EZO For Jira Service Desk from the Atlassian Marketplace and install it.
2. From your Jira Account, head to Settings –> Apps –> Manage Apps. You’ll find EZO under User-installed Apps.
3. Hit the configure button and fill in the data fields with the following:
- Your EZO Subdomain with the host i.e. “businessxyz.ezofficeinventory.com”.
- Your ‘Secret key’. Get it from EZO Settings → Add Ons → API Integration. It will look like “de2fce1ad683976d2f515d0876027994”.
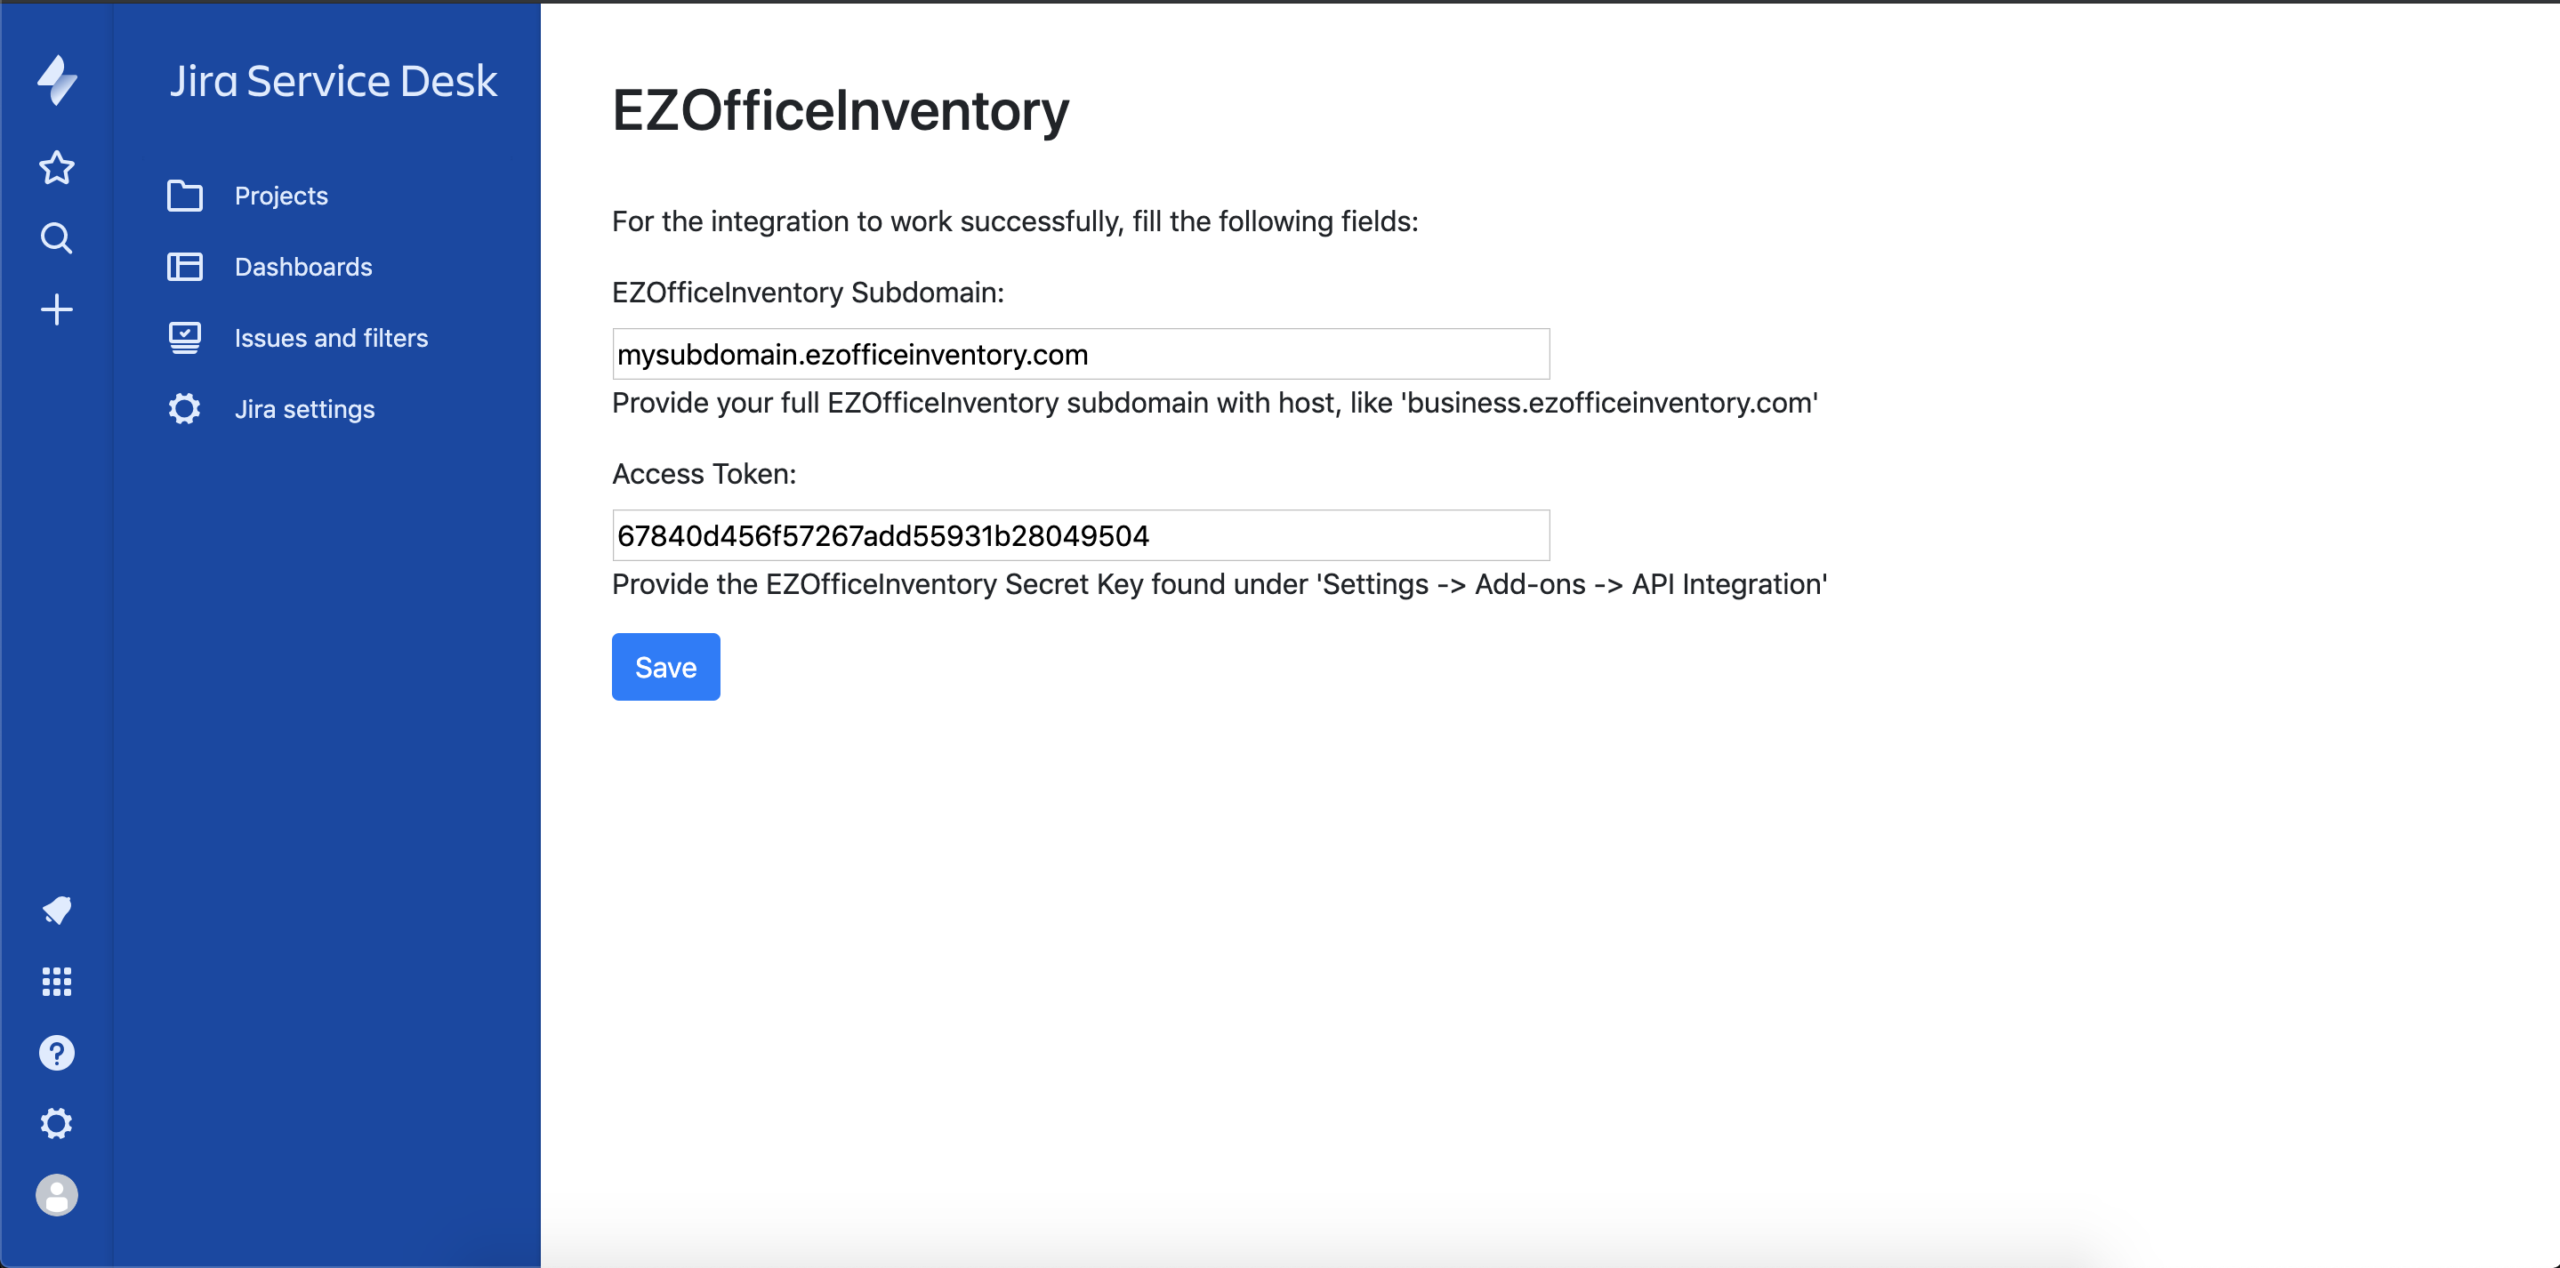
Click ‘Save’. Now, a new Asset Container should be accessible in your Jira Service Desk. This will indicate that your Assets, Asset Stock, and Inventory items are available in Jira.

If you don’t see the Asset Container in your issues, learn how to add an asset field manually to Jira.
4.2. Enable the Jira integration
Next, enable Jira from EZO. Note that only Account Owners in EZO have permission to do this.
1. L
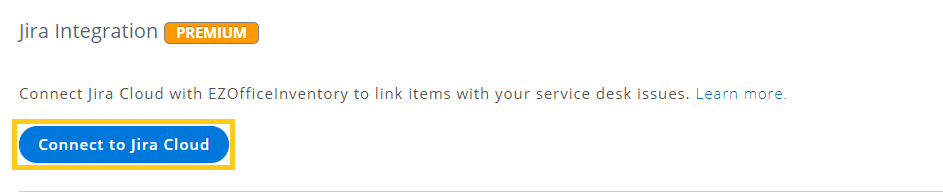
2. This action will require integration permissions that need to be provided by Atlassian. You will be redirected to Atlassian.
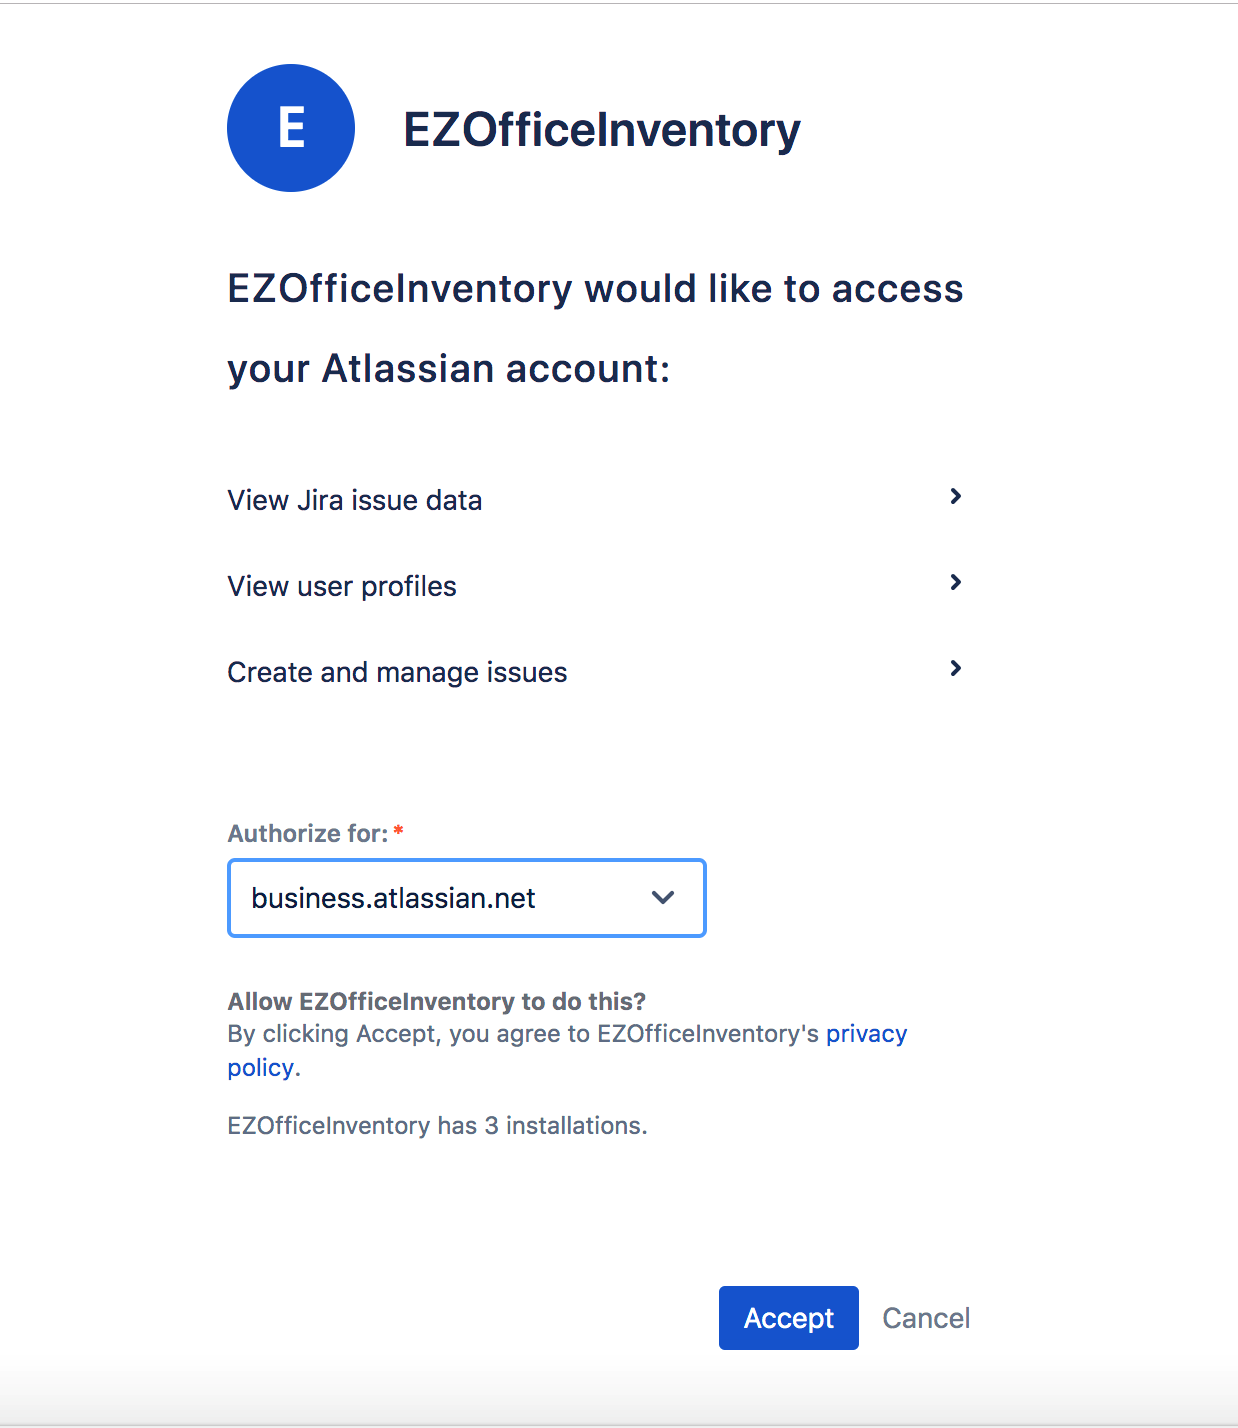
3. Select your Atlassian Account from the ‘Authorize for’ dropdown. Click ‘Accept’ and allow access to EZO.
That’s it! The integration is complete. You’ll now be taken back to EZO.
4.3. Choose Asset Attributes
When connecting Jira from EZO, you can also choose which Asset Attributes to display in Jira. From Settings –> Add Ons –> Integrate Jira, click on ‘Choose Attributes’.
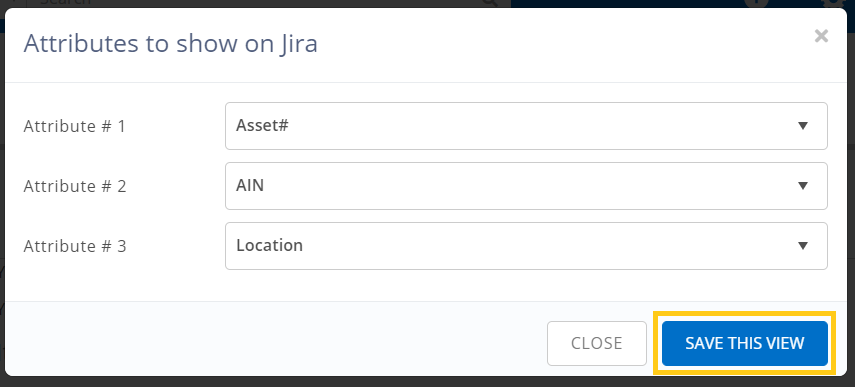
A new dialog will prompt you to make your attribute selections. Once done, click on ‘Save this view’ to save the changes.
5. How the Integration Works
If you’ve successfully integrated the two applications, you’ll be able to see an Asset Container against your issues in Jira. Click on ‘Open EZO’ and you will be redirected to the Reporters profile. Here you will be able to see all Assets checked out, reserved or linked to the ticket.

If no Assets are linked with the issue, the Asset Container will only display the ‘Link asset’ button. On the other hand, if Assets are linked with the issue, they’ll be visible under the Asset Container.
5.1. Link Items with an issue
You can link Assets, Asset Stock, and Inventory items to an issue by choosing them from the available item sections or by searching the EZO catalogue from Jira. Inventory items can also be searched and filtered using Item Type → Inventory.
Here is an example of linking an Asset from Checked Out Items:

Additionally, you can link multiple items with an issue as needed. Once linked, expand the Linked Items tab to view item details and verify linkages.

5.2. Navigate to the Item Details Page from Jira
If you’d like to see an Asset in EZO, expand its view in the concerned issue in your service desk and click on its Asset name.

This will open EZO in your browser. Scroll down the Item Details Page to see all the Jira Issues linked with the said Asset.

5.3. View maintenance records in Jira
Maintenance records created in EZO sync to Jira. Let’s look at one such service in Jira.

This issue synced to Jira from EZO. The record title displays the Service Type of the records (in this case, Maintenance) and the serial numbers of Assets to be maintained (in the case, Asset #986 and #1069).
The Asset Container will list these items and also enable you to link new ones. This comes in handy when users forget to log Assets maintained during a service session in EZO.
Moreover, you can also examine updates recorded against a service in EZO in Jira. These appear under the Activity section. For instance, if the service is marked complete in EZO, a comment will appear under Activity indicating so.
6. Troubleshooting Errors
Error 1
Unable to display Asset details as you’ve provided an invalid EZO Subdomain or Token. To update, go to Settings –> Apps –> Manage Apps. From here, find the installed EZO App and hit ‘Configure’.
Solution: This usually happens when the subdomain for Jira is changed in EZO or a custom domain is added. To fix, go to your Jira Account and update the settings in the EZO App.
Note: Existing data will NOT be impacted by the resetting of the connection.
Error 2
Unable to display Asset details as this user does not exist in EZO. Add them to your EZO account and assign them the same email address as in Jira.
Solution: This happens when a user in Jira doesn’t exist in EZO. To remedy this, create this user in EZO and assign them the same email address as they have in Jira.
Error 3: Access Control
Unable to display Asset details since you aren’t authorized to view them as per your EZO Settings. Contact the Account Owner for authorization.
Solution: Your user role in EZO does not allow you access to the concerned Asset. Contact the Account Owner for permission to view.
Error 4: Unknown Errors
There was a problem accessing the data. Please try again later. If the problem persists, email us at support@ezo.io.
Solution: This can happen for two reasons:
1. While installing the EZO app from Jira, you’ve provided an invalid Access Token or EZO subdomain. To troubleshoot, define your app configurations again from Jira.
2. When the subdomain for the account is changed in EZO or a custom domain is added. To fix, provide the updated subdomain in your Jira app configurations.
Have queries or feedback for us?
If you have any comments or questions regarding our integration, drop us an email at support@ezo.io.


