
EZO enables enterprise-grade project and asset operations by providing a centralized system to track resources, workflows, and dependencies across projects. The Projects module is designed to support cross-functional coordination, multi-site visibility, and operational control, ensuring that assets, work orders, and procurement activities are aligned within a unified execution framework. This allows organizations to manage complex initiatives with full visibility into resource utilization, ownership, and progress at scale.
Need complete visibility into the resources being used across your projects? With EZO’s Projects module, you can consolidate and track all critical project-related resources—Items, Checkouts, Reservations, Maintenance, and more—in a single, centralized workspace.
Whether managing long-term initiatives or recurring operational efforts, the Projects module lets you link key components like Items, Members, Purchase Orders, and Work Orders to a single project. This allows you to monitor usage, ownership, and progress without jumping between modules.
In this blog, we’ll walk you through how to enable, configure, and make the most of the Projects module so you can optimize resource allocation, reporting, and accountability—project by project.
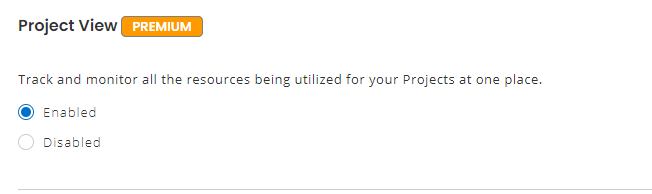
1: Enable Project View
To create a Project and track associated items/work, go to Settings → Add Ons → Project View and enable this setting.
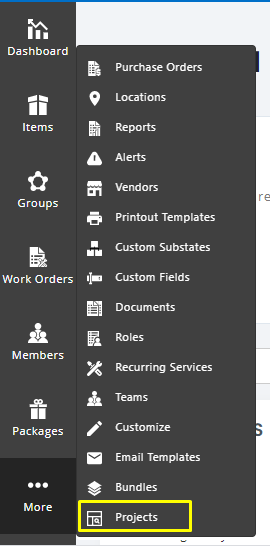
2: Create a new Project
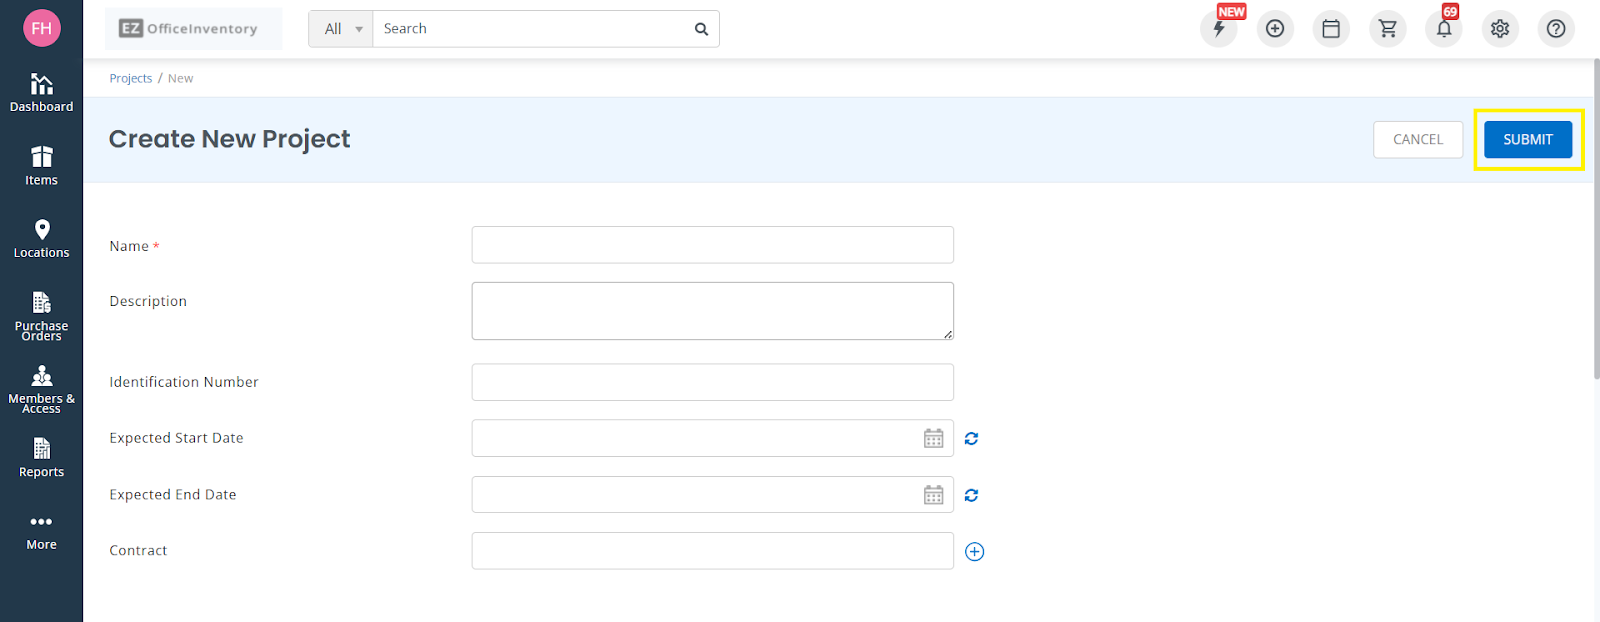
To create a new project, go to the Navigation → More → Projects.
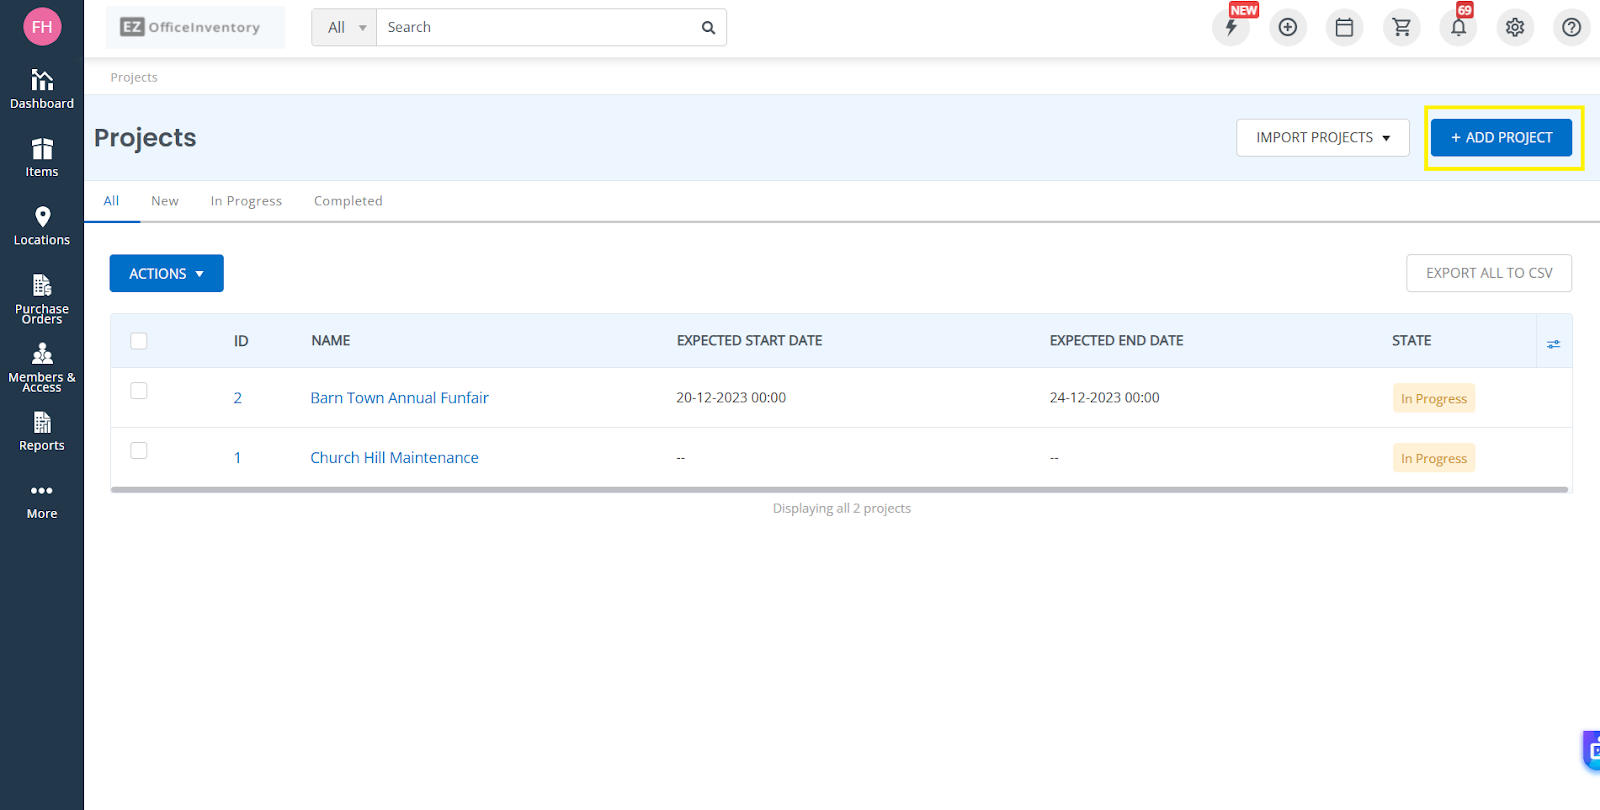
To start a new project, click on Add Project.
On the Create New Project screen, you will need to enter the name of the project (mandatory) and other relevant information.
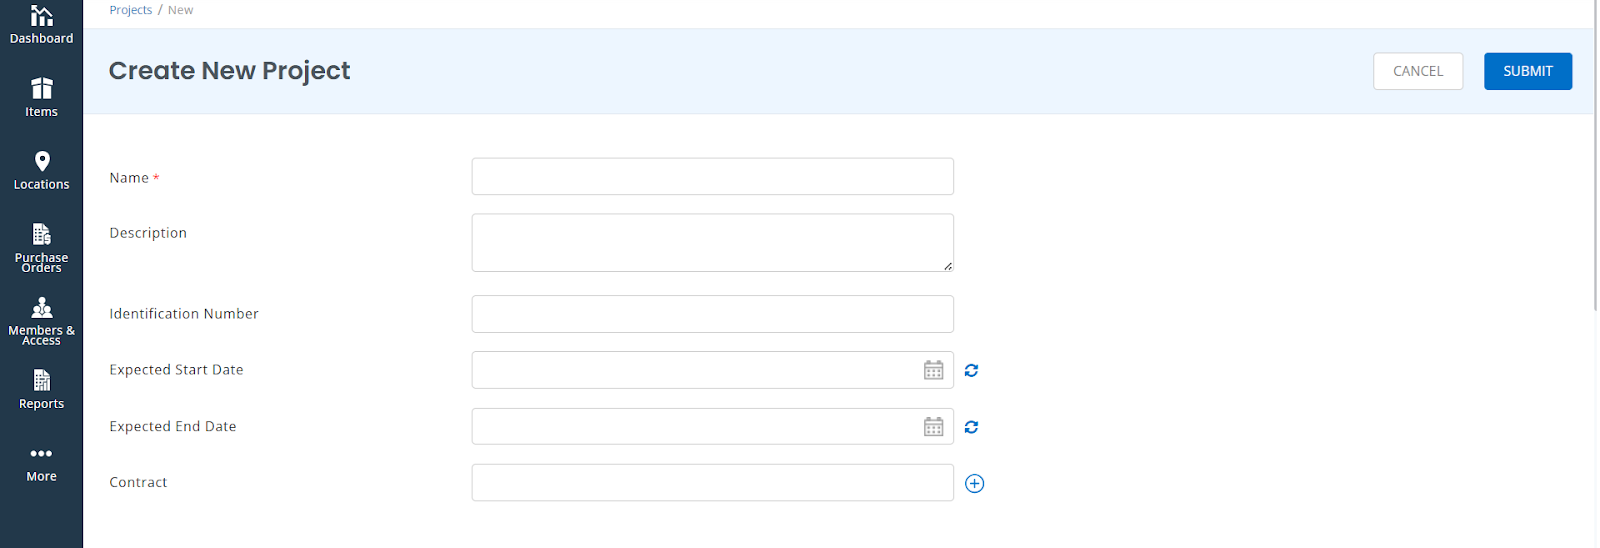
You may also link a project to other modules to streamline cross-functional workflows and reporting.
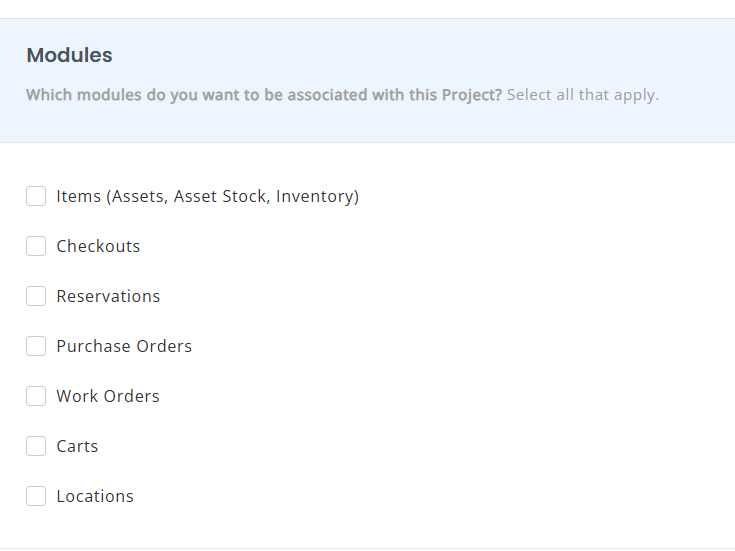
Projects can be associated with the following modules:
Many to Many Relationships
- Members – Many Members to Many Projects
- Items – Many Items to Many Projects
- Locations – Many Locations to Many Projects
Many to One Relationships
- Work Orders – Many Work Orders to One Project
- Purchase Orders – Many Purchase Orders to One Project
- Checkouts – Many Checkouts to One Project
- Reservations – Many Reservations to One Project
- Carts – Many Carts to One Project
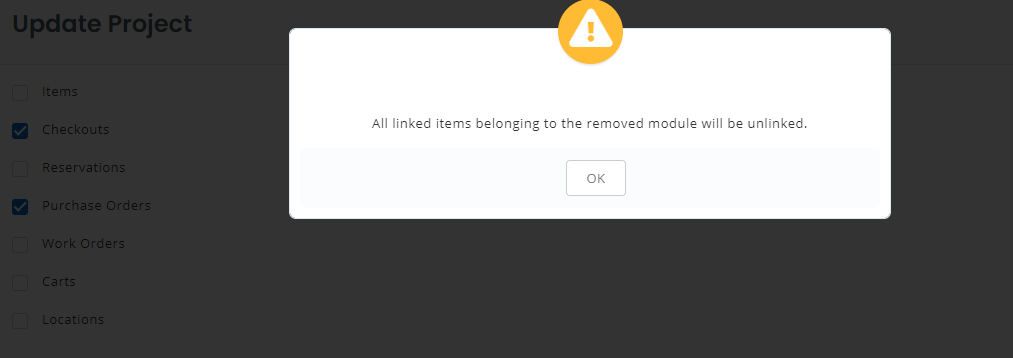
Note: You can only add/remove modules while creating a Project or while it is in the New state, even after it has been created. However, once you start a project, you won’t be able to add new modules.
You may also add records for the modules (Assets, Asset Stock, Inventory, Purchase Orders, Work Orders, etc.) you associate with the project.
For a Project in a New state, you may remove a module; however, all linked records will also be removed with the following warning.
Next, choose the assigned users for your Project and click Submit.
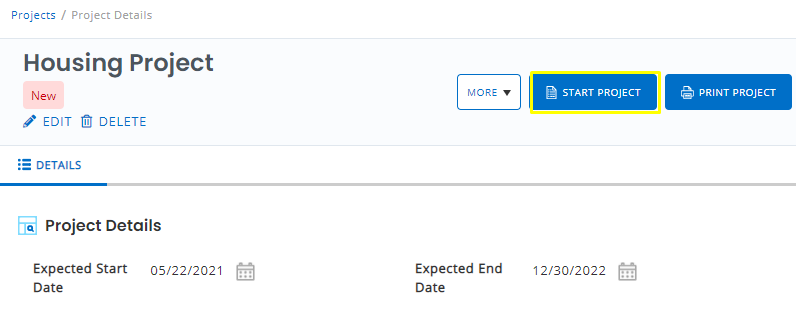
Now the Project is in a new state. In this state, you may make further changes or add new records. Once all modules are finalized, you can Start Project.
2.1: Import mass projects via CSV sheet
You can create or update multiple projects in bulk using a CSV sheet.
Note: The NAME field is mandatory. The system uses a combination of the Identification Number and Name to ensure project uniqueness.
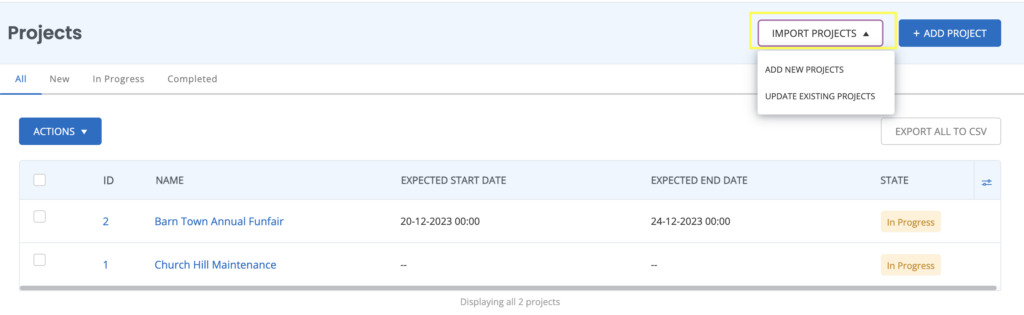
Limitations
- The State of the project cannot be updated via CSV import.
- You can add new contracts, assignees, and records through CSV import, but you cannot unlink or remove them.
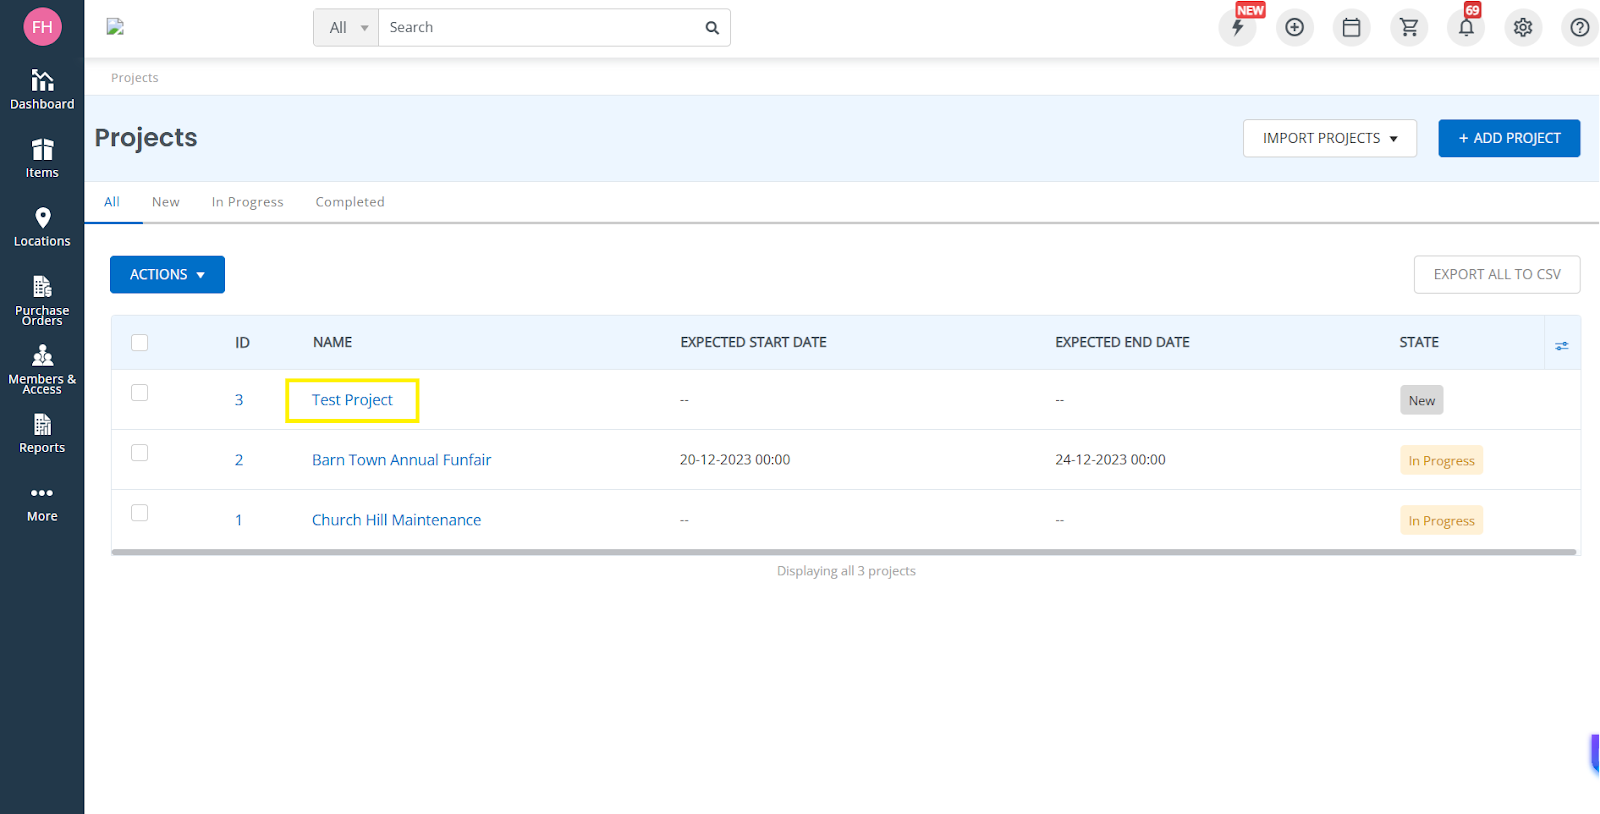
3: Projects Page Overview
Once a project has been created, you may make additional changes before you start it. Do this by opening the relevant project from the listing page:

From the Project Details page, you can:
- Edit the following for the project:
- Update basic information
- Associated Modules (Before starting the project)
- Assignees
- Delete the project
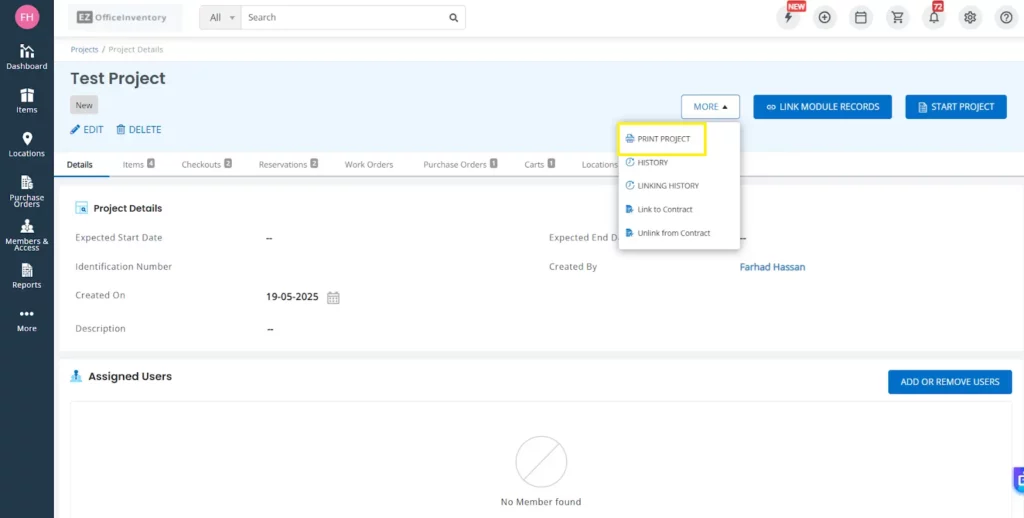
- Access More options:
- Print Project
- History
- Linking History
- Link to Contract
- Unlink from Contract
- Link Module Records
- Start Project
- Project Tabs (If modules are associated)
- Details
- Items
- Checkouts
- Reservations
- Work Orders
- Purchase Orders
- Carts
- Locations
- Contracts
3.1: Details Tab
The Details tab allows you to:
- View Project Details
- View and modify Assigned Users
- View and attach Files
- View and leave relevant Comments
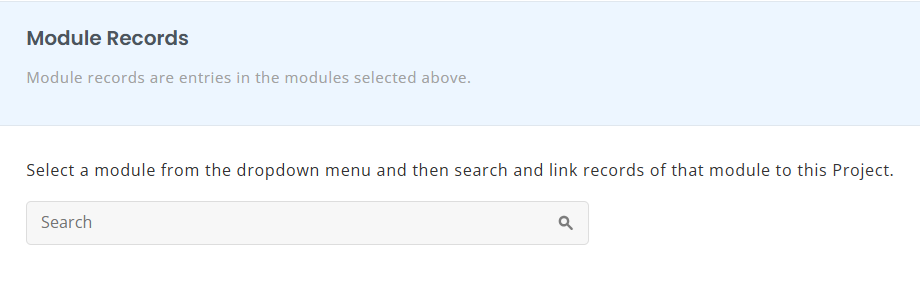
3.2: Linking Module Records
You can link new records for the associated module to easily keep track of resources. You can link the following kinds of records to projects:
- Assets
- Asset Stock
- Inventory
- Purchase Orders
- Work Orders
- Carts
- Locations
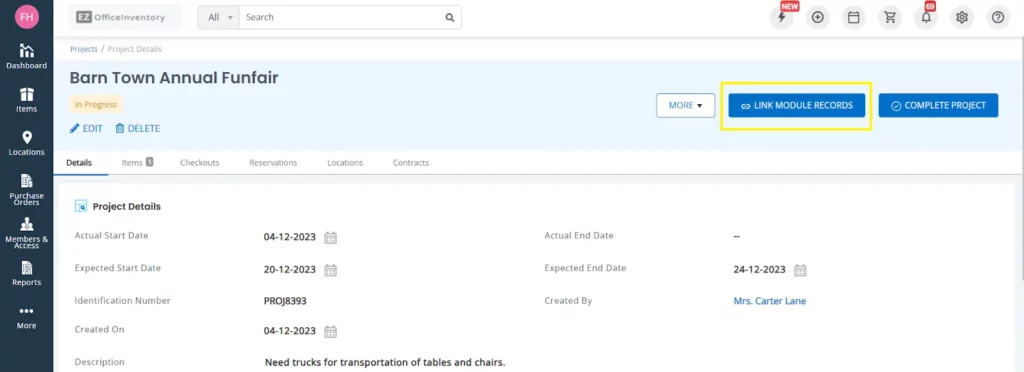
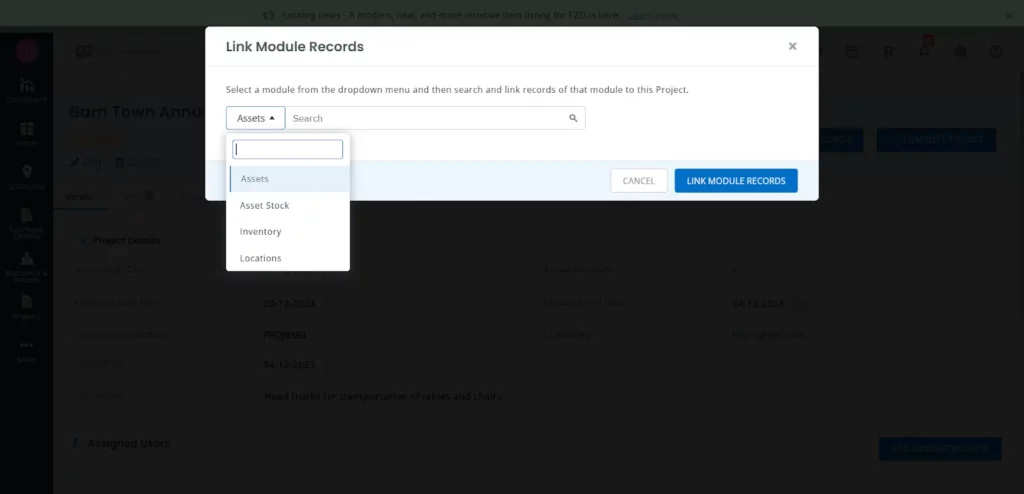
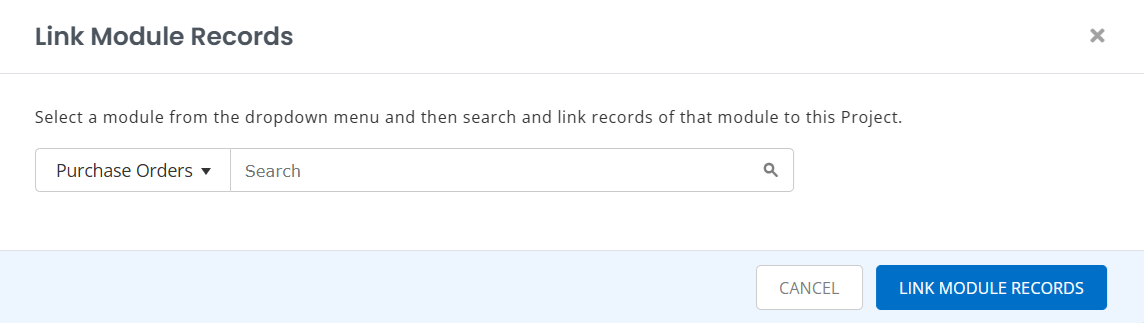
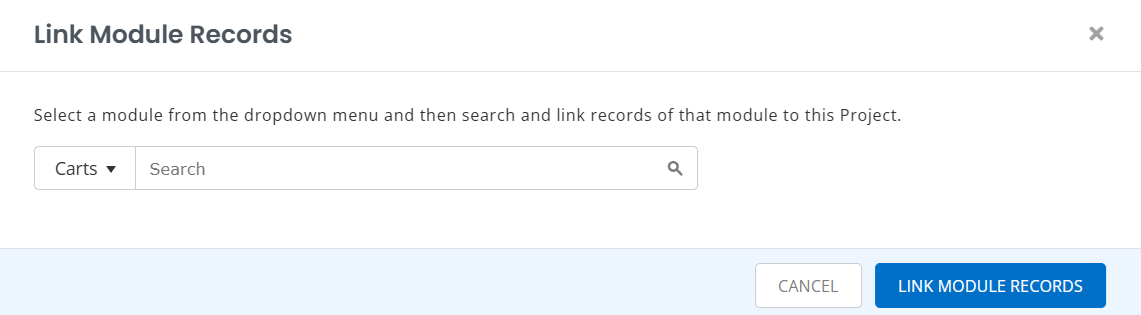
To link module records, open the relevant project and click on Link Module Records.
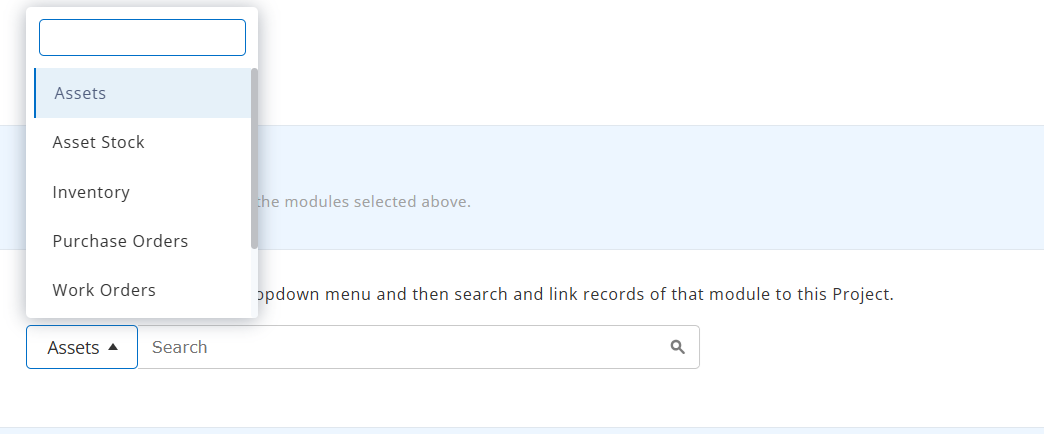
Select the module for which you want to link the record.
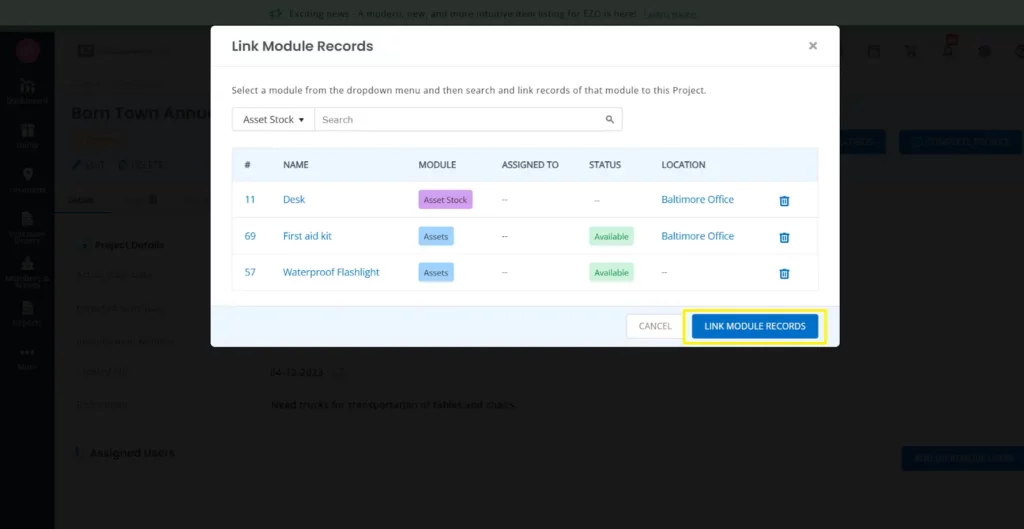
Then search and select all the relevant items to be linked. You may select multiple modules to search and select their relevant records before clicking the Link Module Records button to add all the records.
You can then find these records in their relevant tabs.

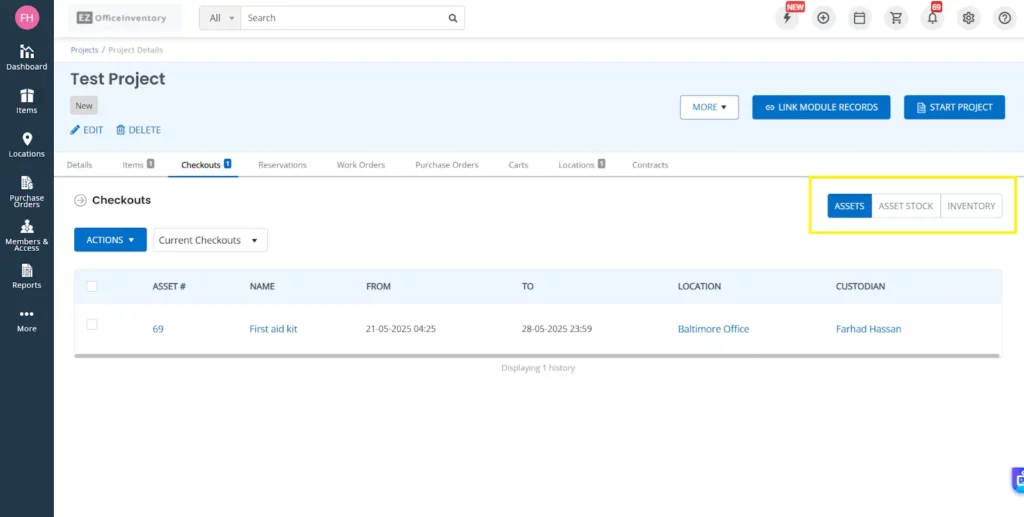
Once you have linked all relevant Items, you can view them on the Project Details page. On the Items and Checkouts tabs, you can also toggle between sub-tabs to check which Asset, Asset Stock, and Inventory items are linked.
3.3: Unlinking Module Records
To unlink a record:
- Go to the relevant tab (e.g., Items).
- Select the record.
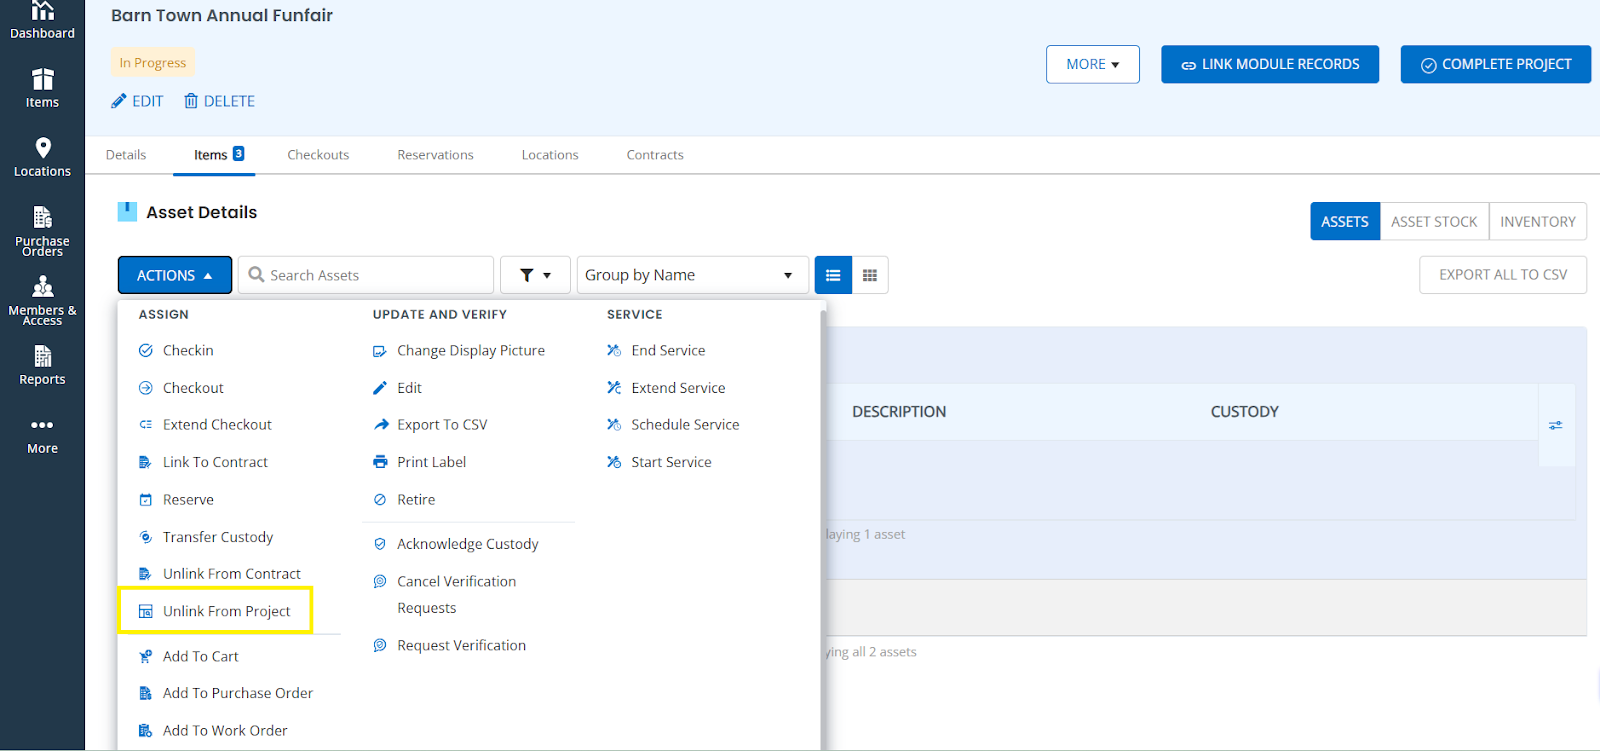
- Click Actions → Unlink from Project.
Note: You may also link/unlink the records from their respective listing/details pages, too.
Note: You can add up to a maximum of 5 Projects when linking to Items.
3.4: Items
3.4.1: Assets


If you haven’t associated any assets with the project, you can:
- Follow the Link Module Records flow (Link to Section 3.2)
- Click Add Asset under the Assets sub-tab within the Items tab

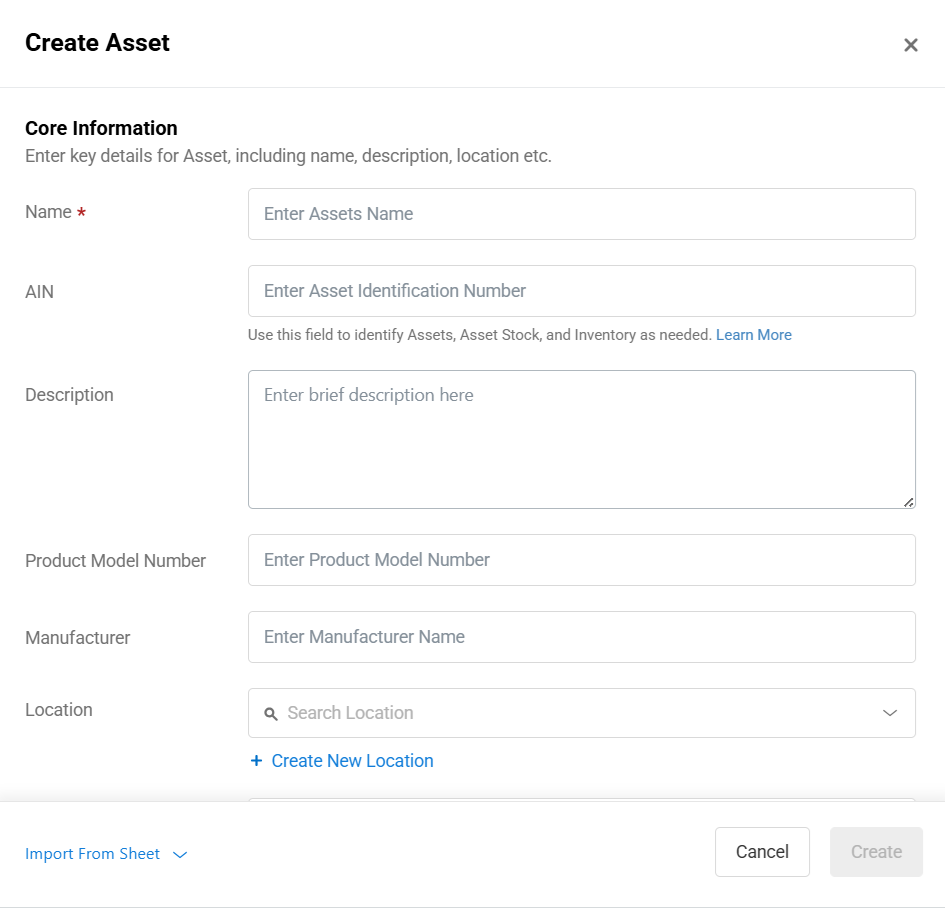
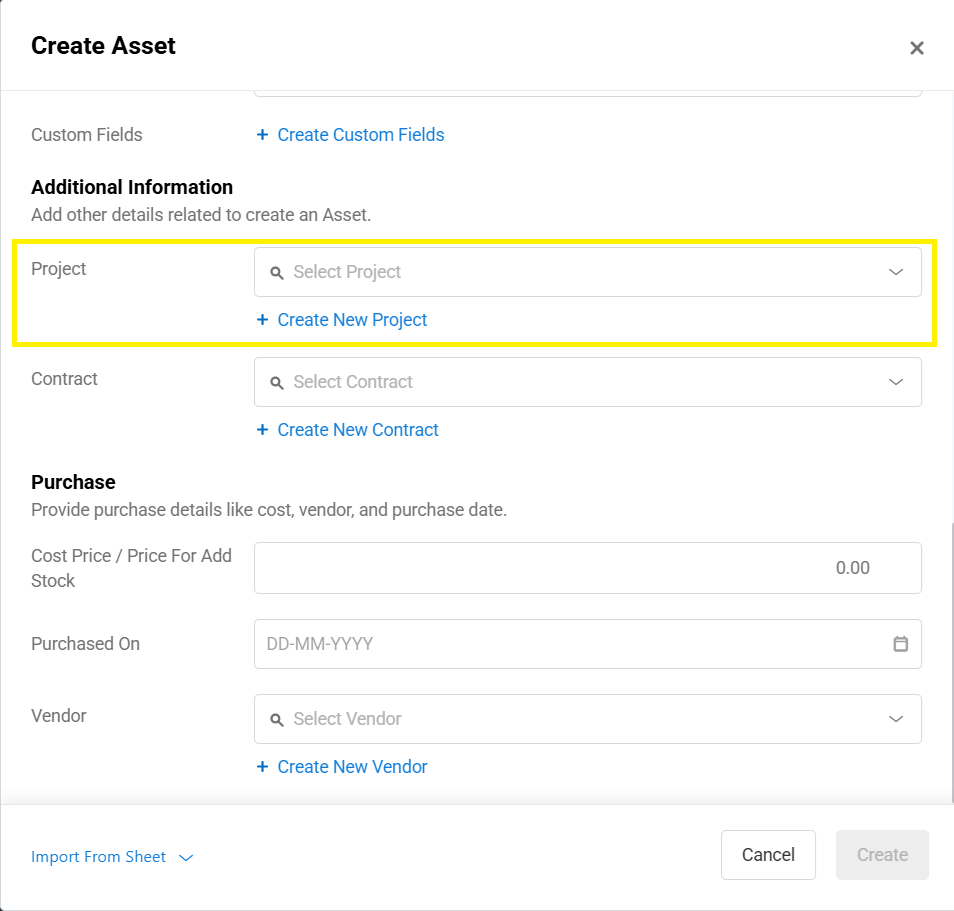
When you click on Add Assets, you are redirected to the Create Asset page, which allows you to create a new asset and link it to a Project as outlined below:
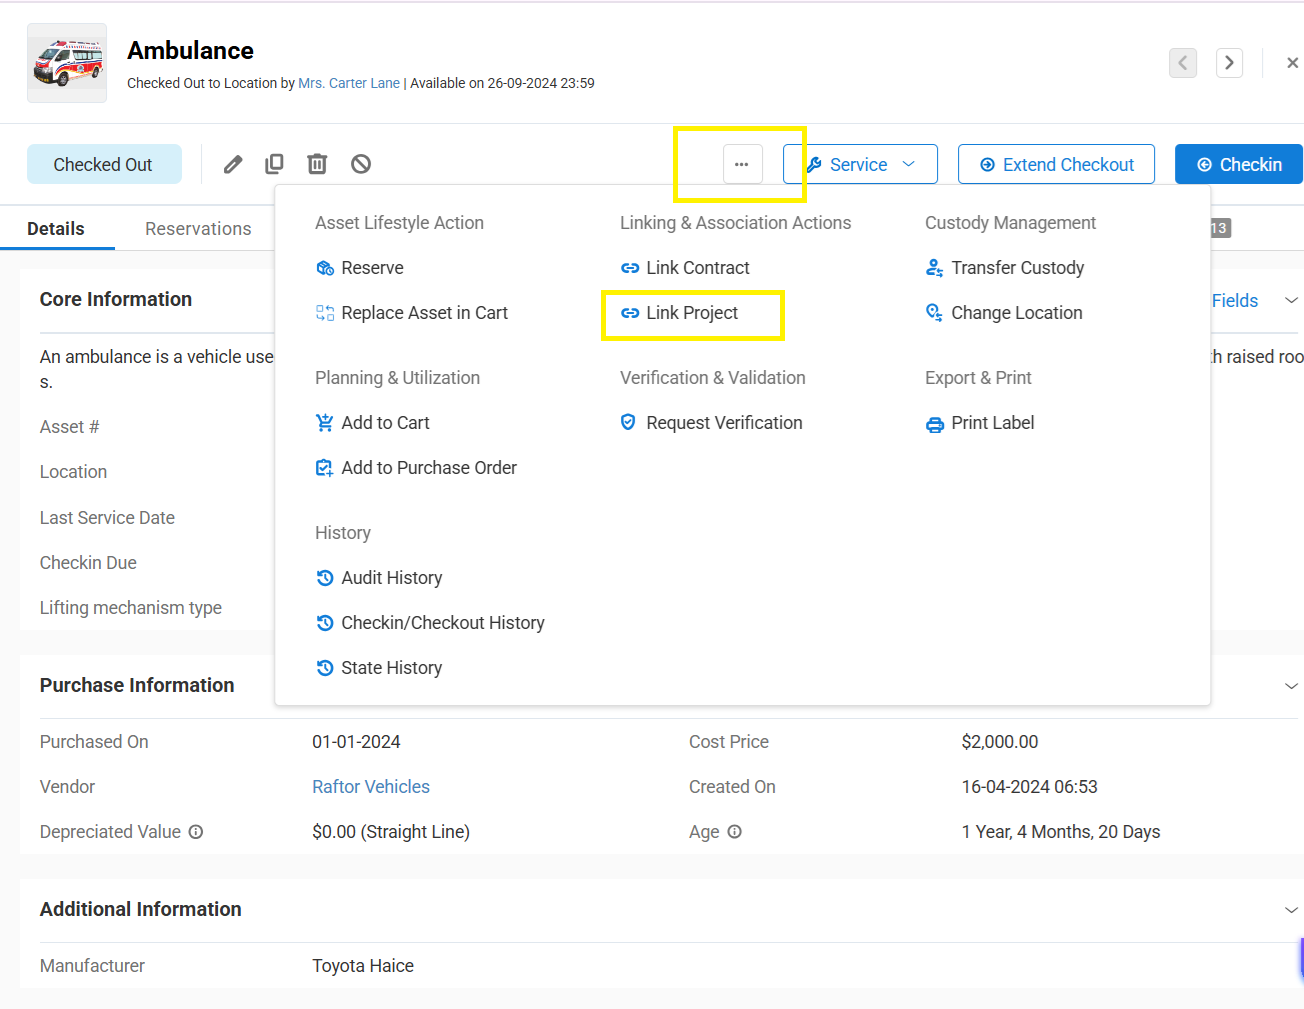
Alternatively, to link an existing asset:
- Go to Items → Assets → [Relevant Asset] → … (Ellipsis) → Link Project
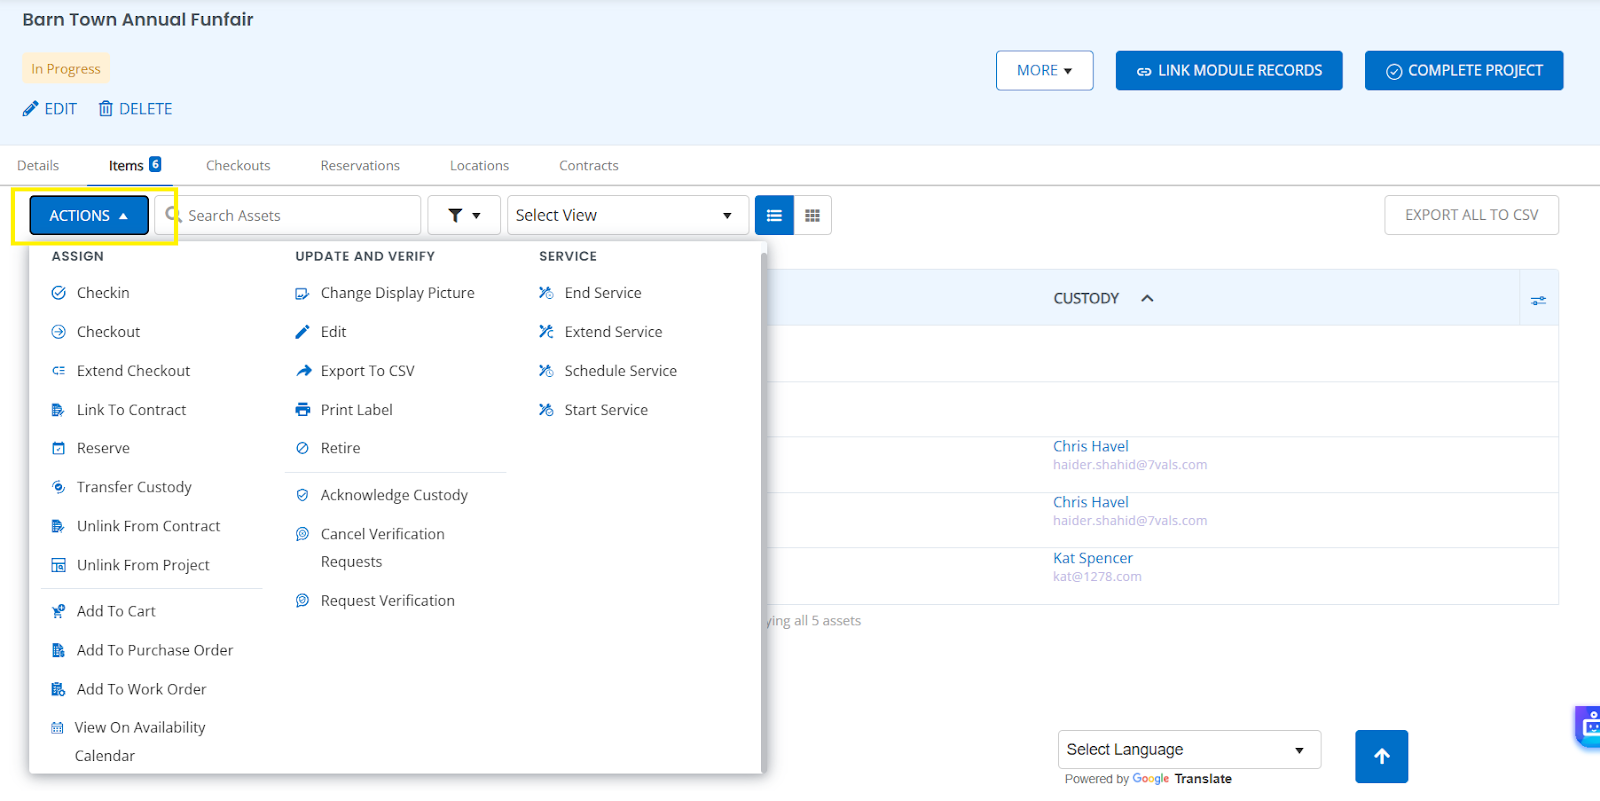
Finally, you may also perform a number of actions on these added assets directly from the project page by clicking on the Action button, as displayed below:
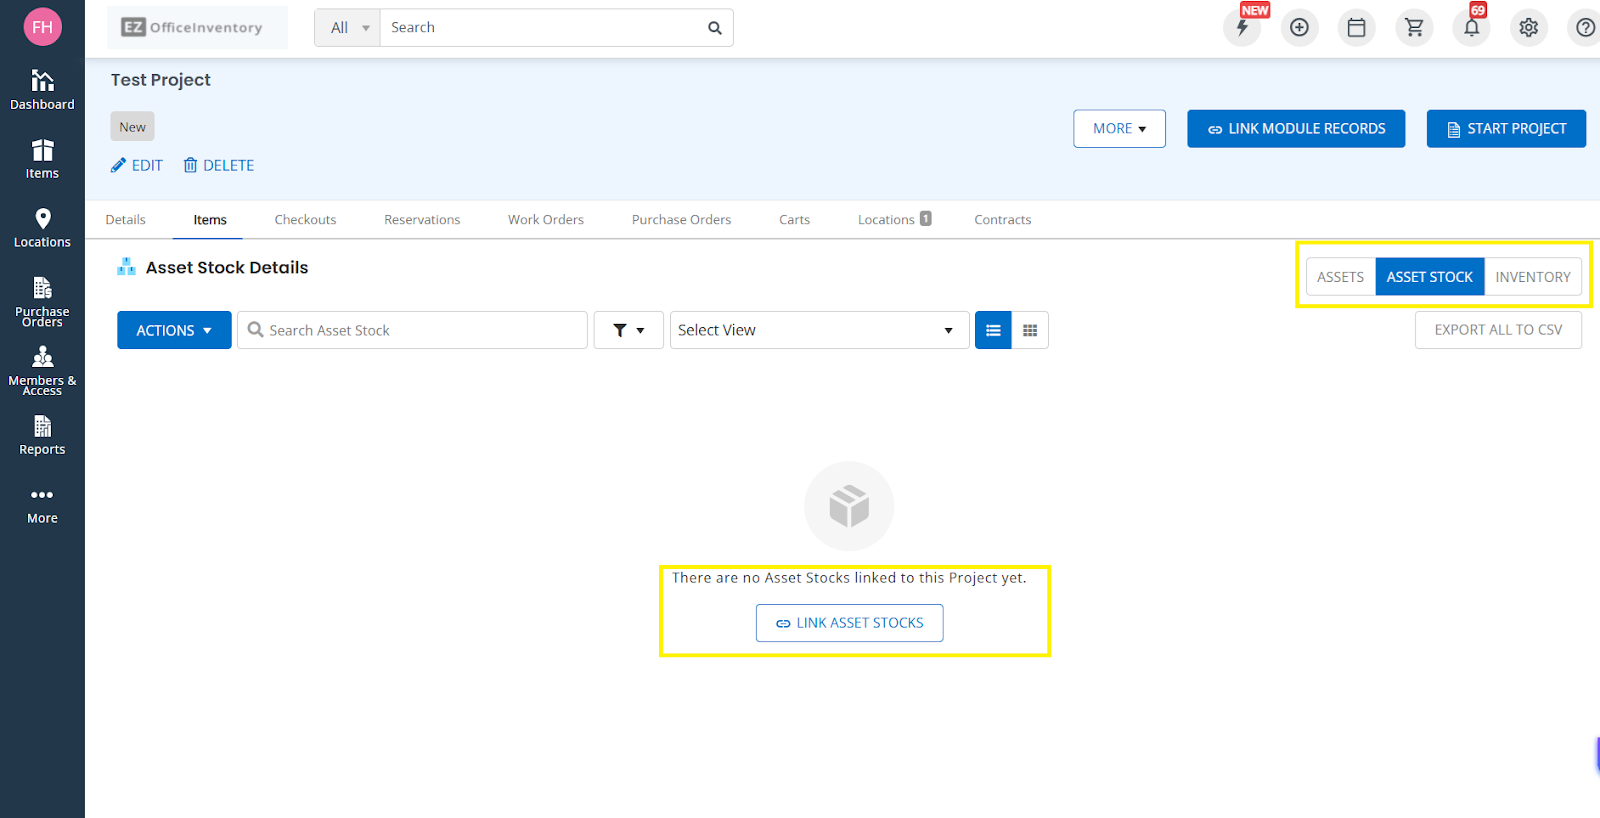
3.4.2: Asset Stock & Inventory
- Go to their respective tabs
- Click Link Asset Stock or Link Inventory
- Select and link the relevant records
3.5 Checkouts
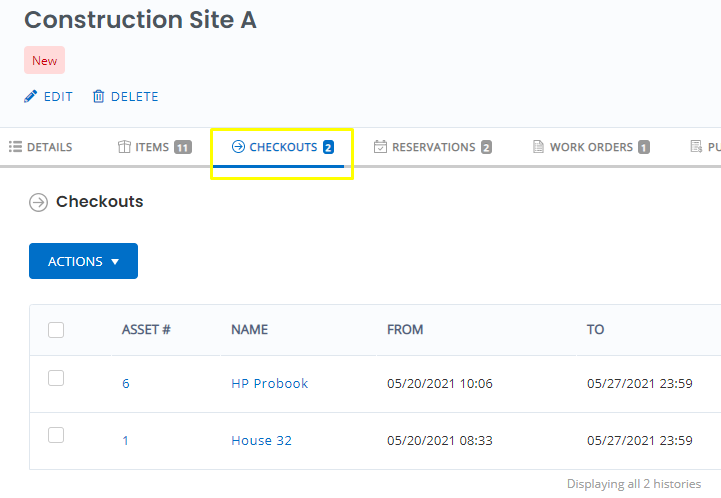
Checkouts on the Projects page streamline the workflow by displaying all related Items present under a single tab. Users don’t have to find Assets from their listing/details page; instead, they can directly take actions on Items from the Projects page.
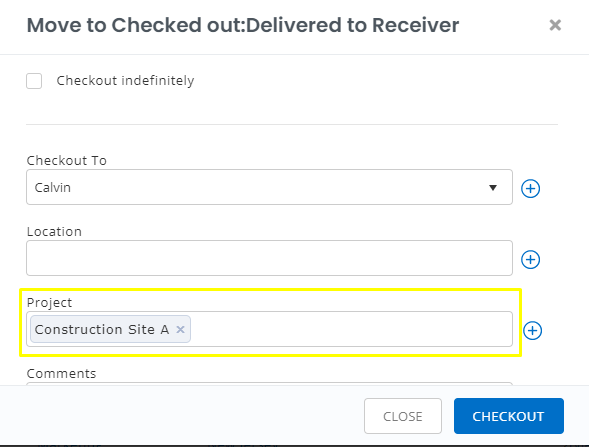
If you have associated the Checkout module with the project, you may track relevant item checkouts. Go to the Projects Details page → Items tab → Asset/Asset Stock/Inventory.
From here, you can select multiple items and check them out. Make sure that the item you want to check out is in the Available state.

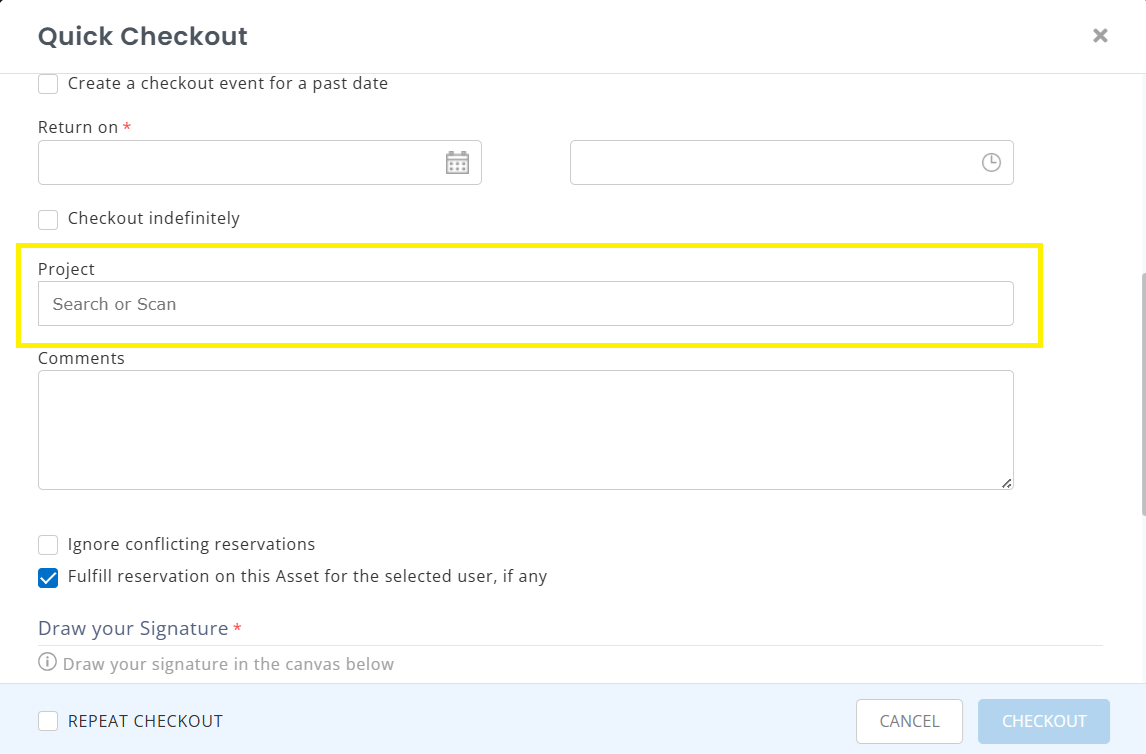
Once you click on Checkout, an overlay will appear prompting you to enter other relevant information.
Once done, you will be able to view the checked out Items, under the Checkouts tab on the Projects page.
You may also link a checkout to a specific project when checking out any item.
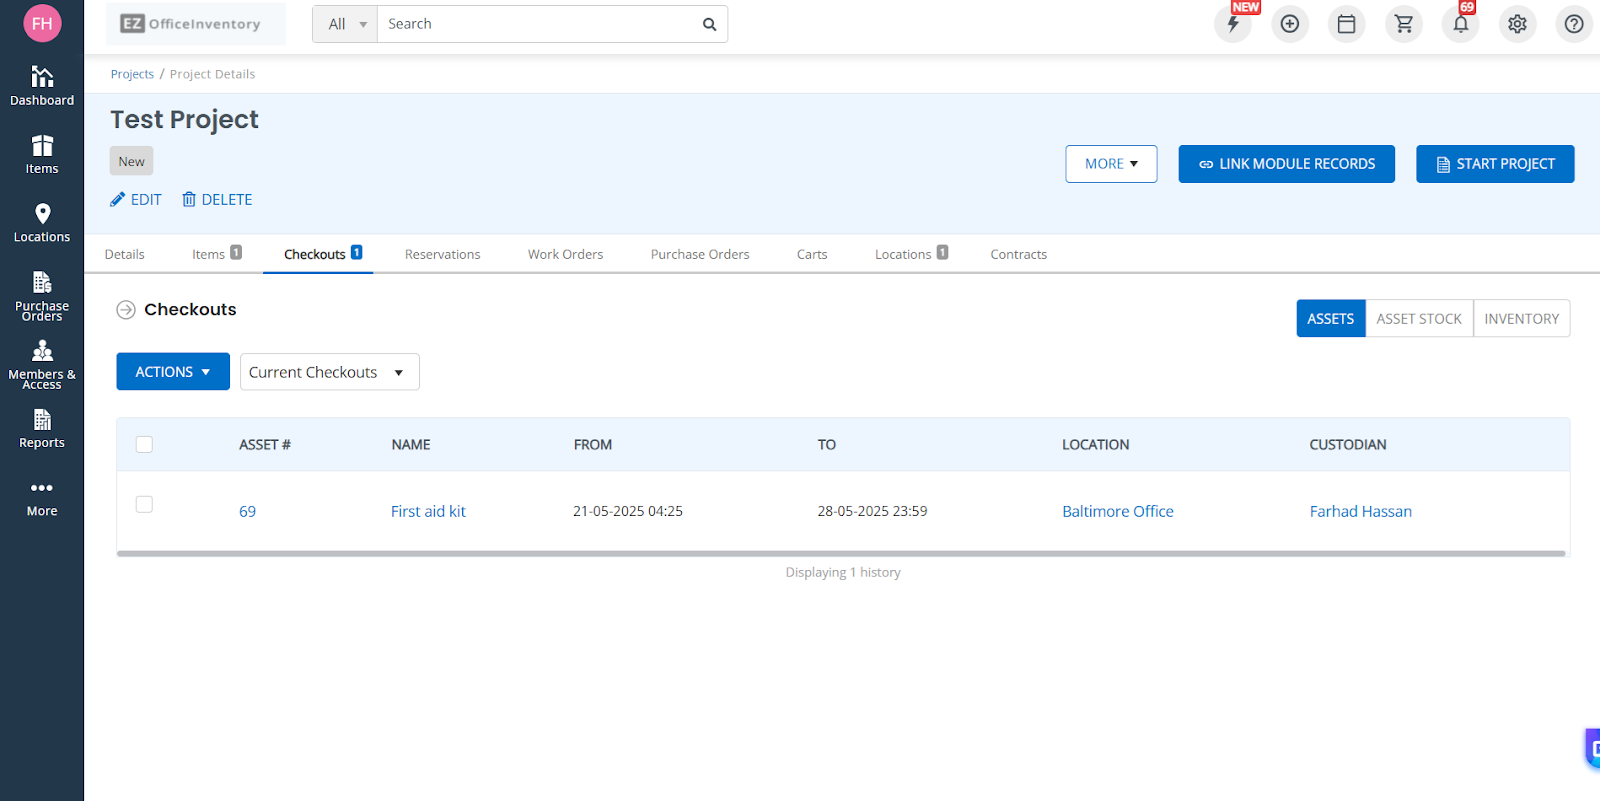
You may switch between the Asset, Asset Stock, and Inventory tabs to view checkouts of the relevant item.
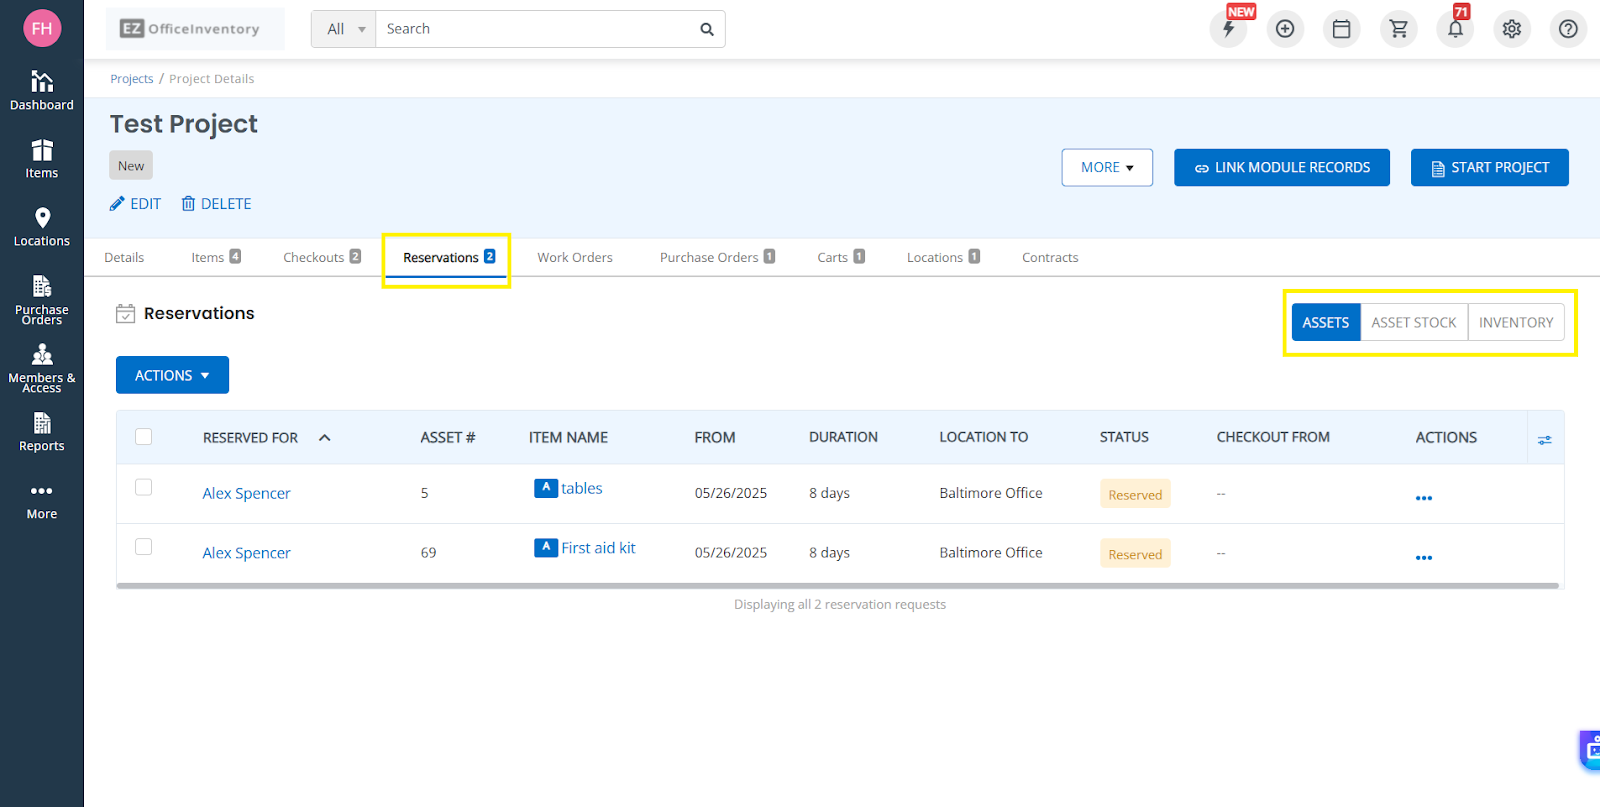
3.6: Reservations
You can reserve items directly from the Projects module.
- Go to the Projects Details → Items tab → Asset/Asset Stock.
- Select all the items you wish to reserve, expand Actions, and click on Reserve.
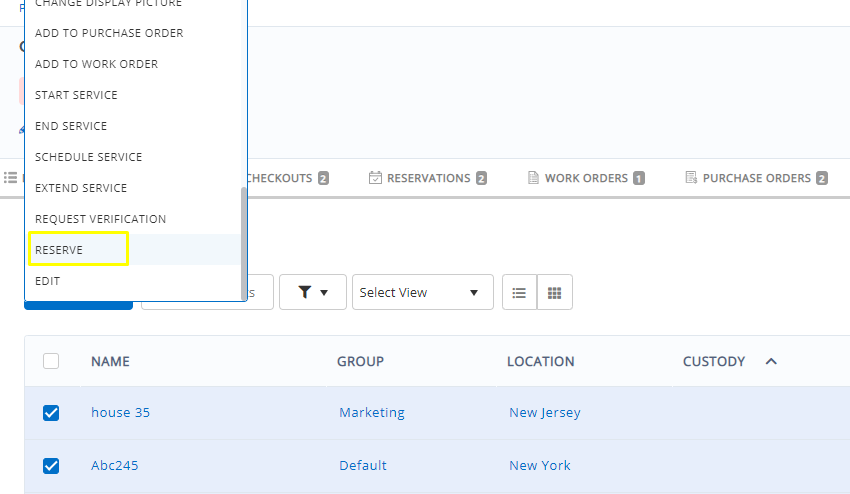
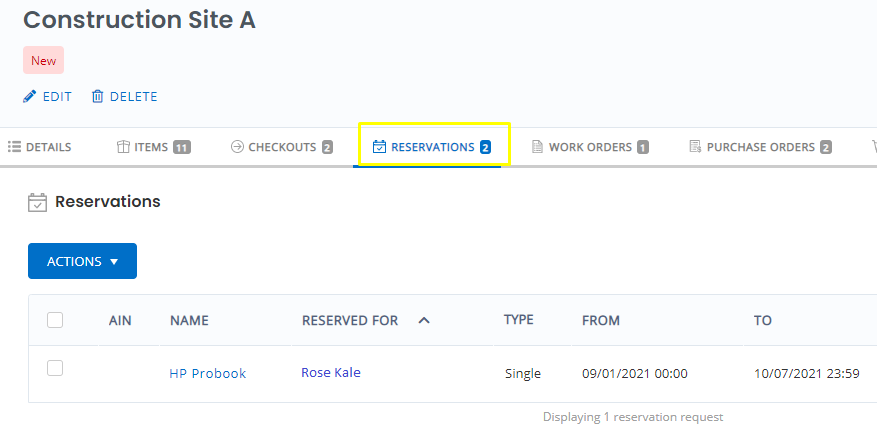
An overlay will appear, prompting you to enter the details about the reservation. You can view the reserved Item under the Reservations tab of the linked Project:
Note: Reservation requests are not added to Projects until the requests are approved.
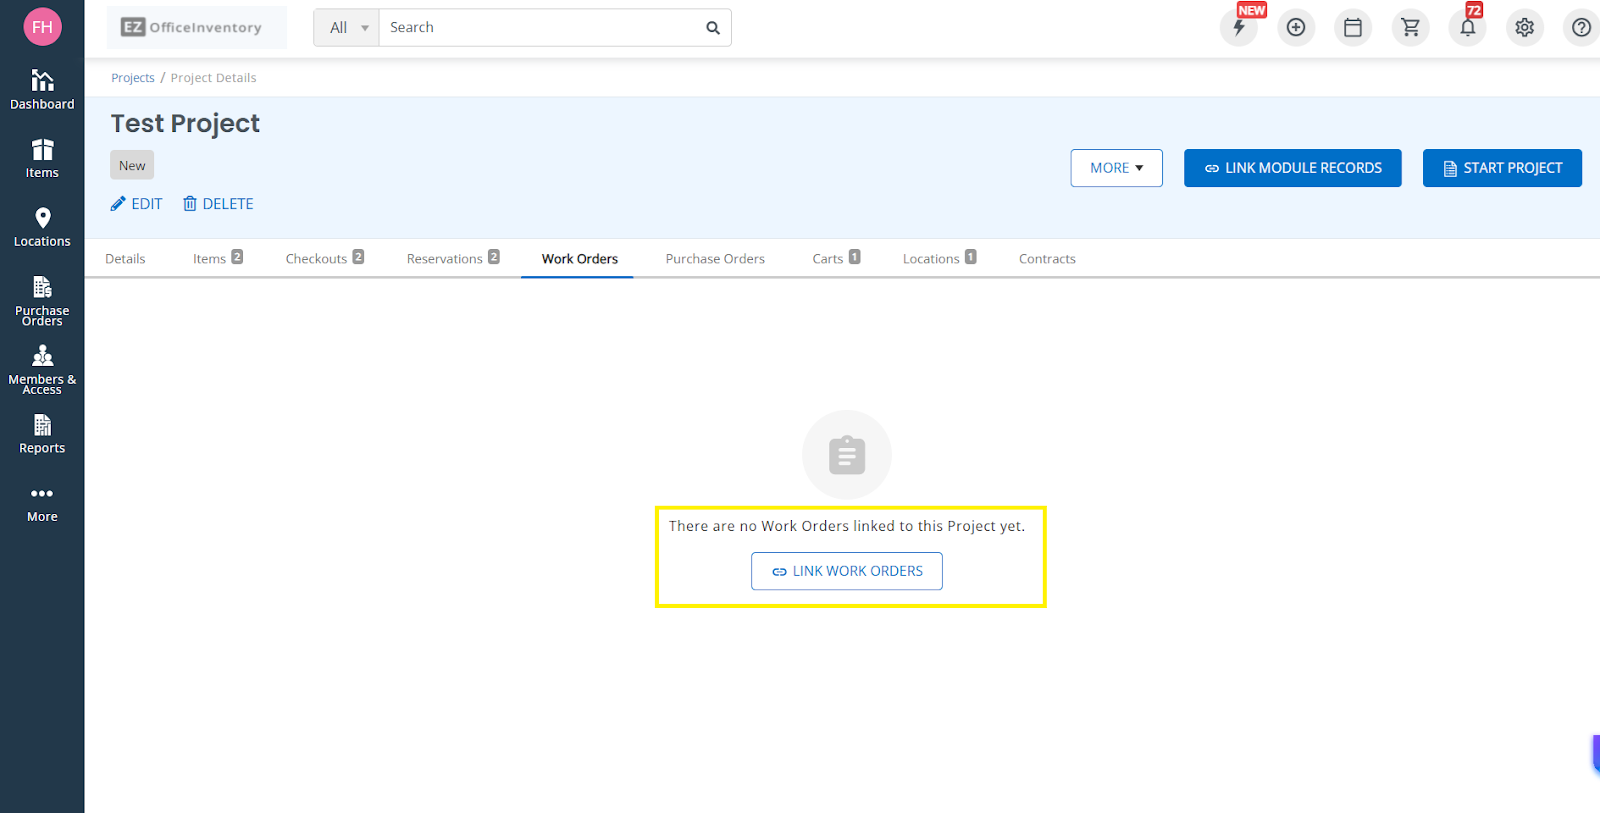
3.7: Work Orders
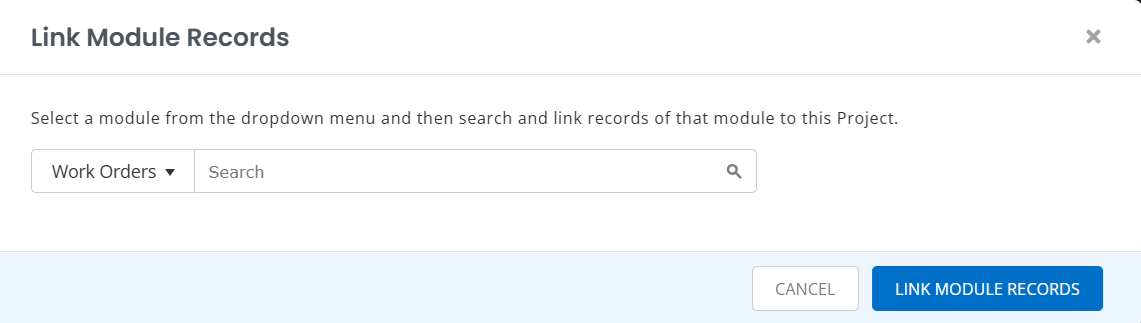
To link a Work Order, go to the Projects details page → Work Orders → Link Work Orders.
You will see the option to search and link a Work Order record. Search for and select the relevant work order, and click on Link Module Records.
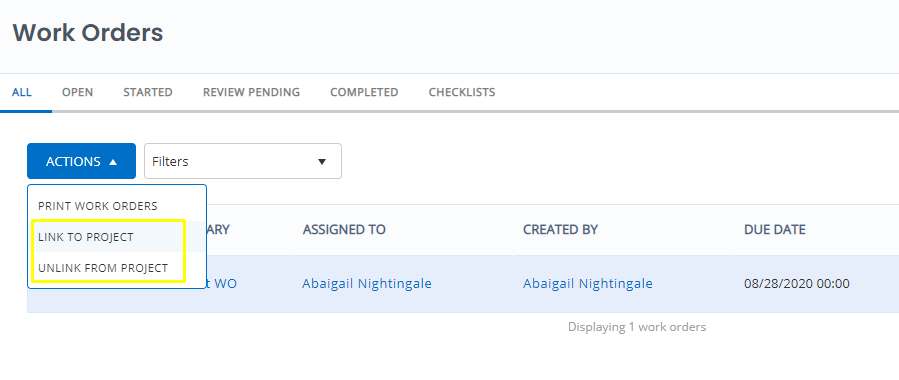
Alternatively, go to Navigation → Work Orders, open the Work Order, click Actions, and select Link to Project.
The linked Work Order will appear under the Work Orders tab of the project.
3.8 Purchase Orders
To link a Purchase Order, go to Project Details → Purchase Orders → Link Purchase Orders
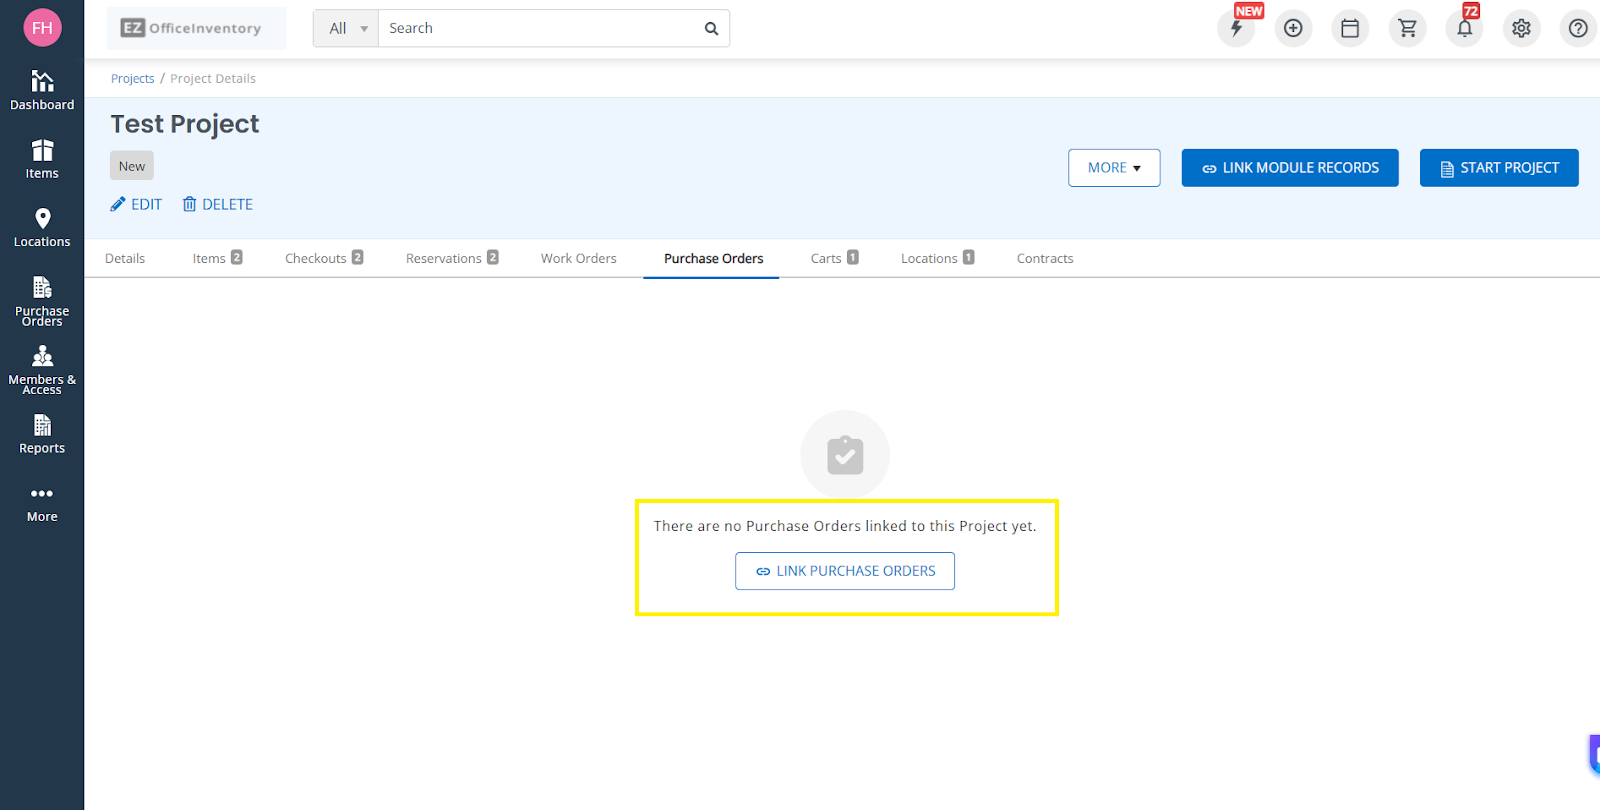
Search for and select the relevant purchase order and click on Link Module Records.
You can also link from the Purchase Order’s detail page:
- Go to Navigation → Purchase Orders, select a PO
- Expand Actions, then click Link to Project
- Or click the Project field directly and type/select the project name

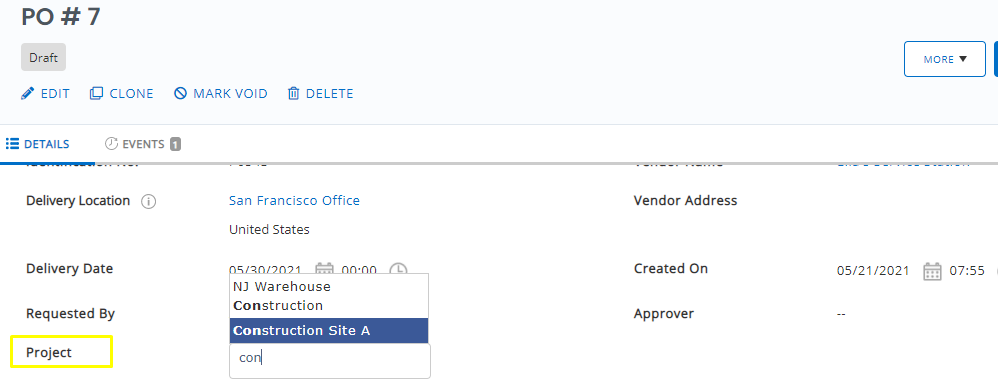
The Project you assign to the Purchase Order will be automatically assigned to all the Line Items as well. If you change the Project for the Purchase Order, it will be changed for all the Line Items as well.
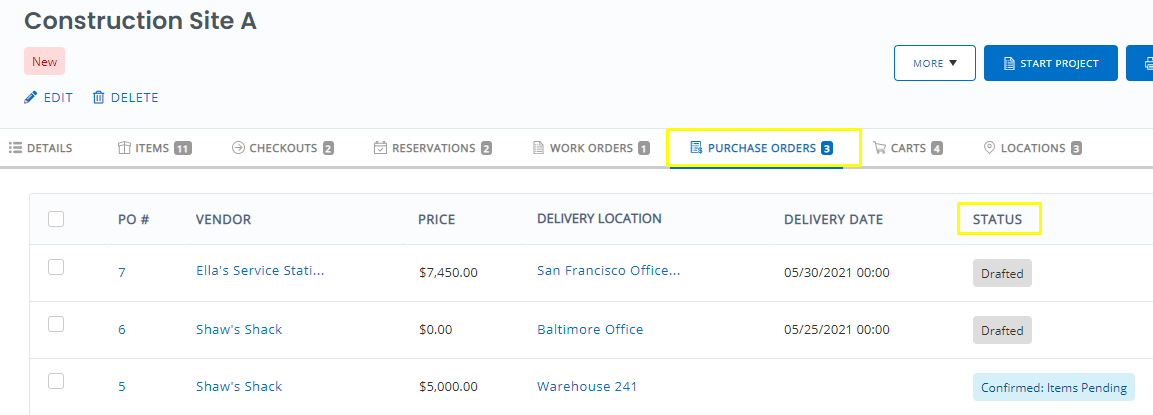
You can view the associated Purchase Orders under the Purchase Orders. Here you can track the status of all Purchase Orders and expedite the progress if needed.
In order to change the view, select the Items view from the tabs on the right side of the page. Here you can view all associated Line Items and their details individually.

3.9 Carts
To link a Cart, go to the Project Details → Carts → Link Carts.
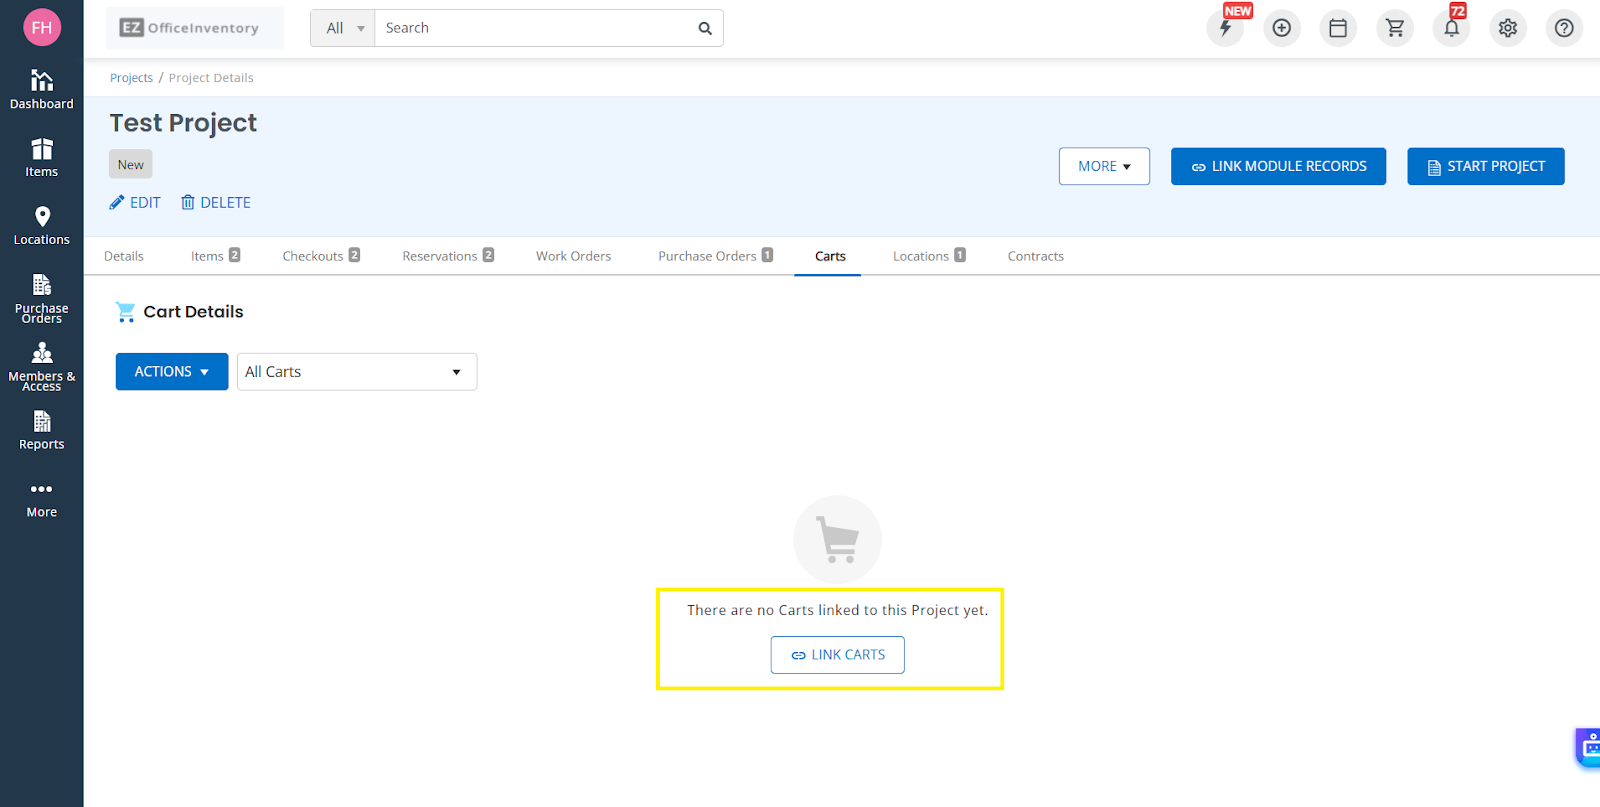
You will see the option to search and link a Carts record. Search for and select the relevant cart and click on Link Module Records.
You may also create a new Cart to add to your Projects. Once you have added Items to the Cart, you can link it to a specific Project on the details page.
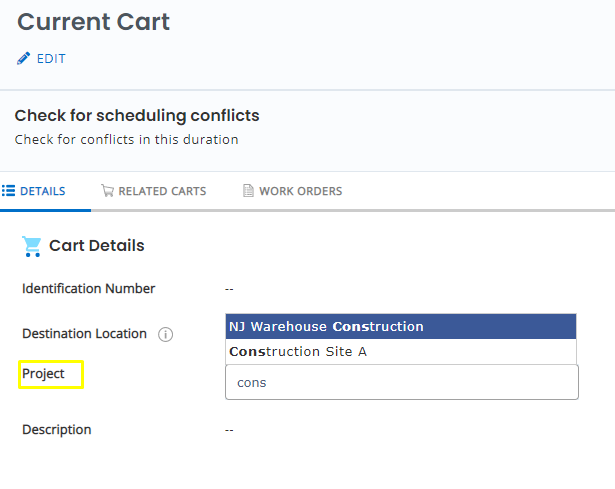
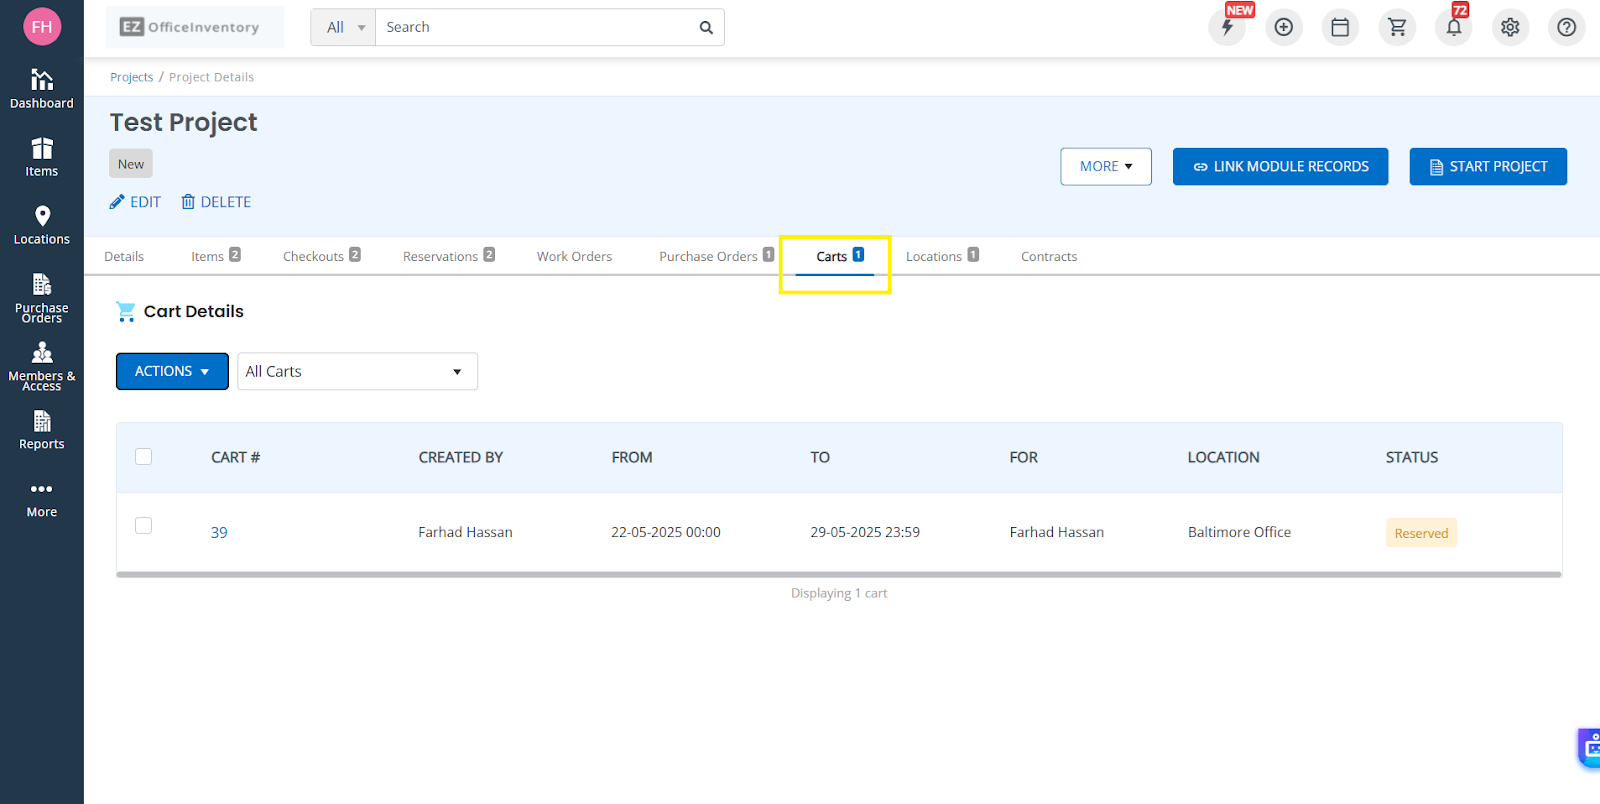
Once you link a Cart to a Project, it will be visible under the Carts tab in your Project.
Note: Items in a Cart will retain their own Projects when added to a Cart. Once you check out the Cart, it will be visible under Checkouts under the Project.
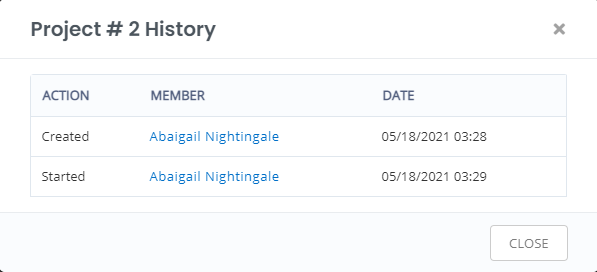
4: Check Project history
To track Project activities, go to the Projects Details Page → More → History. An overlay will appear showing the start and create dates for the Project.
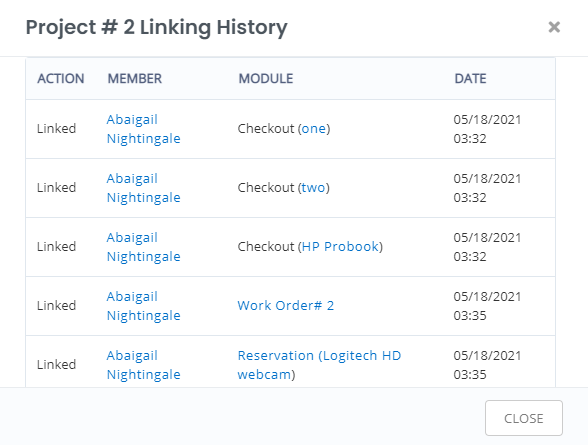
You can even access linking history for your Projects. Go to the Details page → More → Linking History. This displays all actions and modules linked to the Project in a chronological order.
5: Print Projects
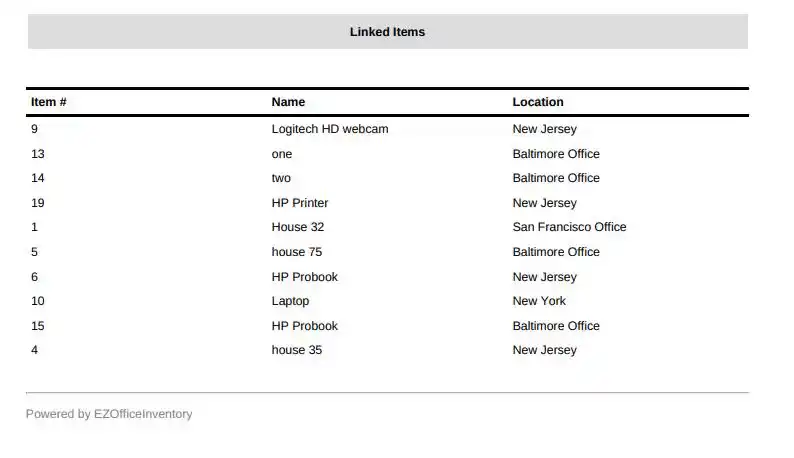
You may print out/download all the details of a project. Simply go to the Project Details page → More → Print Project
You will then be prompted to choose a Print Template.
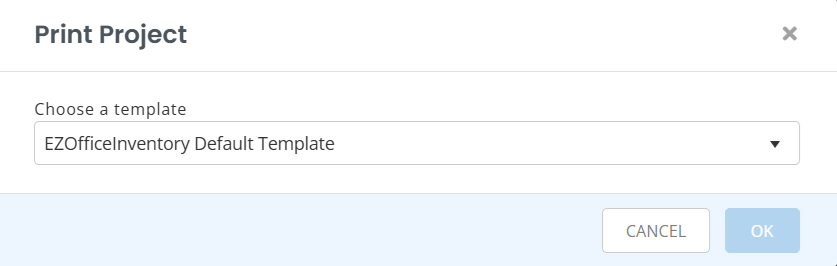
You can use the default EZO template or even customize and make your own from Navigation → More → Printout Templates → Project → Start Designing Template.
A print shows all linked modules with a Project :
Read more: The EZO Print Labels Knowledge Base
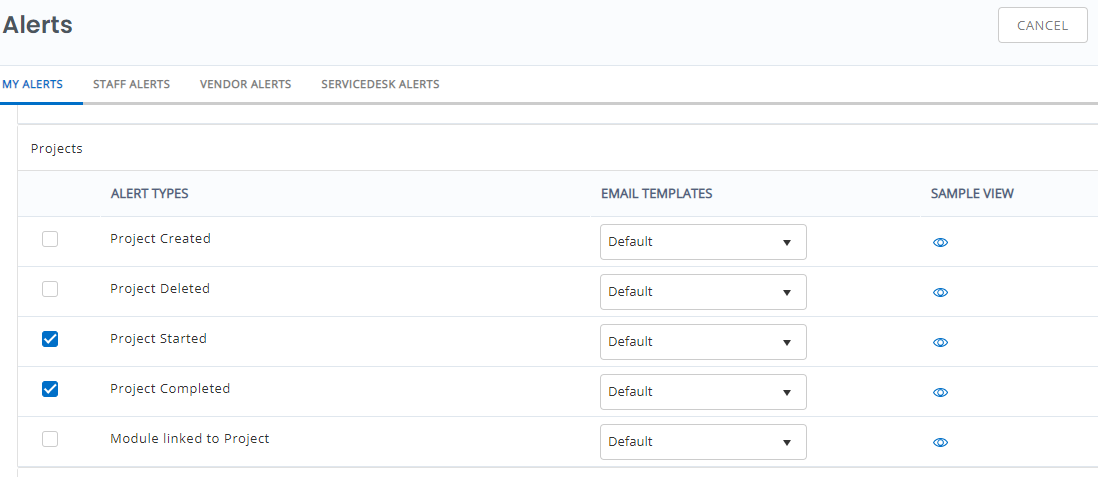
6: Enable Project Alerts
You can turn on Alerts for various changes made to your Project. Go to the Navigation → Alerts & Emails → My Alerts → Projects and select the relevant alerts to enable them.
7: Run Reports for Projects
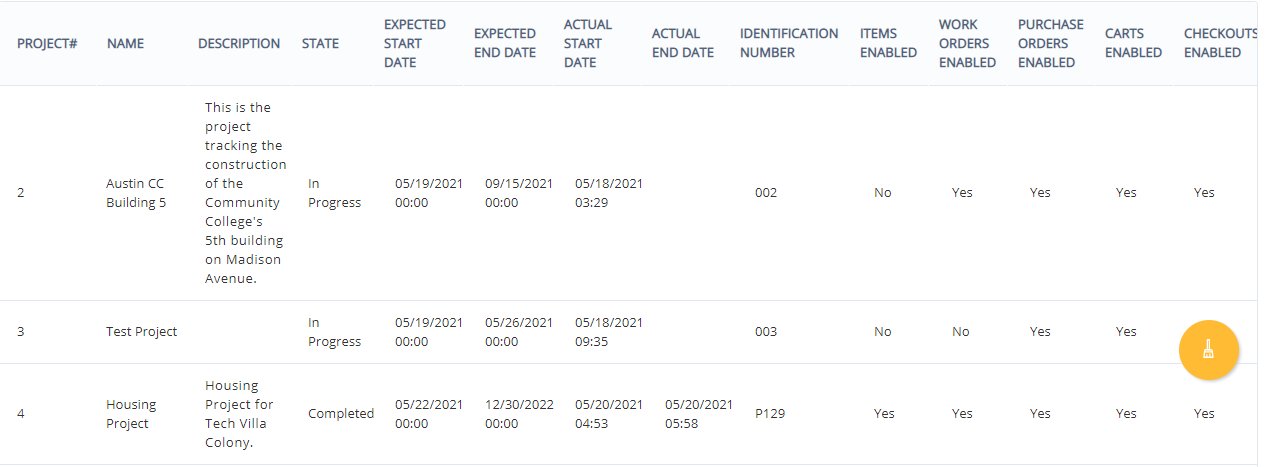
Go to Navigation → Reports → Project Reports and select the required report for All Projects or Line Items.
The regular Report for All Projects displays all modules enabled for projects, along with the number of Items/Locations/Work Orders/Purchase Orders linked.
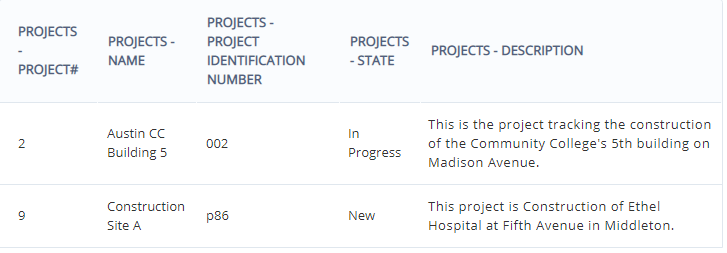
You can also run a Custom Report for Projects. However, the Custom Report can only be selected for a single module except for Items and Locations. When you choose a module like Work Order, the other modules are automatically disabled. This means you can just view one module across all Projects. For instance, a Custom Report for Purchase Orders looks like this:
8: Enable Project KPIs
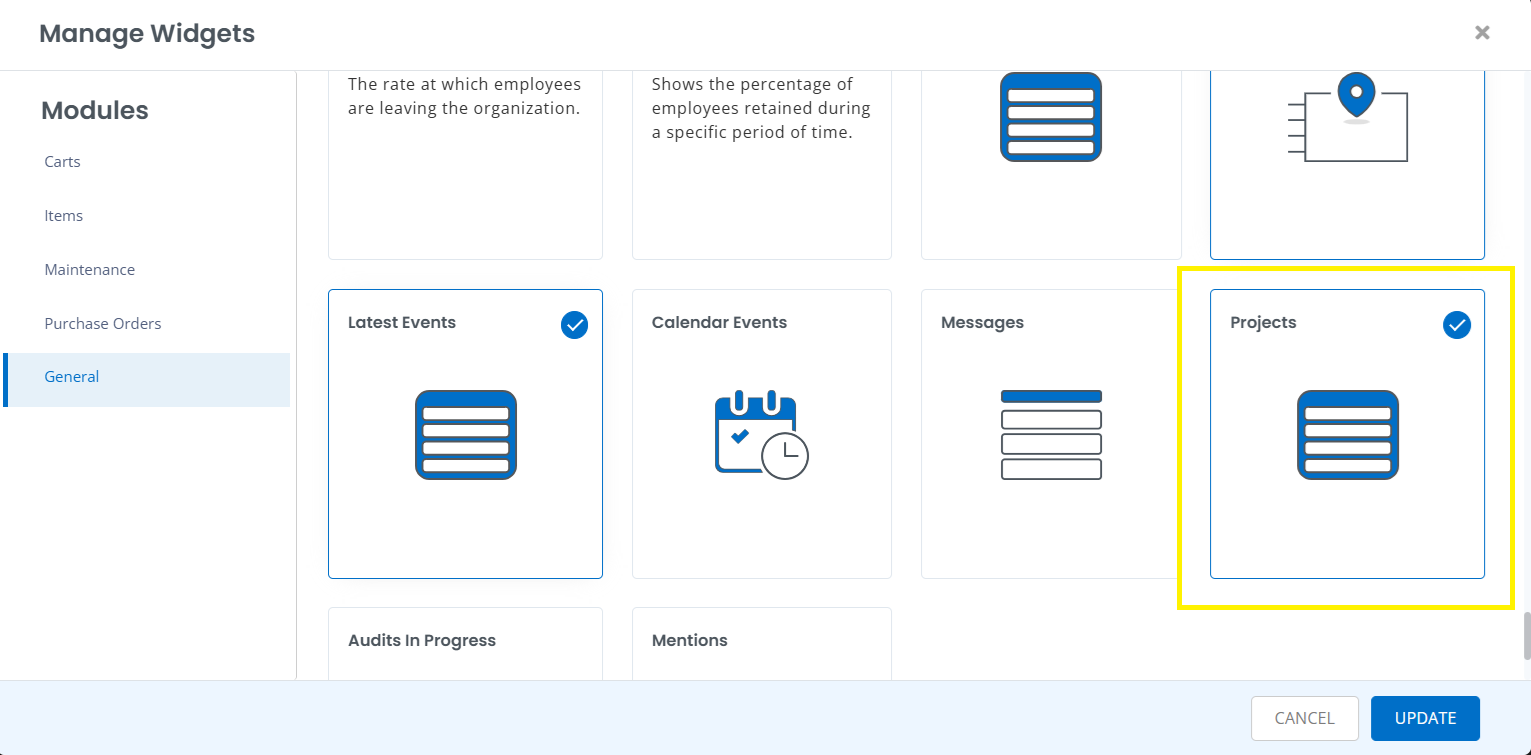
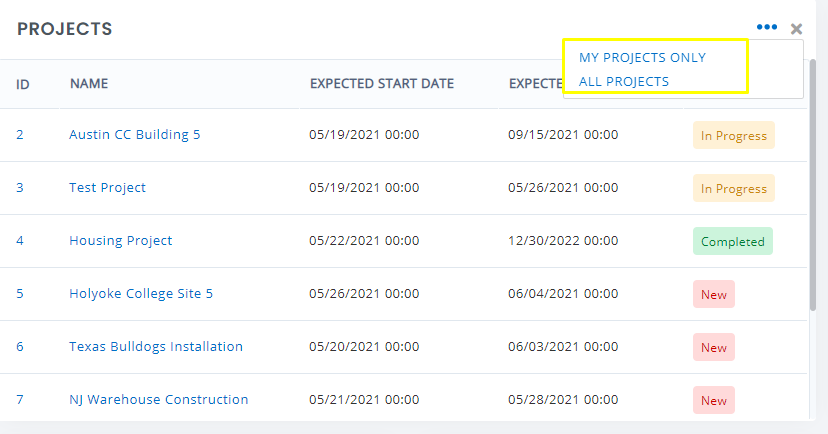
To view Projects on the Dashboard, you can enable Project KPIs. Go to the Dashboard → Edit Dashboard → Manage Widgets → General and select Projects.
The Projects widget will be displayed on the Dashboard in the following form. You can then select whether you want to view All Projects or My Projects. My Projects will only display the ones where you are an assigned user.
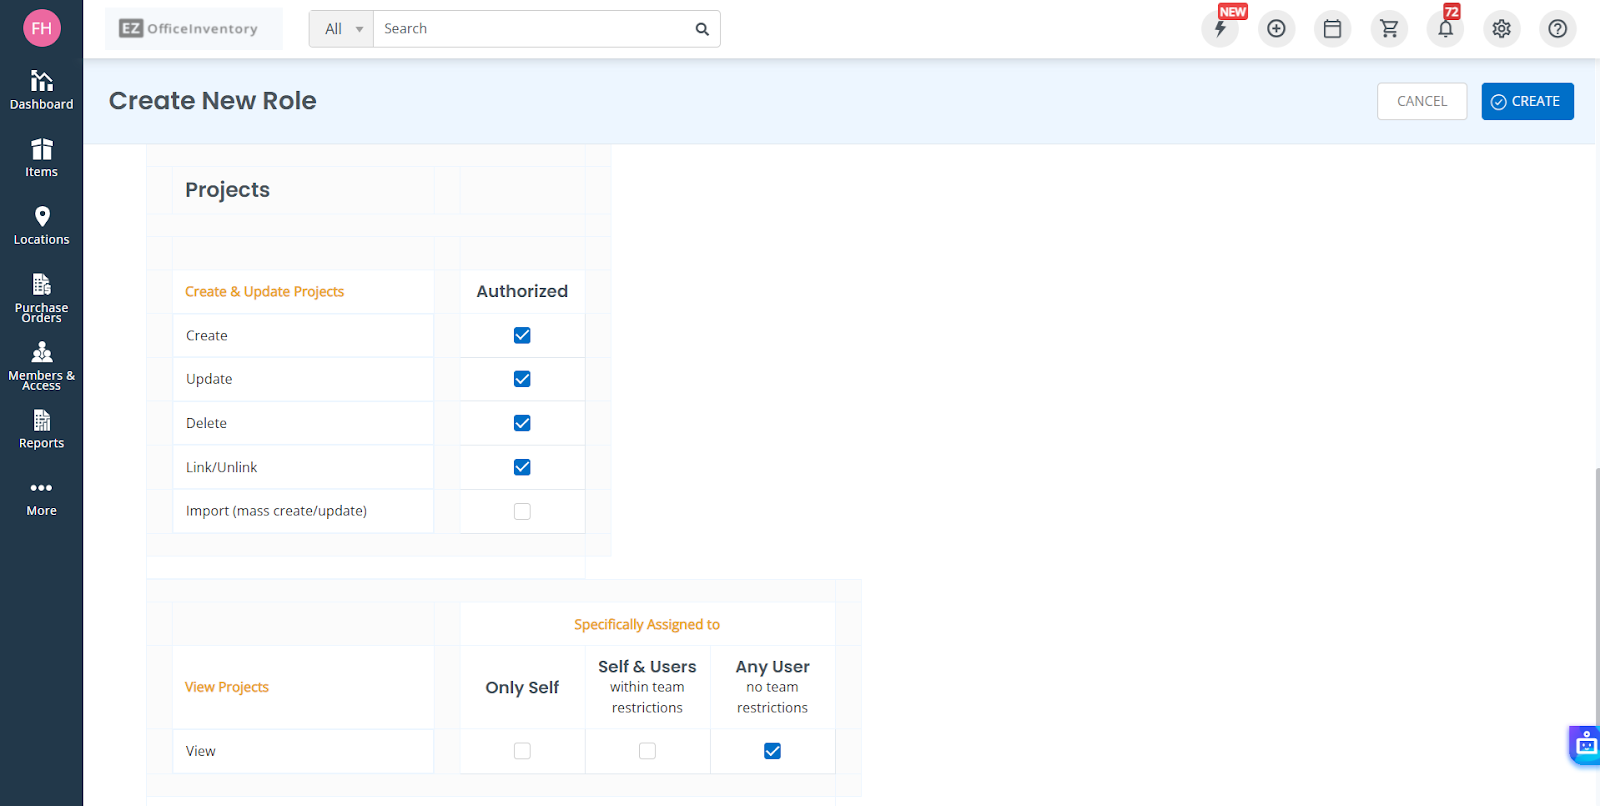
9: Define Roles for Projects
When setting up a new Role, you can choose the Project permissions for that specific role. Settings include viewing, creating, updating, deleting, linking/unliking, and importing Projects.
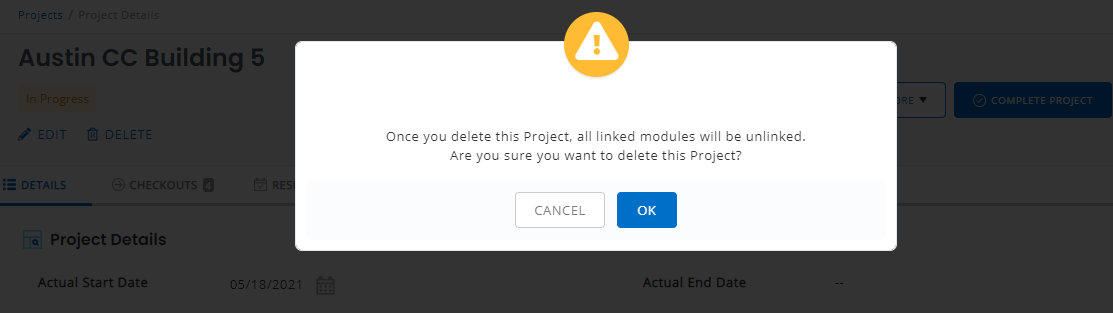
10: Delete a Project
When a project has ended, you may even delete it. Go to the Project Details → Delete. An overlay will appear with the following warning:
About EZO
EZO is a leading asset tracking software. It allows you to track, maintain, and report on inventory from anywhere, at any time. We offer a free 15-day trial – no credit card required!


