Whether your IT team is handling employee support requests, device issues, access approvals, or recurring service tasks, AssetSonar ITSM helps you bring your service desk workflows to the same platform where your IT assets already live.
With AssetSonar ITSM, you can collect requests through the Employee Portal, email, and workplace communication tools; route tickets to the right technicians; track SLAs; associate tickets with assets; and build a knowledge base for faster support.
This guide walks you through the recommended setup path for launching AssetSonar ITSM. Follow these steps to build a working service desk without trying to configure every advanced feature on day one.
Note: If you are new to AssetSonar, start with the main Getting Started with AssetSonar guide first. It helps you set up your basic ITAM foundation, including users, assets, locations, discovery sources, and access. Once your core AssetSonar workspace is ready, return to this guide to launch ITSM.
Step 0: Decide How Your Service Desk Should Work
Before you start configuring AssetSonar ITSM, define the service desk workflow you want to launch first.
You do not need to automate every process immediately. Start with the request types, channels, and technician workflows that your team needs the most.
Ask yourself:
- Who will submit tickets: employees, managers, IT agents, or all of them?
- Which intake channels do you want to support first: Employee Portal, email-to-ticket, MS Teams, or Slack?
- Which ticket types should be available on day one?
- Who should own and resolve tickets?
- Which requests need SLAs?
- What should count as a resolved ticket?
- Which issues should become knowledge base articles later?
For most teams, a practical first version includes:
- Employee support requests through the Employee Portal
- Email-to-ticket for general IT support
- A few service catalog request forms
- Default ticket assignment rules
- Basic SLA policies
- Email notifications for users and technicians
- A small knowledge base for common questions
Once this foundation is working, you can add advanced automations, approval workflows, reports, and communication tool integrations.
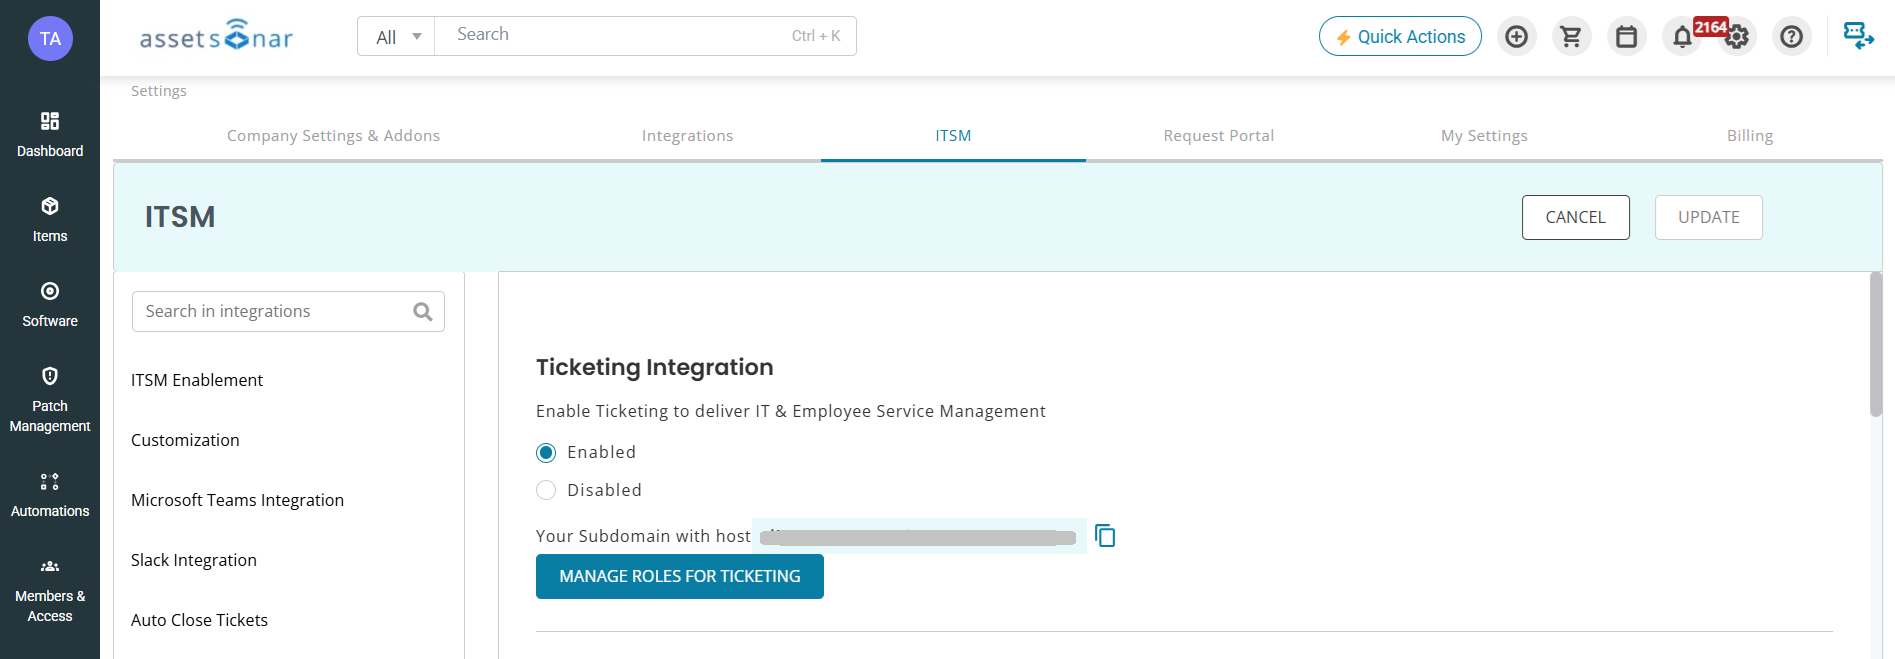
Step 1: Enable AssetSonar ITSM and Assign Access
Start by enabling ITSM access for your workspace and assigning the right roles to your team.
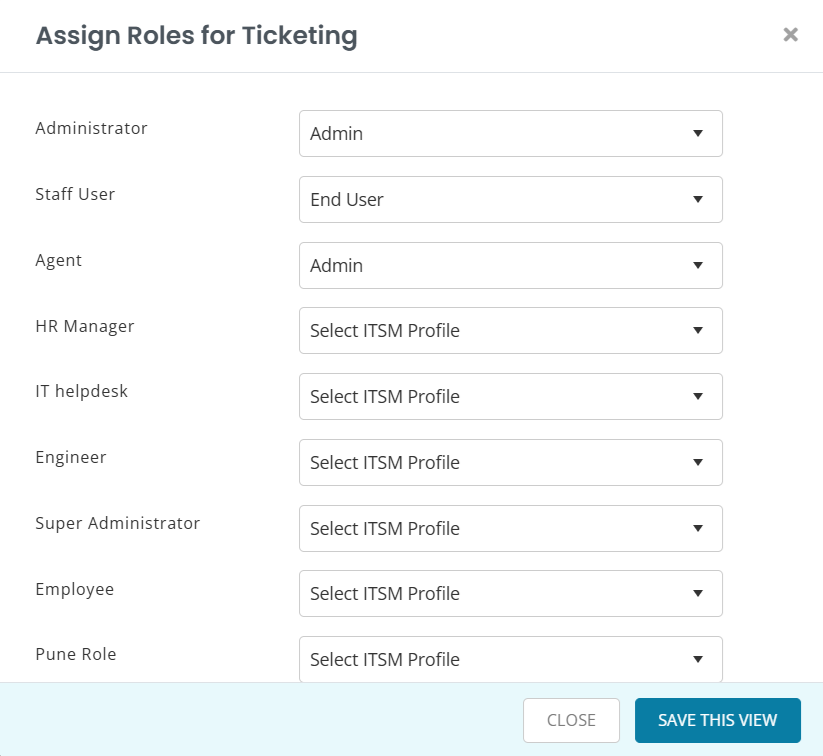
AssetSonar ITSM uses different access levels so admins, agents, and end users can work with tickets according to their responsibilities.
At a basic level:
- Admins configure ITSM settings, request sources, forms, routing rules, SLAs, and notifications.
- Agents work on assigned tickets, update statuses, add notes, respond to users, and resolve requests.
- End Users submit and track tickets through the Employee Portal.
To begin, enable AssetSonar ITSM from your AssetSonar workspace, then assign the right ITSM roles to your users. After access is enabled, users can open ITSM from the AssetSonar app switcher or sign in directly, depending on your workspace setup.
For your initial launch, keep role assignment simple. Add only the admins and agents who need to configure and test the service desk first. You can expand access once the main workflow is ready.
For detailed setup steps, read: Enable Access to AssetSonar ITSM
Step 2: Configure Core ITSM Settings
After access is enabled, configure the basic settings that define how your service desk operates.
Start with your global ITSM settings. These settings control the default behavior of your helpdesk, including ticket handling, sender details, and other workspace-level preferences.
Next, configure your business hours and holidays. These settings are important because they define when your support team is considered available. They also help your SLA timers reflect actual working time instead of counting weekends, holidays, or after-hours periods unfairly.
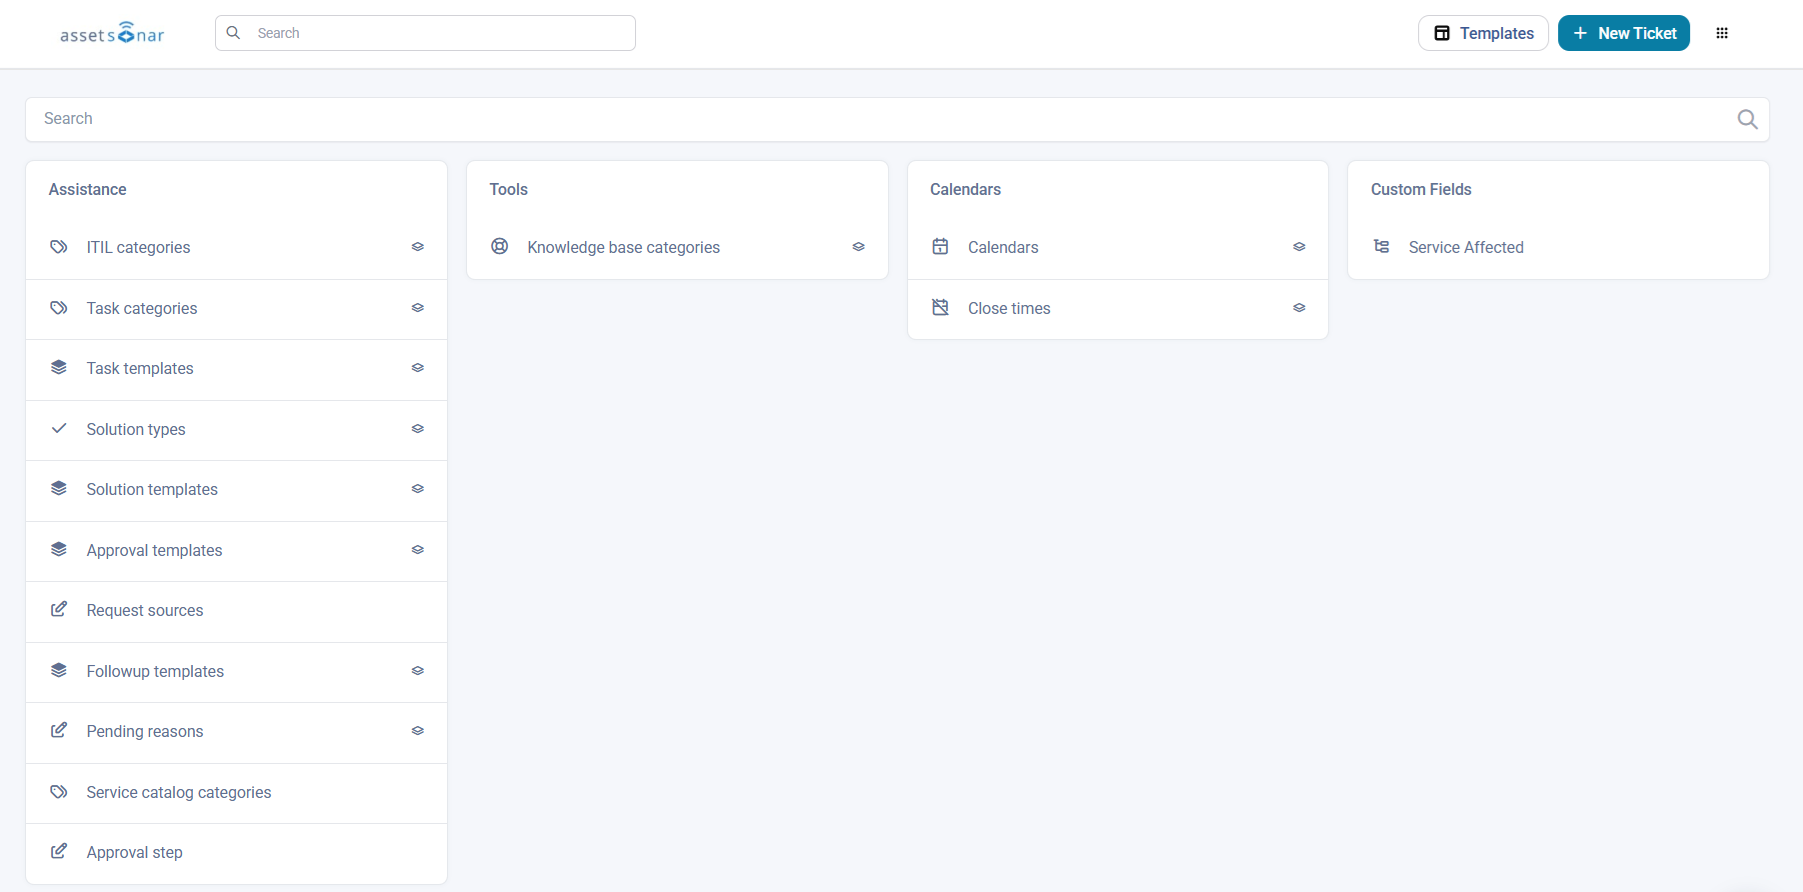
You should also set up the basic classification structure for your tickets:
- ITIL Categories help organize tickets by issue type or service area.
- Solution Types help classify how tickets are resolved.
- Priority Matrix helps define how impact and urgency translate into ticket priority.
- Custom Fields can capture additional information that your team needs for routing, reporting, or resolution.
Keep this setup lean at first. For example, you may only need categories such as Hardware, Software, Access Request, Network, and General Support for your first launch. You can refine these categories later after reviewing real ticket volume.
For detailed setup steps, read:
- Configure Global Settings
- Setup Business Hours & Holidays
- Understand Priority Matrix
- Configure ITIL Categories
- Configure Solution Types
Step 3: Set Up Ticket Intake Channels
Ticket intake channels define how requests enter your service desk.
For most teams, the two core channels should be:
- Employee Portal
- Email-to-ticket
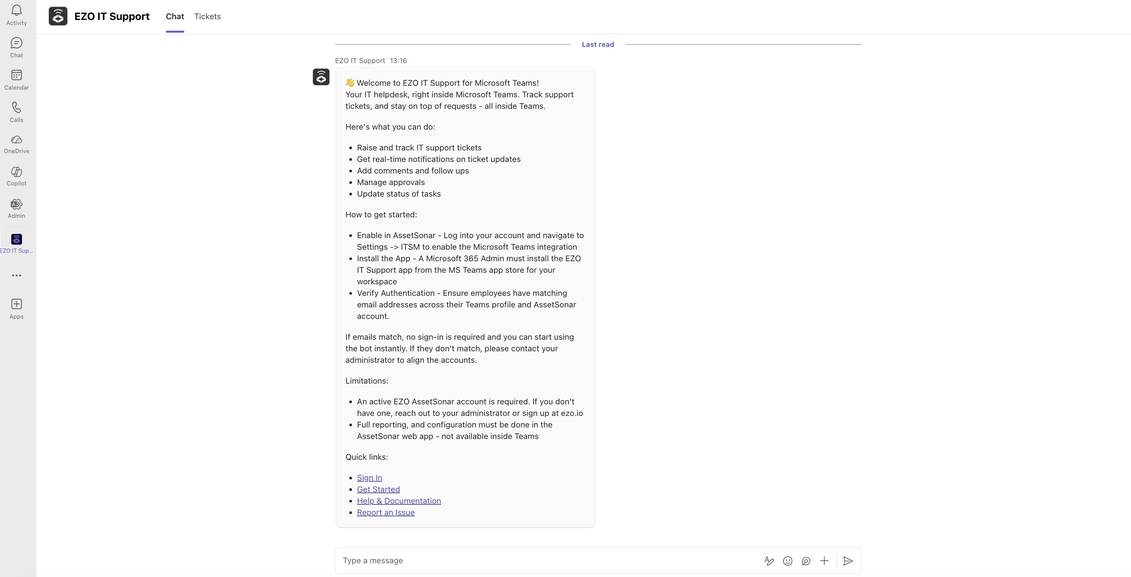
If your team uses collaboration tools such as MS Teams or Slack, you can also integrate them into your ITSM workflows to support ticket intake, updates, and technician collaboration.
The Employee Portal gives end users a structured way to submit requests, browse service catalog forms, and track existing tickets. This is useful when you want employees to provide specific information upfront, such as device name, issue type, priority, or requested software.
Email-to-ticket allows users to send support requests by email. AssetSonar ITSM can convert those emails into tickets so agents can work on them from the ticket queue instead of managing requests manually from an inbox.
You can also support manual ticket creation. This is useful when an agent receives a request through a phone call, walk-in conversation, or internal handoff and needs to log it directly in ITSM.
In case of MS Teams or Slack, the basic launch logic remains the same: connect the workspace, define how requests or notifications should flow, and test the workflow with sample tickets before rolling it out to all users.
For detailed setup steps, read:
- Setup Request Sources
- Configure Email-to-Ticket Creation
- Auto-Create Tickets from Email
- Submit Support Ticket (Employee Portal)
- Manually Create Tickets
- Setup MS Teams Integration
- Use MS Teams Bot for IT Support
Step 4: Create a Basic Service Catalog
The service catalog helps users submit structured requests instead of sending vague messages such as “my laptop is not working” or “I need access.”
Start by creating a few service catalog categories. These categories group related request forms so users can quickly find what they need.
For a basic ITSM launch, you can start with categories such as:
- IT Support
- Device Requests
- Software Access
- Account and Login Help
- Network Issues
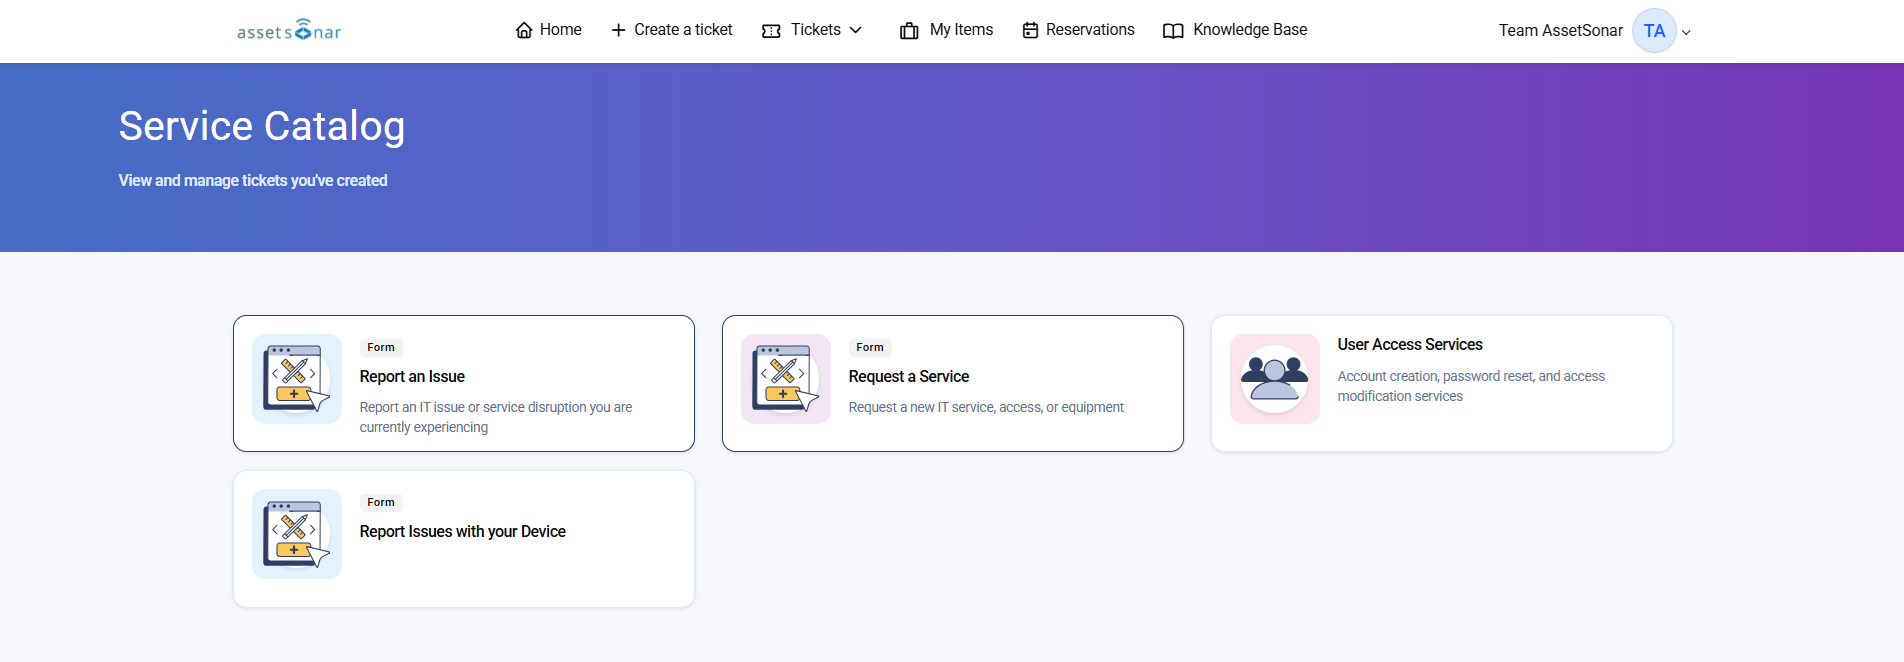
Next, create a few starter request forms. These forms should collect only the information your agents need to triage and resolve the request.
Good first forms include:
- Report an IT Issue
- Request a Device
- Request Software Access
- Report a Device Problem
- General IT Help
Each form should include clear fields for the request type, description, urgency, affected asset, and any supporting details. Where useful, add lookup fields so users can select assigned devices or related assets directly from AssetSonar.
Avoid making forms too complex on day one. Conditional fields, restricted visibility, and advanced workflow links are useful, but they work best after your team has tested the basic request flow.
For detailed setup steps, read:
- Create Service Catalog Categories
- Build Custom Request Forms
- Use Form Templates
- Design Custom Request Forms
- Select Assigned Devices in Forms
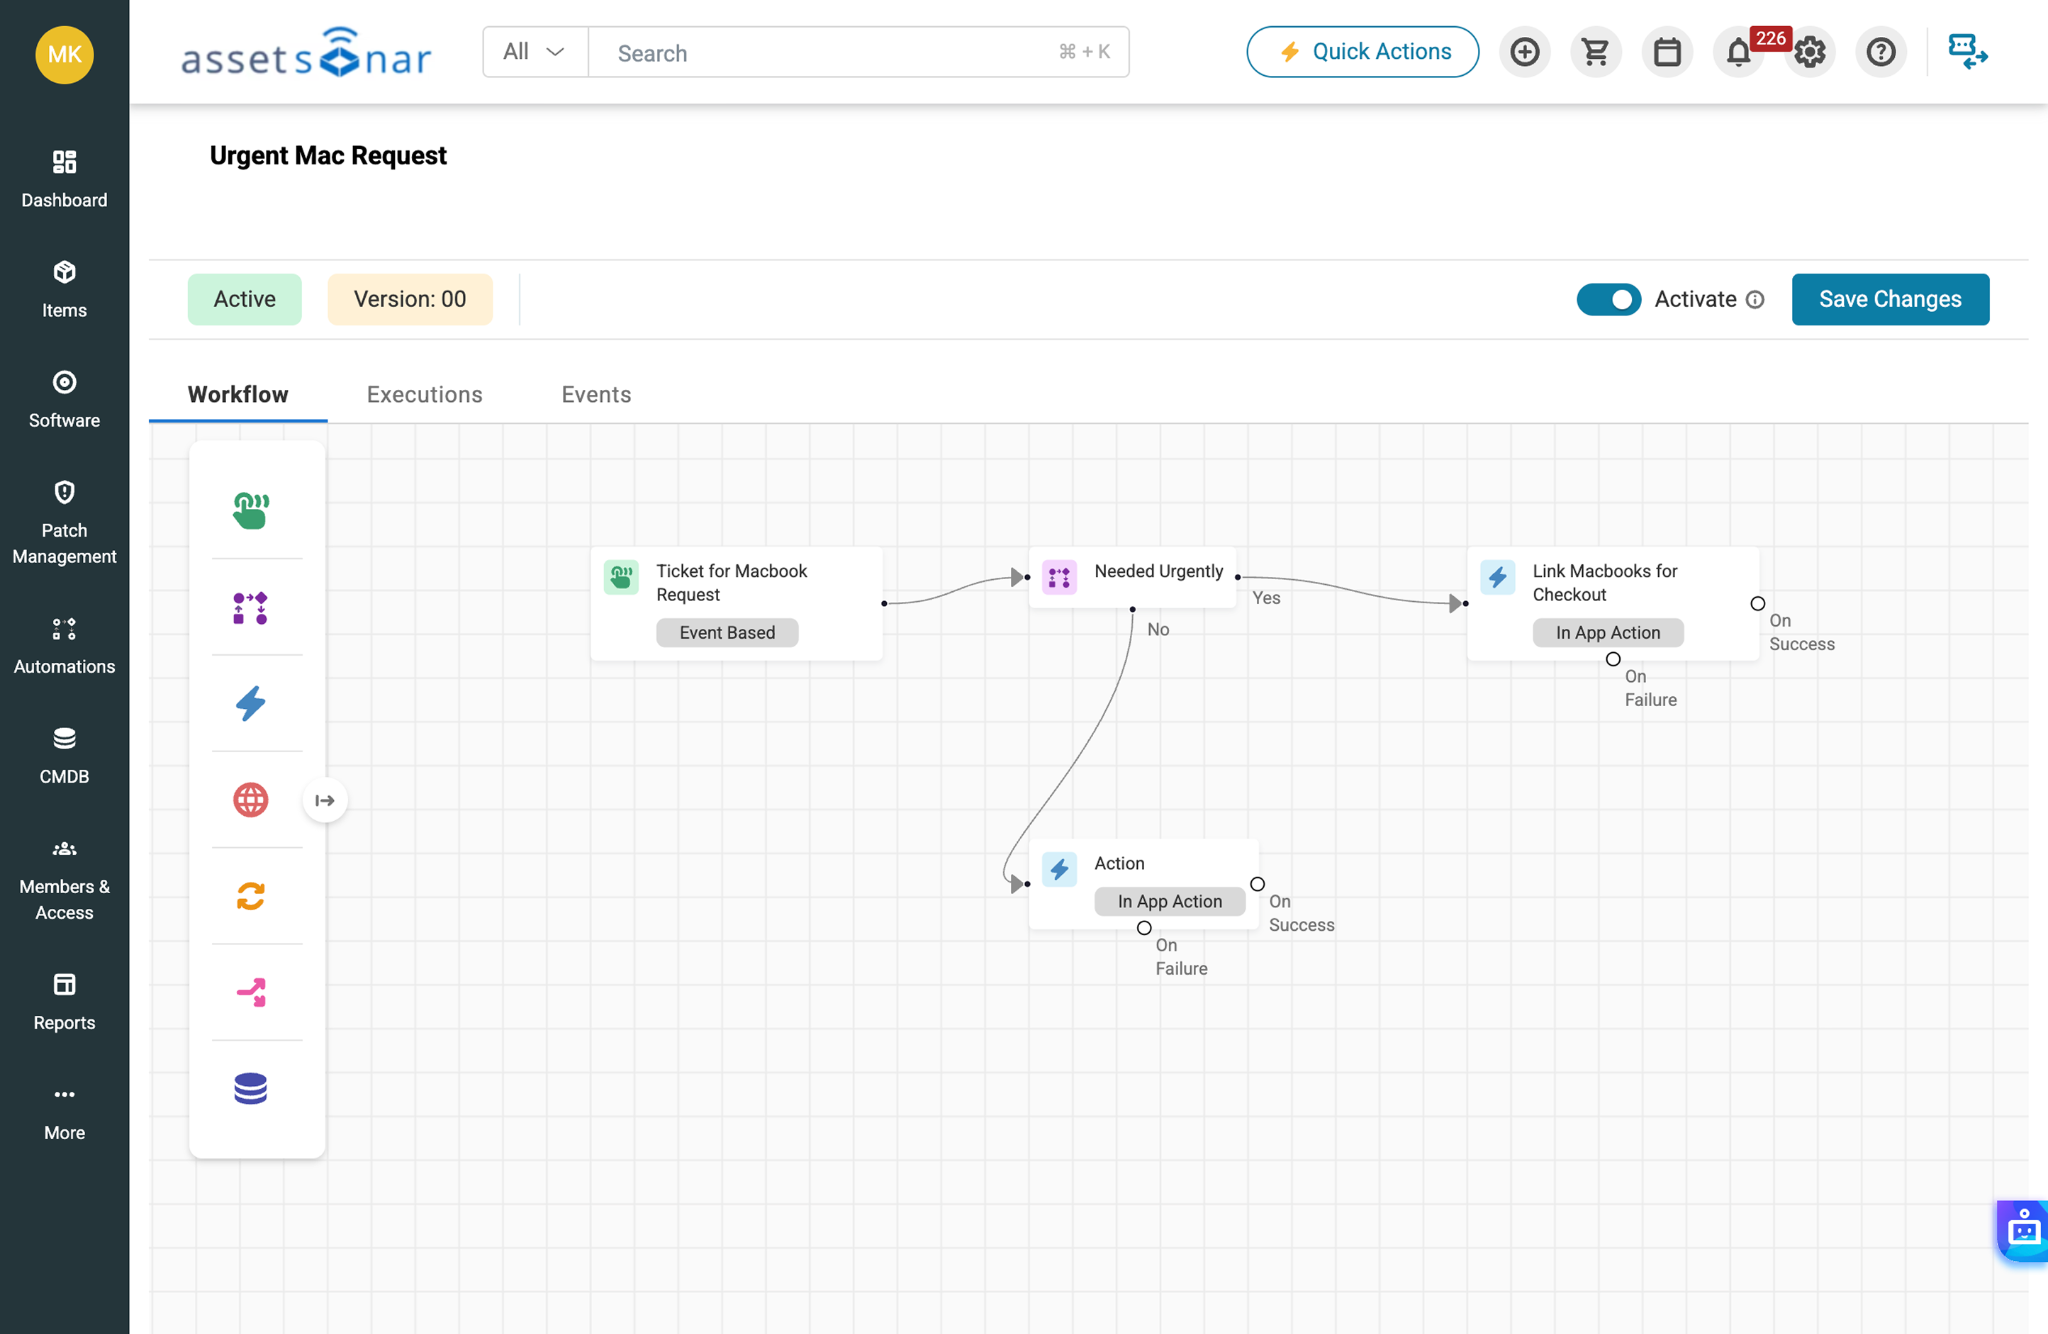
Step 5: Configure Assignments and Routing
Once tickets start coming in, they need to reach the right people quickly.
Start with default assignments. These ensure that tickets created from specific sources, categories, or forms are not left unassigned.
For example:
- Hardware issues can go to the desktop support team.
- Software access requests can go to the applications team.
- General IT help can go to the service desk queue.
- Device requests can go to an asset manager or IT admin.
You can then add automated assignment rules for more specific routing. For example, you may route tickets by request type, location, department, priority, or category.
Manual assignment is still useful. Agents and admins should be able to reassign tickets when the original owner is unavailable, the ticket needs specialist input, or the issue has been escalated.
After setting up assignment rules, test them with sample tickets from each intake channel. Confirm that tickets appear in the right assigned views and that agents can see the tickets they are responsible for.
For detailed setup steps, read:
- Set Default Assignments
- Automate Ticket Assignment
- Assign Tickets
- View Assigned Tickets
- Manually Escalate & Reassign Tickets
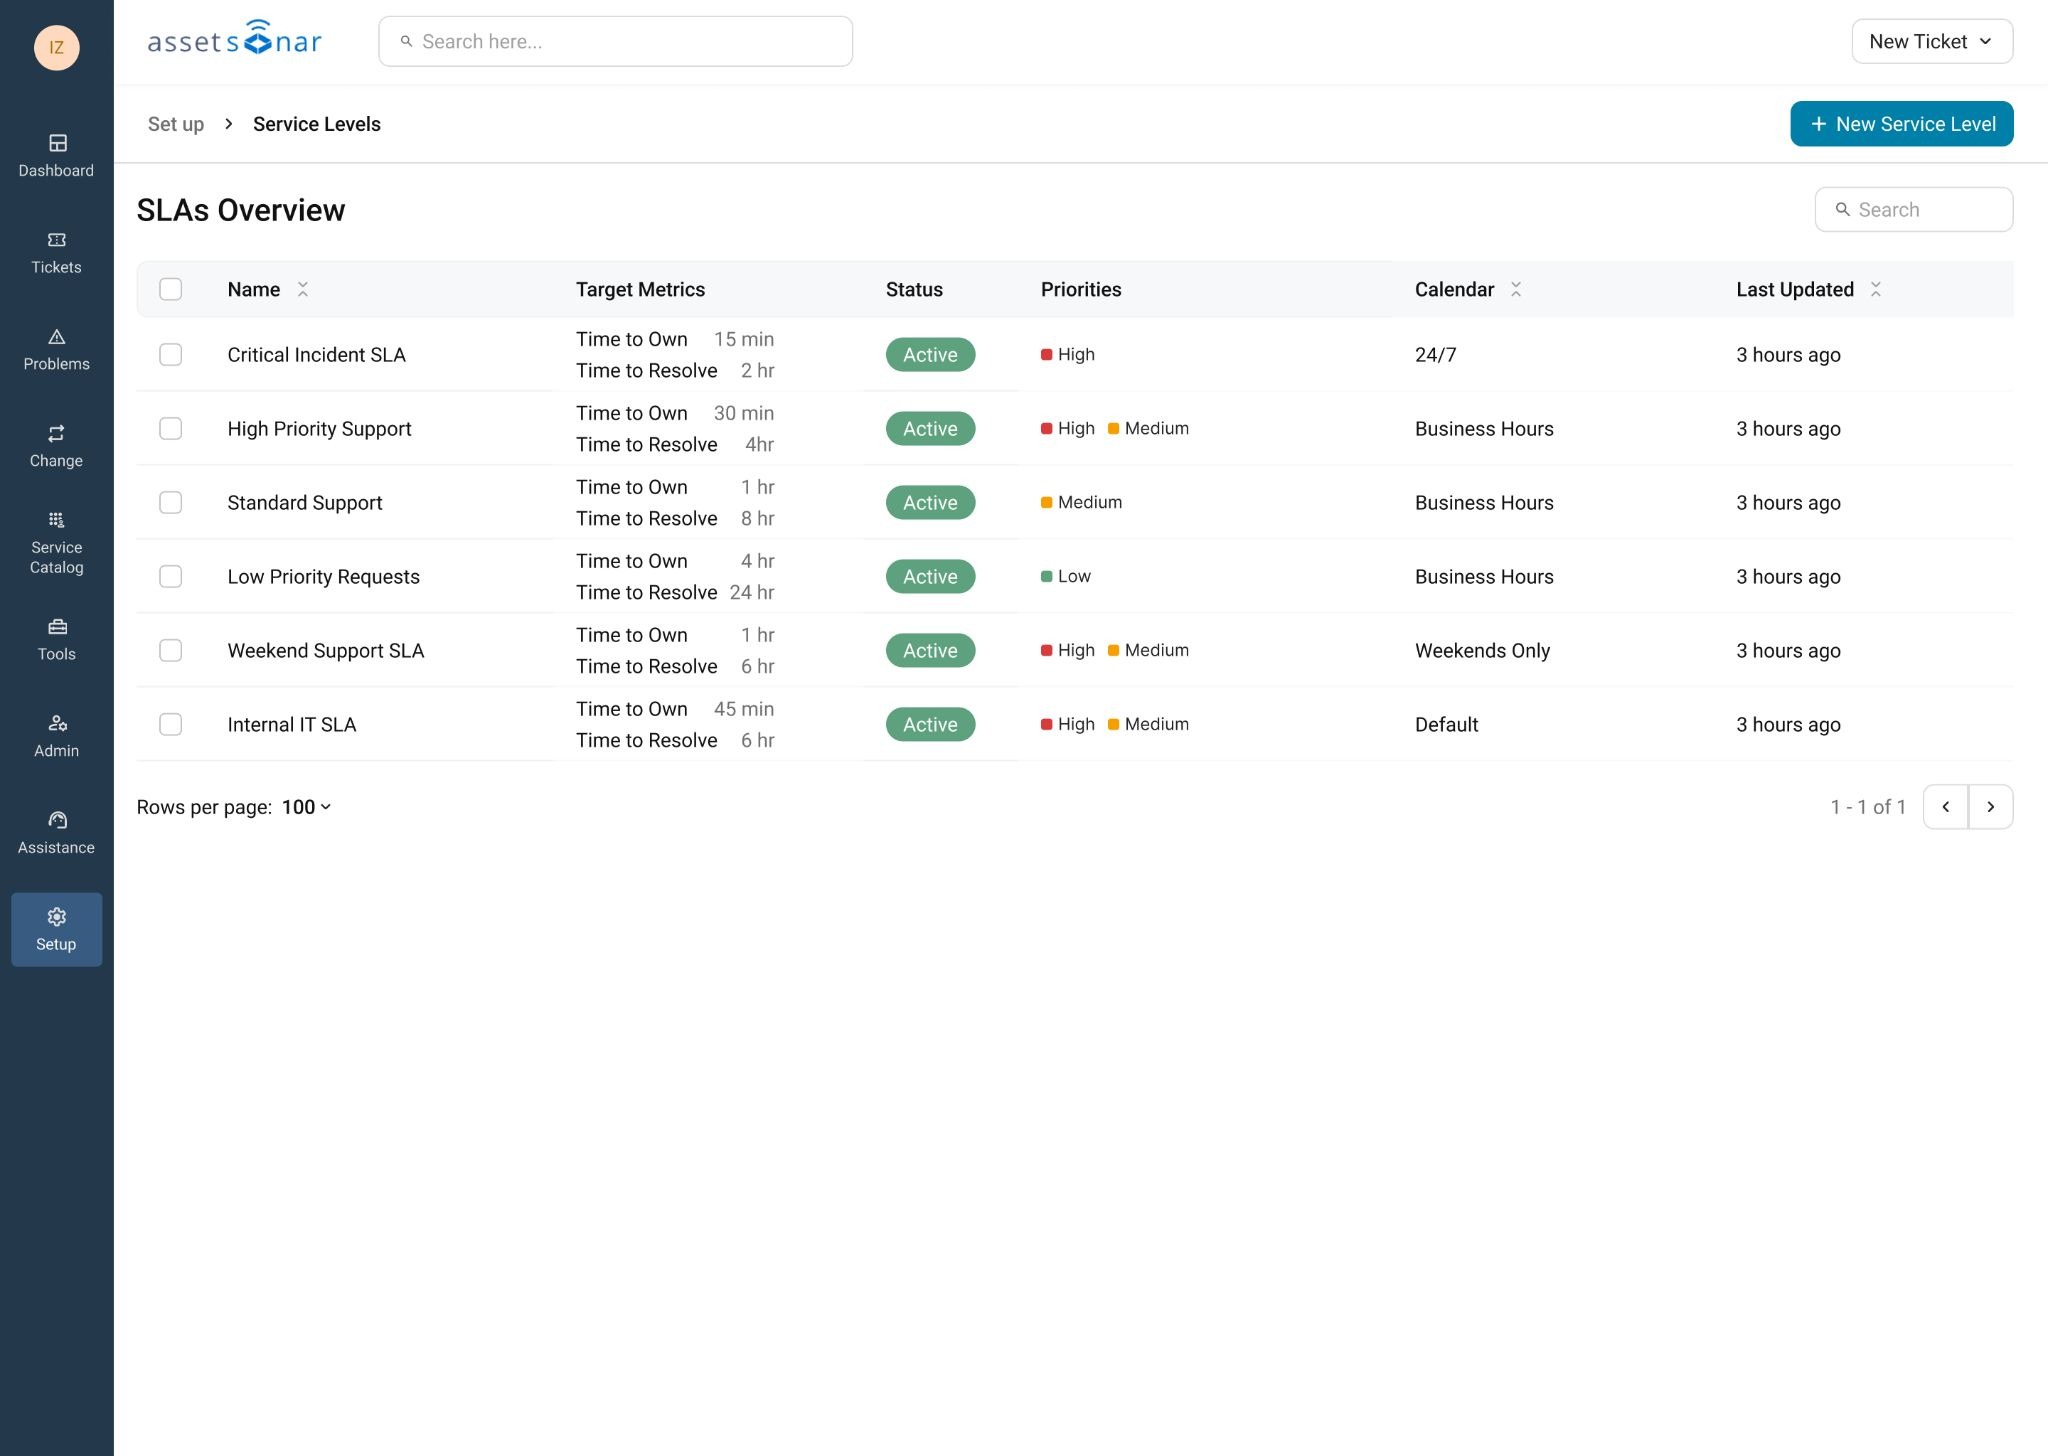
Step 6: Set Up SLAs
Service Level Agreements, or SLAs, define the response and resolution timelines your team commits to.
In AssetSonar ITSM, SLA policies act as the clock for your helpdesk. They define what must happen and by when: how quickly a ticket should receive a first response or how quickly it should be resolved.
Start with one or two simple SLA policies. For example:
- Standard IT requests must be resolved within 24 business hours.
- High-priority incidents must be owned within 30 minutes and resolved within 4 business hours.
When creating an SLA policy, define:
- The policy name
- The working calendar or business hours
- The conditions that determine when the SLA applies
- The response or resolution targets
- Any escalation actions that should occur when a deadline approaches or is breached
Business hours are especially important for SLA accuracy. If your team works Monday to Friday, 9 AM to 6 PM, your SLA timers should follow that schedule rather than counting nights and weekends as active support time.
Escalations define what happens when an SLA needs attention. You can use escalation rules to notify the right people, alert managers, reassign tickets, or increase urgency depending on your support process.
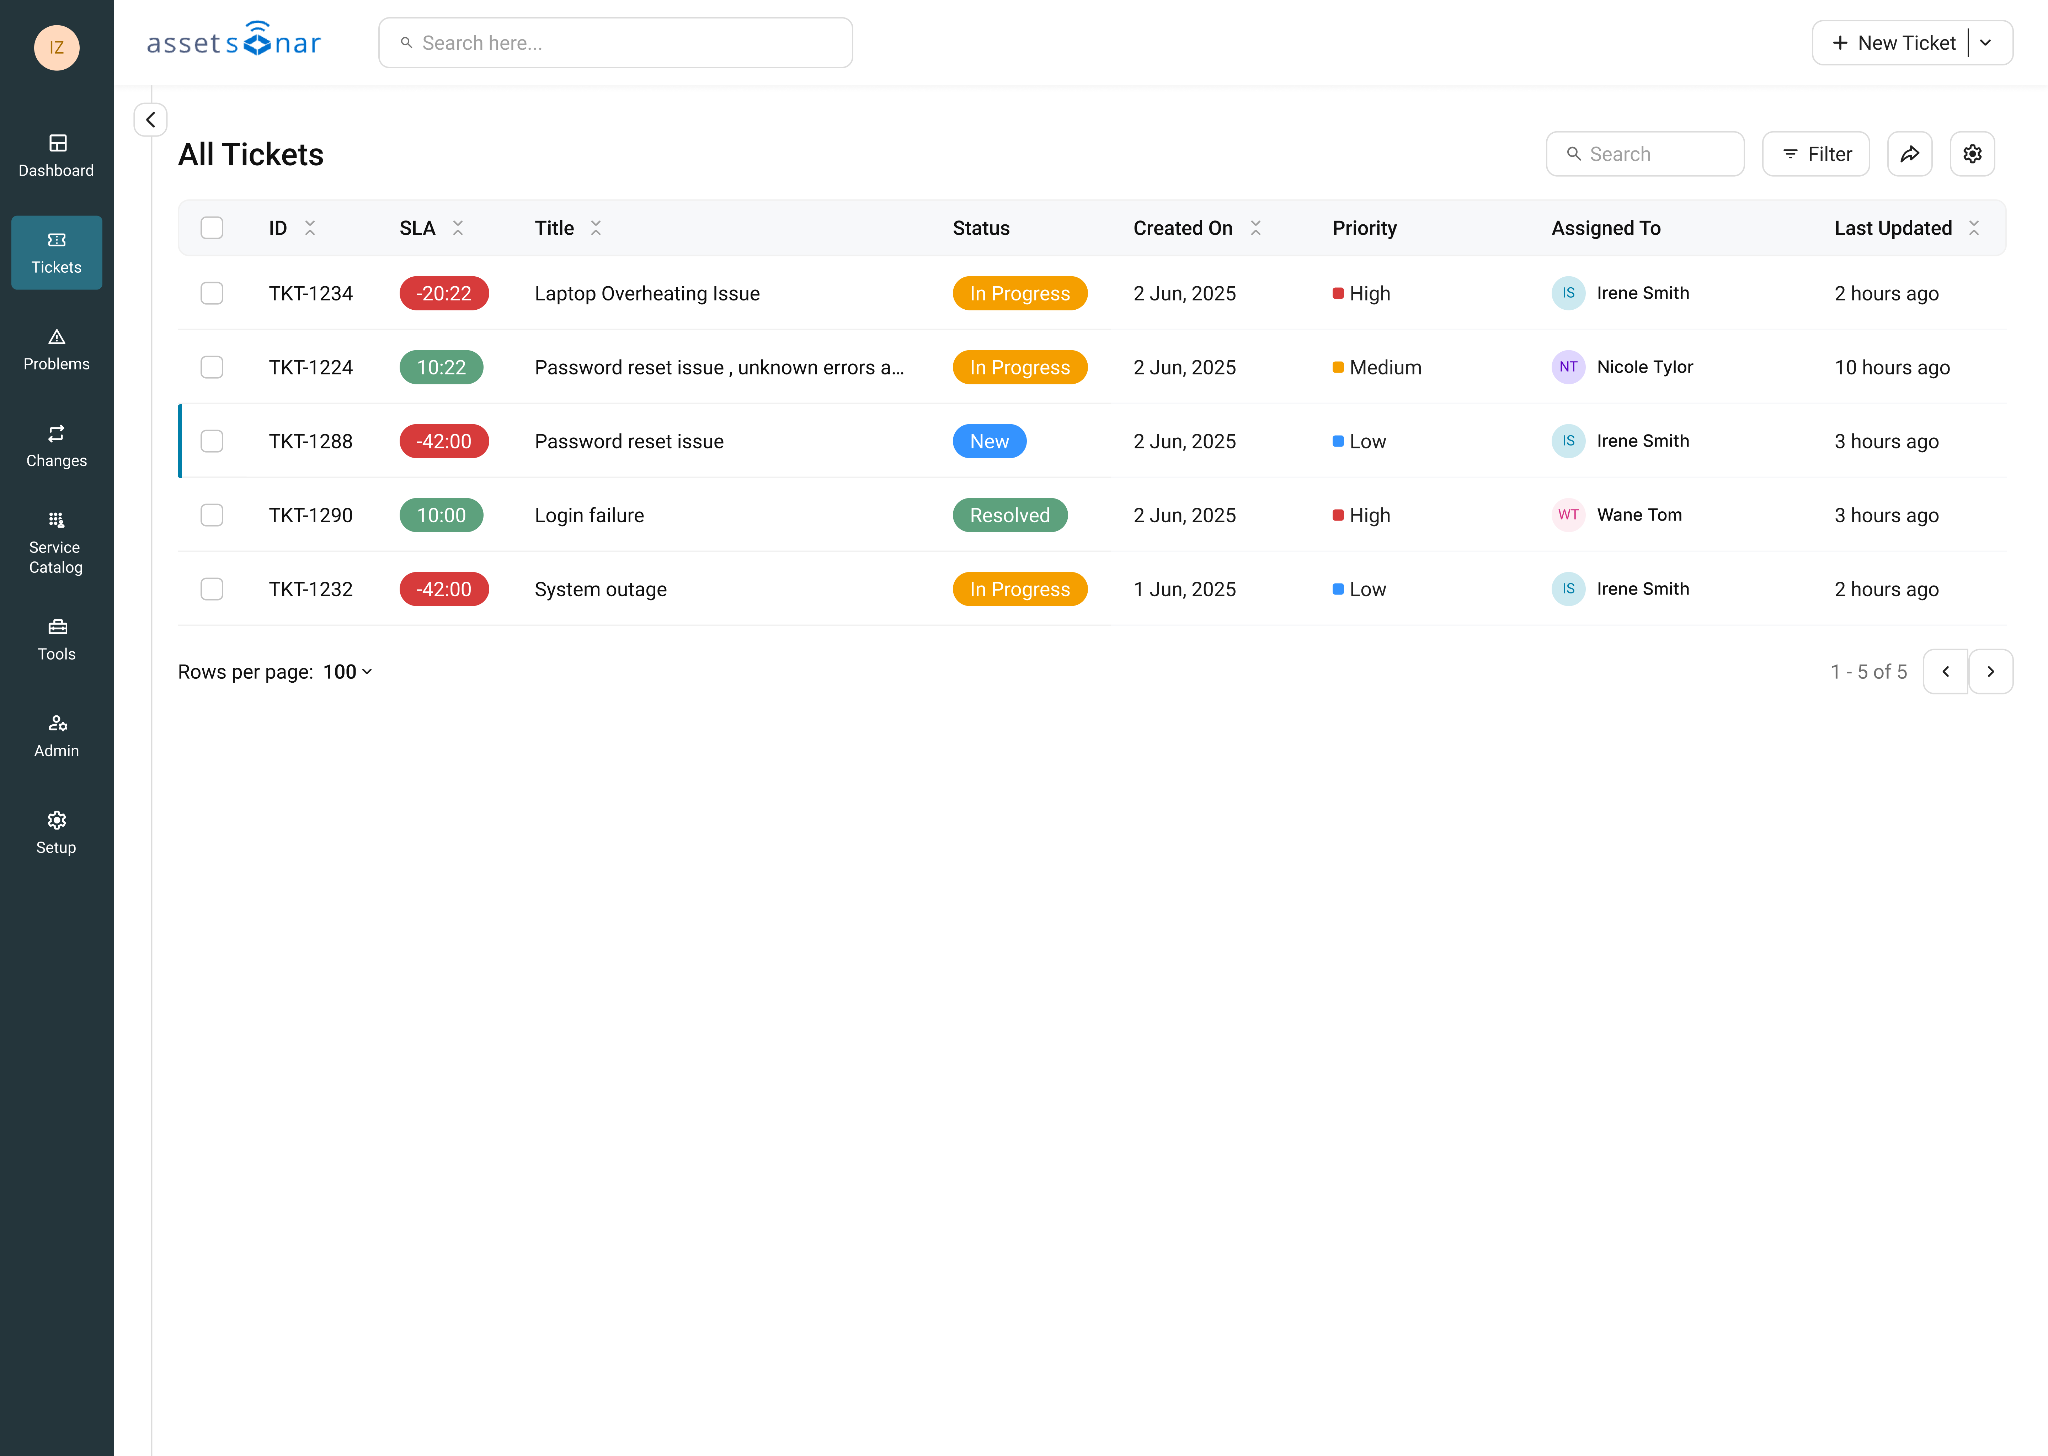
Agents can track SLA status directly from ticket views. This helps them see how much time is remaining before a ticket breaches and prioritize their queue accordingly.
For your first launch, keep SLAs simple. Create one standard policy, submit a test request, and confirm that the SLA status appears correctly on the ticket.
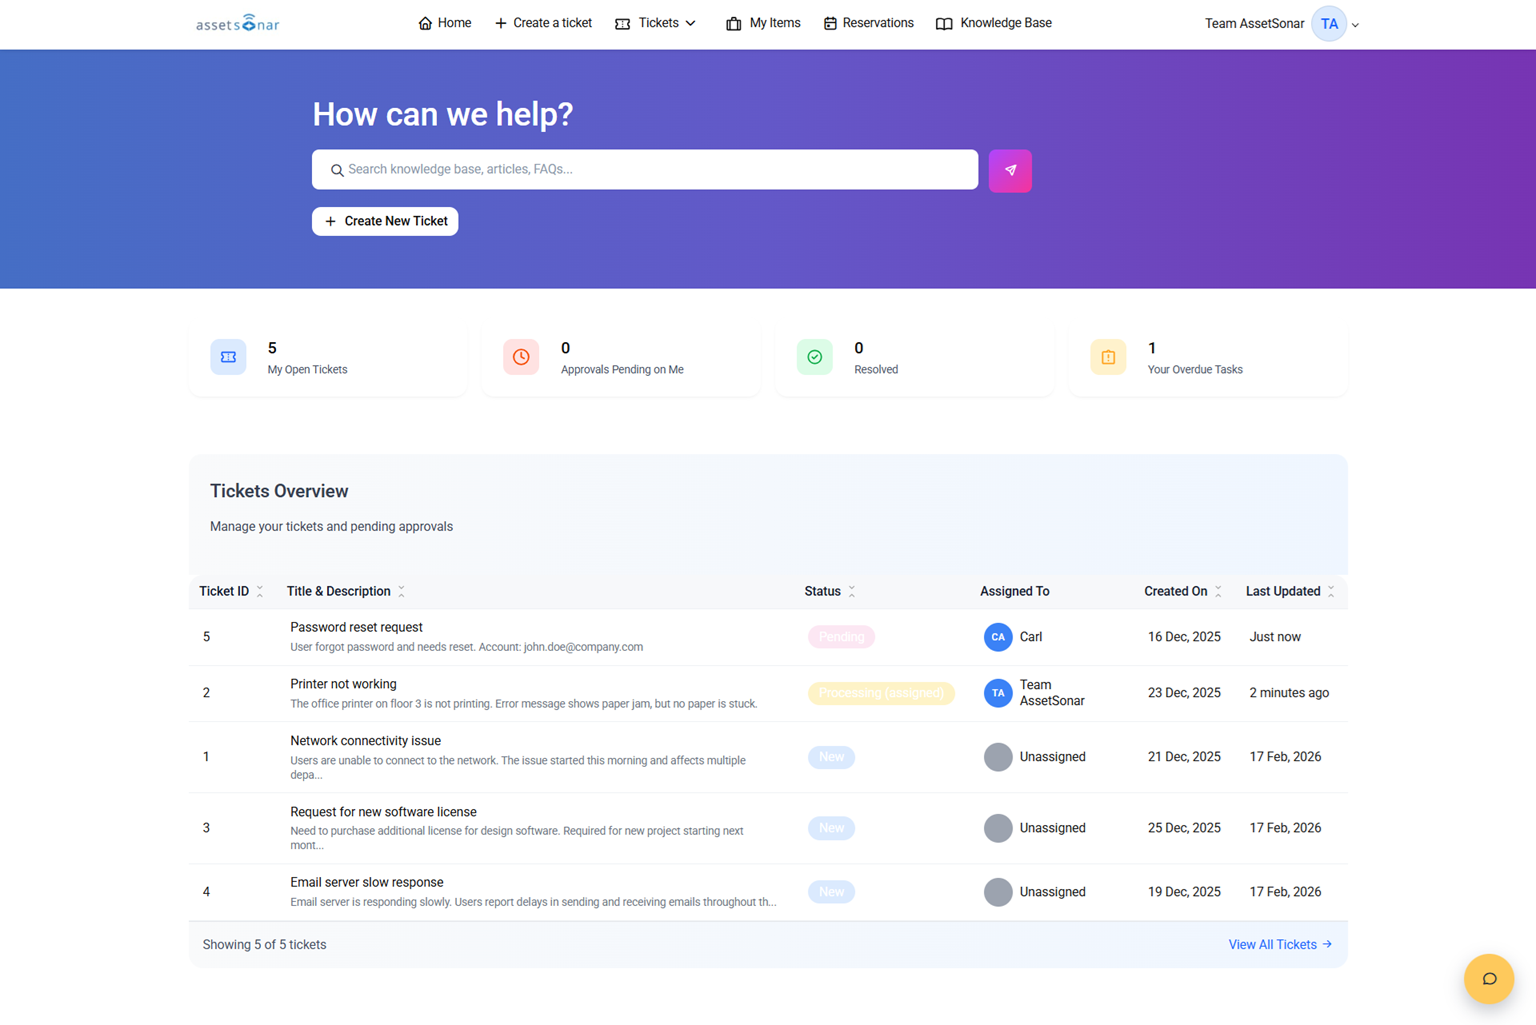
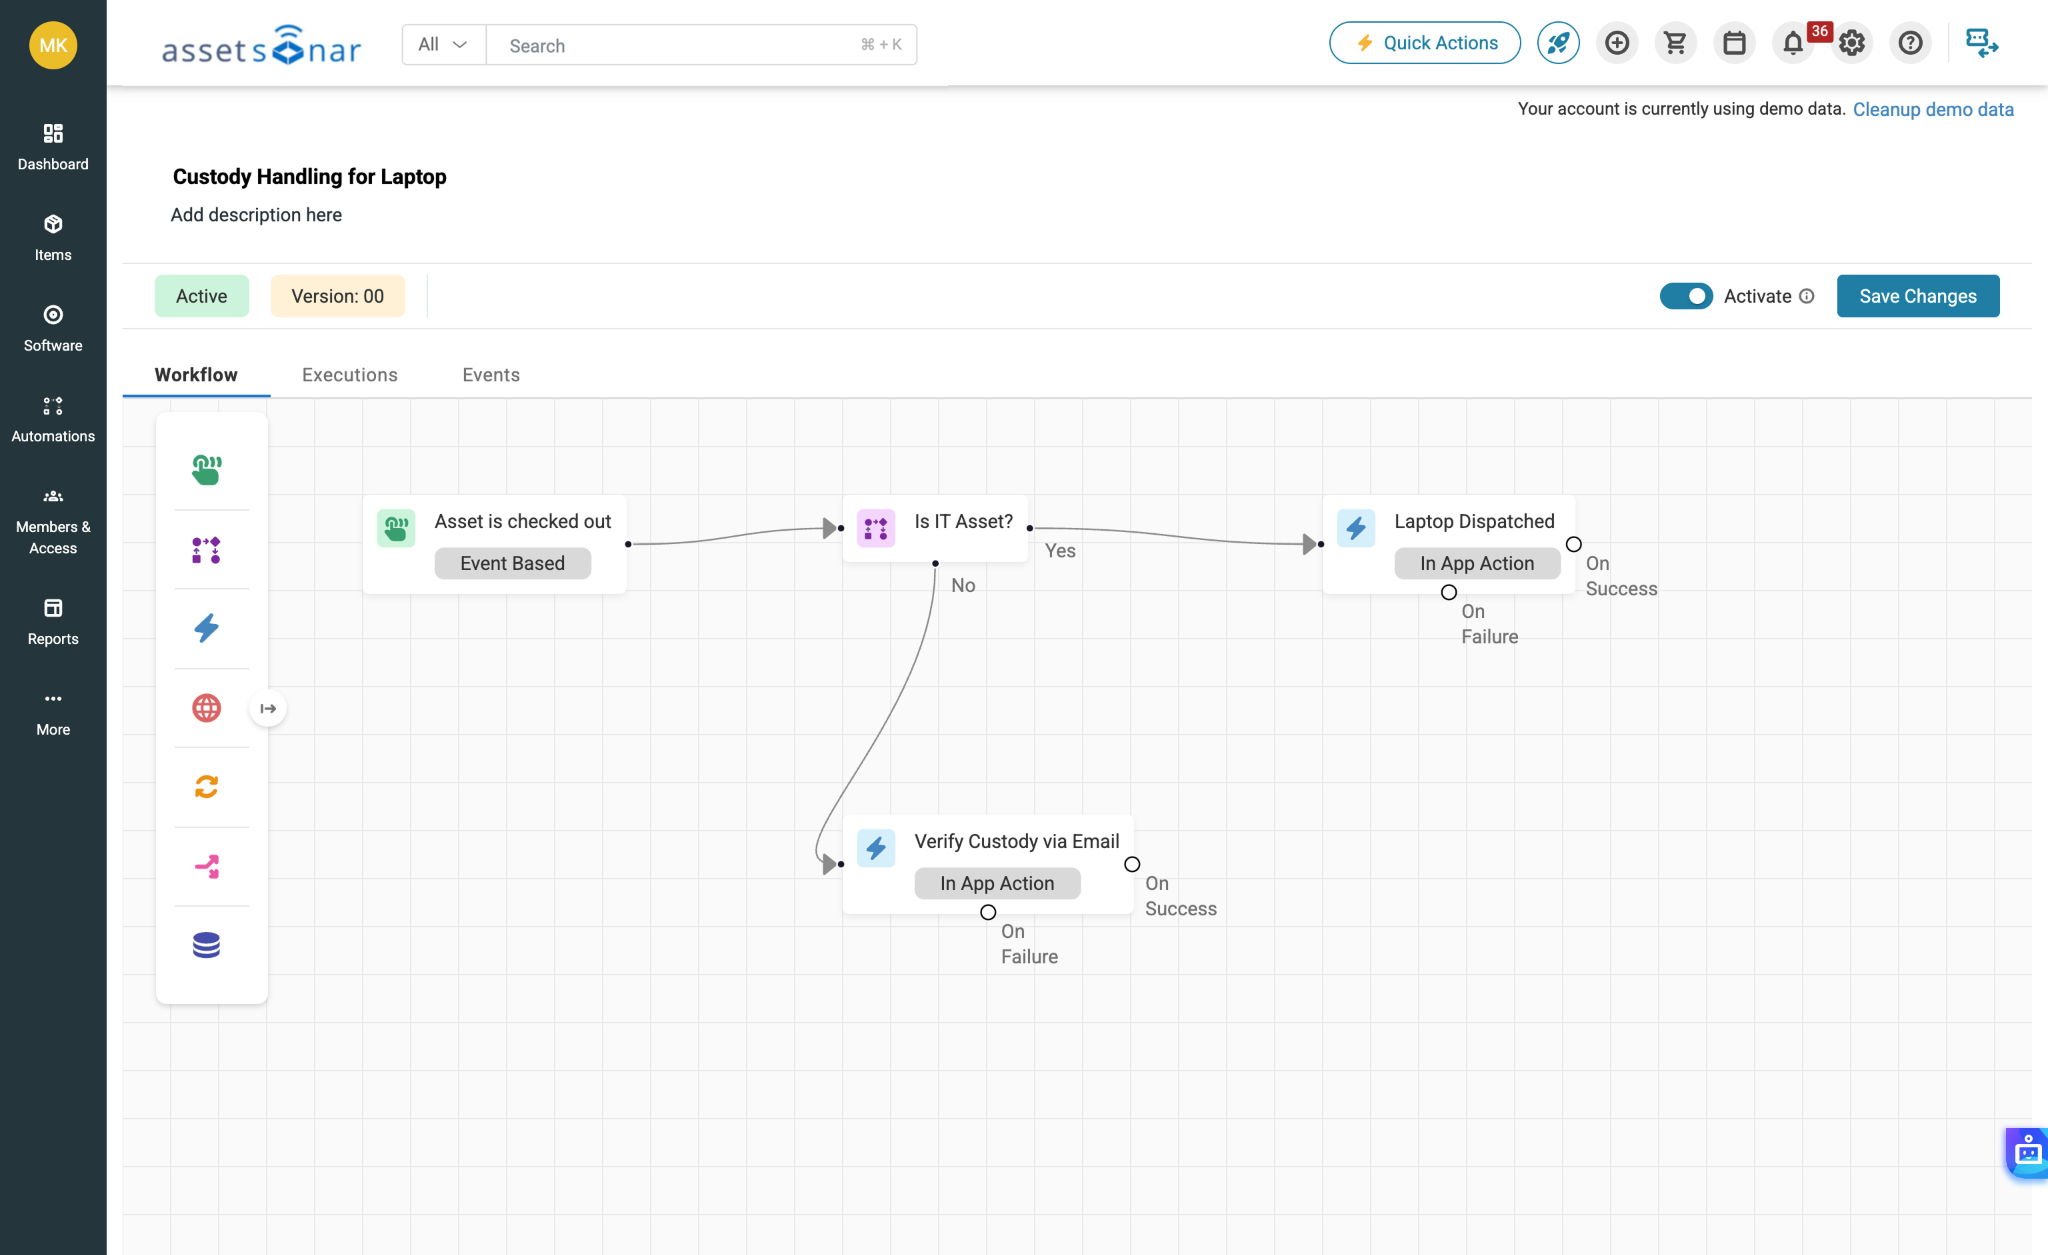
Step 7: Work Through the Ticket Lifecycle
After intake, routing, and SLAs are configured, test how agents will work on tickets from start to finish.
A basic ticket lifecycle includes:
- A requester submits a ticket.
- AssetSonar ITSM assigns or routes the ticket.
- An agent reviews the ticket.
- The agent updates the ticket status.
- The agent adds internal notes, follow-ups, tasks, or approvals where needed.
- The agent associates the ticket with an asset if the issue relates to a device, license, or inventory item.
- The agent adds a solution or response.
- The ticket is resolved or closed.
- The requester tracks the ticket from the Employee Portal.
Use ticket statuses to show where each request stands. For example, a ticket may move from New to In Progress, then to Resolved or Closed.
Use internal notes for technician-only updates. This is helpful when agents need to document troubleshooting steps, handoff details, or context that should not be visible to the requester.
Use followups to communicate with the requester. Use tasks when work needs to be broken into smaller steps. Use approvals when a request requires manager or admin sign-off before it can move forward.
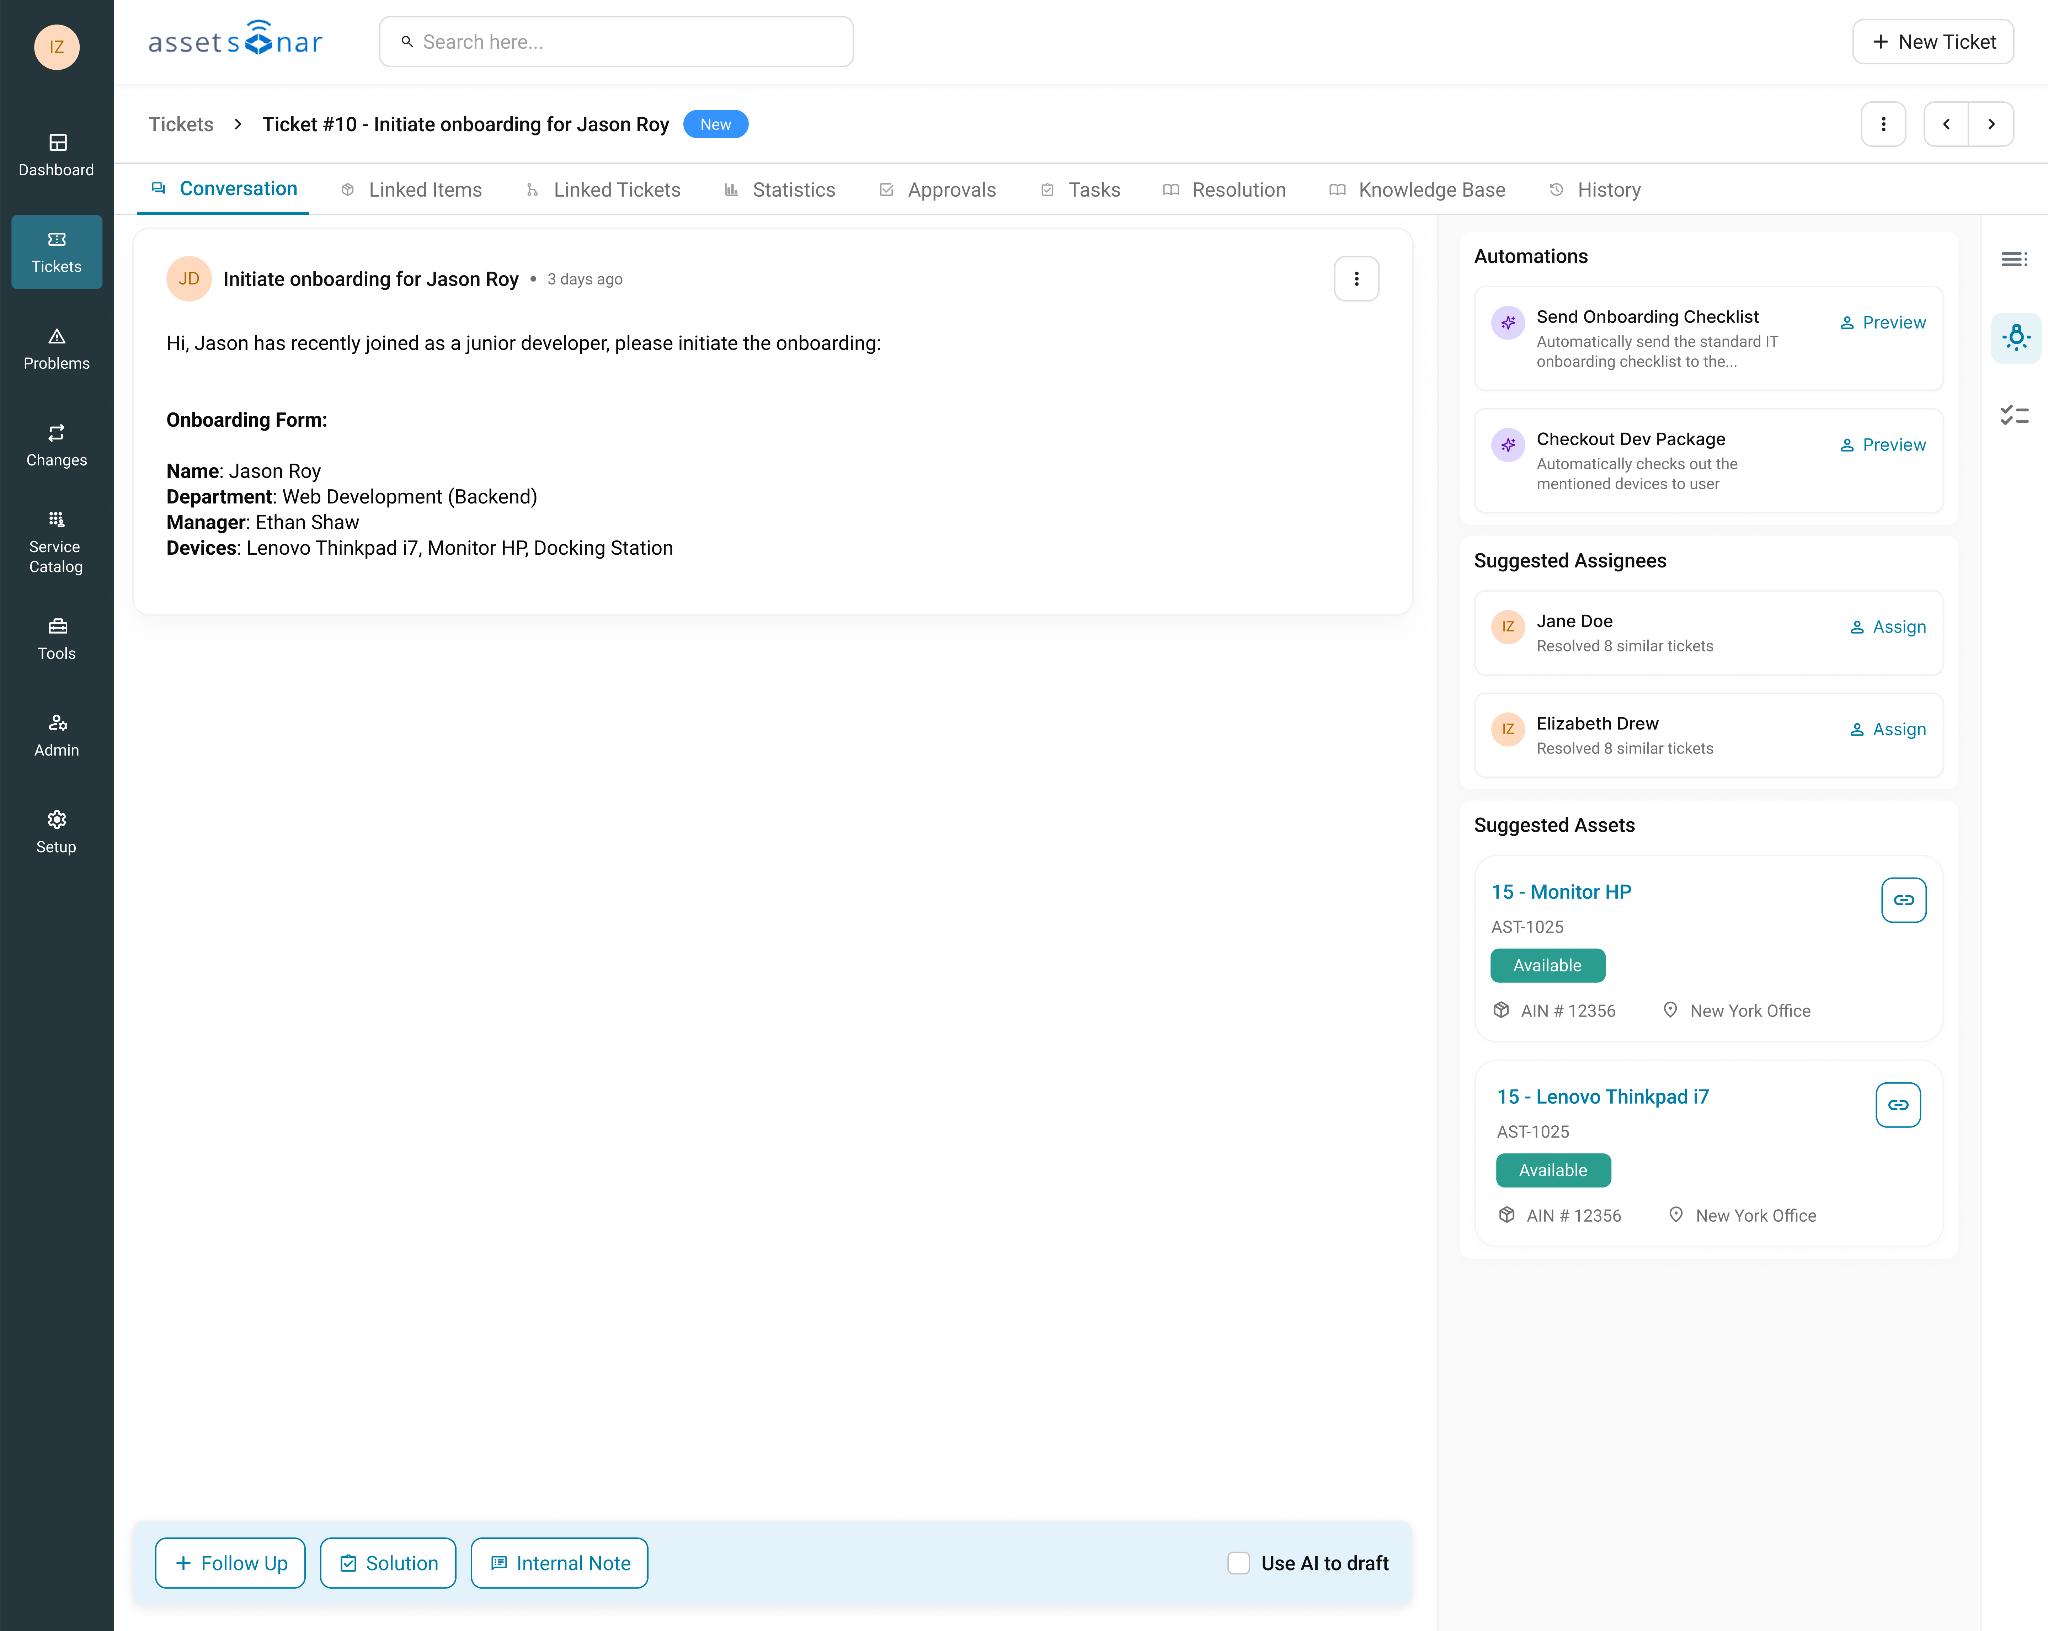
If the ticket relates to a device, associate it with the relevant asset. This helps your team connect service history with the asset record and understand recurring issues over time.
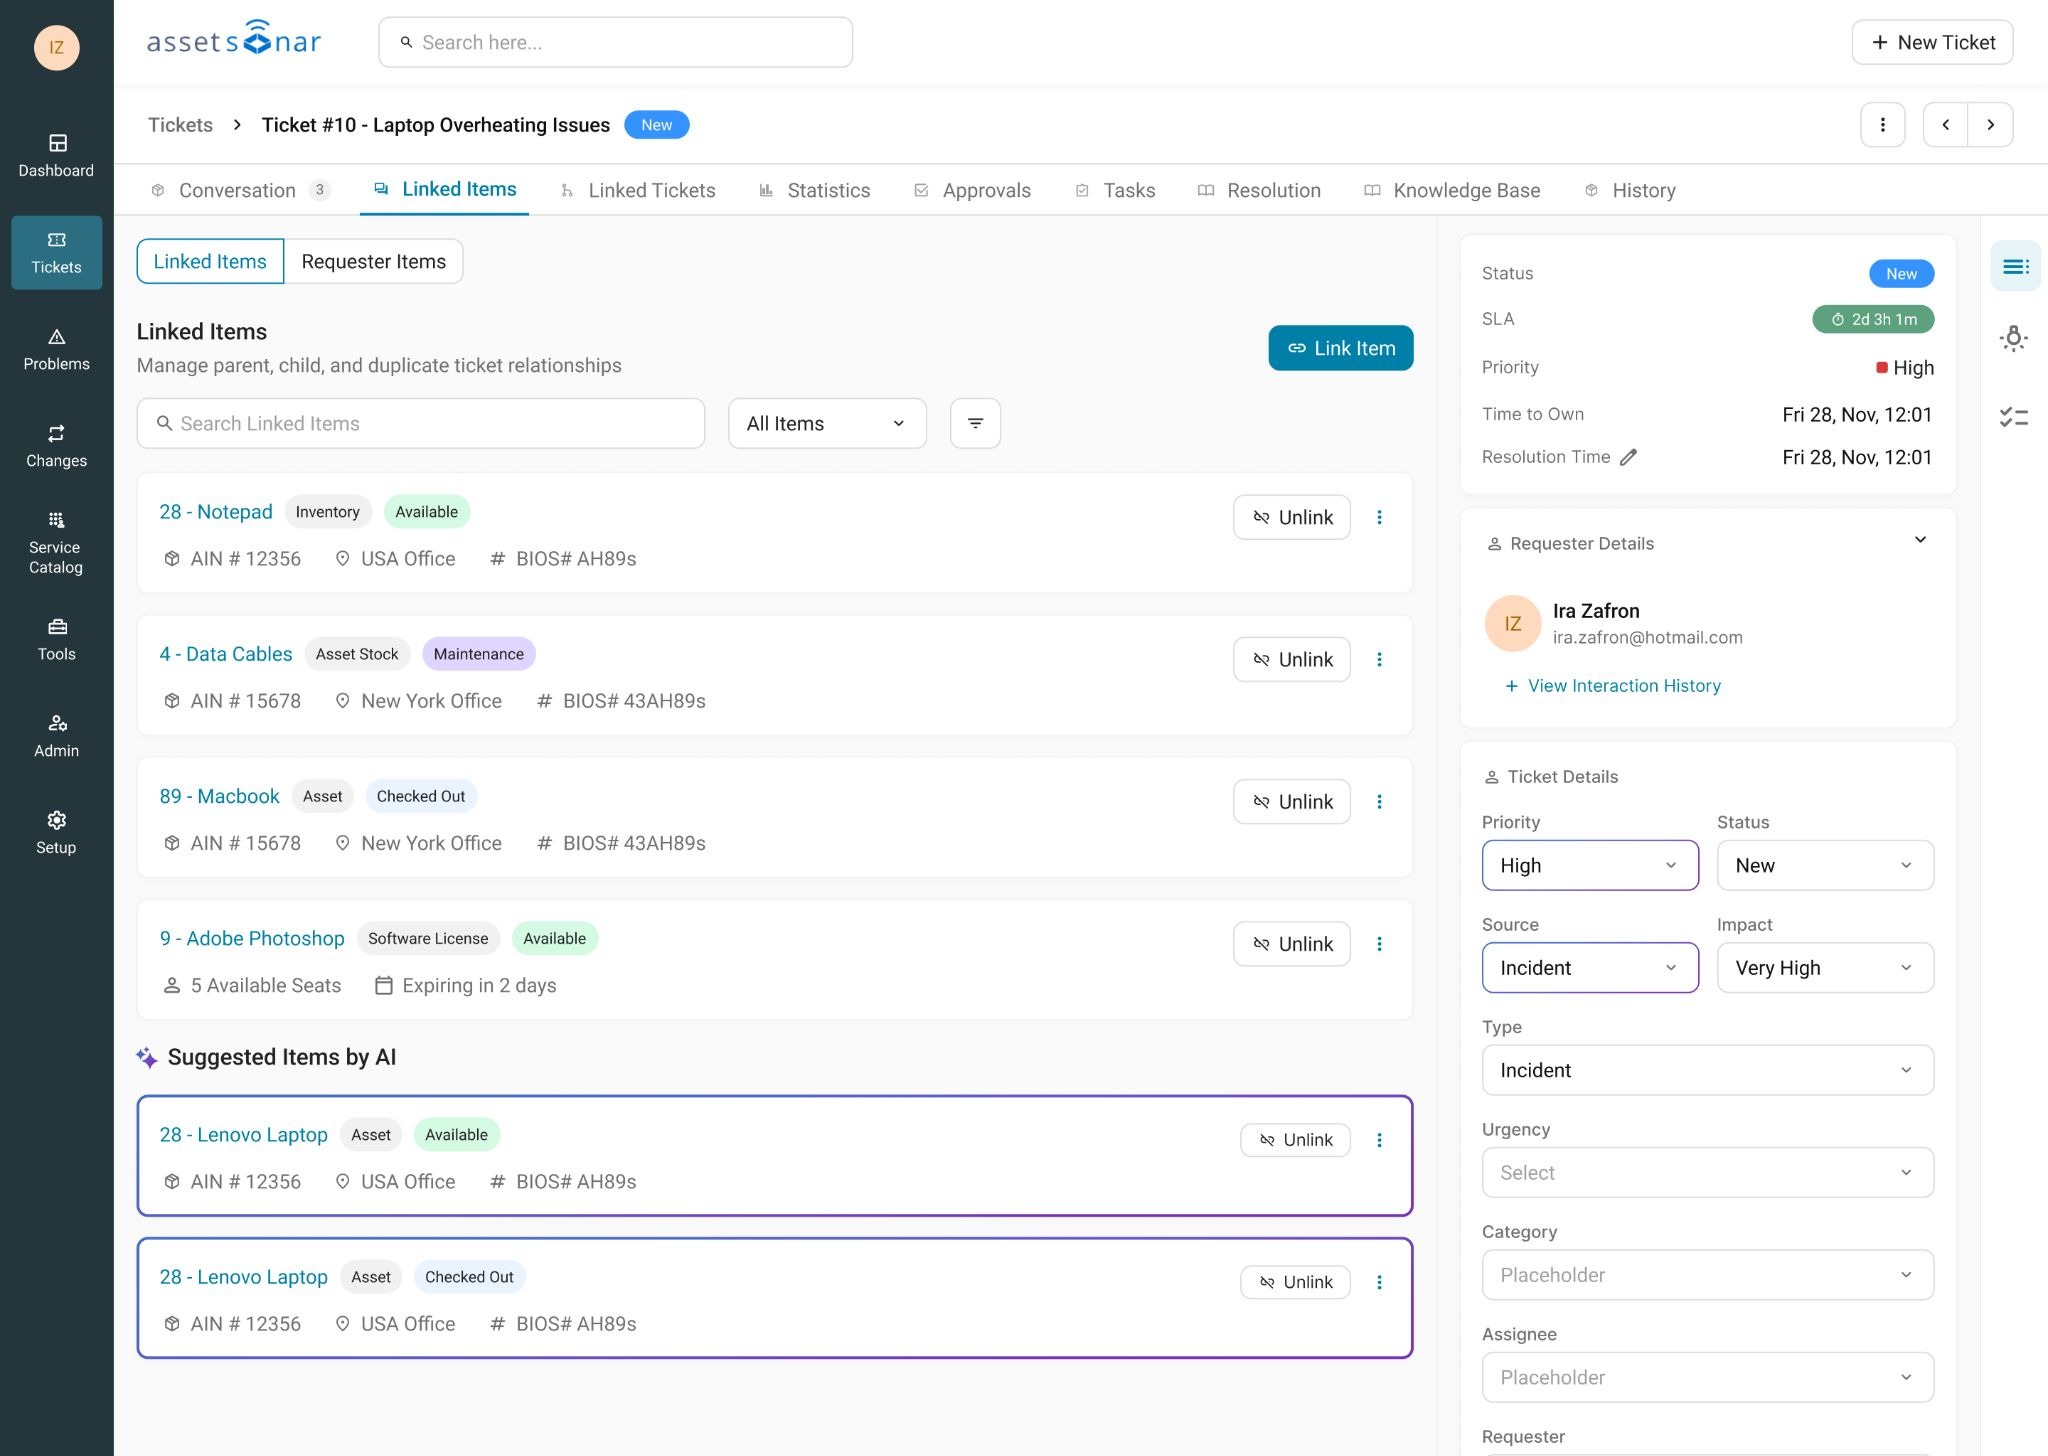
You can also use advanced ticket management features later, such as observers, attachments, reply templates, related tickets, parent-child tickets, duplicate merging, ticket history, and reopened tickets. These are useful once your basic ticket workflow is already running.
For detailed setup steps, read:
- Understand Ticket Actors
- Update Ticket Statuses
- Understand Status Lifecycle
- Associate Tickets with Assets
- Add Internal Notes
- Add Followups, Tasks, Approvals & Solutions
- Track Tickets in Employee Portal
- Reopen Tickets
Step 8: Configure Notifications
Notifications keep requesters and technicians informed as tickets move through the service desk.
Start with outgoing email notifications. These control the emails users and agents receive when ticket events occur, such as ticket creation, assignment, status changes, replies, and resolution.
Next, configure technician notifications. These help agents know when a ticket has been assigned to them, updated, escalated, or changed by another user.
Then configure user notifications. These keep requesters updated when their ticket is received, updated, resolved, or closed.
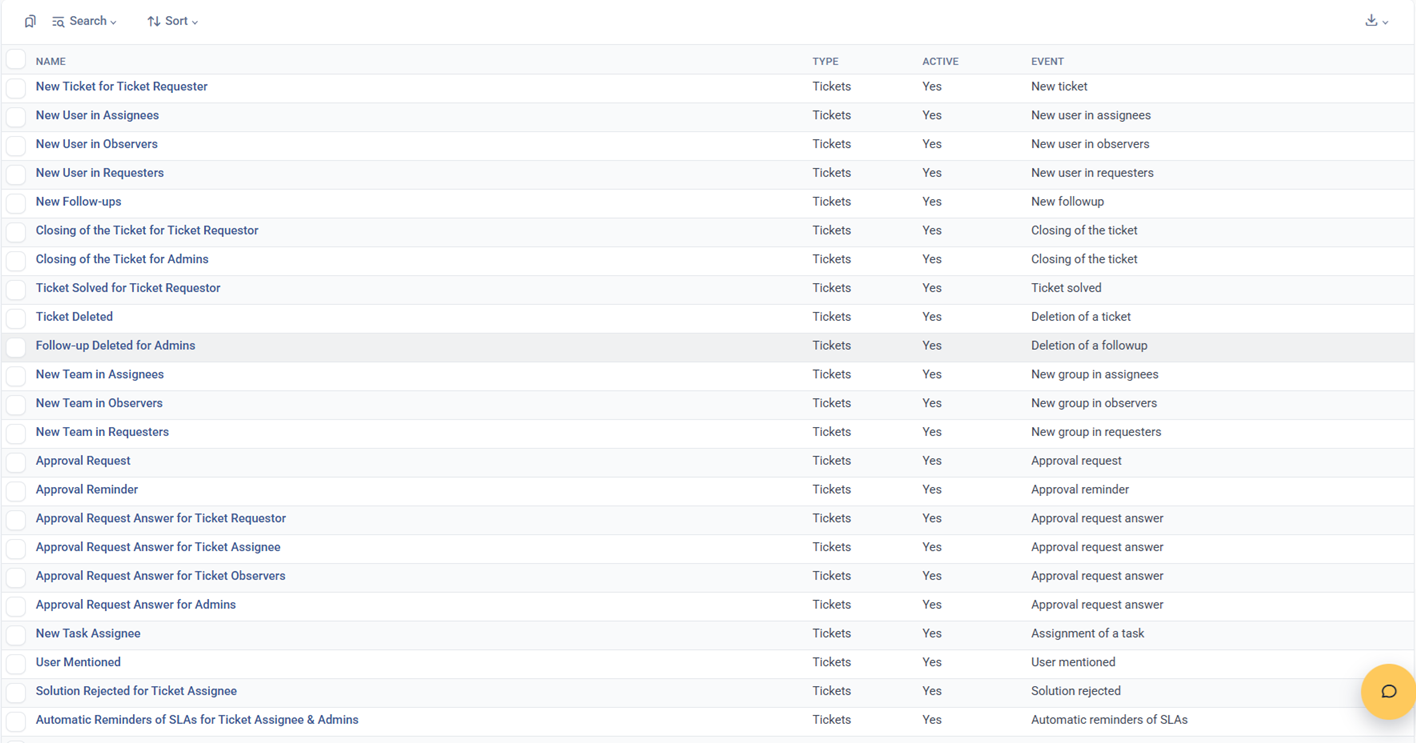
For your first launch, focus on the notifications that matter most:
- Ticket created
- Ticket assigned
- New reply or follow-up added
- Status changed
- SLA warning or breach
- Ticket resolved or closed
After configuring notifications, submit test tickets from the Employee Portal and email. Confirm that the requester and technician receive the correct updates.
For detailed setup steps, read:
- Configure Outgoing Email Notifications
- Configure Technician Notifications
- Configure User Notifications
Step 9: Build a Basic Knowledge Base
A knowledge base helps your team answer repeated questions faster and gives employees a self-service option before they submit a ticket.
You do not need a large knowledge base at launch. Start with a small set of high-value articles based on common issues.
Good first articles include:
- How to submit an IT support ticket
- How to request a new device
- How to request software access
- How to troubleshoot login issues
- How to report a lost or damaged device
- How to check the status of a support ticket
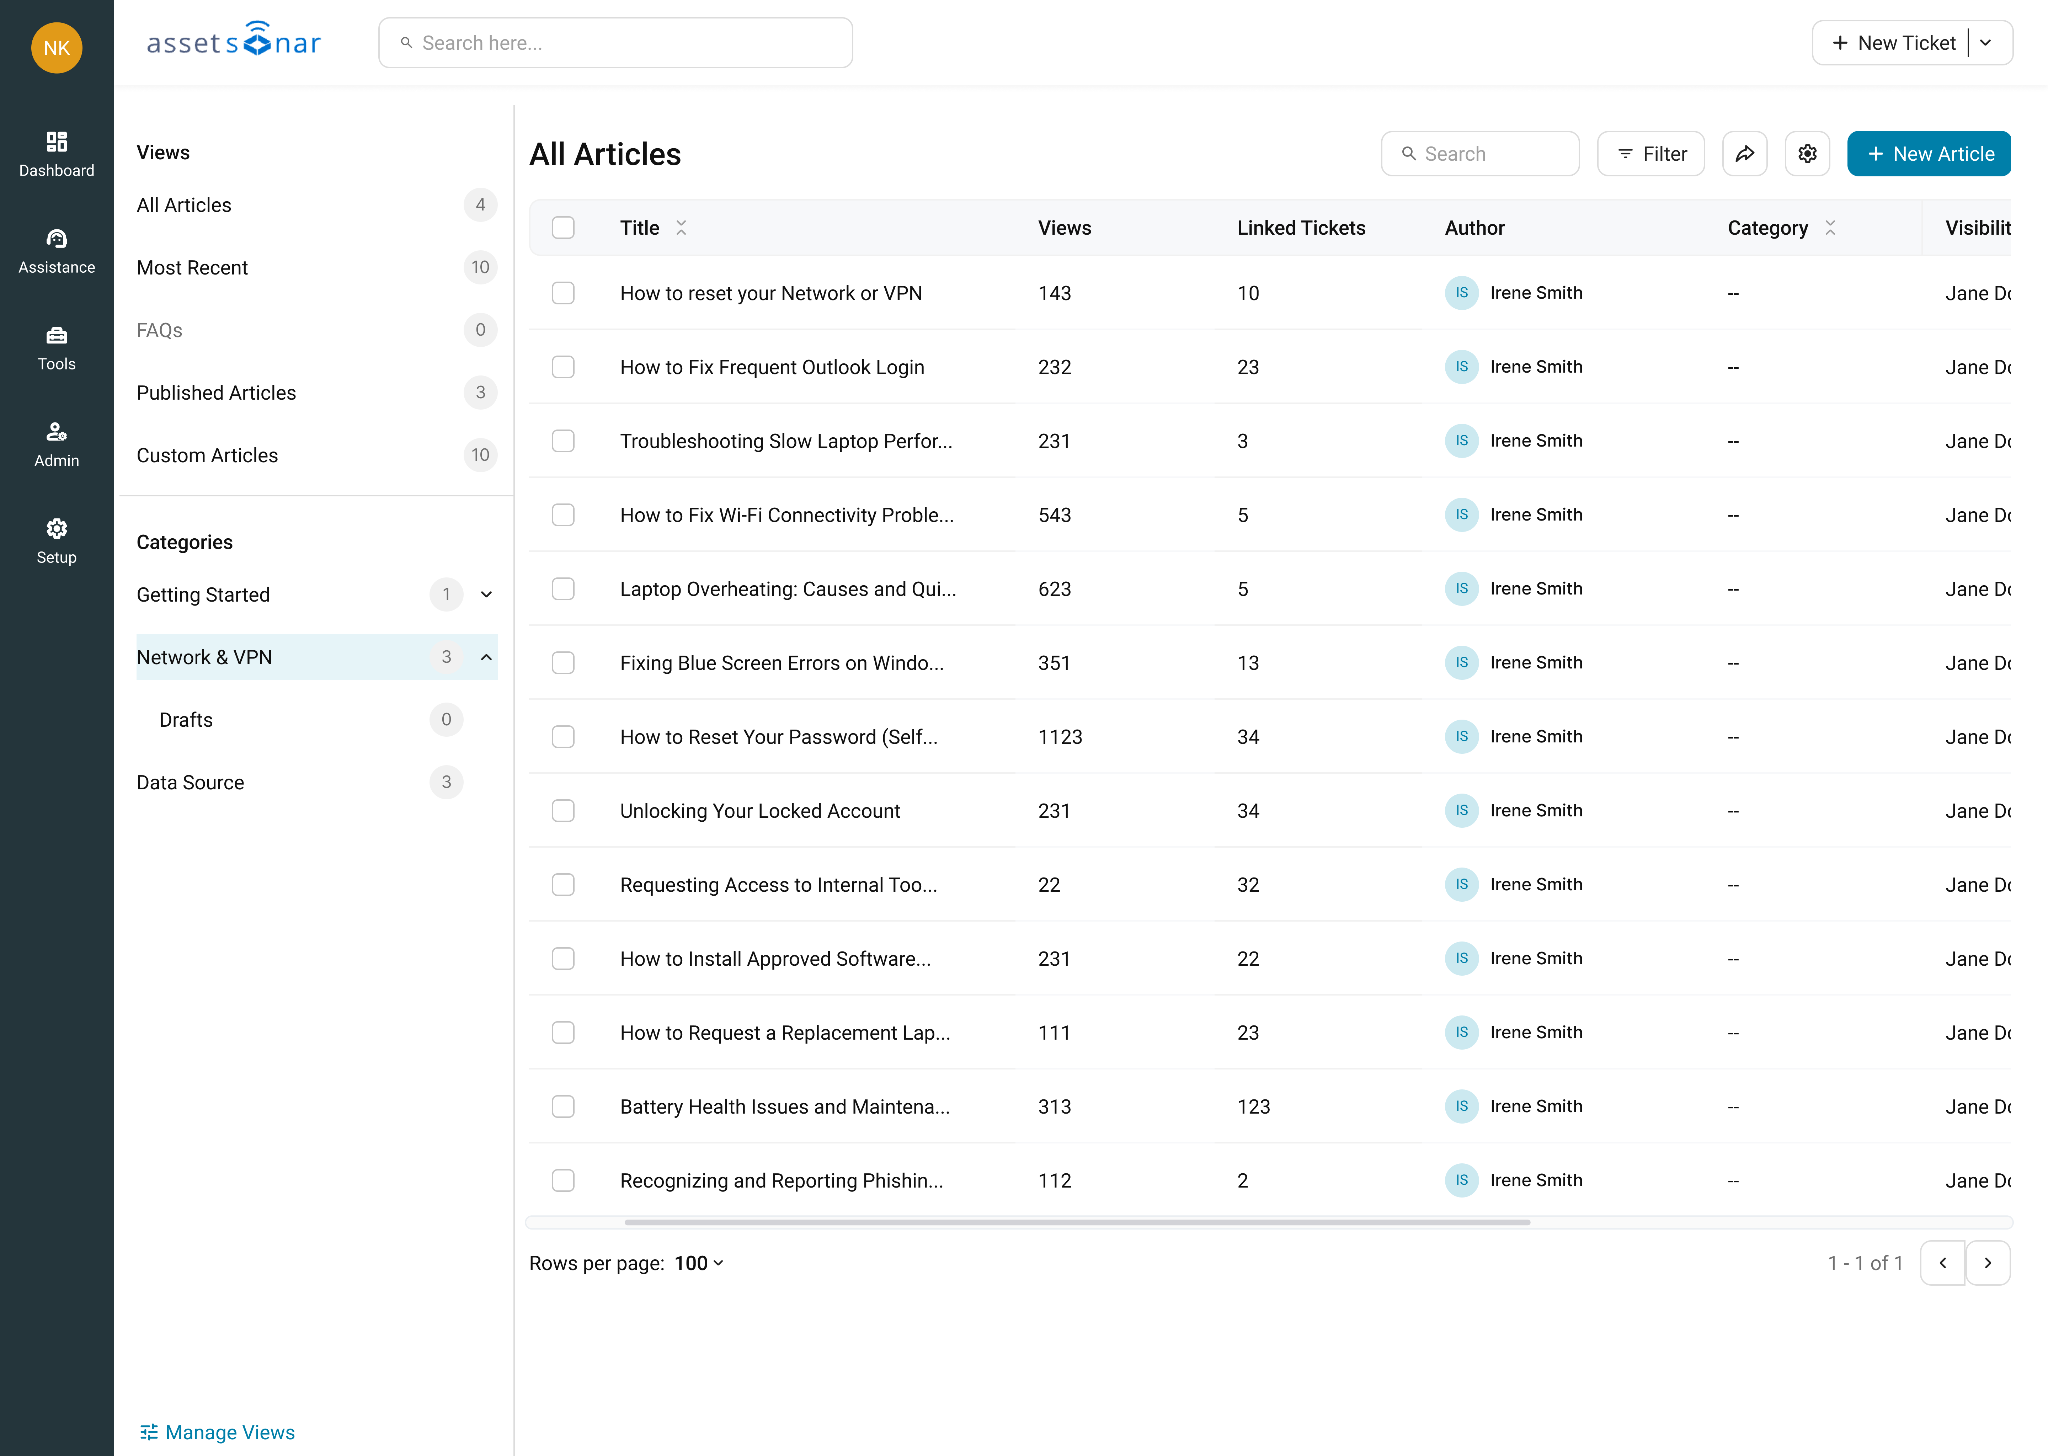
Create knowledge base categories to keep articles organized. Then decide which articles should be public to employees and which should remain internal for agents only.
You can also link knowledge base articles to tickets. This helps agents respond faster and gives requesters clear instructions. Over time, resolved tickets can also become the basis for new knowledge base articles.
For detailed setup steps, read:
- Getting Started with Knowledge Base
- Configure Knowledge Base Categories
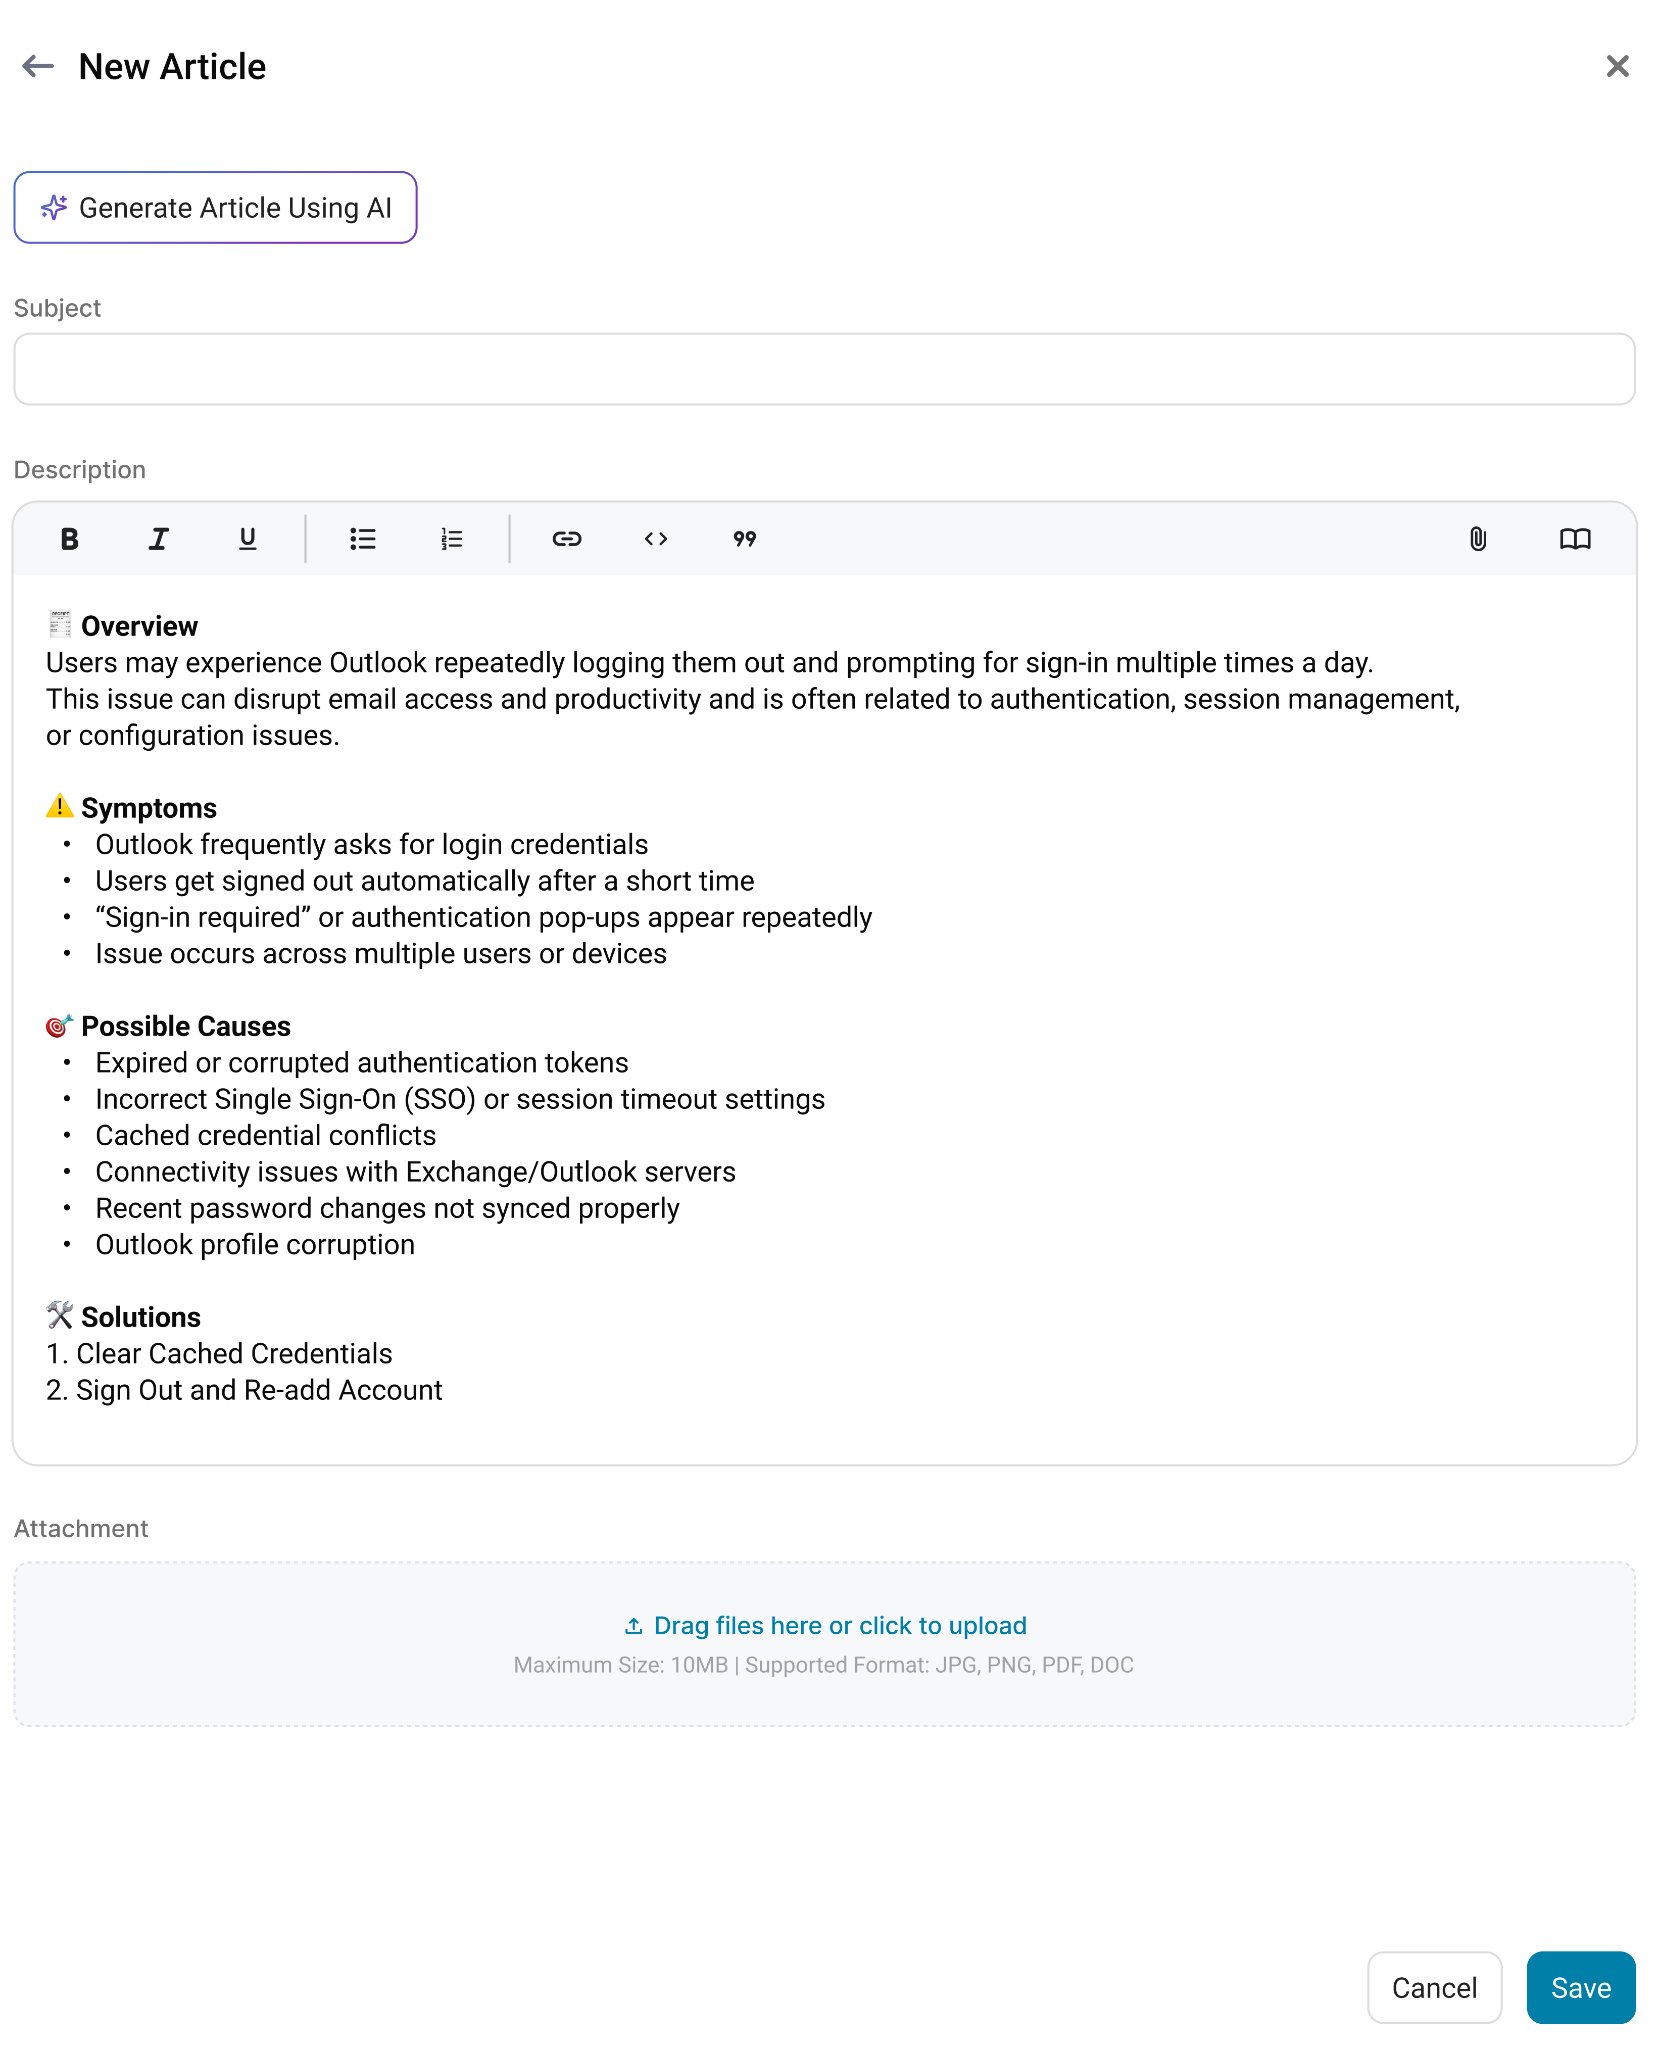
- Create & Publish Knowledge Articles
- Control Article Visibility & Access
- Public vs Internal KB Articles
- Link KB Articles to Tickets
- Turn Resolved Tickets into KB Articles
- Search KB in Employee Portal
Step 10: Test Your Launch Flow
Before rolling out AssetSonar ITSM to your full organization, run a complete launch test.
Use this checklist:
- Submit a ticket from the Employee Portal.
- Submit a ticket by email.
- Create a manual ticket as an agent.
- Confirm that each ticket is created successfully.
- Confirm that request source and category values appear correctly.
- Confirm that each ticket is assigned to the right team or agent.
- Confirm that SLA status appears where expected.
- Confirm that notifications are sent to the requester and technician.
- Associate a ticket with an asset.
- Add an internal note.
- Add a followup or task.
- Add a solution.
- Resolve or close the ticket.
- Confirm that the requester can track the ticket from the Employee Portal.
If any part of the test fails, fix that part before inviting more users into the workflow. It is better to launch a smaller, reliable service desk than a large setup with broken routing, unclear forms, or missing notifications. For any questions or assistance, you can always reach out to us at support@ezo.io.
Step 11: Expand After Launch
Once your basic service desk is live, you can start improving it with advanced ITSM features.
Add automation where your team is repeating the same actions. For example, you can use auto-responders to acknowledge new requests, auto-close rules to close inactive tickets, and assignment rules to route requests more precisely.
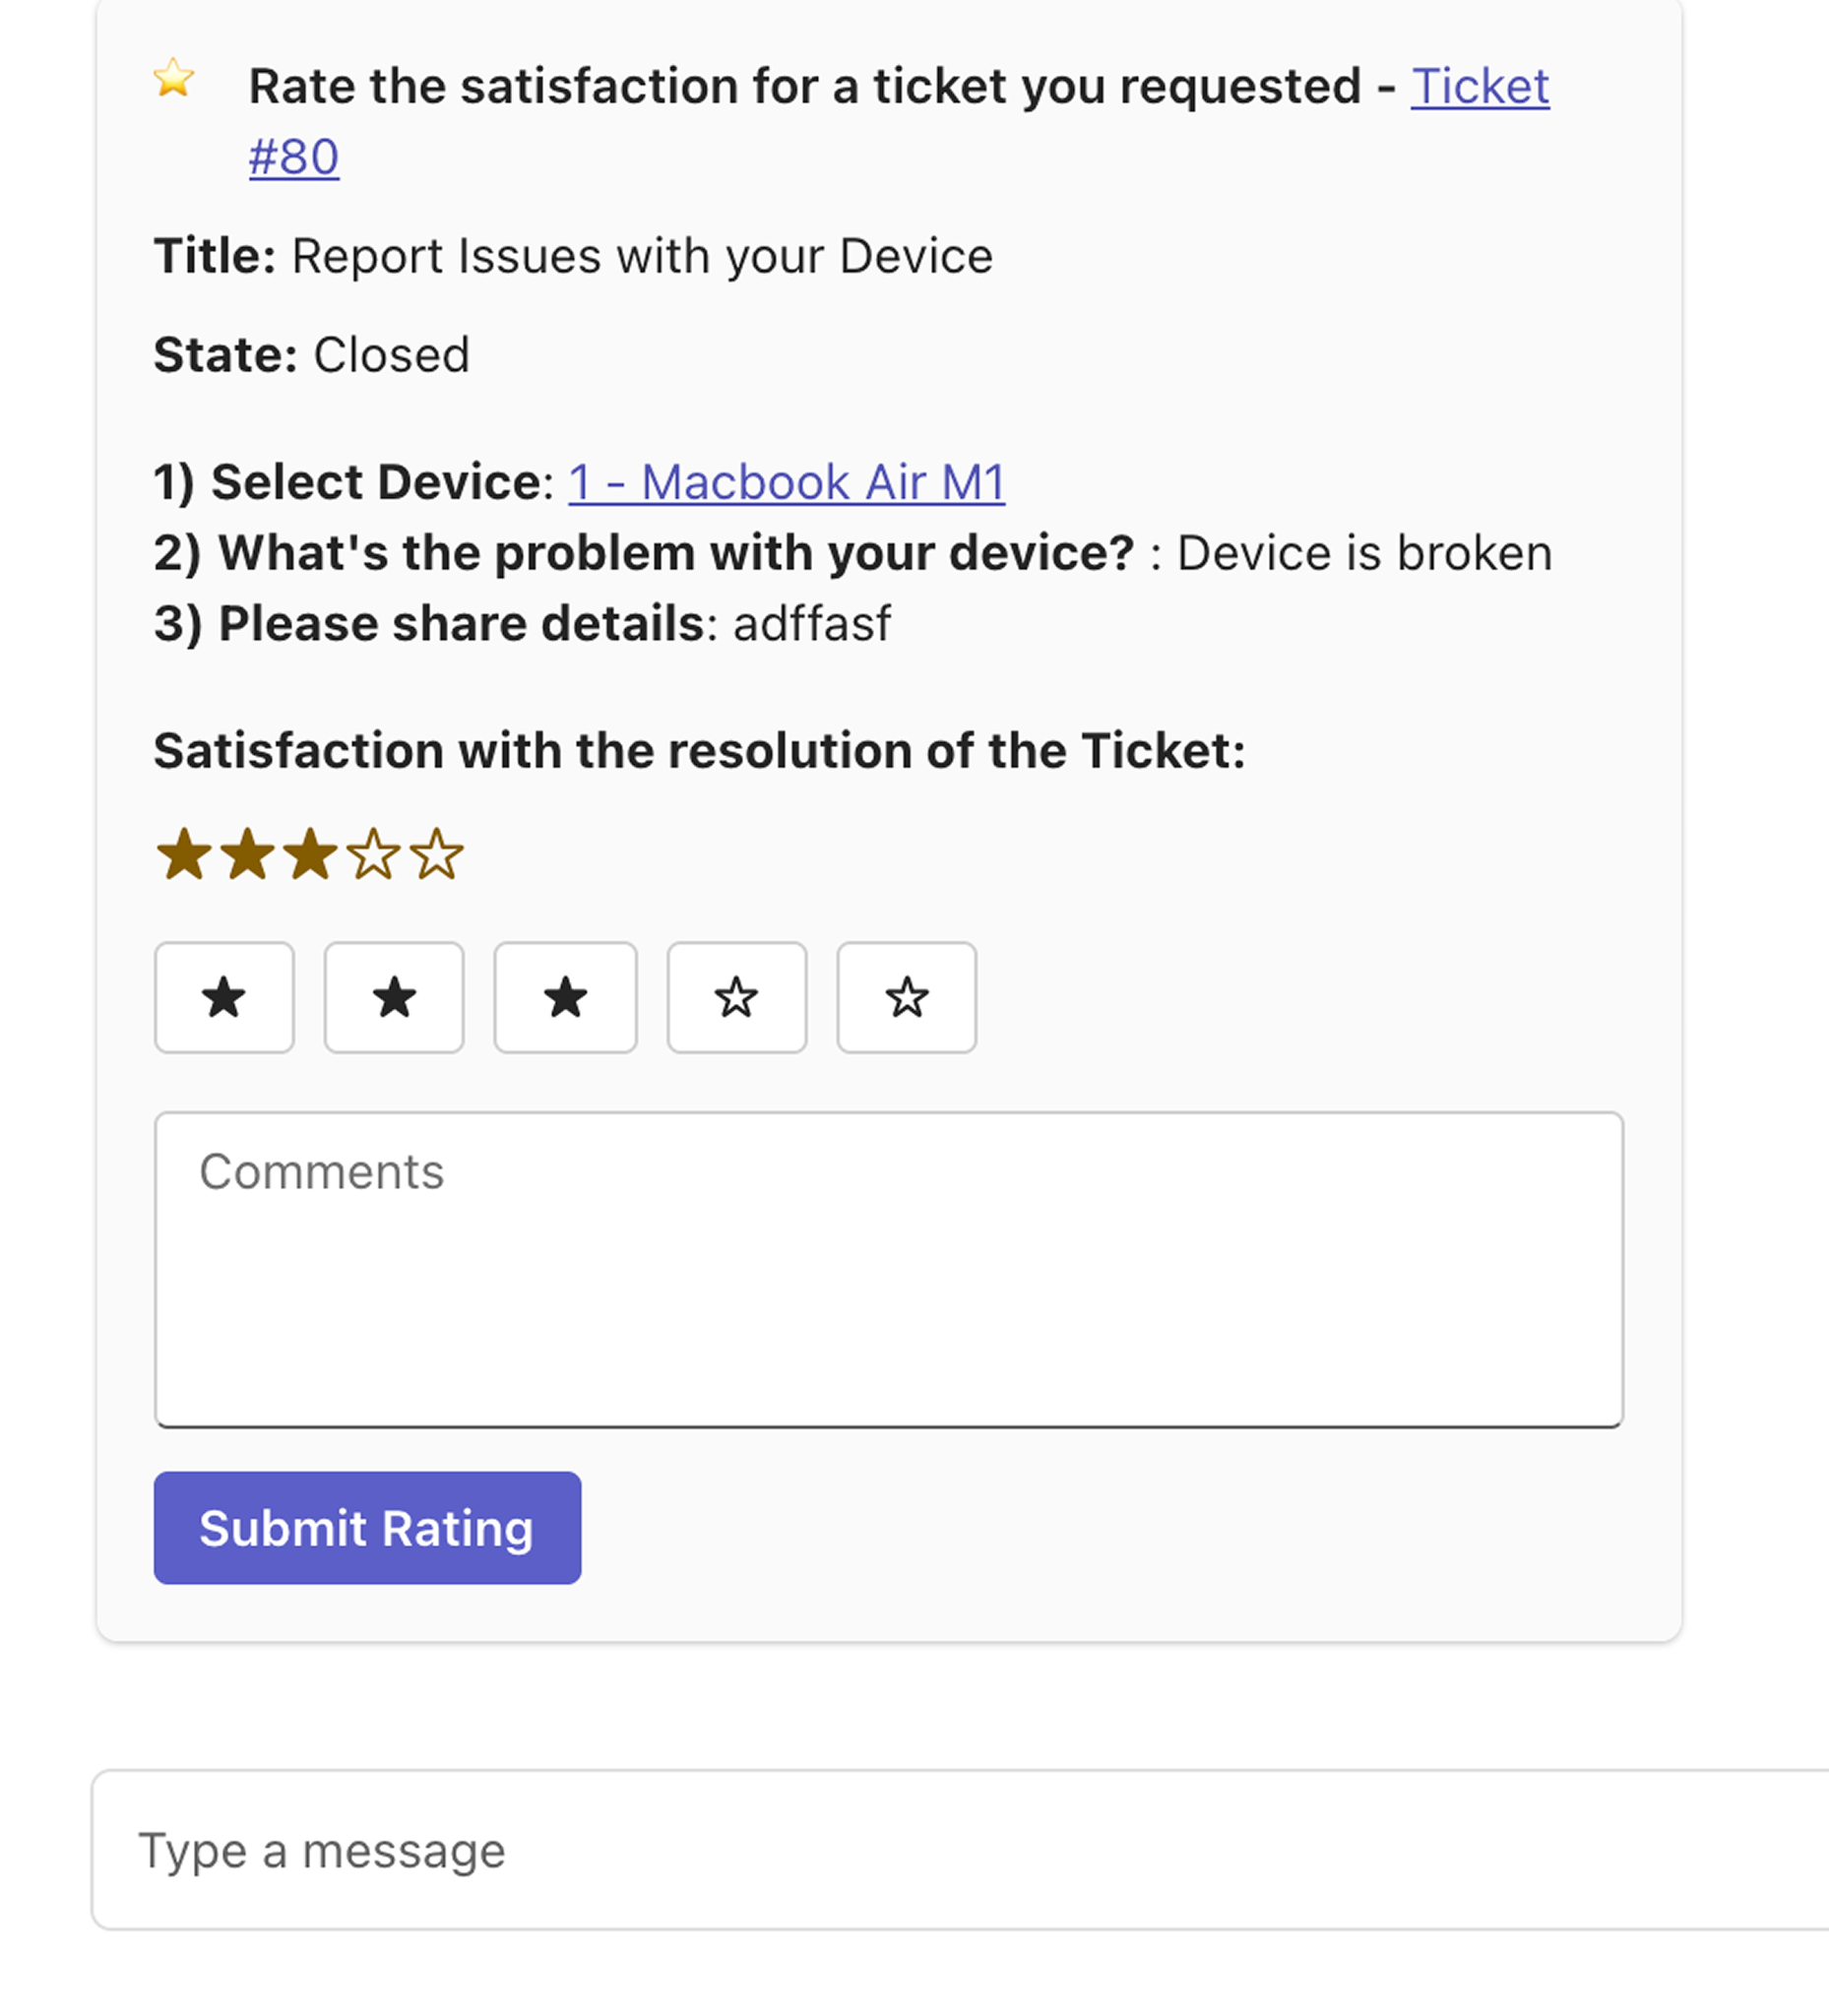
Add customer satisfaction surveys once you are ready to measure support quality. This helps you understand how requesters experience your service desk and where your team can improve.
Create custom ITSM reports to track ticket volume, resolution time, SLA performance, common request types, and agent workload.
You can also expand your communication workflows through MS Teams or Slack if your organization uses those tools for day-to-day collaboration.
As your knowledge base grows, add version control, article visibility rules, embedded media, and stronger links between tickets and articles.
For detailed setup steps, read:
- Setup Auto-Responders & Automations
- Setup Auto-Close Rules
- Customer Satisfaction Surveys
- Create Custom ITSM Reports
- Setup MS Teams Integration
- Use MS Teams Bot for IT Support
- Manage Version Control for Articles
- Embed Media in KB Articles
Ready to Launch Your Service Desk?
AssetSonar ITSM helps you move from scattered IT requests to a structured service desk connected directly to your assets, users, tickets, SLAs, and knowledge base.
Start with the essentials: enable access, configure core settings, set up Employee Portal and email intake, create a few request forms, route tickets to the right agents, define simple SLAs, and test the full ticket lifecycle.
Once your team is comfortable with the basics, you can expand into advanced automations, reporting, approvals, communication integrations, and self-service workflows.
For questions or assistance, reach out to us at support@ezo.io.

![[ITSM | How-to] Getting Started with the Knowledge Base in AssetSonar](https://cdn.ezo.io/wp-content/uploads/2026/03/18092502/knowledge_base_assetsonar_banner.png)
![[ITSM | How-to] Creating Custom Reports for ITSM in AssetSonar](https://cdn.ezo.io/wp-content/uploads/2026/03/30125815/Custom-Reports.jpg)


