

In an organizational setting, assets transition through multiple states. Large organizations require software that allows them to define asset states most relevant to their workflows. For instance, an organization can have different substates for the Parent State. To facilitate such operations, EZO CMMS enables enterprise-level users to create advanced custom substates within existing asset states.
A custom substate is an Asset or Asset Stock state that falls under a Parent State.
Important definitions for custom substates
| Parent State | This is the main state that the item belongs in. The substate will be an addition to the parent state. |
| Name | This is the name that you will identify the substate by. |
| Item Type | This specifies the type of item that the substate applies to i.e., assets or asset stock. |
| Description | This will give you a description of what the substate entails. |
| Substate Transition | These are all the substates that your current substate can transition to. You can also quickly add new substates if you have not created them yet. |
| Substate Actions | These are the labels that describe the transition from one substate to another. |
For example, for the Parent State “Available”, a company can choose to have substates such as “In transit”, “Returned to sender”, or “Delivery in progress”. Parent States and substates can be defined to represent the organizational workflow for streamlined tracking.
Benefits of Custom Substates
The benefits of custom substates are as follows:
Enhanced user experience
The custom substate feature significantly enhances the user experience, simplifying the process of creating and managing substates for assets and asset stock. You can smoothly navigate the feature without problems, resulting in a more intuitive and efficient workflow.
Tailored workflows for specific needs
The custom substate feature allows users to have a higher degree of customization in their workflows. They now have in-depth information regarding the state of their assets and asset stock which enables them to design workflows precisely tailored to their specific needs.
Streamlined configuration
Users can set up their workflows with ease by creating and managing substates for assets and asset stock. This streamlined configuration leads them to a more intuitive experience, saving time and resources.
Seamless substate transitions
The updated functionality of the custom substate feature enables users to experience seamless transitions between substates. This helps them manage their processes effortlessly.
Enable advanced custom substates
Here’s the step-by-step guide to enabling advanced custom substates:
1. Enable custom substates
Go to Settings → Company Settings & Add Ons → Custom Substates. To enable (advanced) custom substate for your enterprise account, contact the support team by sending an email.

Once the support team has enabled the (advanced) custom substates for your account, again go to Settings → Add Ons and select Enabled to add substates to the existing states and customize your workflow. Click Update and save the changes.

2. Create custom substates for assets
To generate custom substates, go to the Navigation Menu and then More → Customize → Custom Substates.

This will take you to the Custom Substates main page where you can add the required states. Click ‘Add Custom Substate’.

Here you can choose the Parent State from the dropdown. You will then be able to define substates for the Parent State.

After selecting the Parent State, click on ‘Add New Substate’. A window will pop up asking you to enter the new custom substate.

Click on “Create Sub State”. After adding your new custom substate, define the Substate Transition.

Note: You will not be able to transfer assets to the required substate without adding the substate transition.
You can also add more than one substate for every Parent State. For instance, the image below shows substates defined for the Parent State “Available”.

3. Edit asset substates
To edit any asset substate, click on Substate → Edit. A new window will appear, allowing you to make the required changes. Here you can also set up transition substates. The image below shows:
- Parent State: Available
- Substate: In Transit
- Substate Transition: Available: Mark as delivered and Available: Mark as returned.

4. Set a default asset substate
For each Parent State, define the default substate. This can be done by selecting the substate in the Default column.

Every time you create a new asset, it will be assigned to the Default substate. For instance, in the image below, the laptop is assigned to the default substate ‘In Transit’ under Available.

5. Assign asset substates
For every asset, you can change its substate as per your business needs. Let’s say you want to check out an asset. You can assign any substate created under the “Checked Out” Parent State. Here we have an HP Laptop that has a substate “In Transit”. To check it out under a different substate go to More → Change Substate to → Checked Out and Delivered.

Note:
1) The substate transition options available on the Asset Details page are the same that you saved on the Custom Substate page.
2) Assets/Asset Stock previously added before creating substates will not have a default substate.
On the other hand, if you simply want to check out the asset you can do so by clicking the Checkout button on the Asset Details page. This will, however, assign the Default substate for the “Checked Out” Parent State.

5.1 Allowed asset substates
There are a few rules for moving between Parent States and substates that are as follows:
For Parent State (Drop Down):
- For Assets, any state can be chosen except Retired.
- For Asset Stock, any state can be chosen except Maintenance, Audit Pending, and Retired.
To change state transition:
- Users can pick from states and their respective substates that the parent state can transition into.
- Users can also choose to create a new transition that is currently not defined for the Parent State.
- Transitions cannot be cross-module i.e., assets substate to asset stock substate
6. Check substate history
The history is stored for all asset substate transitions made in your account. To view it, on the Asset Details page, go to More→ State History
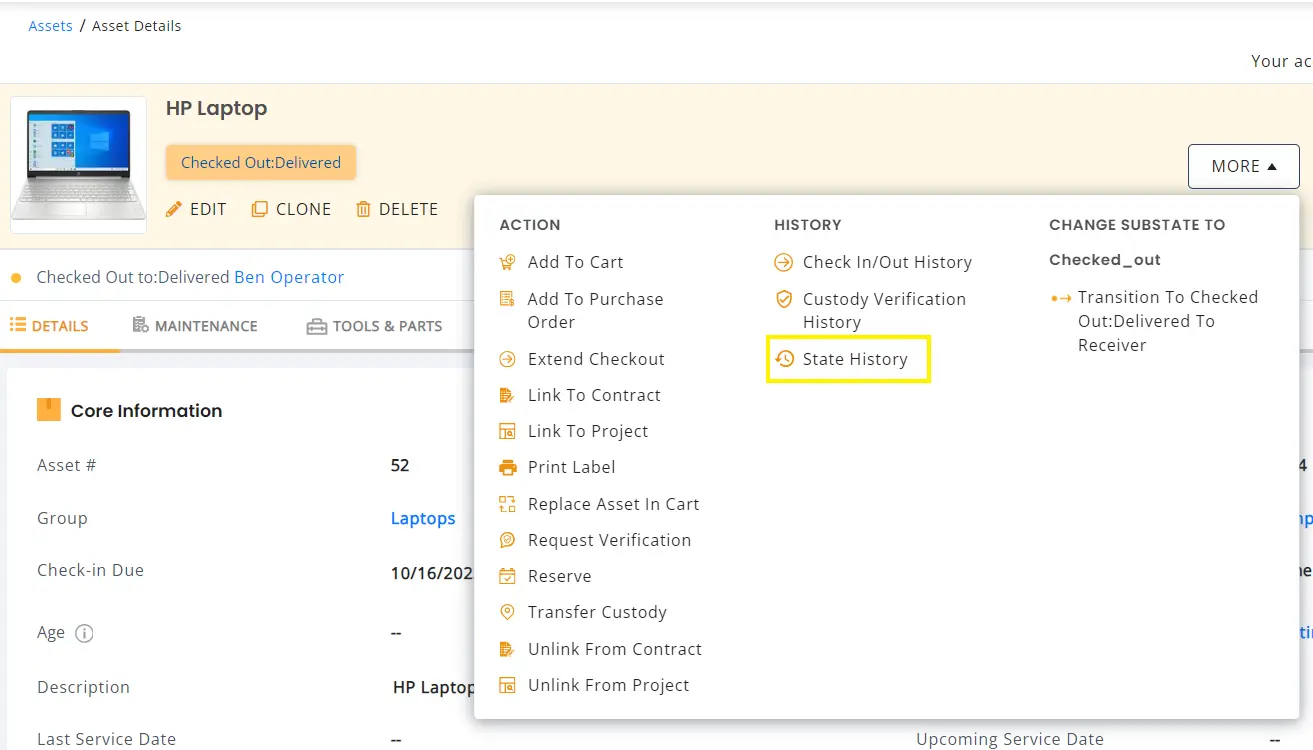
A window will pop up with the substate actions taken on the asset.

7. Deactivate asset substate
Any custom substate that does not have any transition substates associated with it can be deactivated.

8. Create a custom substate for asset stock
For asset stock that is frequently checked out to different locations, you can create custom substates to track items in a streamlined manner. On the Custom Substate page, go to Asset Stock → Add Custom Substate.

For asset stock, you can choose from 4 different Parent States.

After adding the custom substate, define the substate transitions for Asset Stock.
9. Assign substates to asset stock
Go to the Navigation Menu and click More → Custom Substates → Asset Stock. Here you can generate custom subsates for Asset Stock and add transitions just like we did for Assets.

There are two ways to assign substates for asset stock in your EZO CMMS account. They are as follows:
9.1 For existing asset stock
There must be some asset stock in your account before you create the custom substates. To apply substates to previous stock, go to the Substates page and click ‘Move Available Asset Stock Quantity to In Transit’.
Note: The selected substate for this action is always the default substate. In the image below, it’s Available: In Transit.

The button will display the following overlay asking you to choose a location. If you want to move all available stock to the custom substate, select the Null option from the Location dropdown. This will automatically display all available asset stock quantities regardless of location.

Note: Once you move asset stock quantities to a substate, it cannot be reversed.
9.2 For new asset stock
After you have created a new asset stock, go to Asset Stock Details page→ More→ Add Stock. Here specify the quantity and location for the new asset stock.

The new stock added will be automatically assigned the default substate under the Quantity by Location tab.

You will now be able to move asset stock to custom substates as defined in the substate transitions.

Go to the Asset Stock Details page and open More → Substate Transition → Available: Delivery in progress.
This will display an overlay asking you to select the stock quantity that you want to move to the custom substate.

This will redirect you to an overlay asking about the quantity you want to transfer to the substate.

Once the substate transfer is successful, you will be able to see Quantity by Location in its respective substates.

10. Adding asset stock to carts
You can also choose asset stock quantities from different substates to add to a cart. Go to the Asset Stock details page and click on More→ Add to Cart.
An overlay will appear asking you to enter the quantity, location, and state of the required asset stock.

Once you select the relevant fields, asset stock will be transferred to the current cart.

11. Creating substates for packages and bundles
Moving an asset, which is part of a package, to a substate will automatically move all of the assets within that package, along with the package itself, to the specified substate.
For instance, Package 1 contains two assets (Dell Laptop and Dell Laptop 2). Dell Laptop is in substate ‘Available: In Transit’.

Therefore, Package 1 will also be assigned the same substate.

For bundles, individual items can exist in any state. However, when the bundle is being checked out by the cart, the cart state will apply to assets.
12. Creating custom substate reports
For Assets and Asset Stock, you can run reports for different substates. Go to the Navigation Menu and click on Reports → Asset Reports.
For example, we want to run a report for all Available Assets. Click on View Report. From the Asset Status dropdown menu, you can choose Asset States to generate your report.

Now, you are all set to enable (Advanced) Custom Substates and utilize them to organize your Assets and Asset Stock.
About EZO CMMS
EZO CMMS is robust maintenance management software that helps you manage assets, schedule maintenance, and track work orders – all in one place. Streamline operational workflows and enhance productivity using this computerized maintenance management software.


