Invoice labels carry essential information about assets. In order to provide accurate details, they should be designed precisely. EZO CMMS offers customization options to enable users to add relevant information on invoice templates. This feature can be accessed from More → Printout Templates.
1.Create an Invoice Template
You can create several different types of invoice templates for Carts, Purchase Orders and Work Orders.

There is a default template for every invoice label you want to create. However, if you want to create your own and customize invoice templates, click Start Designing Template.
2.Invoice Template Structure
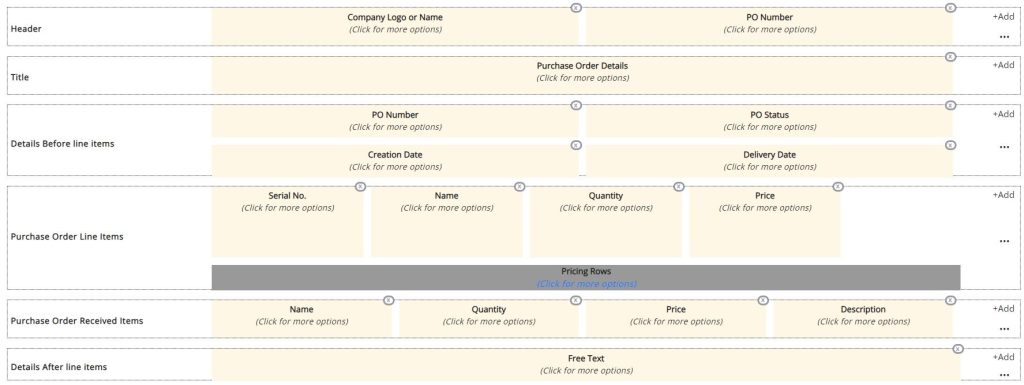
You can now set a Name and Paper Size for your template the way you like. For all invoice printouts, the template looks mostly the same. They are divided into a few simple components: the main sections (grey), visual elements within main sections (blue) and the customization options. For example, the seven main sections for a Purchase Order invoice include:
- Header
- Title
- Details Before Line Items
- Purchase Order Line Items
- Purchase Order Received Items
- Details After Order List
- Footer

You can start by customizing the names of the element as well as their format. This can be done by “ click for more options” under the main element. A window will pop up and you can edit any details you like. You can change details such as font style, font size and text alignment.
Invoice numbers are extremely important for generating invoices as they help keep track of taxes and income. Having a number assigned to all company transactions also makes it easier to track payments and keep financial records in check. All EZO CMMS invoice templates have separate invoice numbers as follows:
- Purchase Order number (for PO invoices)
- Cart number (for cart invoices)
- Work Order number (for Work order invoices)
In EZO CMMS, we provide the option of customizing the invoice number for Work Order and Purchase Order invoices .For instance you can edit the name of the Work Order number to Maintenance Order Number based on your business needs.

3.Add or Remove Elements Within a Section
The EZO CMMS invoice templates also enable you to add more elements to an invoice printout. However, you can have a specific number of elements per section; like the Header can have a maximum of three elements. For example, you can choose either Library Image or PO Identification Number to add in a Purchase Order Template Header.


If you wish to remove a certain element, click on the ‘x’ on the top right corner of the element. Whereas, you can add new elements by clicking on the +Add button in the grey space. The options to add new elements vary according to the section you are editing. For example in Purchase Order Line Items, you can add item identification number, location, groups and even display images.
The PO Line Items section is a detailed description table about the items in the purchase order. This information can be altered to suit your business needs and the vendor requirements. For example, if you want a specific brand or feature that is not readily available, add a Display Picture for accuracy. You can even specify the Group/Sub-Group for which an item is being purchased for. This helps filter out items according to their designated departments.
If you have set up custom fields in your EZO CMMS account, you can also add those in your invoice. Item Custom Fields can be added to the Order line items section whereas you can add Order Custom Fields to the Before/After Line Items.

4.Further Customization
You can add additional elements to customize invoice templates in each section but be sure to always add the important ones. The three dots under the +Add button offer further customization. For example, in the Purchase Order Template, you can apply borders to rows and columns and even sort by ascending and descending order.


5.Add Custom Text
The EZO CMMS invoice templates are very flexible and allow ample room for customization. In the templates, after the ‘Details After Order List’ section you have the option to add Free Text (also accepts HTML formatting tags). These could be any type of special maintenance instructions in case of a Work Order invoice template.
6.Select a Default Invoice Template
Once you customize invoice templates, you can assign default invoice templates from More → Printout → Templates. For example, we select Purchase Order 124 as a default template for purchase order invoices.

7.Printing out an Invoice Template
You can print out invoice templates for the three modules: Carts, Purchase Orders and Work Orders. Simply go to the relevant modules Details Page click on More → Print Cart/ Work Order/Purchase Order.

8.Cloning Invoice Templates
Designing new invoice templates everytime can be very time consuming. As a solution EZO CMMS allows you to clone and edit an existing template.
Go to More → Printout Templates → Purchase Order/Cart/ Work Order.
Click on the clone button on the right side under Actions.

After you click on this, a similar template will be created. You can then make the required changes and finalize a new template.
About EZO CMMS
EZO CMMS is the next generation maintenance management software. It does more than just simple maintenance, it empowers your teams with a central command center to assign and complete work orders to achieve optimal productivity. We offer a free 15-day trial – no credit card required!


