

CMMS enables you to assign items to specific locations. Set up parent-child locations, and nest locations without a limit so you can track items from a country to a state, city, street, warehouse, all the way down to a single shelf.
Asset Stock and Inventory may be assigned two location types; Default Locations and Stock Locations. These two item types are tracked in bulk, which is why it is possible for items within the same inventory or asset stock category to be spread out across different locations.
1. Types of Locations
1.1. Default Location
A Default Location can be set when you first add an item, say Asset Stock from Items → Asset Stock → Add Asset Stock. It can also be changed through the Edit button at a later time from the item’s detail page. You can access this within the ‘Extended Information’ section.

A Default Location gets selected automatically whenever you Add or Remove stock to or from an existing Asset Stock or Inventory item, or if you Reserve stock for future use. This will be especially helpful if most of the activity happens to take place in that location, helping make the process much quicker.
For example, below we’ve reserved an asset stock item with the Default Location set to San Jose. This automatically shows up in the ‘New Reservation’ overlay.

1.2. Stock Locations
A Stock Location enables specificity when you log in asset stock or inventory details. Of course, a Default Location is a Stock Location too. Stock Locations allow you to have an up-to-date bird’s eye view of all the different places your items are located, helping you manage items across locations.These are displayed under ‘Quantity by Location’ on an item’s detail page. You will also be able to know if the stock is available in excess or optimal quantities.

2. Transferring and Retiring Stock
Depending on your plan, you can also transfer stock from one stock location to another. This can be enabled from Settings → Add Ons.

Of course, you don’t always have to choose a location when adding or transferring stock, choosing instead to opt for the blank field. In this case, the stock will be added to a general pool of stock, displayed below:

However, if all your stock has been assigned to specific locations, you must choose where you want stock to be transferred from:


You can also retire stock from specific locations. Do this from the Retire button, opening up this overlay:
Again, if you don’t specify a location and have a generic pool of items, the stock will be deducted from this pool. The same logic applies when checking out Asset Stock.
3. Low Stock and Location Thresholds
A Low Stock Threshold can be assigned for any asset stock or inventory item. An email alert will be sent to you when the total stock quantity hits a specific number, helping you plan ahead. A Location Threshold is similar, but is assigned to alert you to the total stock quantity at any location hitting a certain value. These can be changed from Edit → Extended Information:

In the example above, you will be alerted when the total stock quantity is 100, or when the stock in any of the three locations hits 50.
You can further have location specific thresholds for asset stock.

4. Deactivating Locations
If a location no longer contains any items and you don’t plan on restocking it, you can deactivate it. This serves two purposes:
- Users can no longer assign any items to a location that is not in use.
- All item history associated with the location is still available for reference.
4.1. Which locations can be deactivated?
Not all locations in CMMS can be deactivated. Here are the conditions:
- The location shouldn’t contain any items, bundles or packages.
- It shouldn’t be linked with an active Cart, Work Order or Purchase Order.
- No User Listing should be linked with the location.
- All child locations need to be inactive.
Note that a Location that you deactivate can be activated at any time if you want to resume using it.
4.2. How do you deactivate a location?
Now let’s see how to do this. Head to a location that you wish to deactivate from the Locations icon on the side navigation bar. From the Location Details page, hit ‘Deactivate’.

Note: Only an Account Owner, Administrator or a Supervisor can deactivate a location.
4.3. What happens once a location is deactivated?
An inactive location can no longer be assigned to any items, Bundles, Carts, Work Orders, Purchase Orders or User Listings.
It also stops showing up in the Locations tab under Items.
4.4. How to activate a location?
If you decide to resume a inactivate location, you can activate it from the Location Details page.

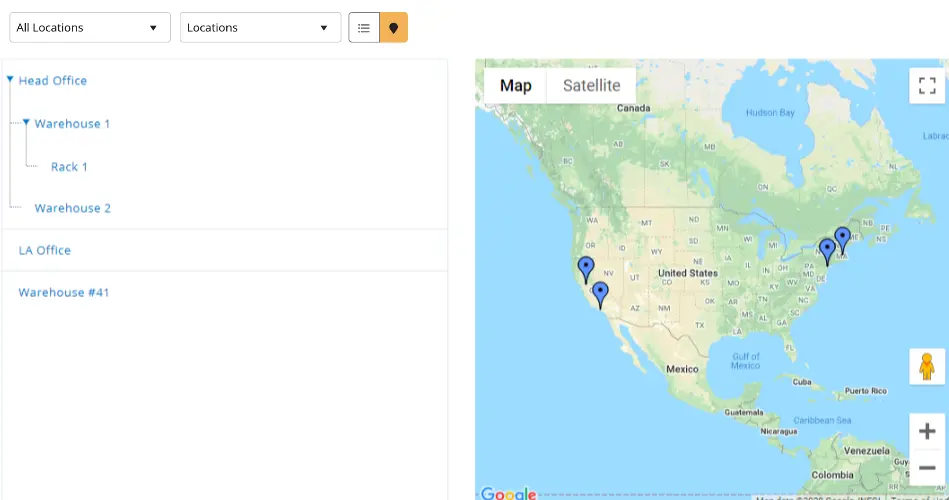
5. Visual Data
All Stock Locations created can be seen on a map from the Locations tab. Clicking a map pin will make it expand into the next set of nested locations. Hovering over this will give you a quick summary of all the items and stock quantities present at that location.
About EZO CMMS
EZO CMMS is the next generation maintenance management software. It does more than just simple maintenance, it empowers your teams with a central command center to assign and complete work orders to achieve optimal productivity. We offer a free 15-day trial – no credit card required!


