

In large organizations, tracking hundreds of item requests from different users is difficult without a dedicated system. Once a request has been made, users cannot view the status of their requests, resulting in long queues and delays in daily workflows.
The item request portal is designed to be user-friendly, bridging the gap between end-users and admins with a robust platform. It’s hosted on a separate URL from the EZO CMMS app, so requesters can quickly initiate and manage their item requests without extensive training.
When a requester adds an item to their cart and reserves it, the request is sent to the Admin. The Admin can then review the request and either accept or deny it. This process ensures that all requests are managed and tracked and that requesters can view their requests’ status in the portal.
Benefits of the Request Portal
Item Request Portal is a platform for high-frequency checkout users in organizations such as hospitals, universities, or construction sites. The second use case includes low-frequency checkouts, but many users reserve items.
High-frequency checkouts involve frequent requests for items, such as in hospitals or construction sites, while low-frequency checkouts entail occasional requests from a large number of users.
Here are some benefits of using the EZO CMMS Item Request Portal:
Scalability and accessibility: The Item Request Portal offers organizations a centralized platform for managing asset requests, especially those with high-frequency checkouts. Its scalability and accessibility ensure it adapts to future changes or demands, promising a more efficient and streamlined workflow.
Operational efficiency: IT administrators receive massive requests from various sources, including email and text, causing informational overload. Streamlining the asset request process enables organizations to reduce the time it takes to fulfill requests, thereby improving the efficiency of the asset request workflow and enhancing visibility into assets. This results in enhanced operational efficiency, which leads to employees being able to perform their tasks/projects in a timely and efficiently.
Optimized user experience and productivity: The user-friendly interface significantly reduces the likelihood of user errors (such as logging requests for unavailable monitor models) and diminishes the necessity for support requests, leading to increased employee morale and productivity—happy employees mean higher-quality work.
Let’s look at how you can set up and use the portal:
Enabling the Request Portal
Go to Settings → Request Portal → Enable.

Populating Your Account
Before diving into the Request Portal, it’s essential to understand how to set up your EZO CMMS account. Don’t worry; here is a quick guide for you. If your account is already set up, skip this section.
First, you’d want to populate your account with items to showcase them on the Request Portal. There are three quick ways to do that:
Import Items from Excel
This is a quick way to import all your data into your EZO CMMS account. Learn More.
Add and clone Items
For instance, you may have 20 Dell Inspiron laptops of the same brand and model number. You can just create one asset and then clone it 19 times. You can clone up to 25 items at a time. During cloning, you can choose the exact item image if required to avoid uploading images multiple times.

Change Display Pictures for Multiple Items
This process is simple for new and current users and is especially useful in a mass edit scenario. For example, upload/change the display image for an asset with five similar items added to your account, such as a monitor. Type and search ‘Monitor’ from the search bar and then choose ‘Assets’ from the ‘Filter Results’ section that shows up.

Click on Assets (5) under the view tab on the right. Here, you can collectively change display pictures from the Mass Actions tab, as shown below:

Setting Up Your Request Portal
Once you have populated your account, you can use the Request Portal. Let’s walk through the entire configuration process:
Request Portal URL
You can easily use the URL or domain we’ve provided for your request portal.

You can also use your URL/Domain to access your Request Portal on EZO CMMS. Your users can use this URL to reserve items, e.g., national.library.com.

Note: Each registrar has its method of adding CNAME records. Your DNS change may take several hours to take effect.
Branding
You can customize the portal according to your business themes. Go to Settings →Request Portal → Branding.
Upload your company logo: This image can be a graphic that represents your brand, including a business name, symbol, initials, or even a logo. You can also embed a URL onto the logo. This way, you can quickly return to the home page by clicking the logo (or any other page if you embed its link).

Themes
Maintaining your company’s consistency when using the Request Portal is important. You can set the following color themes for your portal:

Customize colors for different buttons and backgrounds: You can set a theme for the action buttons, the menu bar, search buttons, backgrounds, and panel colors. Pick a color that best suits your company’s portal theme. Here is what your portal will look like:

Advanced CSS editor: Use the advanced CSS editor for advanced portal design and development.
Note: You can always reset the theme to default colors.
About Us: Add text to the ‘About Us’ tab. In this tab, tell your users about your company. Go to Settings → Request Portal → About Us.

This is how it will appear in the portal:

This space can be customized to provide a company overview, contact information, and terms and conditions. Use HTML to format the text.
Item display
Number of rows per page: Set the number of rows you’d want your items to take on a page from Settings → Item display settings. As an example, we went with 3:

Grouping items with the same name(s): This is for assets only. You can group items with the same name so that they are displayed in a consolidated manner. For example, if you have six similar ‘extension wires,’ you can simply group them as one listed item rather than crowding your portal with five more. A requester can always mention the quantity required while checking out an item.
Manage reservation duration
There are two options for managing reservation durations. You can allow requesters to reserve indefinitely or set a default maximum or minimum reservation duration.

Indefinite reservations mean no end date for a reservation made for an item. These work well in industries such as healthcare and education, where items are often checked out until the end of their lifespan, so the requesters don’t have to specify an end date. Select the indefinite reservation checkbox and click update. Now go to the portal, select the item you want to reserve, and click ‘Add to Cart.’

Click on “Add to Cart” again, and you will be redirected to the Cart details page where you can confirm the reservation:

In another use case, where the requestor knows for how long the item needs to be requested, they can select a specific reservation duration from the Items page:

Once you select ‘Specify Duration,’ you will be asked to enter a ‘To’ date:
Click on ‘Add to Cart’ again and complete the reservation.
The next option is to select ‘set a default or maximum period.’ When the reservation timeline is known beforehand, the admin sets a default reservation period. This saves time and facilitates quick checkouts for requesters. A maximum reservation period entails the most prolonged time an item can be reserved. When setting up reservation periods, the maximum duration has to be greater than the default duration and can not be applied if you’ve already checked the indefinite reservation.
Once you select the checkbox, you can set days, weeks, and months for the default duration. In the next column, you can also set a maximum duration. If the maximum duration is left blank, the maximum duration will be set. Select the last checkbox to allow requesters to edit the default location if needed. The entire workflow is summarized below:

Update the settings and open the portal. Select an item you want to reserve and click Add to Cart.’ The default duration will be visible:

If you enabled the editing access for requesters, they will be able to edit while adding the item to the Cart:

In case you select both ‘reserve indefinitely’ and ‘set default duration’ checkboxes, the maximum duration column will be disabled:

Disclaimer on the Cart
Use this space to configure a message for requesters when checking out items from the Cart. Say you want your requesters to know that reservations will be slightly delayed. A simple note will do the job. See image below:

Visibility Control
Control which items you want to show on the Request Portal. To get started, head to Settings→ Request Portal → Visibility Control.
Show available quantity of items: Select this option to show the available number of items on the Request Portal at the time of reservation. Item visibility for roles will vary according to the permissions set for each custom role. Learn more about setting permissions here.

Item permissions for custom roles
Custom role permissions: Different roles in organizations will use the Request Portal. To ensure a seamless user experience, members should be able to view only items relevant to their roles. For this purpose, you can select what information you want to display. Here is how you can set up group and location permissions for custom roles in the Request Portal:

When this requester goes to the Portal, they can only view Items within the selected Groups and Locations.
Terms and conditions: Set the terms and conditions for reserving any item from your Request Portal from Settings → Request Portal → Terms and Conditions

Item Filters
The ‘Item Filters’ speed up the checkout process for requesters. Admins can select relevant filters from Settings → Request Portal → Item Filters. Available filters include item availability, showing available items, and location and group filters. Some businesses have particular item traits that can be depicted by custom field filters, as shown below:

Main Menu Tabs
Provide customized names to the main menu tabs from Settings → Request Portal → Main Menu Tabs. Fill in the fields against My Requests, About, and Catalog. You can also enable Bundles for the portal here.

This is what the tabs look like once you set them up:

External Links as Tabs
Suppose you’d like to have additional tabs added to your portal. In that case, you can add links to external pages and redirect your requesters there, e.g., your corporate website, a dedicated blog site, or even detailed terms and conditions. EZO CMMS allows you to add up to 3 external links to your Request Portal tabs.

Restricted Access
Enable Restricted Access from Settings → Request Portal if you want to restrict your Portal to the members in your EZO CMMS account. Once enabled, members can log in to view your catalog.

Using the Request Portal
When you are done setting up the portal, you can click on the portal domain to start using it. When you land on the Request Portal, you will see a list of all the items populated in your EZO CMMS account.
The Request Portal setup is divided into the following categories to help you set up:
- Request experience
- Visibility control
- Custody management
- Access Restriction
Request experience for high-frequency checkouts: Reserving an item
When you land on the homepage, your EZO CMMS account will display a list of items. You can apply filters to find the desired item:

Select an item you want to reserve from the Request Portal. Click ‘Add to Cart’

Next, hover over the Cart icon on the top right, and you will view the option to View/Edit the Cart:

Next, you can attach reference files and add comments. You can take three actions for the cart: Browse Items, Clear Cart, and Reserve. If all the required items are in the Cart, click Reserve.

The reserved Cart looks like this:

View Reservations
Requesters can view all their reservations under the ‘My Reservations’ tab as shown below:

Here, users can check the status of their reservations and track them until it is checked out and appear in their custody.
Actions on Reservations
Once a reservation has been made, it is displayed under the Notifications bell icon. The Account Owner or admin can go to Pending Reservations.

The Account Owner/Admin can then view Reservations and take an action as shown below:

Request Portal simplifies the reservation process by making tracking, reviewing, and expediting user requests on a single platform easier.
My Items
Once a reservation request is approved, the item is checked out to the requestor. All these items will appear under ‘My Items’ as shown below:
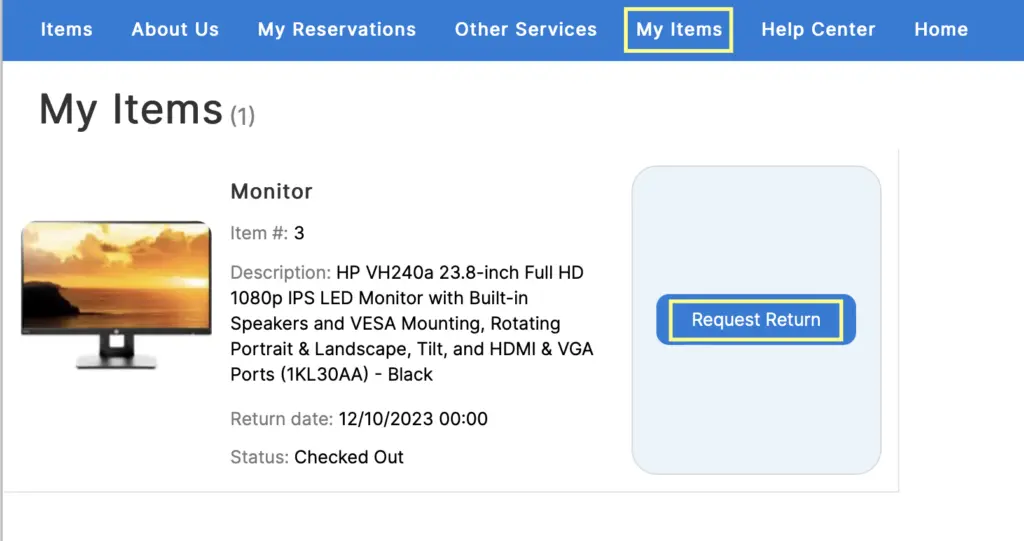
From here, the user can ‘Request Return’ to check in the item. Once the return has been requested, the status will be changed to ‘Return Requested.’ To request a return for the whole Cart, go to ‘My Reservations’ and click on the ‘Return’ button under Actions:

Reservation Reports
Reports can be generated for the number of reservations received from 4 different sources: API, Mobile app, Web App, and Request Portal. A reservations report displays reservation count#, total self-serve, and mean time to resolve reservations:
This report can be customized by applying numerous filters. For instance, you can generate a report on how many reservation requests were made using the Portal at a specific location:


