
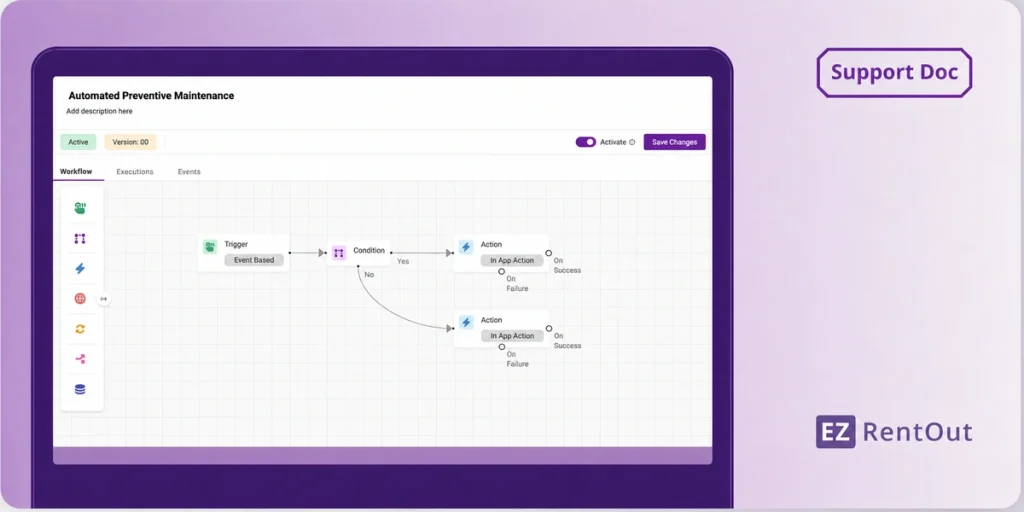
EZRentOut’s Automation Engine provides a flexible way to automate rental and equipment management workflows across different operational processes. Teams can create custom automations to streamline tasks such as order management, preventive maintenance, and equipment usage tracking.
By allowing users to define Triggers, Conditions, and Actions, automations reduce manual work, improve consistency, and minimize the risk of human error by ensuring routine tasks are carried out automatically.
With EZRentOut’s Workflow Automation Engine, you can design visual workflows that automate these processes from end to end.
The Automation Engine uses a drag-and-drop, node-based canvas where you connect Triggers, Conditions, and Actions to create workflows tailored to your business requirements.
Benefits of EZRentOut Automations
EZRentOut automations are particularly useful for equipment rental businesses that manage large fleets and need to keep operational workflows consistent as they grow.
Here’s how automation can help:
- Improved accuracy and reliability: Automate routine rental and equipment management tasks consistently, reducing the risk of manual errors.
- Customizable and scalable workflows: Build workflows around your specific requirements and adapt them as your rental operations grow, from simple order automations to preventive maintenance workflows.
- Reduced manual work: Automatically handle routine tasks, such as updating order information or creating preventive maintenance work orders when equipment reaches a defined usage threshold.
Now let’s look at how you can build these automations and put them to the test.
Enable the Automation Engine
To enable automations,
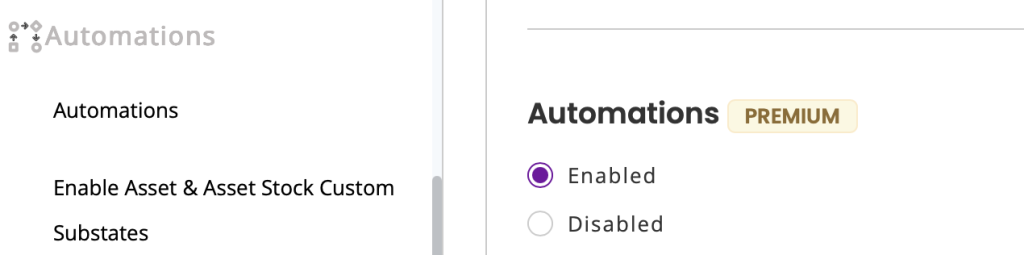
- Navigate to Settings → Company Settings & Addons → Automations.
- Select Enabled and then click Update to save your settings.
How the Automation Engine Works
To understand how the Automation Engine works, let’s walk through a simple example. Suppose you want EZRentOut to automatically add a standard note to every new rental order.
This workflow has two basic building blocks:
- Trigger: Determines when the workflow starts.
- Action: Determines what EZRentOut should do when the trigger and conditions are met.
In our example:
Trigger: An order is created
Action: Set the order description to predefined text
Once the workflow is activated, EZRentOut automatically performs the action whenever a new order is created.
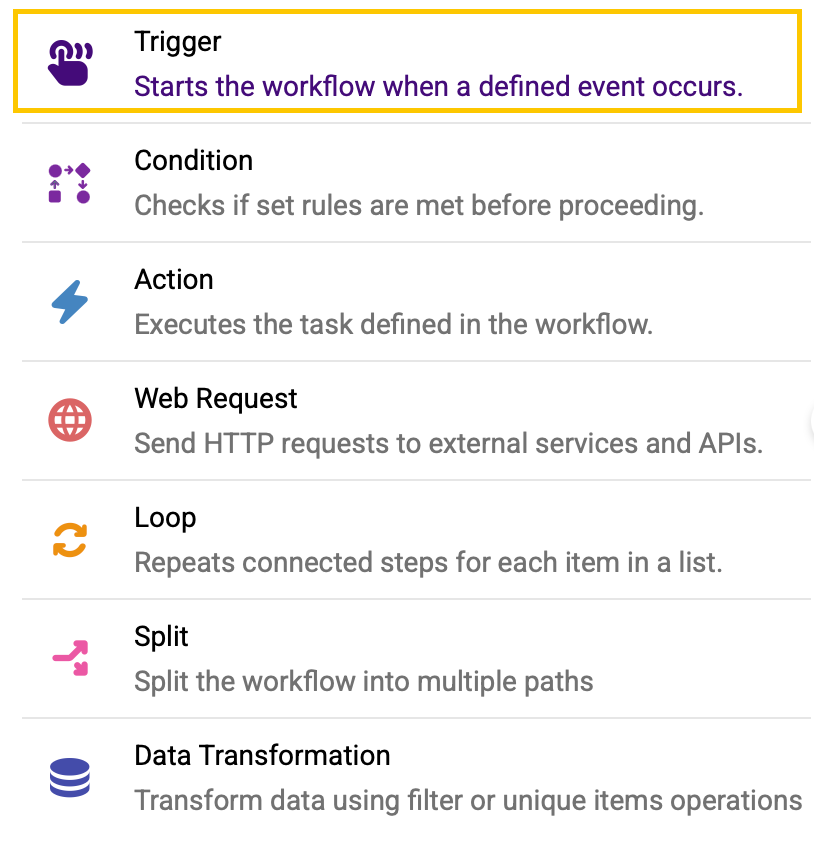
The Automation Engine lets you build this workflow visually using a drag-and-drop canvas. You can add Trigger, Condition, and Action nodes to the canvas and connect them to define how the workflow should run.
We’ll use this simple example to walk through how to create and activate an automation.
1. Create a Workflow
To create a workflow automation in EZRentOut:
- Navigate to More → Workflow Automations and click the + Create New Workflow button.

- Enter a Title (required) and optional Description.

2. Add a Tigger Node
A Trigger determines when an automation starts. It is the event that tells EZRentOut to begin running the workflow. In this workflow, the Trigger will be Order is Created, so the workflow starts whenever a new rental order is created.
To add a trigger node:
- Click the Trigger icon and drag it onto the canvas.
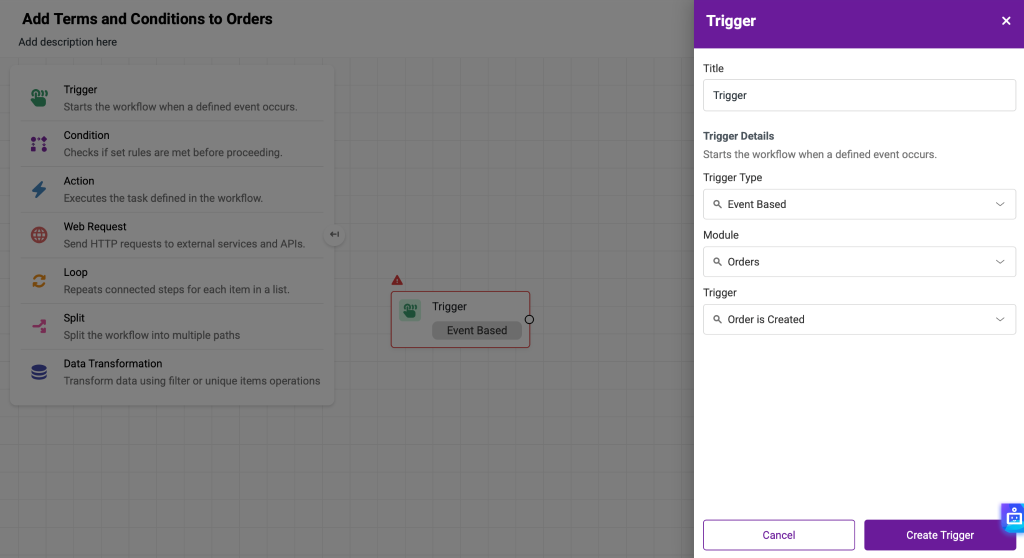
- In the trigger modal,
- Select Event Based as the Trigger Type.
- Select Orders as the Module.
- Select Order is Created as the Trigger.
- Click the Create Trigger button.
Note: You will not see any configuration options in the condition or action nodes until you select the module in the trigger. The options are configured based on the module selected in this node.
3. Add an Action Node
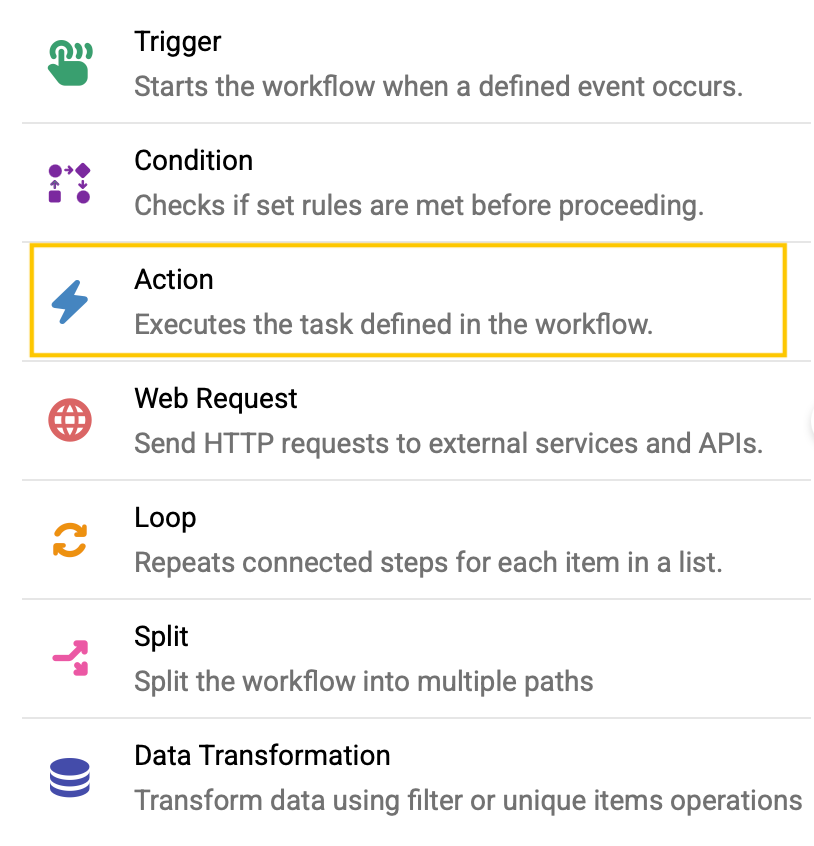
The Action node defines what EZRentOut should do when the trigger occurs. A workflow can include one or more actions, allowing you to automate tasks that would otherwise require manual intervention.
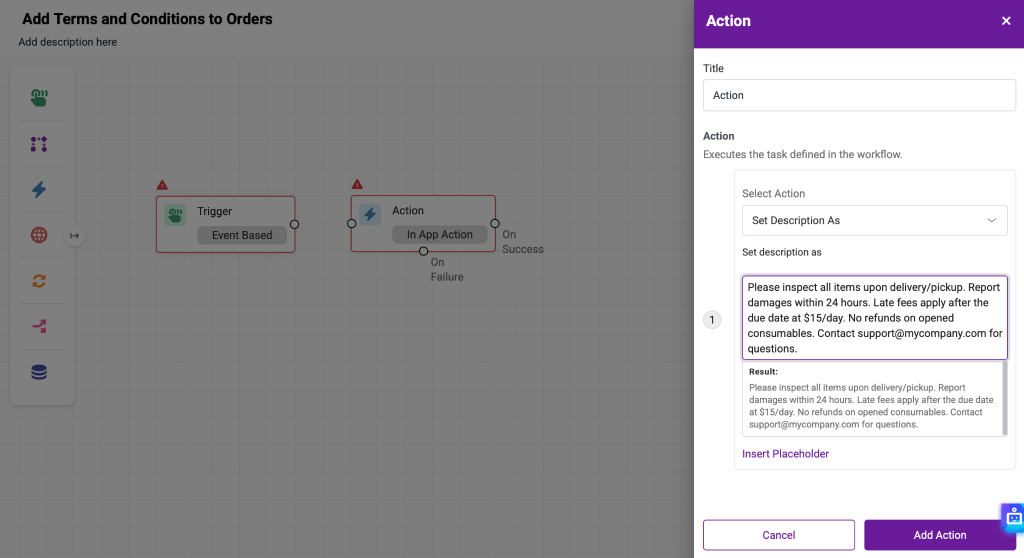
For this example, we’ll use an Action node to automatically update the description of a newly created order.
To do this:
- Click the Action icon and drag it onto the canvas.
- In the Action modal, select Set Description As from the Action dropdown, then enter the text you want EZRentOut to add to the description of newly created orders.
- Click the Add Action button.
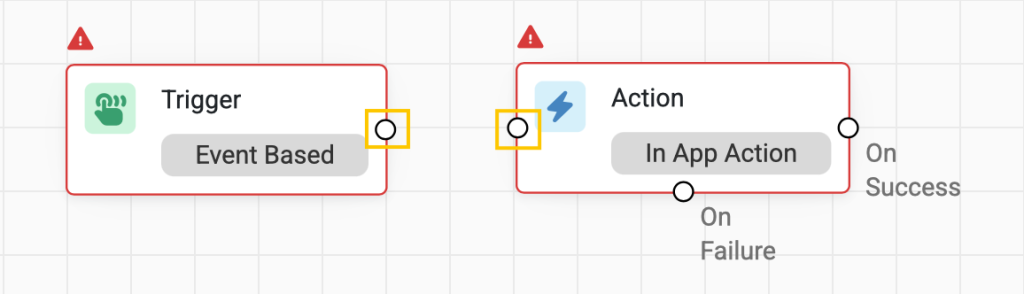
Once configured, connect the Action node to the Trigger node by dragging the connector from the Trigger to the Action.
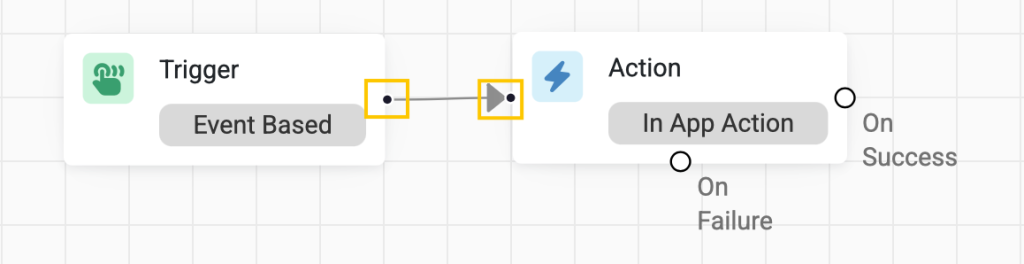
Note: You may delink the two nodes by double-clicking the arrow.
Your workflow should now follow this structure:
Order is Created → Update Order Description
Once the workflow is activated, EZRentOut will automatically update the description whenever a new order is created.
4. Activate the Workflow
Once you have configured and connected the Trigger and Action nodes, the workflow is ready to be activated.
Activating a workflow makes it live. Before activation, you can build and save the workflow without EZRentOut automatically performing the configured actions. Once activated, EZRentOut monitors the event defined in your Trigger and runs the workflow whenever that event occurs.
For this example, activating the workflow means EZRentOut will automatically update the description whenever a new rental order is created.
To activate the workflow click Save Changes and activate it by toggling the Activate switch.

In the confirmation pop-up, click Activate.
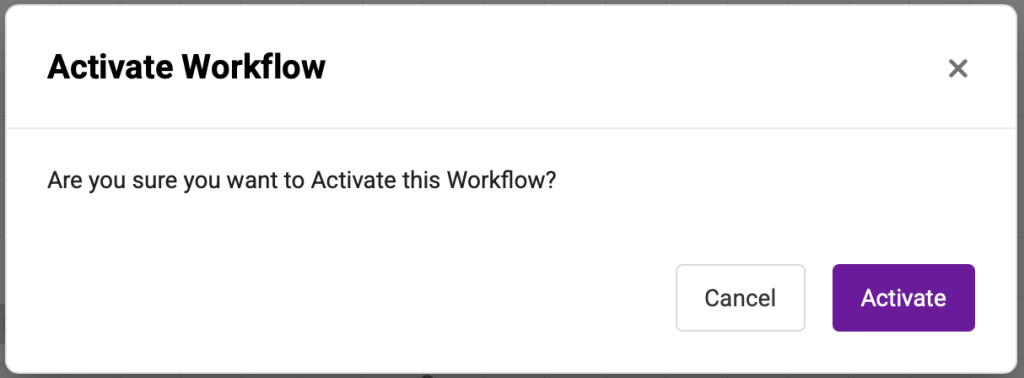
Once activated, you do not need to manually run the workflow each time. EZRentOut automatically starts it whenever its Trigger conditions are met.
5. Test Your Automation
After activating the workflow, create a new rental order to test whether it works as expected.
- Create a new rental order in EZRentOut.
- Enter the required order details and save the order.
- Open the order and check its description.
The description should contain the text you entered in the Set Description As Action.
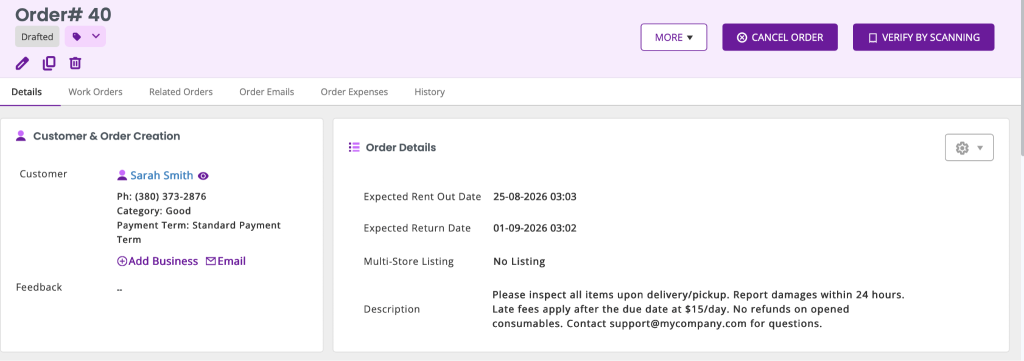
Testing your workflow before relying on it for day-to-day operations helps confirm that the Trigger and Action are configured as intended.
6. View Workflow Executions
EZRentOut records each time an automation runs in the Executions section. You can use these records to check whether a workflow was triggered successfully and review what happened during its execution.
To view an execution:
- Navigate to More → Workflow Automations.
- Open the Executions tab.
- Locate the execution for the workflow you want to review.
- Open the execution to view its details.
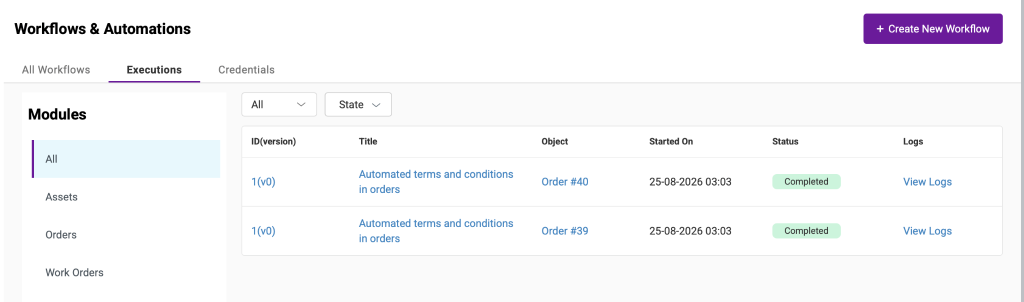
For example, after creating a new order, you can find the corresponding execution and view its execution logs to verify that the workflow was triggered and the Set Description As Action was completed successfully.
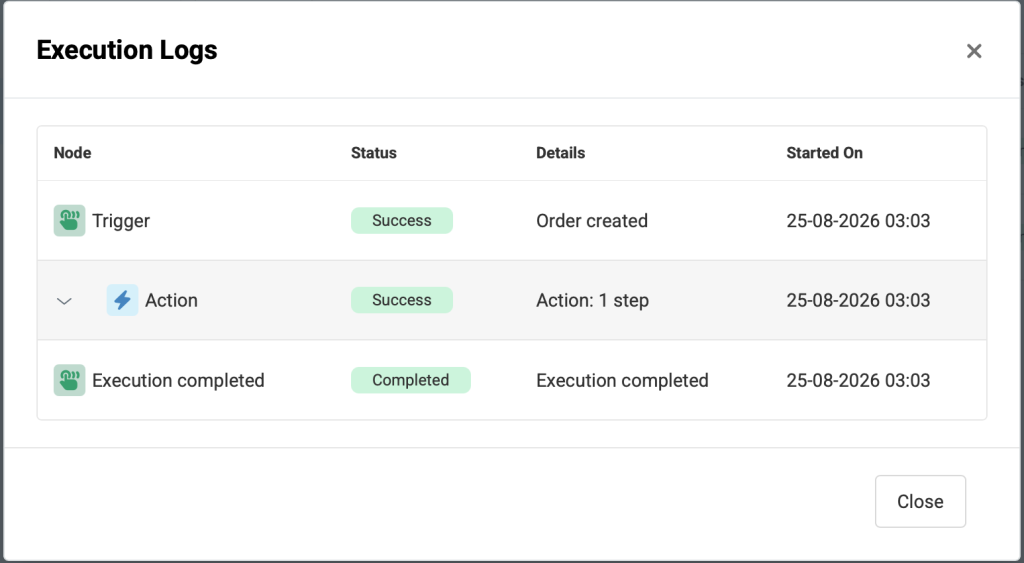
Tip: If your workflow does not produce the expected result, checking its execution is a good place to start. It can help you determine whether the workflow was triggered and whether the configured Action was completed.
Note: Workflow executions typically run once every hour. For example, if a trigger occurs at 5:11 PM, the workflow execution will be created at 6:00 PM. In some cases, you may see the execution created earlier, depending on the workload on the server.
Note: Activating a workflow does not apply the Action to existing orders. In this example, the description will be updated for orders created after the workflow is activated when the Trigger is met.
Automate Preventive Maintenance Based on Equipment Usage
The previous example demonstrated a simple automation with a Trigger and an Action. You can also use Conditions to create more targeted workflows.
For example, heavy equipment used in construction, transportation, oil and gas, mining, and utilities may require preventive maintenance after a defined number of kilometers or operating hours.
You can use the Automation Engine to automatically create a work order when an asset reaches a specified usage interval.
In this example, we’ll create a workflow that has the following:
- Trigger: Usage meter is updated
- Condition: Asset belongs to the Tools and Equipment group
- Action: Create a scheduled work order
This workflow ensures that preventive maintenance is initiated automatically when the configured usage interval is reached for the relevant equipment.
1. Create a Workflow
Navigate to More → Workflow Automations and click + Create New Workflow.

Enter a Title and optional Description for the workflow.

2. Add a Trigger Node
The Trigger determines when the workflow starts. For this example, we’ll use a usage meter update as the trigger.
To add the Trigger node:
- Click the Trigger icon and drag it onto the canvas.
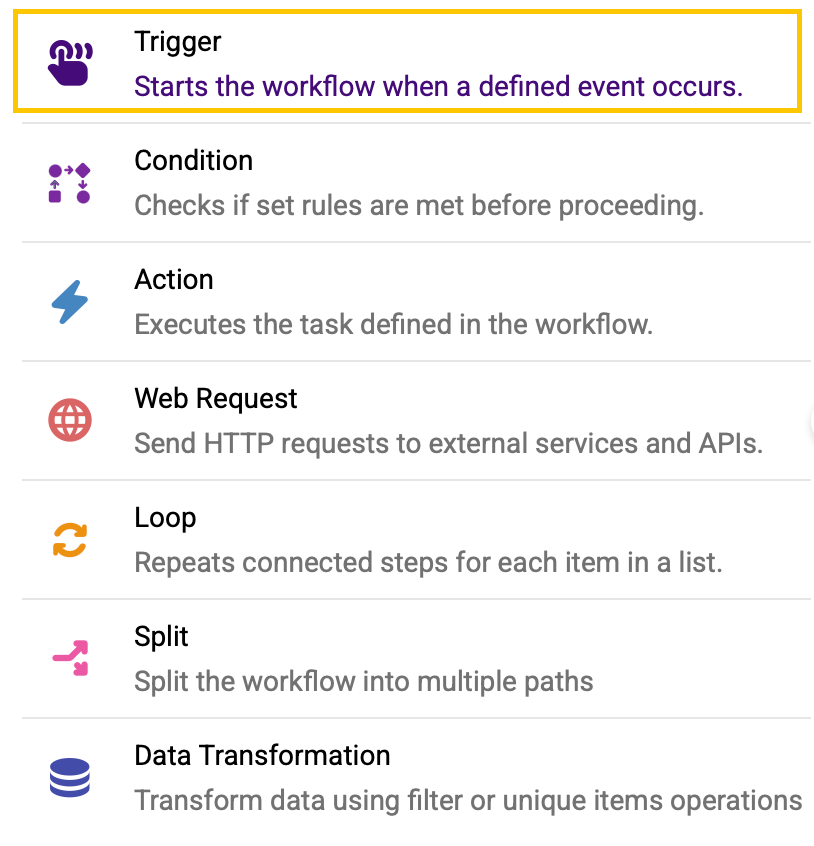
- In the Trigger modal:
- Select Event Based as the Trigger Type.
- Select Assets as the Module.
- Select Field is updated as the Trigger.
- Select Usage meter as the Field.
- Select Interval from Last Trigger and enter the relevant usage interval.
- Click Create Trigger.
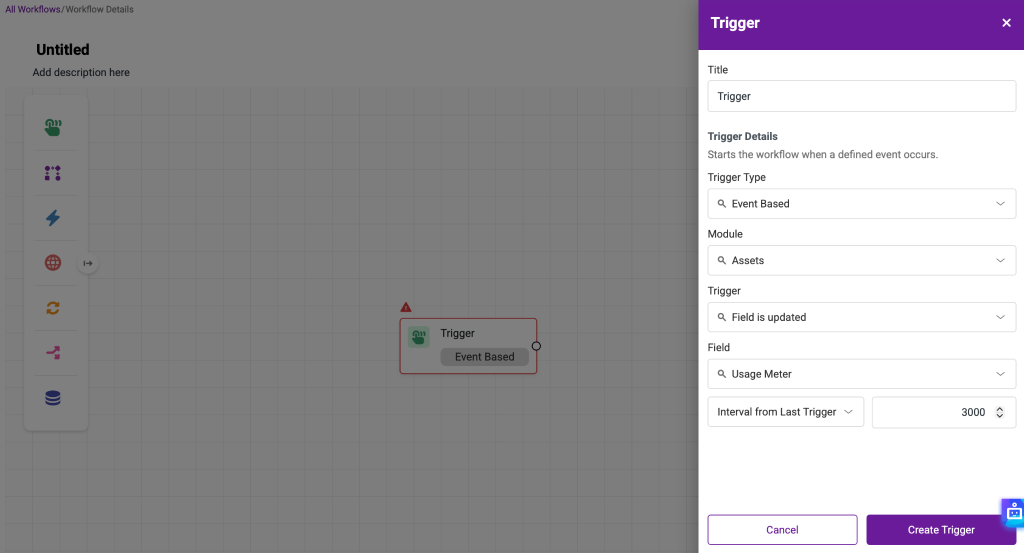
The workflow will now be triggered when the asset’s usage meets the configured interval from the previous trigger.
3. Add a Condition Node
A Condition determines whether a workflow should continue based on criteria you define. It acts as a decision point in the workflow, allowing an Action to run only when the specified condition is met.
For example, you can use a Condition to check whether an asset belongs to a particular group, has a specific status, or meets another requirement. When the condition is met, the workflow follows the Yes branch. If it is not met, the workflow follows the No branch.
In this example, we’ll use a Condition to check whether the asset belongs to the Tools and Equipment group. This ensures that the preventive maintenance work order is created only for assets in that group.
- Click the Condition icon and drag it onto the canvas.
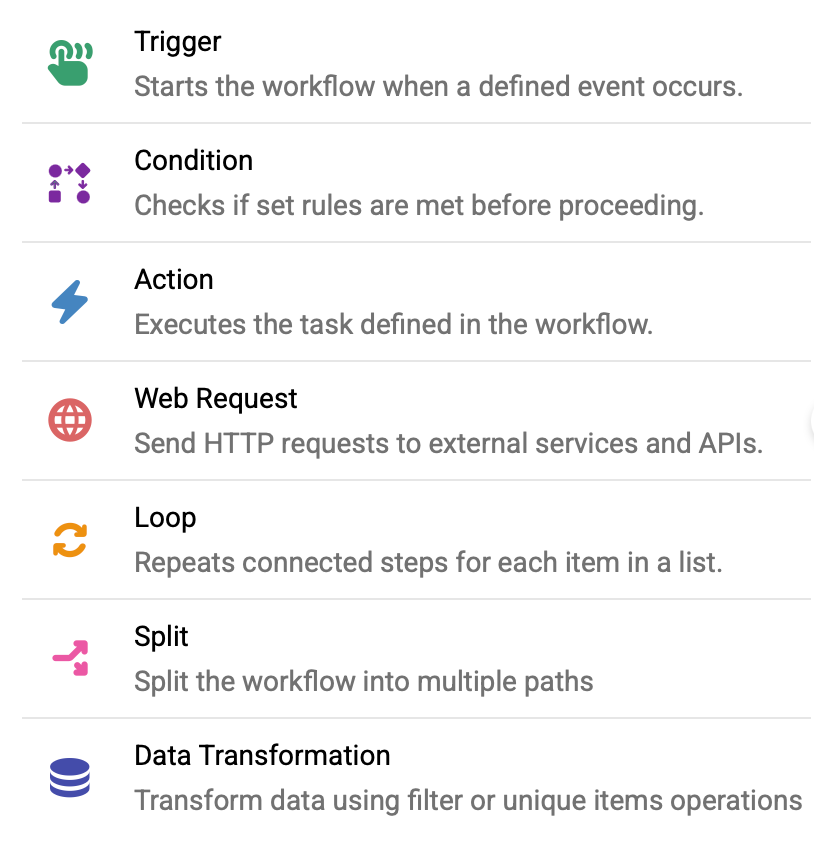
- In the Condition modal:
- Select Group from the first dropdown.
- Select Equals as the operator.
- Select Tools and Equipment as the group.
- Click Done.
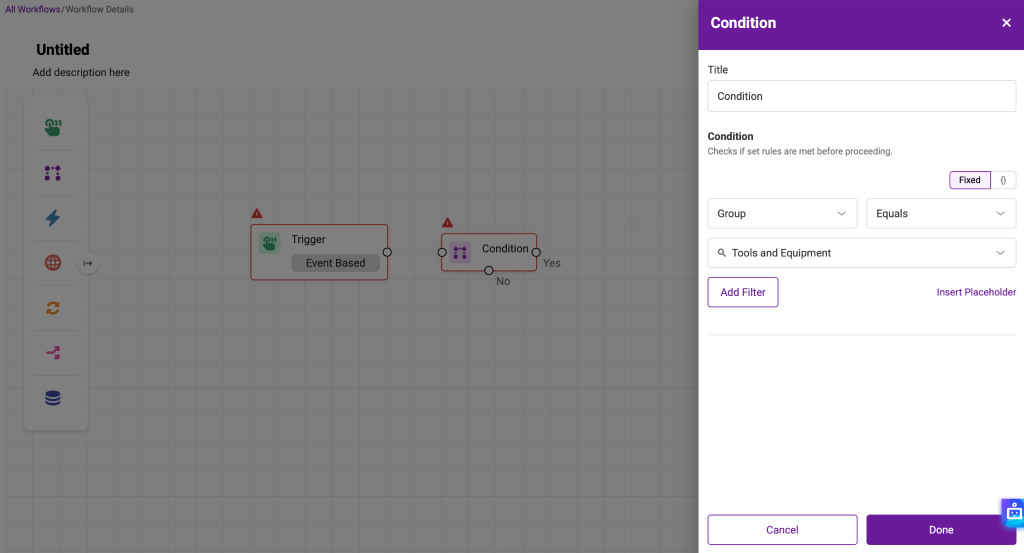
Connect the Condition node to the Trigger node by dragging the connector from the Trigger to the Condition.
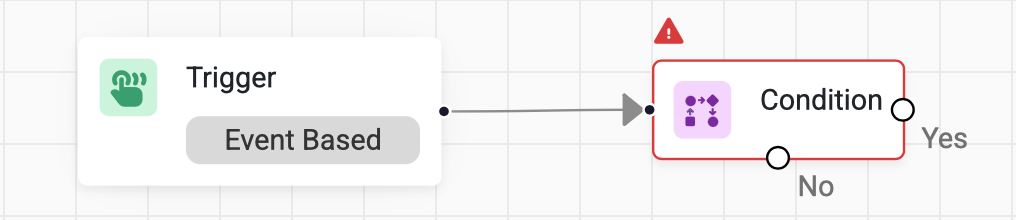
The canvas automatically creates Yes and No branches. The workflow can use these branches to determine what happens when the condition is met or not met.
4. Add an Action Node
Now configure the workflow to create a scheduled work order when the condition is met.
- Click the Action icon and drag it onto the canvas.
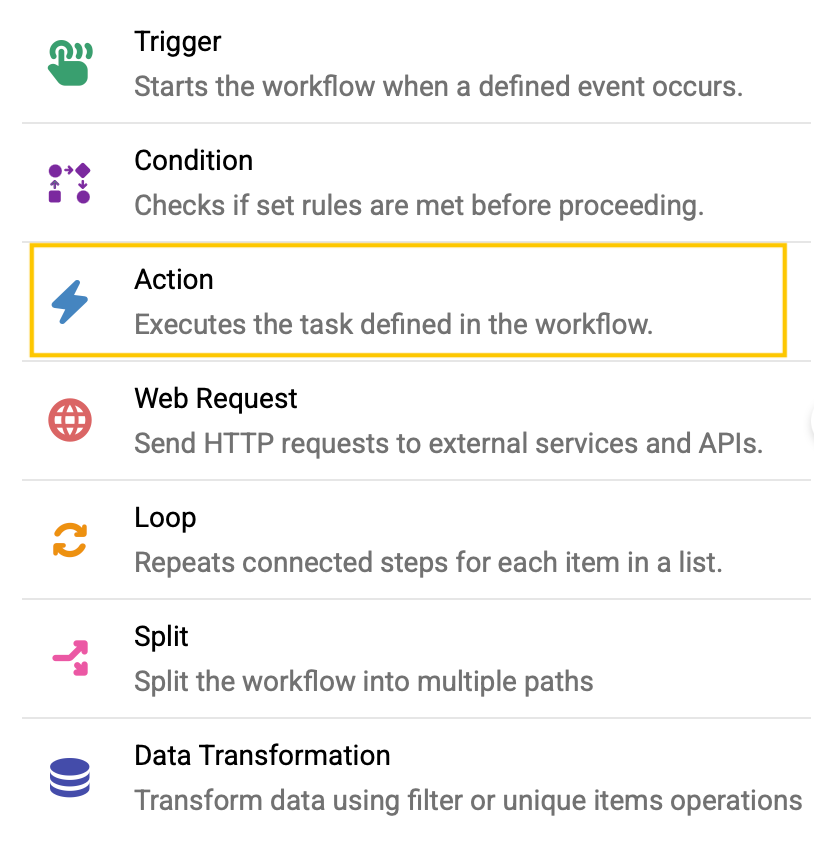
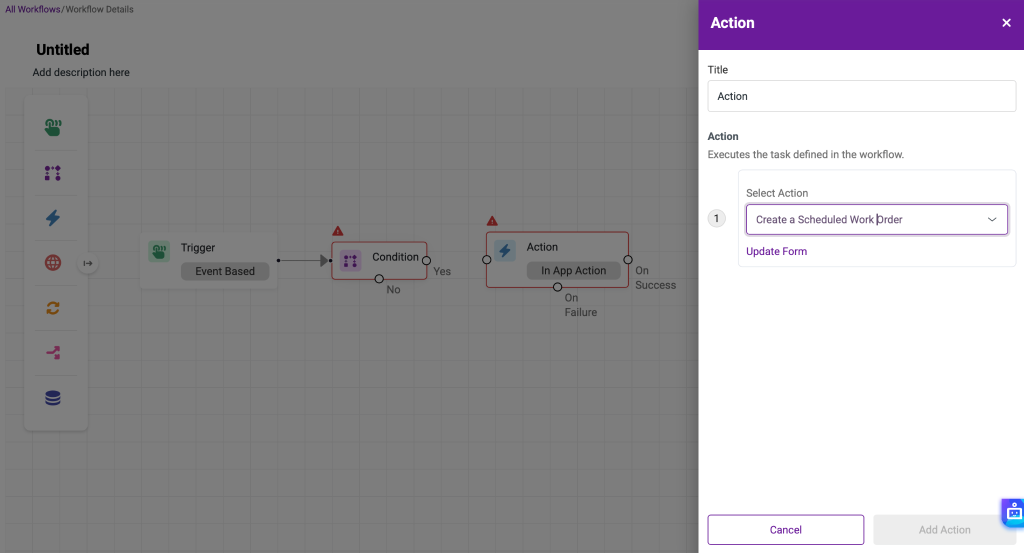
- In the Action modal, select Create a Scheduled Work Order from the Select Action dropdown and click Update Form.
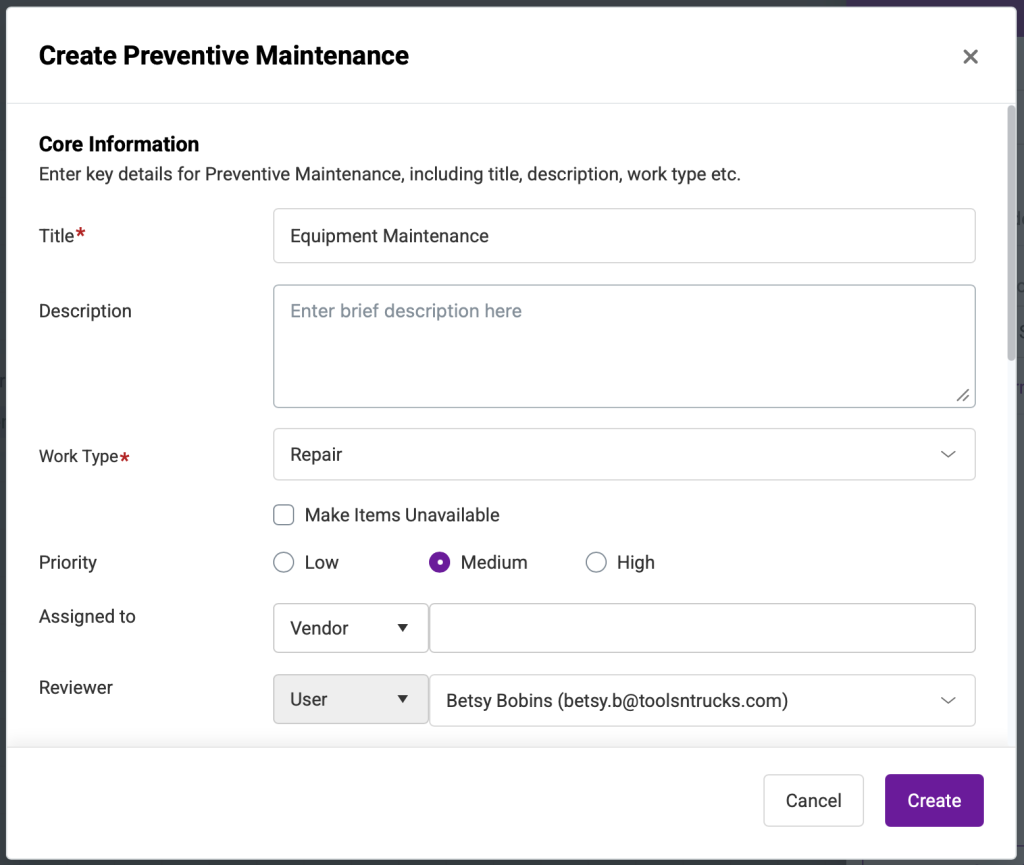
- In the Create Preventive Maintenance pop-up, enter the relevant work order details and click Create.
- Once the work order form is configured, click Add Action.
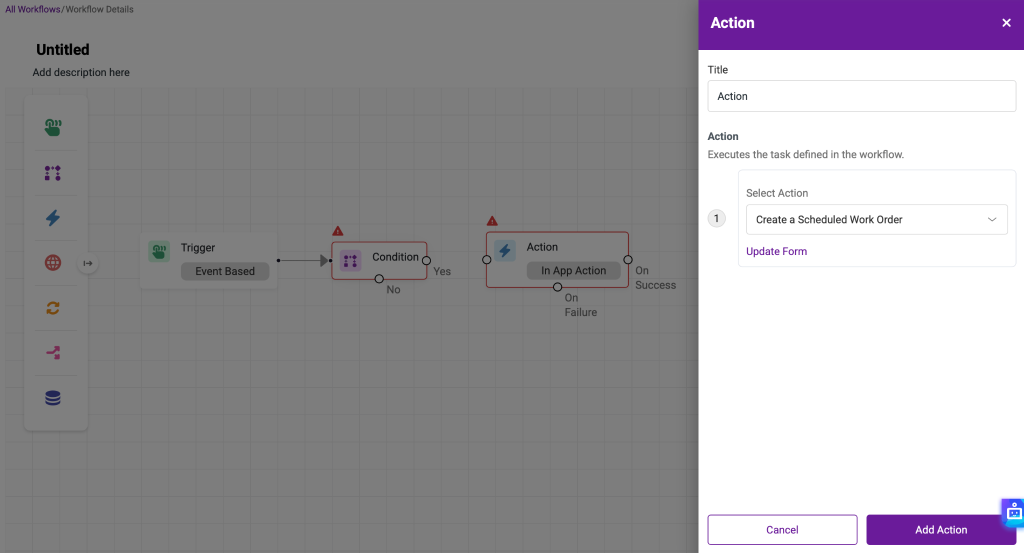
Connect the Action node to the Yes branch of the Condition node.
Your workflow should now follow this structure:
Usage Meter Updated → Group Equals Tools and Equipment → Create Scheduled Work Order
5. Activate the Workflow
Once the workflow is complete, click Save Changes and activate it by toggling the Activate switch. In the confirmation pop-up, click Activate.

When an asset meets the configured usage interval, EZRentOut will run the workflow. If the asset belongs to the Tools and Equipment group, the configured scheduled work order will be created automatically.
6. Verify the Work Order
You can use Executions to verify that the workflow ran successfully. To do this, navigate to More → Workflow Automations, open the relevant automation and go to the Executions tab.
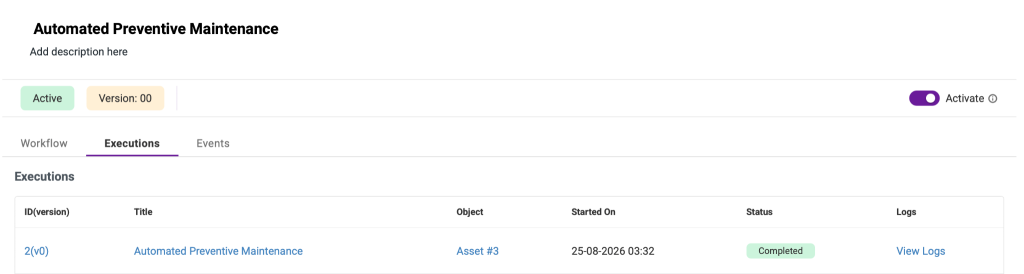
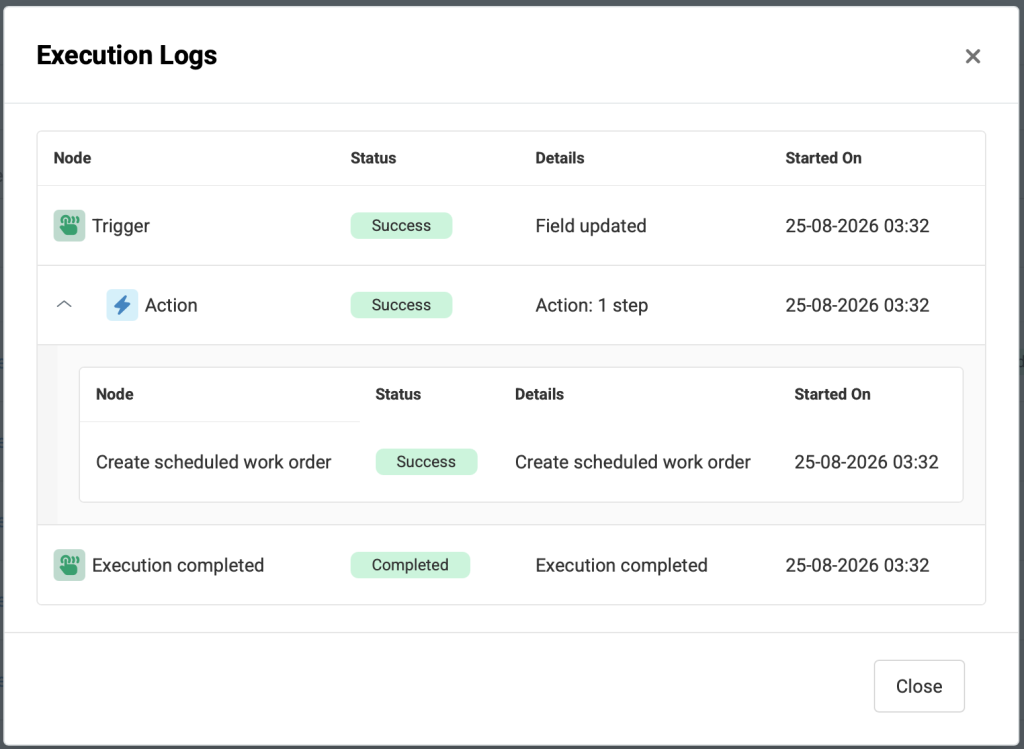
Open the execution to review the Trigger, Condition, and Action. Once the Action has completed successfully, you can open the resulting work order to review the preventive maintenance details.
The work order is created by the Automation User, making it easy to identify work orders generated automatically by the Automation Engine.
Automate Your Rental Workflows with EZRentOut
The Automation Engine gives you a flexible way to reduce manual work across your rental and equipment management processes. Whether you need to standardize order information, schedule preventive maintenance based on equipment usage, or automate other recurring tasks, you can build workflows around your specific operational requirements.
The key is to start with a clear understanding of when an automation should run, what conditions should be met, and what action EZRentOut should take. By combining Triggers, Conditions, and Actions, you can create workflows that handle routine processes automatically and consistently.
As your operations grow, you can build on these basic workflows to automate more complex processes and reduce the time your team spends monitoring and completing repetitive tasks.
If you need help setting up an automation or have questions about the Automation Engine, reach out to support@ezo.io.

![[How-to] Manage Work Orders in EZRentOut](https://cdn.ezo.io/wp-content/uploads/2018/02/05101010/Work-orders-scaled.png)
![[How-to] Service and Maintain Items in EZRentOut](https://cdn.ezo.io/wp-content/uploads/2015/05/18102704/Service-and-maintenance.jpg)
![[How-to] Manage Orders in EZRentOut](https://cdn.ezo.io/wp-content/uploads/2015/06/25104053/Support-Blog-What-are-Orders-in-EZRentOut.webp)