
EZO enables enterprise-grade communication workflows by allowing organizations to standardize, customize, and control email notifications across asset operations. Email Templates are designed to support consistent messaging, enforce process-driven communication, and ensure that stakeholders receive relevant, context-rich updates aligned with operational workflows. This helps organizations maintain clarity, accountability, and coordination across teams and departments.
Would you like all EZO alerts and emails to include more structured, organization-specific details and standardized communication formats? Maybe you want your internal communications to align with defined workflows, approval processes, or guide users toward the next steps in operational tasks.
For this, you can create custom email templates to customize your email-based communication with your staff. These templates can be used for actions that generate emails.
Here’s a step-by-step guide to enabling and using email templates in EZO.
1. Enabling Email Templates
To enable Email templates, go to → Company Settings & Add Ons → Email Templates.

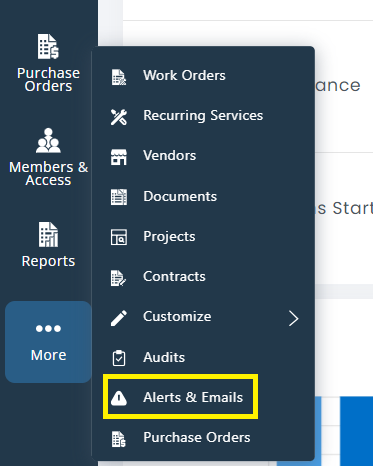
You can then access the module by clicking on More → Alerts & Emails from the left side navigation bar. You will be taken to the Alerts Page where you can manage alert settings and email templates.
2. The Alerts Page
This is where you manage alert settings. You can select the action for which you want to receive emails and choose email formats for each. Simply check the action box to receive an alert when the action is conducted.
You can view the email format for each action by clicking on the eye icon, as highlighted below:

You will be taken to the sample view of the action – for instance, the following image shows a sample email the account user will use at the time of check-in.

To add new email templates from here, click on the ‘+’ sign under the ‘Email Template’ heading and fill the fields.

Click ‘Create Email Template,’ and the template will be saved for use. You can either choose to use your custom template or the default one. Choose the template of your choice from the dropdown. You can also edit the template you created by clicking on the edit button.

3. The Email Templates Page
To add a custom template from the email templates page, go to More → Alerts & Emails → Email Templates. You’ll see a list of alert types followed by their email templates. Simply click ‘+Add Template’ to get started (see image below).

3.1 Adding a New Template
To add a new template from the Email Templates Page, click ‘+Add Template’ to get started (see image below).

This will open an overlay for the email template where you can type the new email template.
You can use placeholders to draft specific emails for your staff. These contain dynamic data such as asset name, member, check-in due date, etc. Of course, these will be different for each template type.

For a list of all possible placeholder options in EZO alerts, click here.
Note: Choosing the ‘Custom Attribute Values’ placeholder will include all custom attributes associated with a particular item in the email.
The following image shows an email draft for a checked-out item.

Hit ‘Create Email Template’ to save the draft. You will be taken to an overlay where you can ‘Edit’, ‘Sample View’ or set the template as default.

3.2 Edit the Template
To edit an email template, select the template name and hit ‘Edit’. The following overlay will appear where you can make changes to your email template.
Click ‘Update Email Template’ when done.

You can also delete the template if necessary or switch to the original template.
4. Switching between Custom Templates
If you have multiple templates for a particular action, you can easily switch between them by clicking on the drop-down menu in Alerts.

4. Customizable Email Template for Date Alerts
You can also customize email templates for the ‘Date Alert’ custom field. To create this, go to More → Customize → Custom Fields → Add Custom Field, then choose the alert from the drop-down:

You can now add a new Email Template and choose the relevant custom field from the ‘Template Type’ drop-down to begin customizing your email.
5. Alerts and Members
All confirmed members receive emails based on their selected actions of interest, for example, checkout, checkin, etc. Staff members receive only the emails they’ve subscribed to when they’re involved in the action, while administrators receive emails for all actions across the company. For more details, click here.


