In construction, dispatch is not just about sending equipment to a job site. It’s about balancing long-term project planning with urgent, real-time demands. The Dispatch Center in EZO is a centralized command hub that provides equipment managers with complete visibility and control over Equipment, Tools, and Consumables. Project Managers can manage General and Item-related incoming requests while viewing equipment utilization, availability, and lifecycle states in a calendar-based view.
By unifying planning, execution, and tracking into a single, intelligent view, it helps teams stay proactive rather than reactive and allocate equipment more effectively.
Benefits of the EZO Dispatch Center
Let’s help you understand how Dispatch Center can help optimize your construction operations and manage requests in a unified planner:
1. Unified command view
The Dispatch Center consolidates all incoming requests, including reservations, work orders, purchase orders, and even General Requests with and without assigned equipment, into a single planner. This eliminates the need to switch between modules. As an equipment manager, you can operate from one source of truth, reducing oversight and administrative friction.
2. Long-term planning with calendar visibility (6–12 months ahead)
The Dispatch Center’s calendar-based visualization enables equipment managers to plan equipment allocations well in advance for large-scale projects. They can assess future reservation conflicts, anticipate equipment shortages early, and align procurement with project timelines in advance. For instance, two long-term projects might require a forklift in 3 months’ time; as an equipment manager, you can arrange for extra forklifts in advance to avoid delays in projects.
3. Streamlined request processing
Equipment managers can process incoming requests instantly, even when no specific equipment is attached, such as a general request like “Inspect Boom Lift” with the Dispatch Center. They can quickly assign the appropriate equipment and complete actions such as reservations, check-outs, check-ins, or verifications directly from the request itself. The system reduces delays and ensures fast, accurate responses without compromising operational control.
4. Lifecycle and state visibility
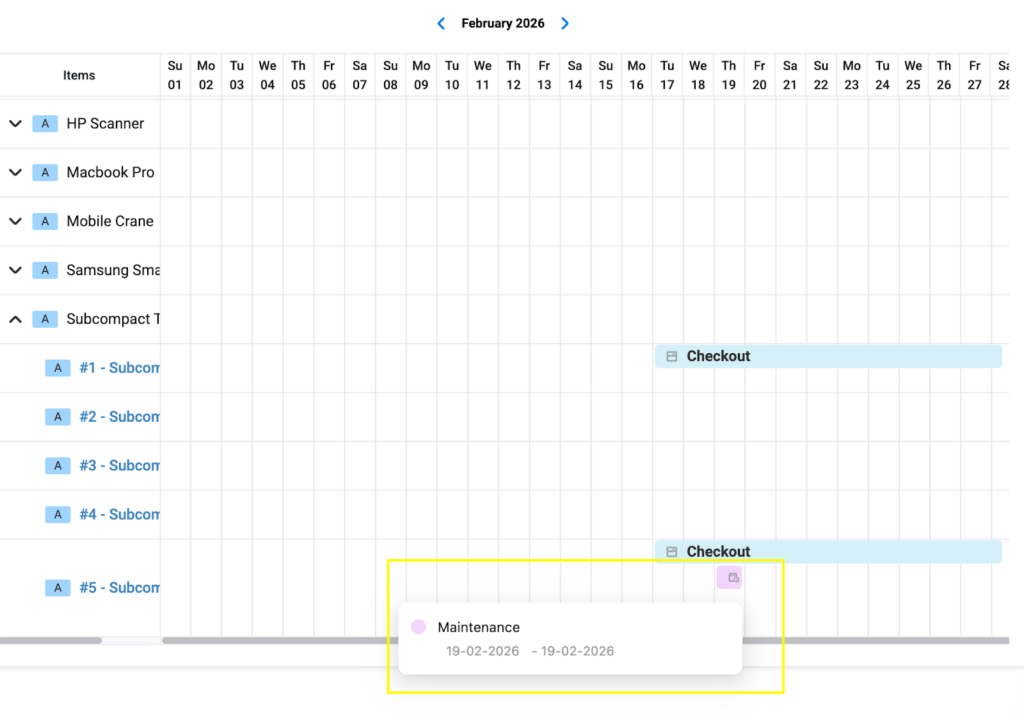
The feature provides a clear, time-based visualization of equipment states, including Available, Reserved, Ready for Dispatch, Dispatched or Checked Out, Maintenance, and On Order. This allows equipment managers to instantly understand utilization levels and availability across projects. Additionally, historical usage remains accessible within the planner, creating a reliable audit trail that supports long-term performance analysis and operational accountability.
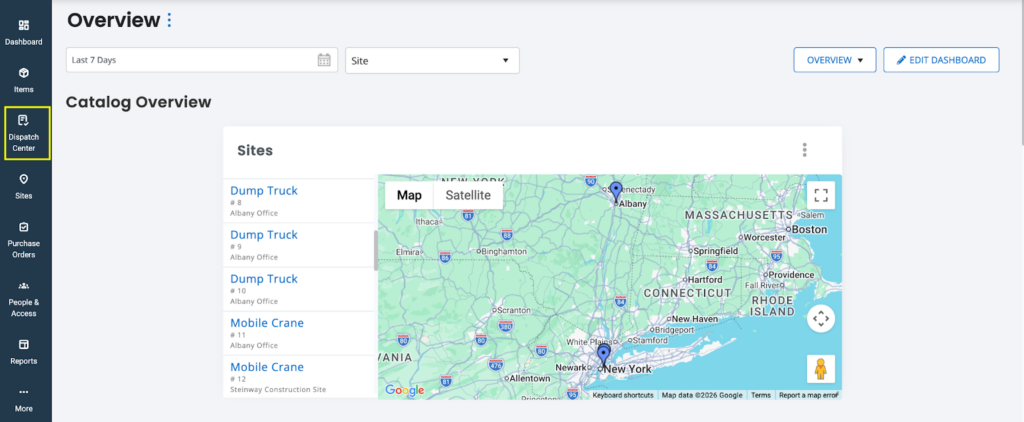
5. Access to equipment count and stock quantities
Along with the Dispatch Center’s request management capabilities, equipment managers have quick access to equipment counts, tools, and consumable quantities across locations, enabling them to swiftly manage warehouse logistics. Equipment managers can also track inventory consumption by work order, providing complete visibility into where and for which project each item was used.
Let’s get started with how to manage items and projects using the Dispatch Center:
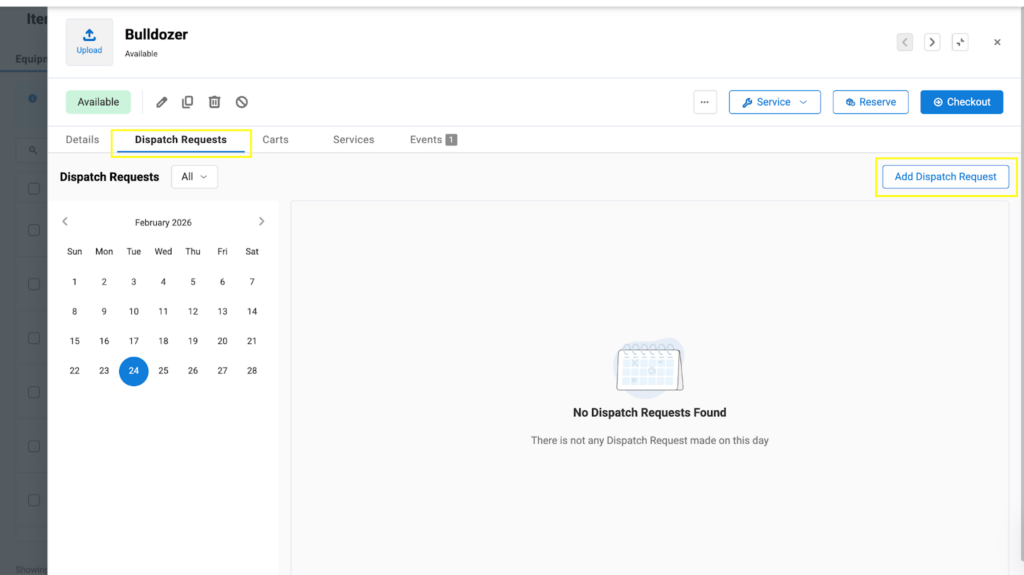
1. Creating a Dispatch Request
The first step to managing your Dispatch Center is creating a Dispatch Request. With a Dispatch Request, crew members can request equipment to be provided at a specific location, site, or for a project.
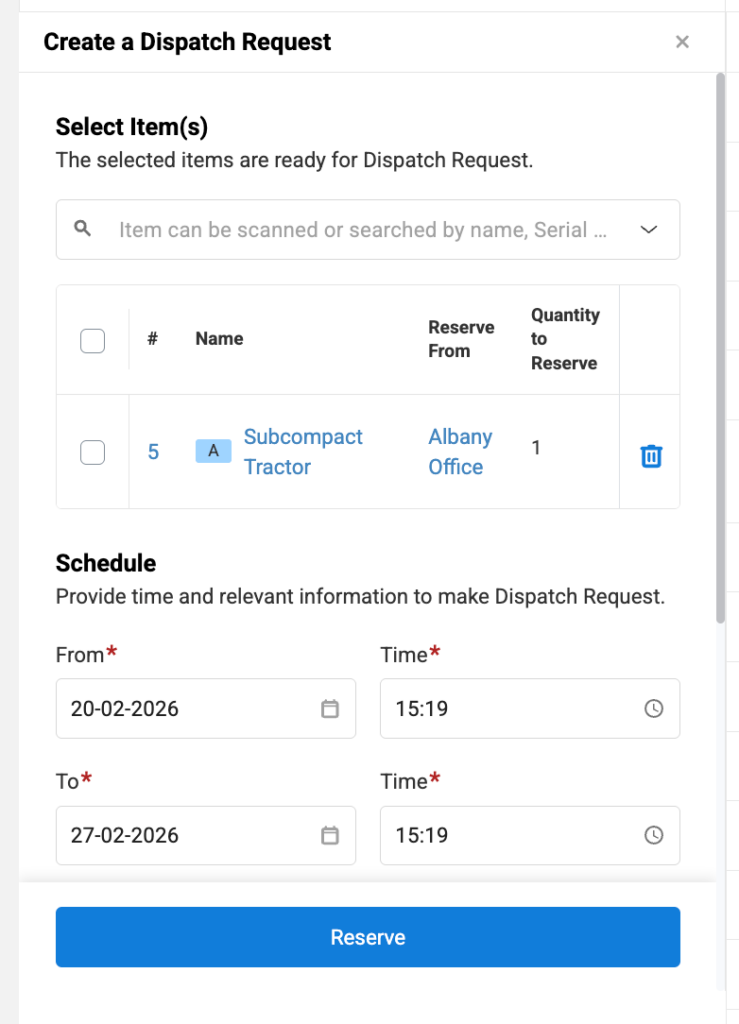
To create this request, go to your Equipment Details Page → Dispatch Requests → click “Add Dispatch Request.”
You will be taken to the following page, where you can create a new Dispatch Request. Select whether you want to reserve the equipment for a Crew Member or a Site, select the Dispatch Request Site or a Project, and choose the Reservation dates.
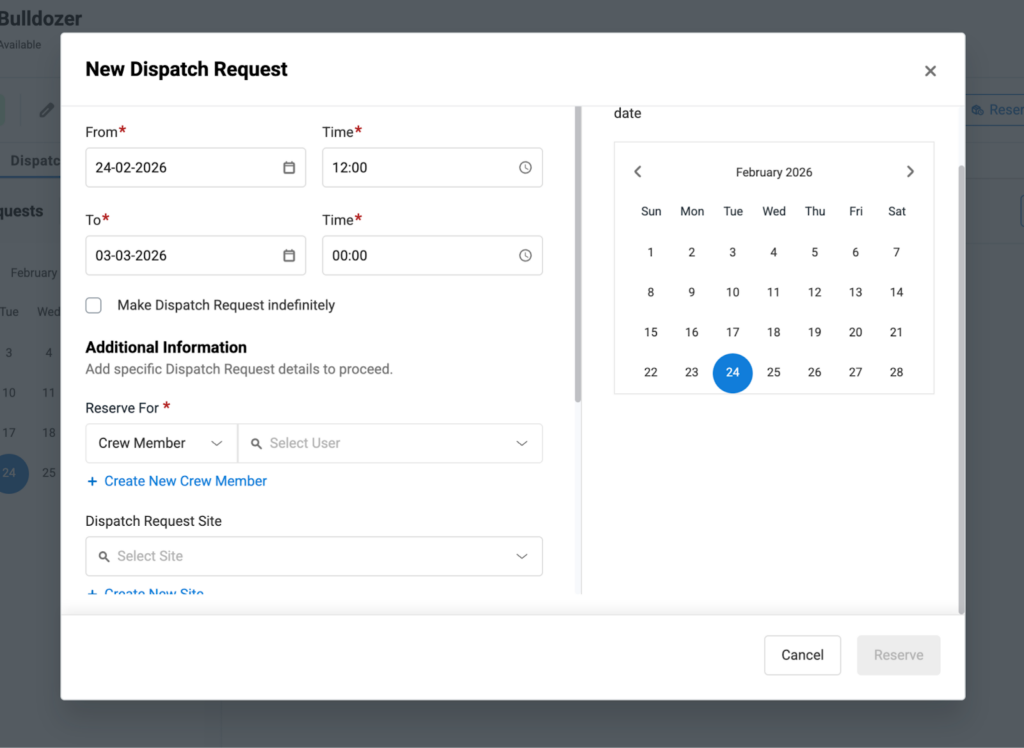
Hit “Reserve” once you have created the request. The Dispatch Requests Page will be updated with details of your request. You can take actions on the Request directly from here. Edit the request, checkout the item, or dispatch it.
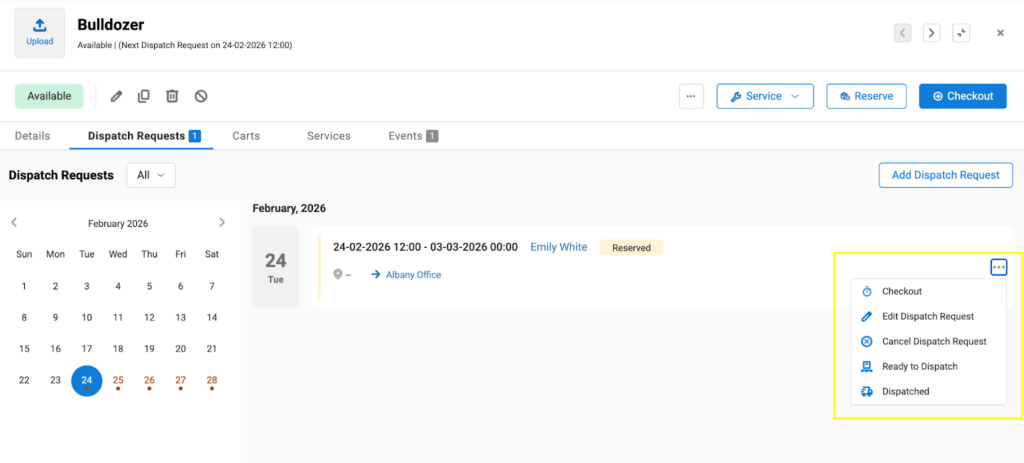
However, if one of your crew members creates a request, you can take action on it directly in the Dispatch Center. The Dispatch Request will also appear on your Dispatch Center under Equipment Requests.
Note: General Requests can be created through the Request Portal. Any request that does not directly relate to any Equipment will fall under this category.
2. How to access the Dispatch Center
The Dispatch Center is a unified planning and execution view that allows equipment managers to:
- See all incoming requests (item and non-item)
- Plan allocations 6–12 months in advance
- Handle real-time dispatch and check-ins
- Track equipment lifecycle states
- Manage stock and inventory by location
- Maintain full traceability and audit history
It combines Request Management with Item Planner into a single operational view.
To access the Dispatch Center, head to the right navigation bar on your EZO dashboard. Click “Dispatch Center.”
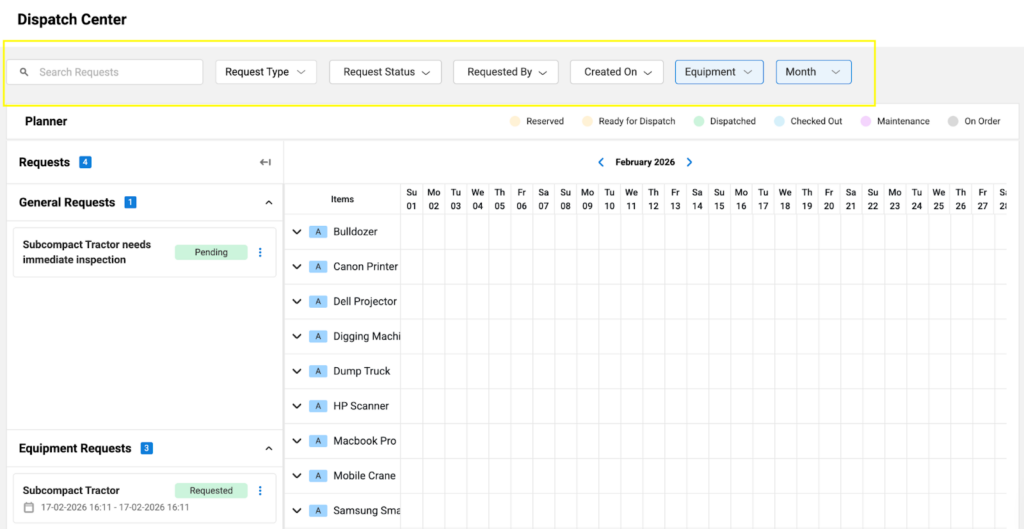
Requests are categorized into:
- Non-Item Requests (Left section)
Requests without specified equipment, tools, or consumables:
- General Requests
- Work Requests (without items)
- Purchase Requests (without items)
- Item Requests (Right section)
Requests directly linked to equipment, tools, or consumables:
- General Requests
- Reservation Requests
- Work Requests (with items)
- Purchase Requests (with items)
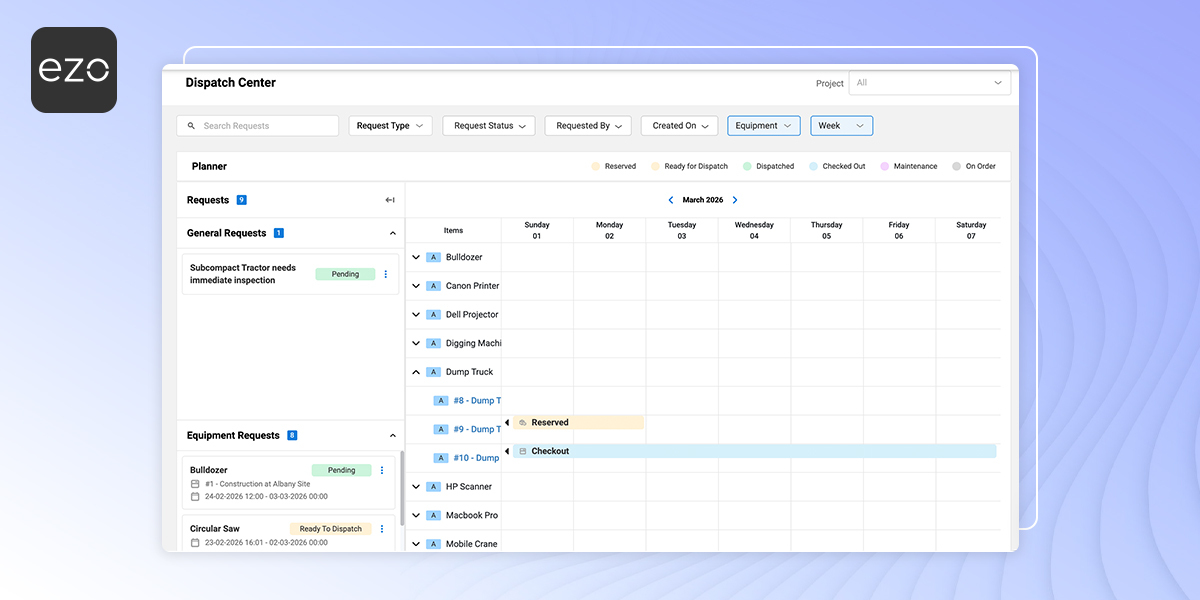
This is how the Dispatch Center looks:
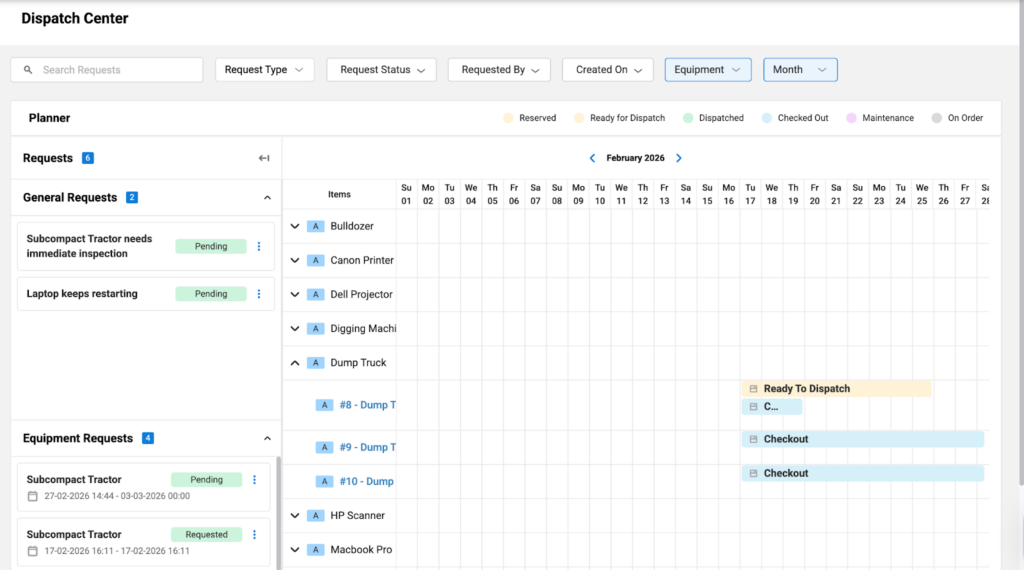
Equipment managers can manage all types of Item and Non-item requests directly from the Dispatch Center and also get a detailed view of the equipment availability so they can approve, deny, or take action on the requests accordingly.
General and Equipment Requests fall under the broader category of “Requests,” with the total number of Requests marked both collectively and by category to give equipment managers an idea of the number of requests they have received.
General Requests may be generated from the Request Portal and may not be associated with any specific item. Whereas, Equipment Requests can be generated from within EZO, directly from an Equipment’s Details Page.
The Request Statuses are “Reserved,” “Ready for Dispatch,” “Dispatched,” “Checked out,” “Maintenance,” and “On Order.” Each request status is color-coded to easily identify them on the Planner.
3. Managing non-item requests
Non-item requests allow equipment managers to take direct operational actions.
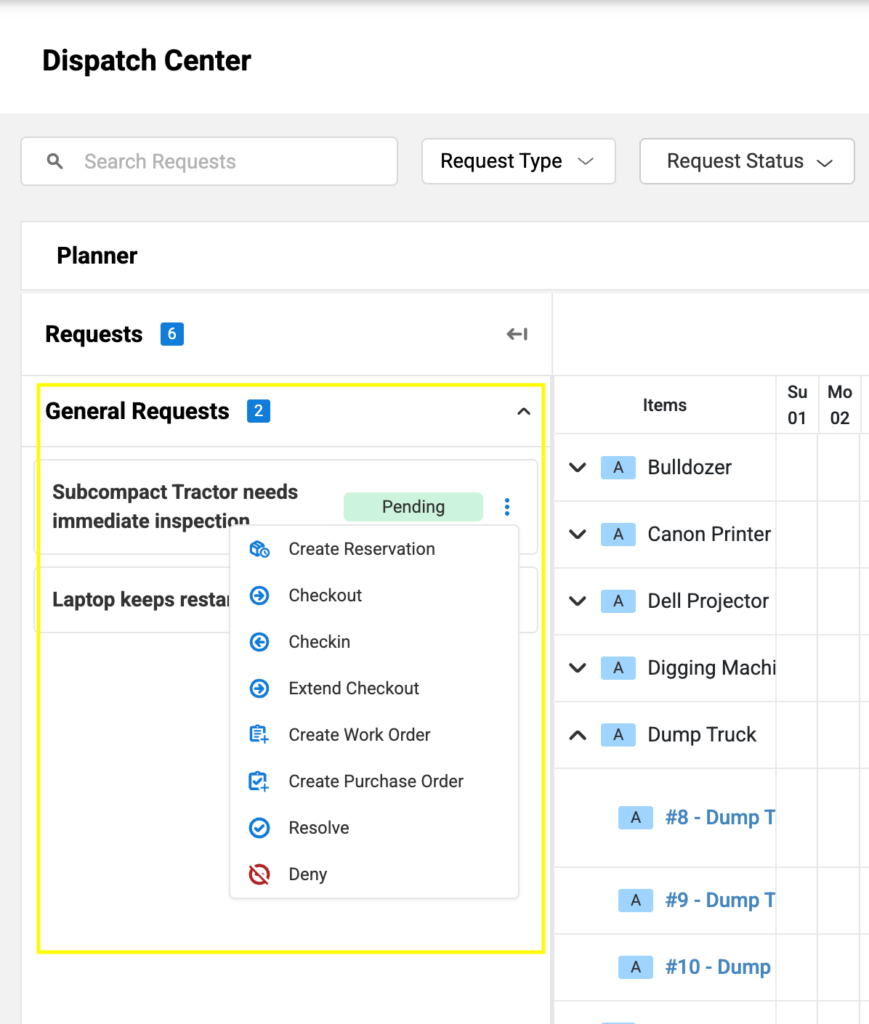
From a General Request, you can take multiple actions, such as “Create a Reservation,” “Checkout,” “Checkin,” “Extend Checkout,” “Create Work Order,” “Create Purchase Order,” or simply “Reserve” or “Deny” the request.
If you click “Create a Reservation,” the following form will open up on the same panel, allowing you to associate the relevant equipment with the request and reserve it (as shown below). The Item Reservation will be created immediately and will show up on the Planner on the right section.
Similarly, when you click “Create Work Order” or “Create a Purchase Request,” you will be taken to the Work Order and Purchase Order creation forms on the right panel where you can enter the details and create the relevant orders.

Creating a Work Order Request converts the request into a work order, and if equipment or inventory is added, it appears in the planner as a maintenance block.
If the General Request has been successfully completed, click “Approve,” and the request will be resolved and will not appear on the request panel.
4. Applying filters
The navigation bar at the top of the Planner in the Dispatch Center lets equipment managers save time by filtering for specific requests. They can filter by:
- Request type: General Requests, Reservation Requests, Work Requests, and Purchase Requests.
- Item type: Since the planner handles multiple item categories, users can filter by Equipment (default view), Tools (Stock), and Consumables (Inventory).
- Request Status: Managers can refine the view by request lifecycle stage, helping prioritize approvals, pending actions, and completed workflows without confusion.
- Requested By: Quickly identify requests submitted by a specific site supervisor, project manager, or team. This improves accountability and enables managers to respond to high-priority stakeholders more quickly.
- Created On: Sort requests by creation date to focus on the most recent submissions or review historical entries within a specific timeframe.
- Time period: Filter the request by Month or Week.
- Search Bar: Use the Search Bar to find a specific request using its name.
This is the preview of the Planner if we try finding the General Request made by Rosa Call on the 20th of February 2026.
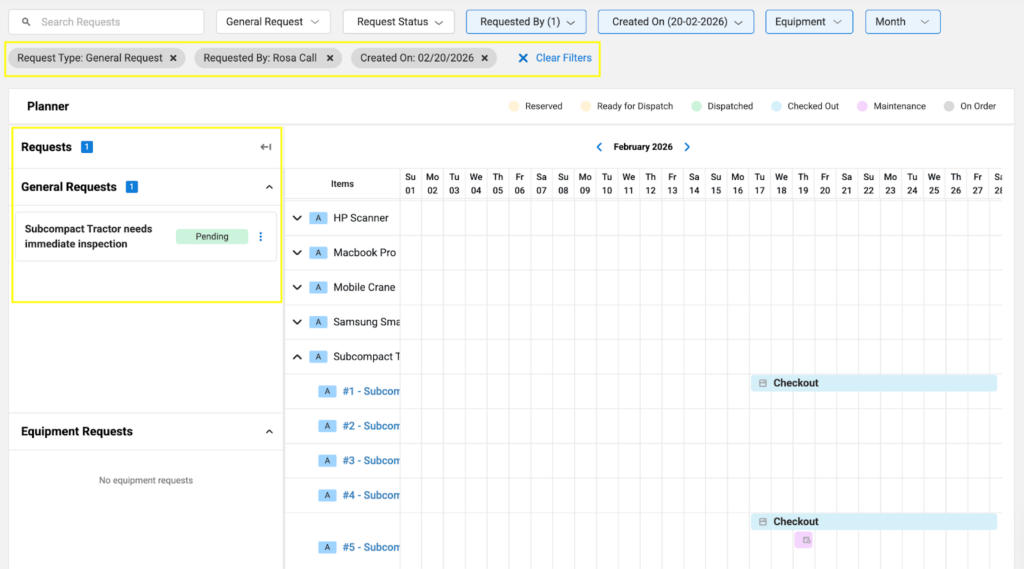
Hit “Clear Filters” if you no longer want the view by the filter of your choice.
5. Taking actions directly from the Planner
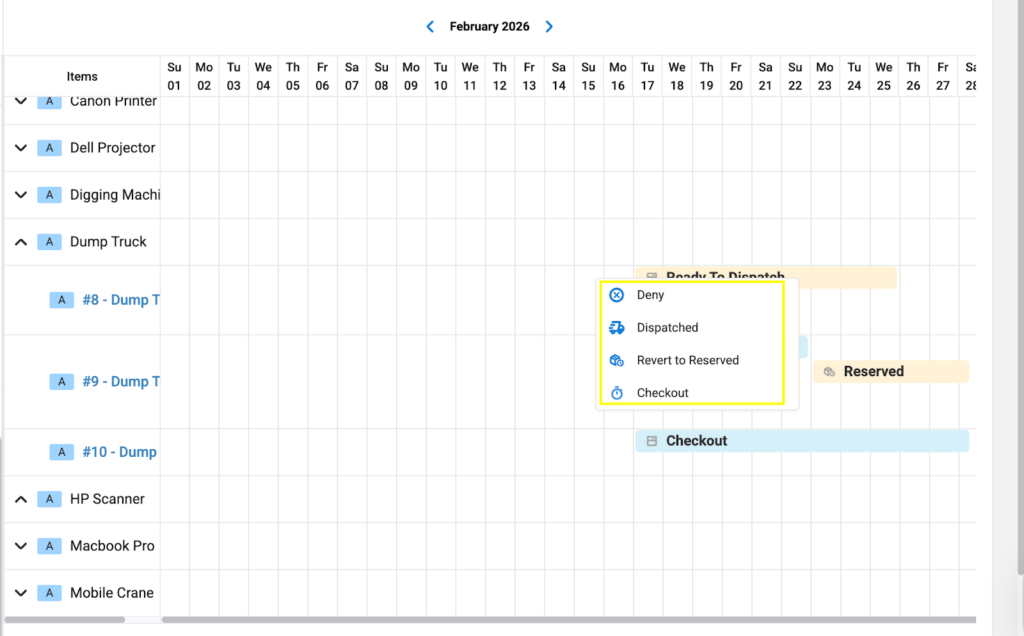
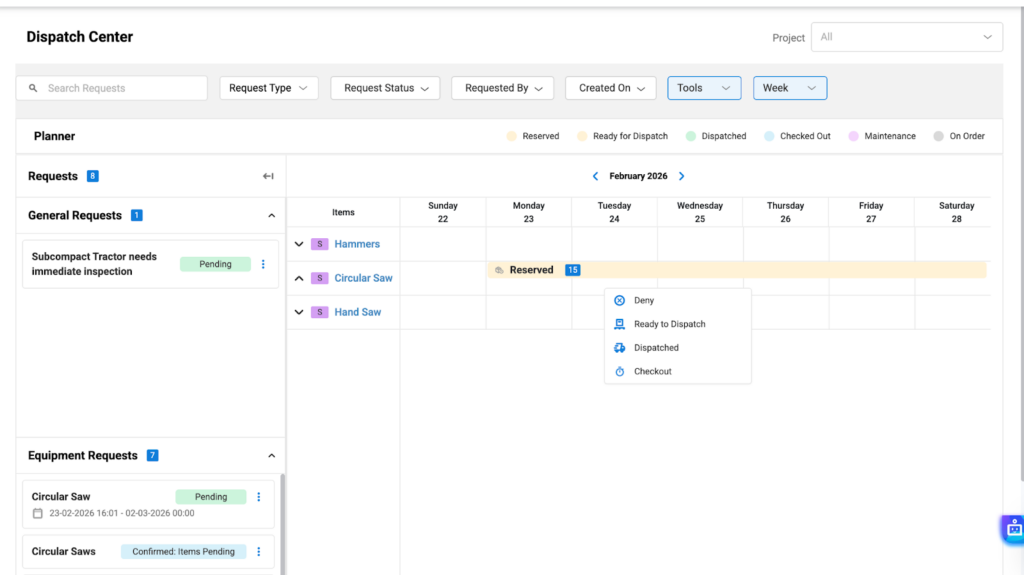
If an equipment manager gets a Reservation request, it will appear as “Reserved” against the equipment name in the Planner. You can take an action on the reservation directly from the Planner, including “Deny,” “Ready for Dispatch,” “Dispatch,” and “Checkout.”

Similarly, if a request is in the “Ready to Dispatch” state, you can Deny the request, Revert to Reservation, Dispatch, or Checkout the item as shown below.
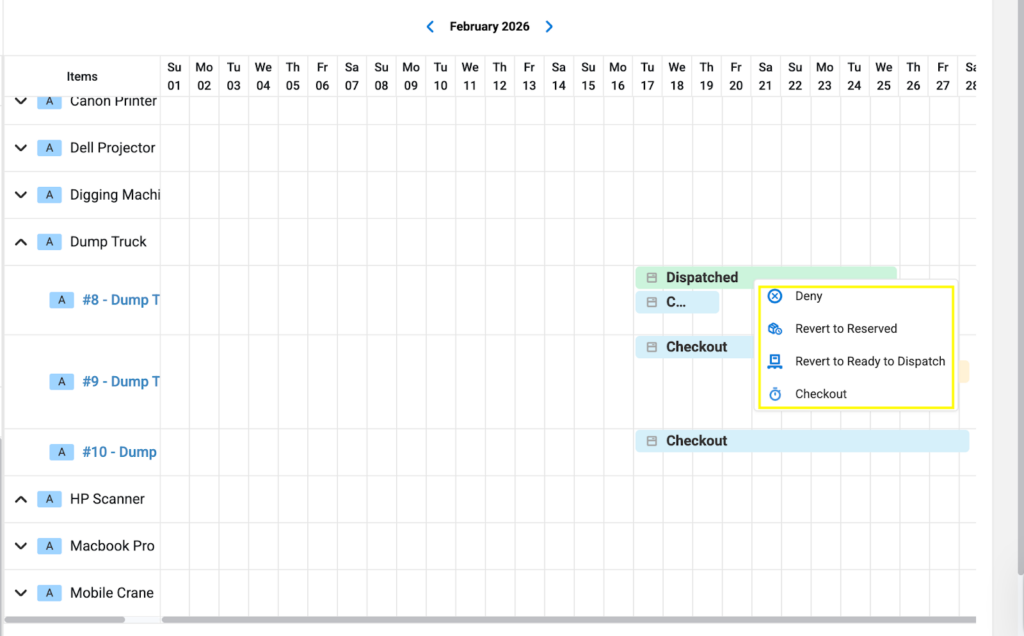
The request status will change instantly in the Planner. For instance, in the example below, we marked the Dump Truck “Dispatched.” You can take actions on a Dispatched Request from the Planner as well. Note that even after the equipment is checked in, the status remains as a historical record of past events on the equipment.
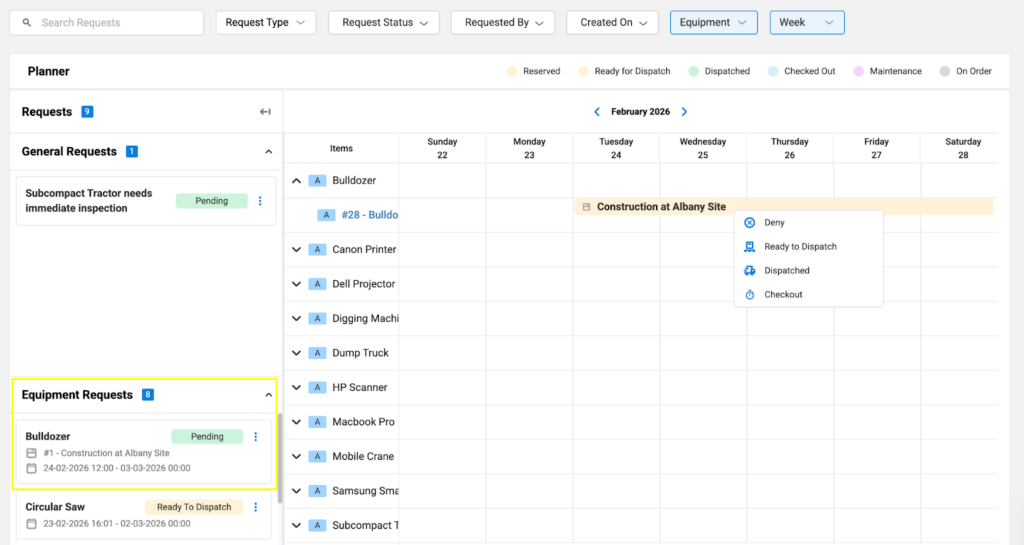
6. Handling Project Requests
You can filter the view of your Planner with your Projects. To do so, click Project at the top right of the Planner, then select the project you want to view requests for.
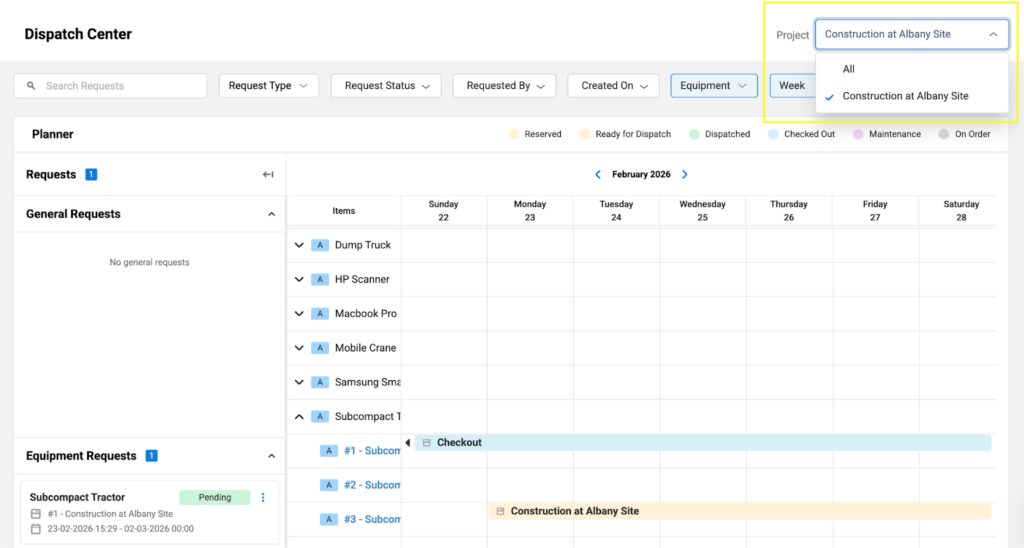
Once you select the Project, the Planner will show only requests specific to the project, and a block will appear for the requested equipment. The block’s color will indicate the state of the request.
For instance, a crew member reserved a Subcompact Tractor for the Construction Project at Albany Site; it appears in yellow on the Planner, and as an equipment manager, you can deny the reservation, make the equipment ready for dispatch, dispatch directly, or directly check it out to the crew member.
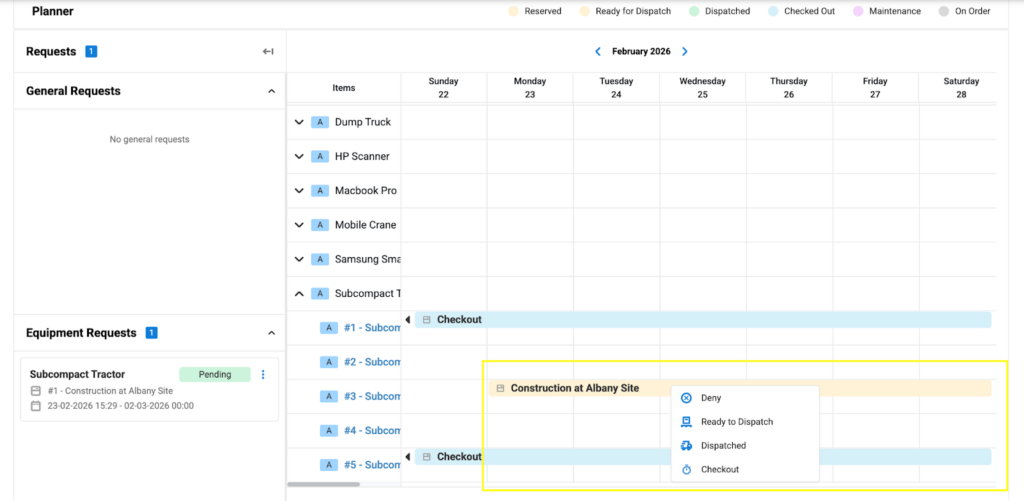
You can also take these actions by clicking the three dots under the Equipment Requests section, or by directly clicking the project name in the Planner’s calendar view.
7. Managing requests for Tools and Consumables
If you receive a request for a Tool, it will appear under Equipment Requests on the left side of the Planner. For instance, in the following screenshot, a crew member made a Purchase Request for 10 units of Circular Saws. So, the request appears under the Equipment Requests section but does not appear in the Planner’s calendar view.
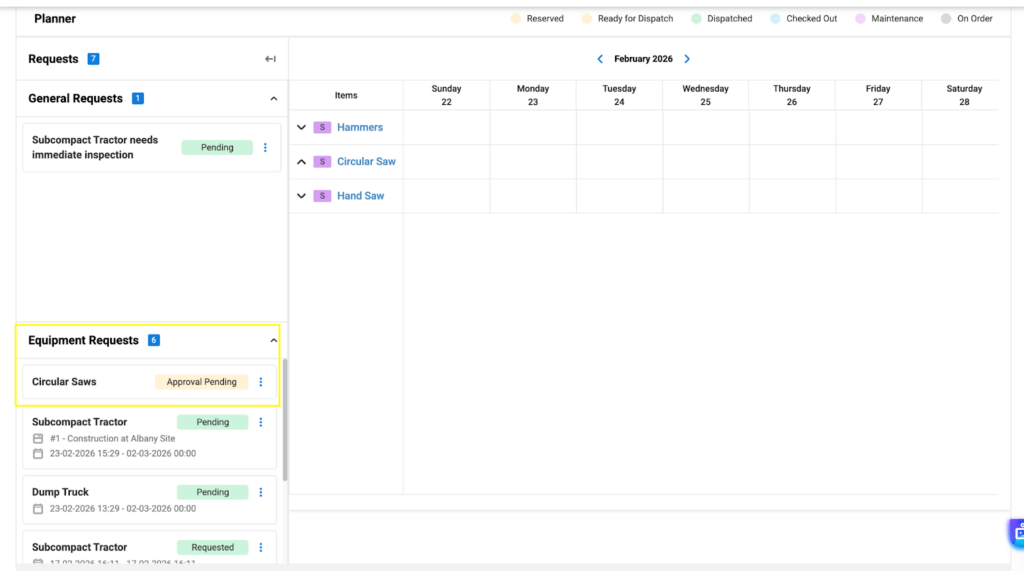
Whereas, a Reservation Request for the Circular Saws will appear in the Planner’s calendar view, allowing you to take an action on it as required. The most recent status of the equipment will be reflected in the Planner.
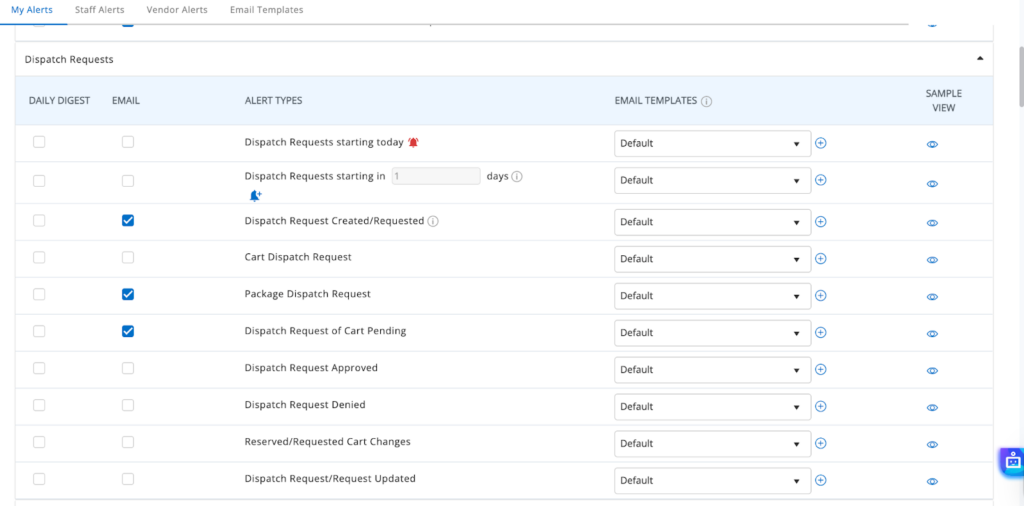
8. Setting Alerts for Dispatch Requests
You can enable alerts for your Dispatch Requests from the Alerts & Emails module in EZO. Head to Alerts & Emails → My Alerts → “Dispatch Requests.” Tick the alerts you need to enable and you will be good to go.
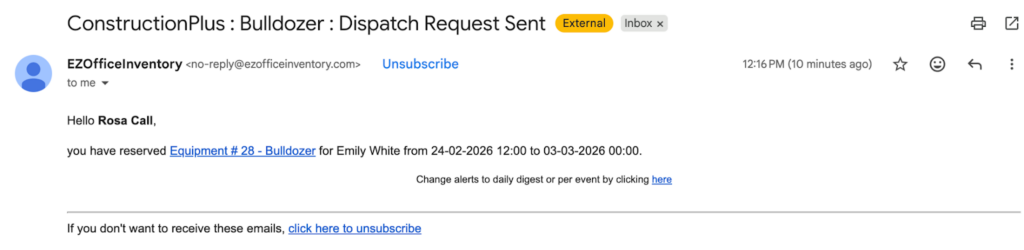
Here’s an example of an email alert of a Dispatch Request.
And that’s it! You are ready to use the Dispatch Center in EZO.

![[How-to] Create General Requests Using the EZO Request Portal](https://cdn.ezo.io/wp-content/uploads/2024/10/General-Requests-1-scaled.jpg)
![[How-to] Use the Fulfillment Center in EZO](https://cdn.ezo.io/wp-content/uploads/2024/09/09132543/EZOoffice-support-blog.jpg)
![[How-to] Set up the Request Portal to Take Charge of Asset Requests As an Admin](https://cdn.ezo.io/wp-content/uploads/2023/10/req-portal.jpg)


