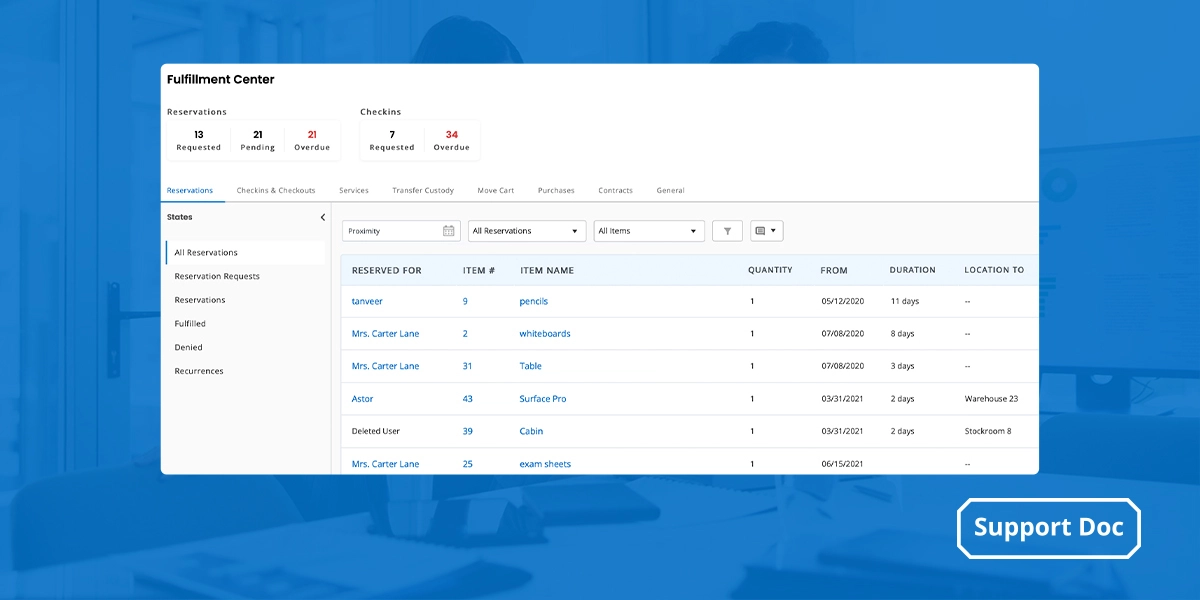
The Fulfillment Center is designed to facilitate power users (admins) to respond to multiple request types. It acts as a central module to view and manage all requests related to check-ins, reservations, carts and purchase orders.
Benefits of the Fulfillment Center (FC)
The Fulfillment Center primarily saves time and presents all urgent requests at a single place. Here are some more benefits:
1. Centralized request management that declutters
The ability to view and manage all request types (reservations, check ins, service requests, custody transfers, purchase order requests etc.) within a centralized module, offers granular control over requests placed within the system.
2. Faster approvals & better response times
The fulfillment center radically simplifies the request handling process for faster approvals and better request response times ensuring compliance with SLA standards.
3. Enhanced operational efficiency
User access limitations create unavoidable operational friction. The direct actions inside the RMC, reduce admin workload by consolidating requests & making it easier to quickly respond to them. This makes it easier to approve/deny pending requests fast and keep operations running smoothly.
Fulfillment Centre Use Case
The Fulfillment Centre is designed to address workflows for organizations with the following settings enabled:
| Setting Type | Enabled for |
| Arbitration on User Listings | Arbitration for Reservation (Enable all) |
| Carts Module | Allow Staff Users to Move Cart, Arbitration on Move Items in Cart |
| Transfer of Custody | Arbitration on Transfer of Custody |
Using the Fulfillment Centre
Go to the notifications bell icon to access the Fulfillment Centre:

You will be redirected to the Listings Page with all the request tabs related to different modules such as Reservation, Check-in, Transfer Custody, Move Cart, Contracts and General:

1. Reservations
The first tab is the Reservations tab, where all your reservation requests will be displayed.
On the right side of the Listings page, there is a ‘States’ column. This acts like a filter to sort through the different types of requests you have received.
By default, when you open the Listings page, ‘All Requests’ will be selected. These include requests in any state in any state. You can also view a certain type of reservation request. For instance, to view denied requests click on ‘Denied’ from the States column.
Additionally there are some other ways you can sort out your reservations data.
Proximity: The ‘Proximity’ dropdown lets you view Reservations within a certain time span. Reservation by name: Next you can also sort data by the person who has requested the Reservation.
Reservation by item: You can also view Reservations by type of asset, asset stock, inventory and Carts.
By default the Listing page shows columns labeled ‘Reserved For’, ‘Quantity’, ‘Type’, ‘From/To’ and ‘Actions’.
By clicking on the edit button, you can add more columns as per requirement:

The ‘Actions’ column enables you to to Edit or View the Reservation, and Approve or Deny a Reservation Request. By clicking on the icons in the Actions column, you can choose the action you need to take.

If a request has been approved or denied, the Reservation Listings Page will appear like this:

You can edit or view your reservation.
2. Check-ins and Checkouts
When you click on the Check-in & Checkout tab, you will view all Check-ins due:

Check-in requests can be filtered with the Item type and Carts. Click on the icon in the ‘Action’ column to check-in the asset:

Click on ‘All Checkouts’ to take actions to check-in, extend checkout or transfer custody for assets:

3. Transfer of Custody
Transfer of custody requests will be shown as follows:

At the right side, the States column gives you the option to view All Requests, Pending, Fulfilled and Denied. Next the Actions dropdown shows two options to approve or deny the request.
The table for Transfer Custody requests includes details such as item name, requested by, dates and checkout time.
4. Purchase Order
The Listings page for Purchase Orders appears as shown below:

Click on the approval/ denial signs to approve or deny and the right side icon is for request revision.
5. Contracts
The Listings page for Contracts will appear as follows:

6. General
The General listings page appears as shown below:

You can Comment, Take an Action, Resolve or Deny a request. Read more on how to create General Requests
7. Tracking request progress
The Fulfillment Center makes it easy to track the status of requests throughout the approval and fulfillment process with the Progress column. It provides visibility into who approved, rejected, or fulfilled a request, helping teams monitor request progress and identify pending actions.
The Progress column is available across all Fulfillment Center listings and displays the latest stage of each request. Depending on the request status, it may show:
- Approval Pending: Displays the user currently responsible for approving the request.
- Approved By: Displays the user who approved the request.
- Approval Denied By: Displays the user who rejected the request.
- Fulfillment Pending: Indicates the request is awaiting fulfillment.
- Fulfillment: Displays the user who fulfilled the request.
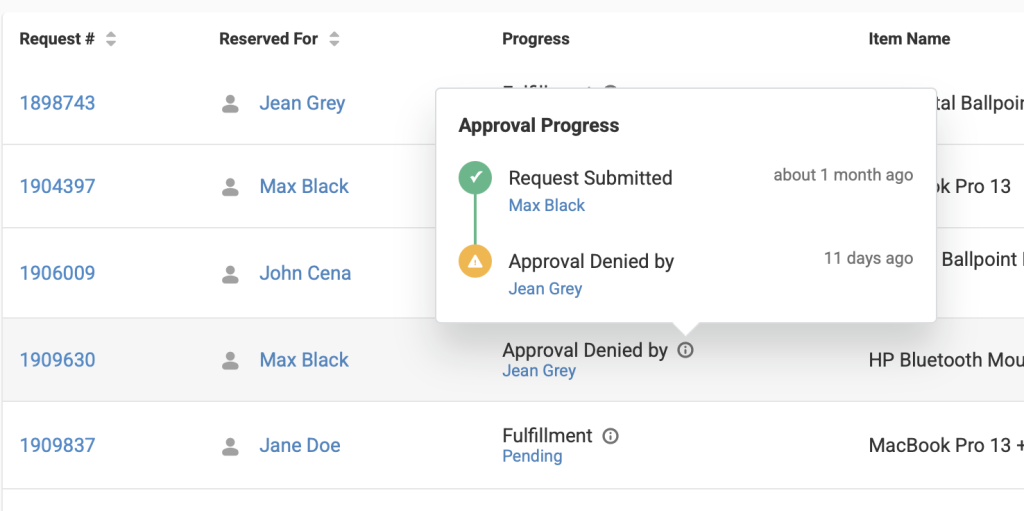
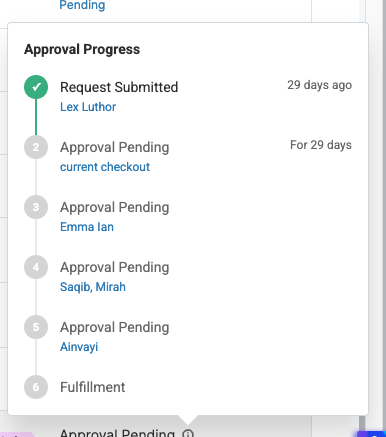
You can hover over a value in the Progress column to view the complete request timeline, including:
- Request submission details.
- Each approval stage and approver.
- Current pending approver, if applicable.
- Request fulfillment status and the user who fulfilled the request.
For requests with multiple approval levels, the timeline displays each approval stage in the order it occurred, making it easy to track the request from submission to completion.
8. Fulfillment Center KPIs
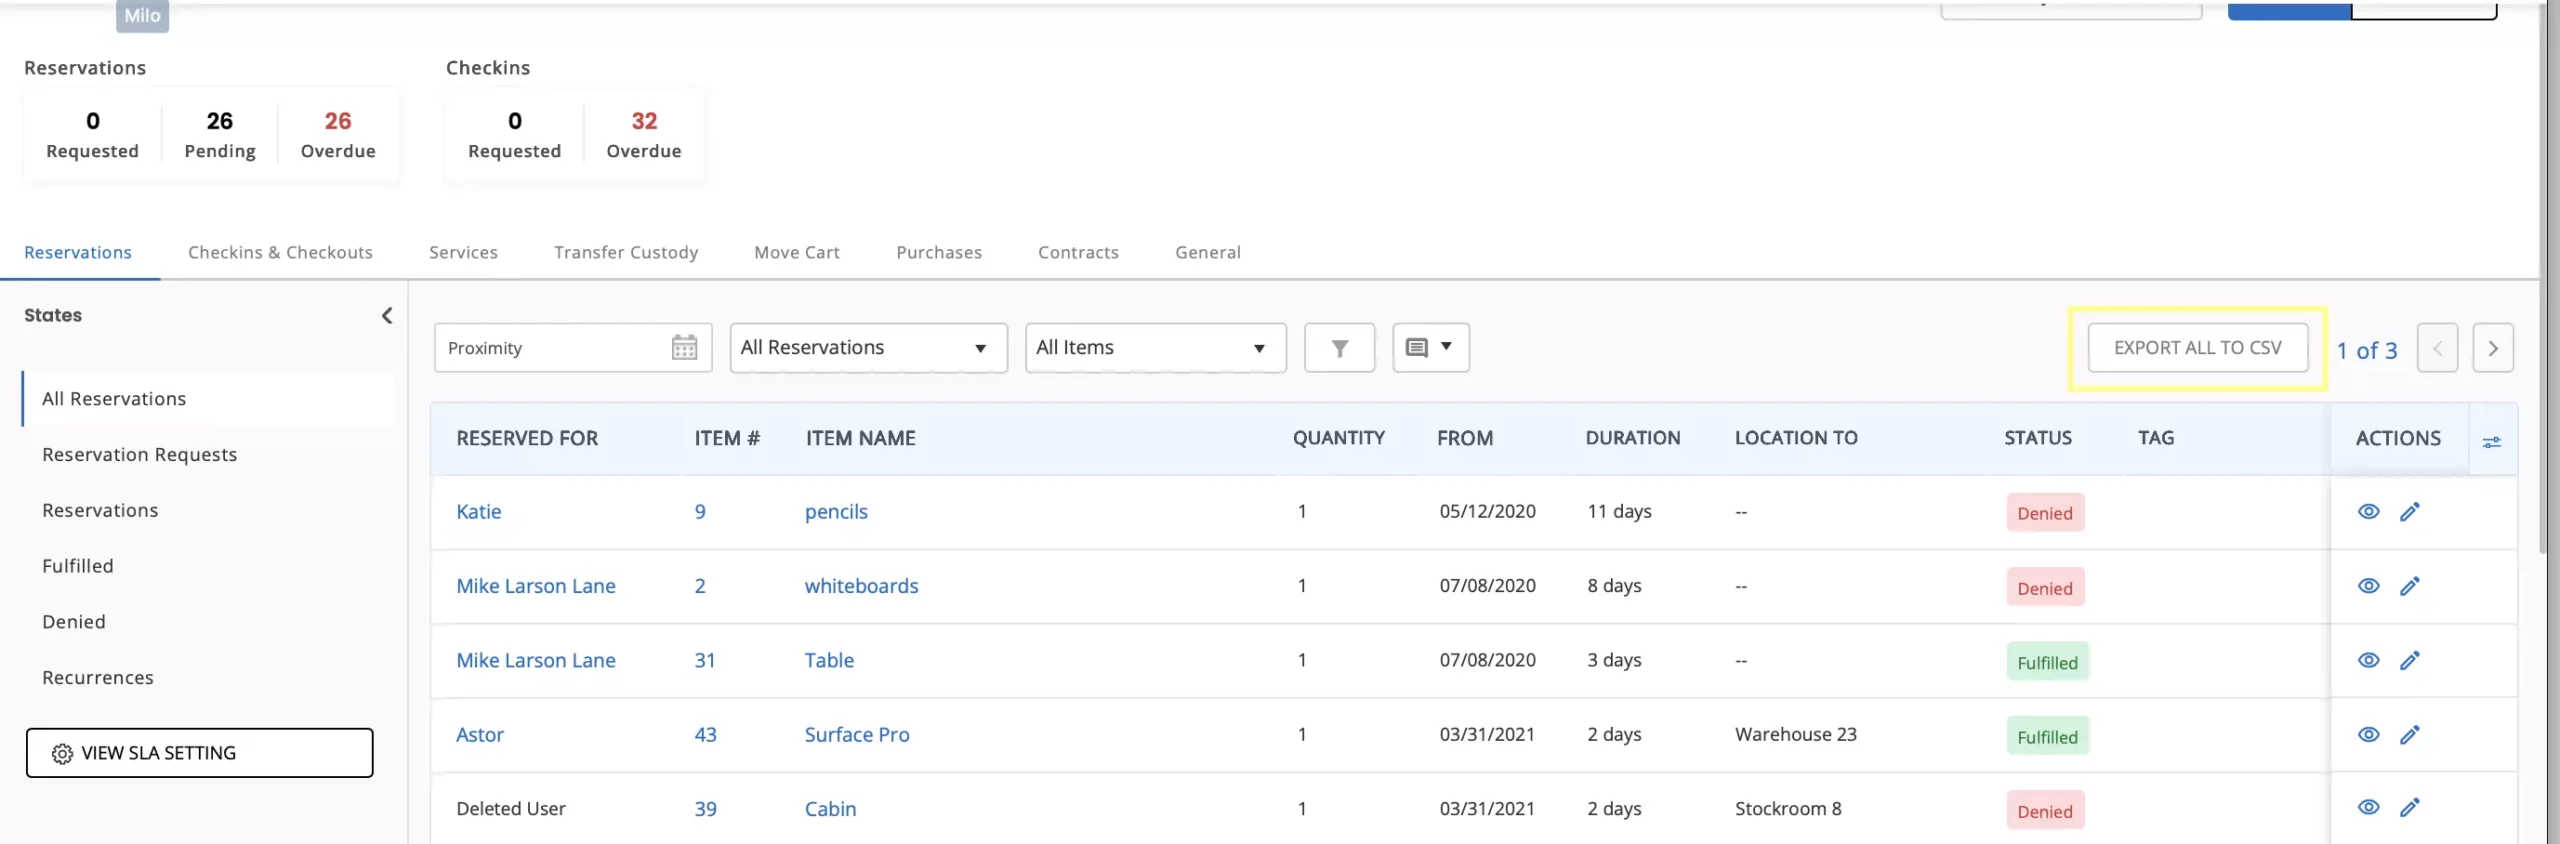
The Fulfillment Center acts as a dashboard and displays all critical Reservation and Check-ins KPIs:

9. Export CSVs
There will be an export to CSV button for all modules including reservations, check-in/checkouts, work orders and general requests. Clicking on this button will download a CSV containing all details on the listing page.
10. Perform Bulk Actions in the Fulfillment Center
You can perform actions on multiple requests or items at the same time from the Fulfillment Center. This allows you to process requests in bulk instead of opening each one individually.
To perform bulk actions, navigate to the relevant tab and section, select the requests or items you want to process by checking the checkboxes next to them, and choose the required action from the ACTIONS button that appears at the top of the listing.
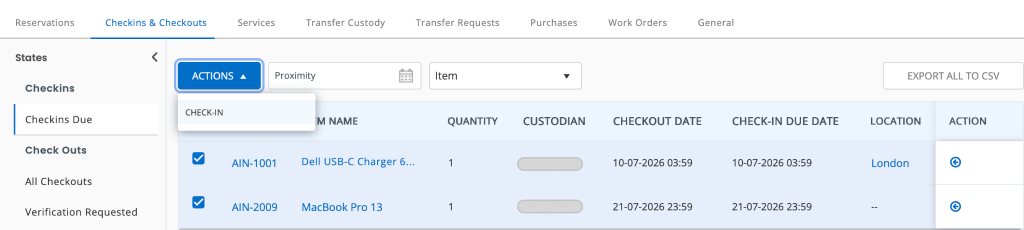
The following bulk actions are available across the Fulfillment Center:
| Fulfillment Center Tab | Section | Bulk Actions Available |
| Reservation | Reservation Requests | Approve, Deny |
| Checkins & Checkouts | Checkins Due | Check-In |
| Checkins & Checkouts | Verification Requested | Verify, Deny |
| Transfer Custody | Custody Transfer Requests | Approve, Deny |
| Transfer Requests | Pending | Approve, Deny |
| Purchases | Purchase Requests | Approve, Deny, Request Revision |
| General Requests | Pending | Approve, Deny, Take Action |
Note: Approve, Deny, and Request Revision bulk actions for Purchase Requests are also available in the Purchase Orders module, in addition to the Fulfillment Center.
11. SLA Setting
Users can set a time limit within which users have to respond to requests. You can set an SLA time for reservation requests currently.
Go to Reservations → SLA Settings on the bottom left.
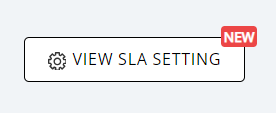
Set the SLA time and enter the number of hours within which the user has to respond to the request.

If the user does not respond to the request within the number of hours set, then it will be recorded as SLA Breach and the following sign will be displayed on your reservation listings page.

12. Analytics for Reservation Requests
You can analyze your Reservation Requests using the Analytics module in your Fulfillment Center.
To do so, click on ‘Analytics’.

You will be taken to the following page where you can see the ‘SLA Breached Reservation Request Report’ which provides an overview of the number of SLAs breached.

Note: The Analytics module is specific to the ‘Reservations’ module.
13. Send Approval Reminder Emails
If a reservation request is waiting for approval, admins can remind the assigned approver directly from the Requests list. You can also automate approval reminders based on how long a reservation has been waiting for approval.
Send a Manual Approval Reminder
When a cart is in the Requested state and is waiting for a specific approver, Admins can send an approval reminder directly from the Requests list.
- Navigate to the Fulfillment Center and locate the reservation request that is awaiting approval.
- In the Progress column, click the Send Approval Reminder bell icon.
- The reminder email will be sent immediately to the assigned approver.

After sending the reminder, the bell icon changes to Reminder Sent and becomes available again after 24 hours. If no specific approver is assigned to the pending approval step, the reminder option will not be displayed.

Note: The Progress column may not be visible by default in the Fulfillment Center. If you don’t see it, click the Column Customization button and add the Insights column to the reservation listing.

14. Automate Approval Reminders
You can also use the Workflow automations to automatically send reminder emails when an approval has been pending for a specified number of days.
To configure an automated reminder navigate to More → Workflow Automations and click + Create New Workflow. Provide a name and optional description for your workflow and follow the steps below.
Create a Trigger node
- Click the Trigger icon and drag it onto the canvas.
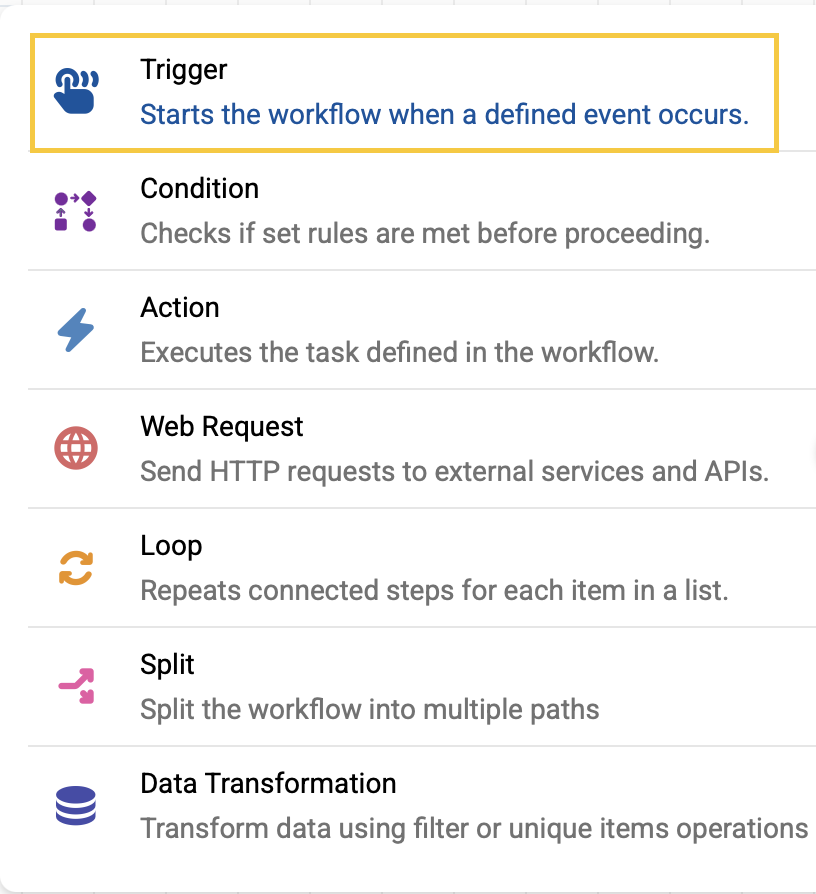
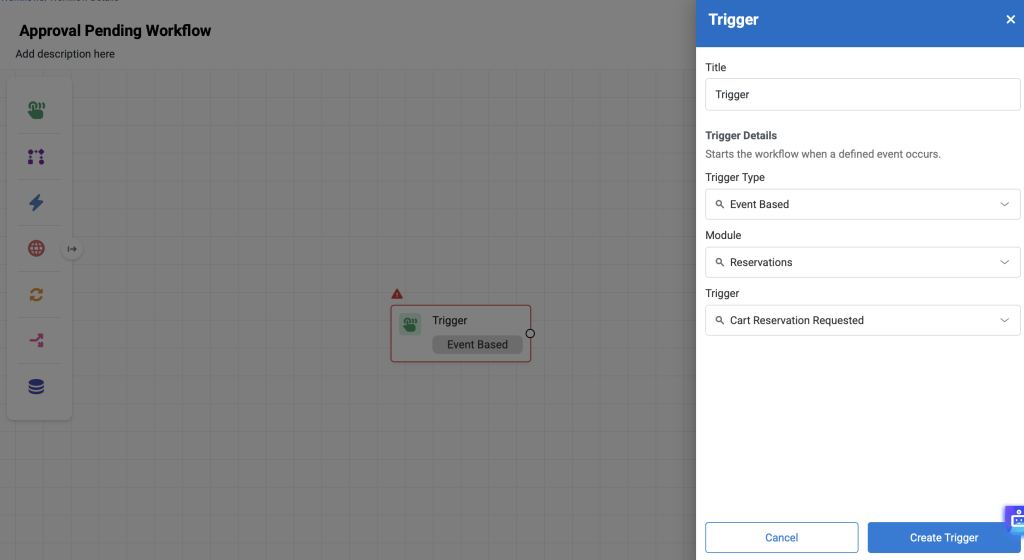
- In the trigger modal,
- Select Event Based as the Trigger Type.
- Select Reservations as the Module.
- Select Cart Reservation Requested as the Trigger.
- Click the Create Trigger button.
Add a Condition node
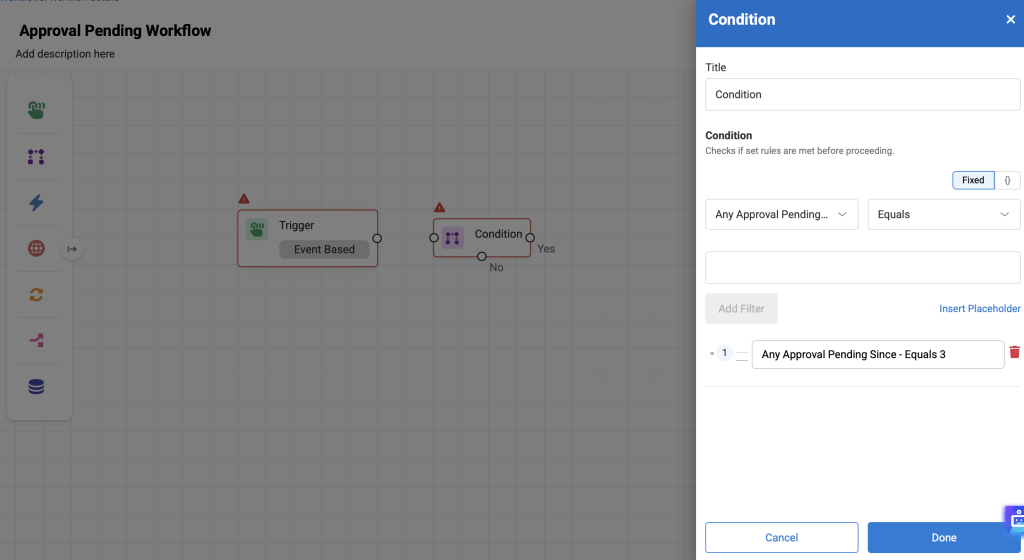
Once you have created a trigger, you can add a condition to check that certain criteria are met before any action is taken. In this example, we will add a condition that checks if any approval has been pending since a specific number of days.
- Click the Condition icon and drag it onto the canvas.
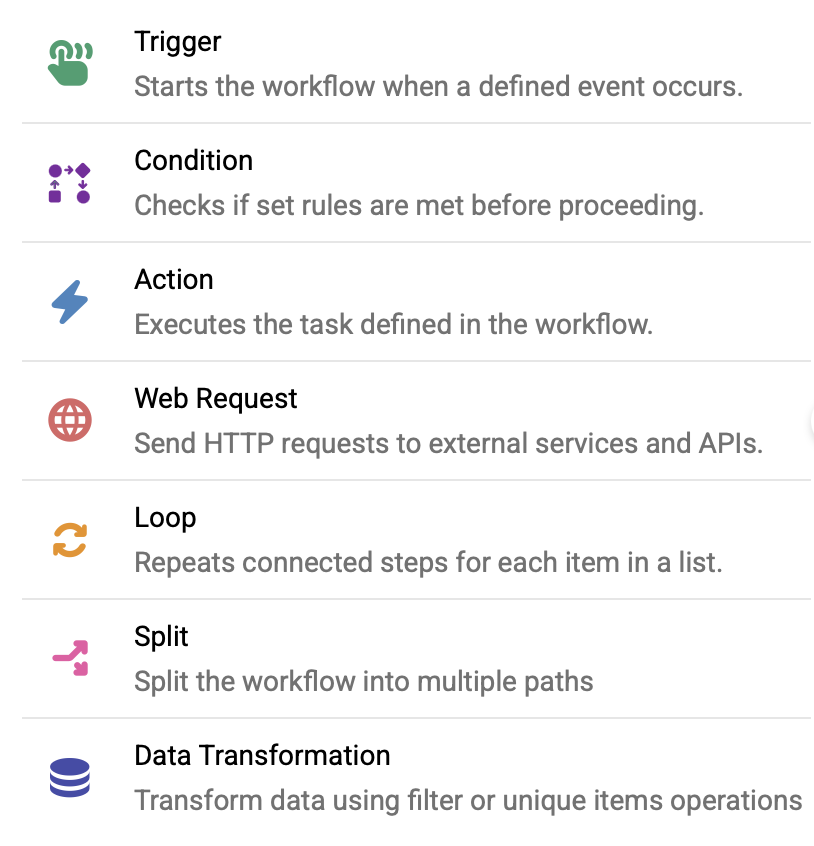
- In the Condition modal:
- Set the condition to Any Approval Pending Since and enter the number of days.
- Click the Add Filter button.
- Click the Done button.
Once you’ve configured the Condition node, link it to the Trigger node by dragging the arrow from one node to the other.
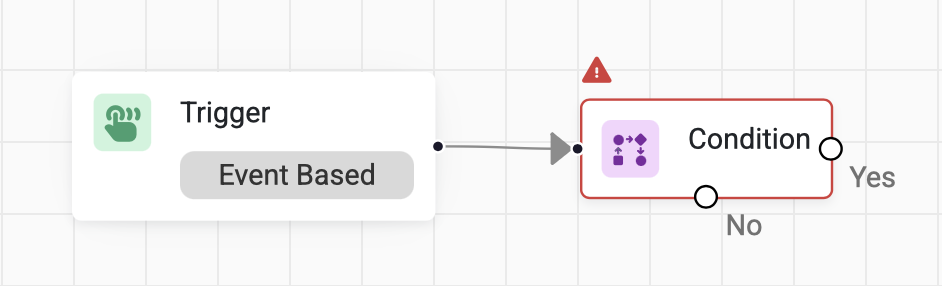
Note: The canvas automatically creates Yes and No branches, which can then be linked to the relevant actions depending on what you want to automate when the condition is true or false.
Add an Action node
Now add an Action node to send a reminder email to the approver.
- Click the Action icon and drag it onto the canvas.
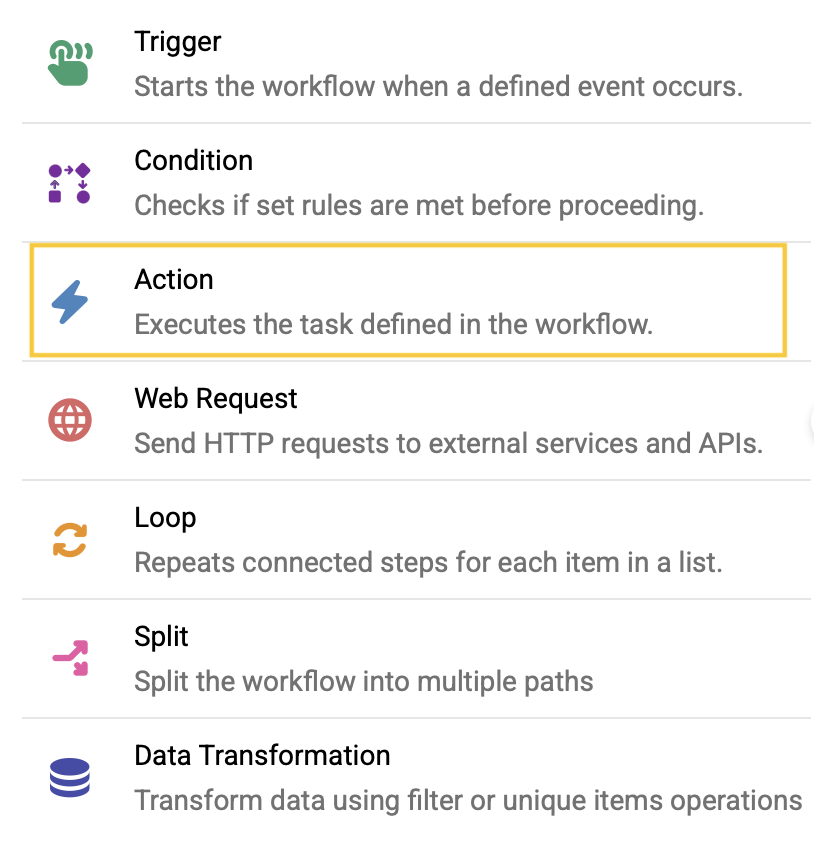
- In the Action modal, select Send Email as the action.
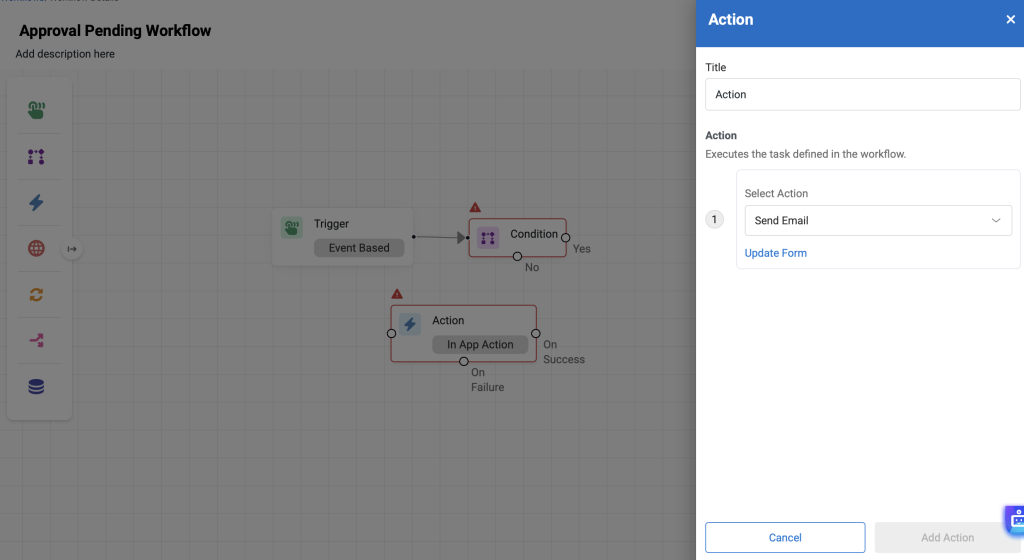
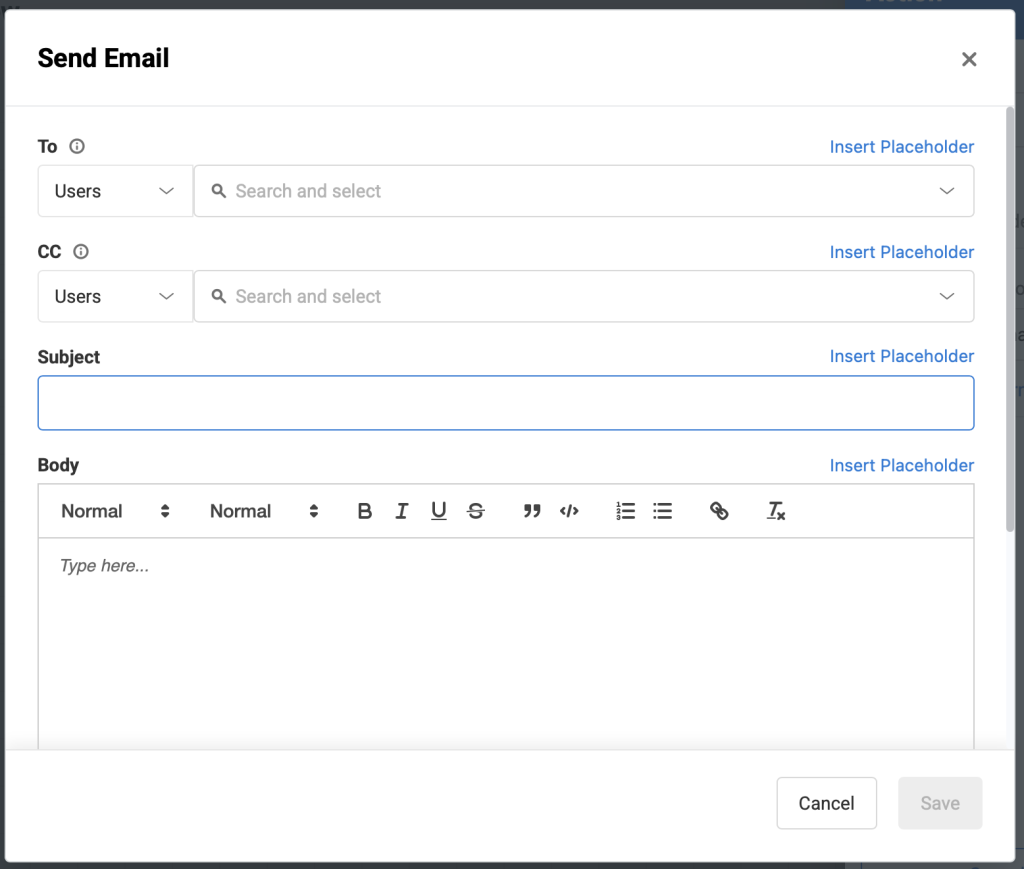
- Click the Update Form button and in the Send Email pop-up click Insert Placeholder given in the To section.
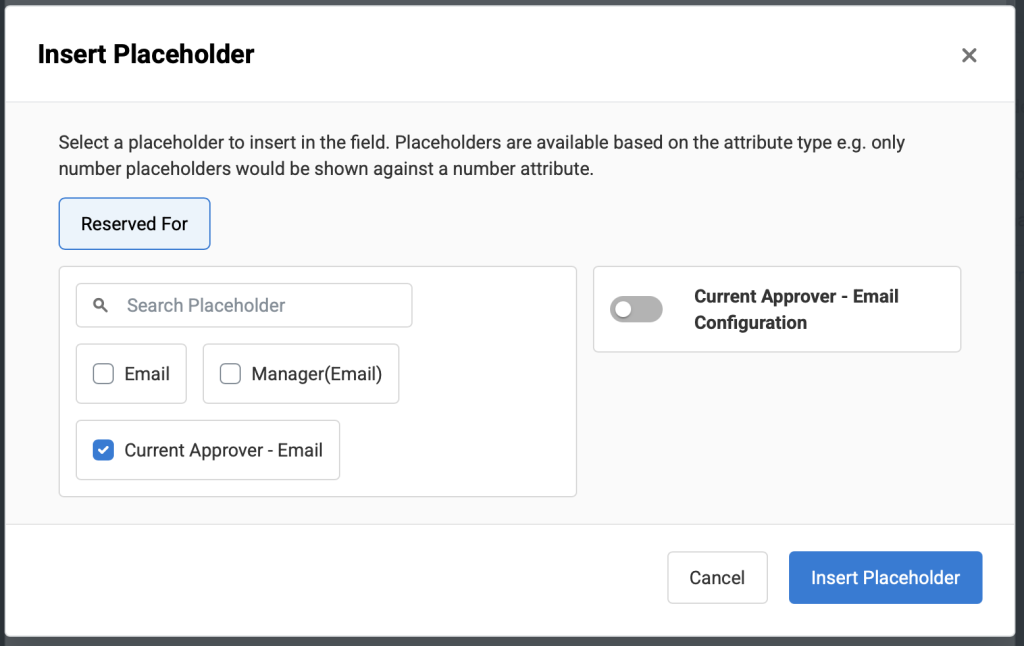
- In the Insert Placeholder pop-up, select the Current Approver – Email placeholder and then click the Insert Placeholder button
- Save your changes and click Add Action.
Once configured, link the Action node to the Condition node by dragging the arrow from one node to the other.
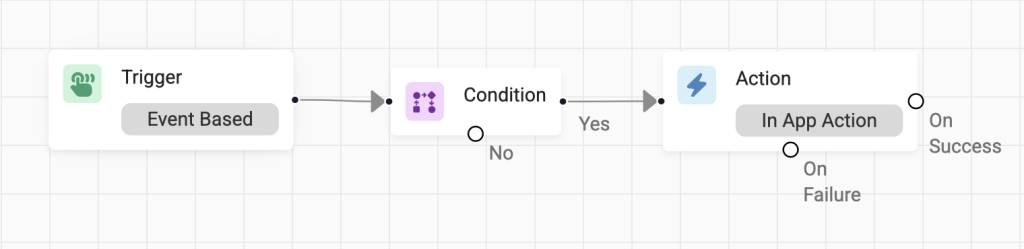
Once the workflow is complete, click Save Changes and activate it by toggling the Activate switch. In the confirmation pop-up, click Activate.
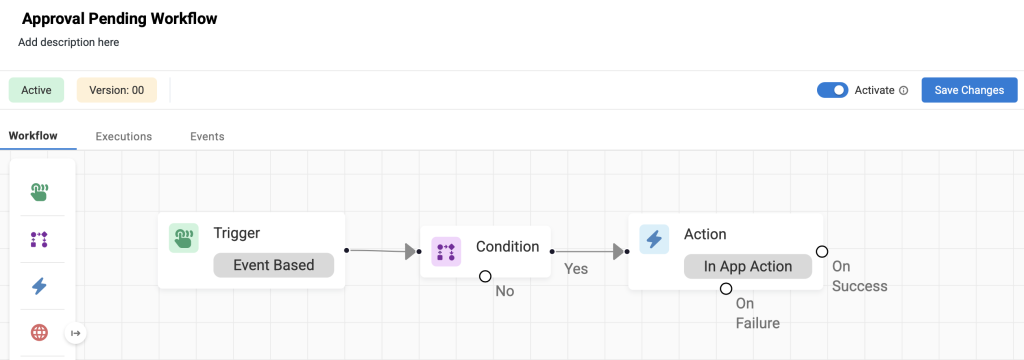
The minimum threshold for Approval Pending Since is 1 day. The automation will send the email to the current approver assigned to the pending approval step. If no specific approver is assigned, the email will not be sent.

![[How-to] Create General Requests Using the EZO Request Portal](https://cdn.ezo.io/wp-content/uploads/2024/10/02072156/General-Requests-1-scaled-1.webp)
![[How-to] Customize Request Portal For Your EZO Account](https://cdn.ezo.io/wp-content/uploads/2024/03/Page-Builder-Request-Portal-.jpg)
![[How-to] Set up the Request Portal to Take Charge of Asset Requests As an Admin](https://cdn.ezo.io/wp-content/uploads/2023/10/req-portal.jpg)