Heavy equipment rentals come with high stakes on both ends of every transaction. A bulldozer leaves your yard and comes back with damage, without a documented record of its condition at rent-out, proving accountability can be difficult. Disputes take time, cost money, and can affect customer relationships.
Equipment Inspection in EZRentOut replaces paper-based inspection checklists with a structured digital workflow built directly into the rental order. Your team can document equipment condition before it is rented out and again when it is returned, creating a clear, time-stamped inspection record.
This guide walks you through enabling Equipment Inspection, creating inspection checklists, and completing inspections during the rent-out and return process.
Note: Equipment Inspection is a Premium feature and is currently available on the web app. Mobile app support is coming soon.
1. Enable Equipment Inspection
Before you can create and use inspection checklists, enable Equipment Inspection in your account. The Work Orders module must also be enabled because inspection checklists are created through the Work Orders module.
Follow the steps below to enable Equipment Inspection in your account:
- Navigate to Company Settings & Addons and search for Equipment Inspection.
- Select Enabled and then click the Update button.
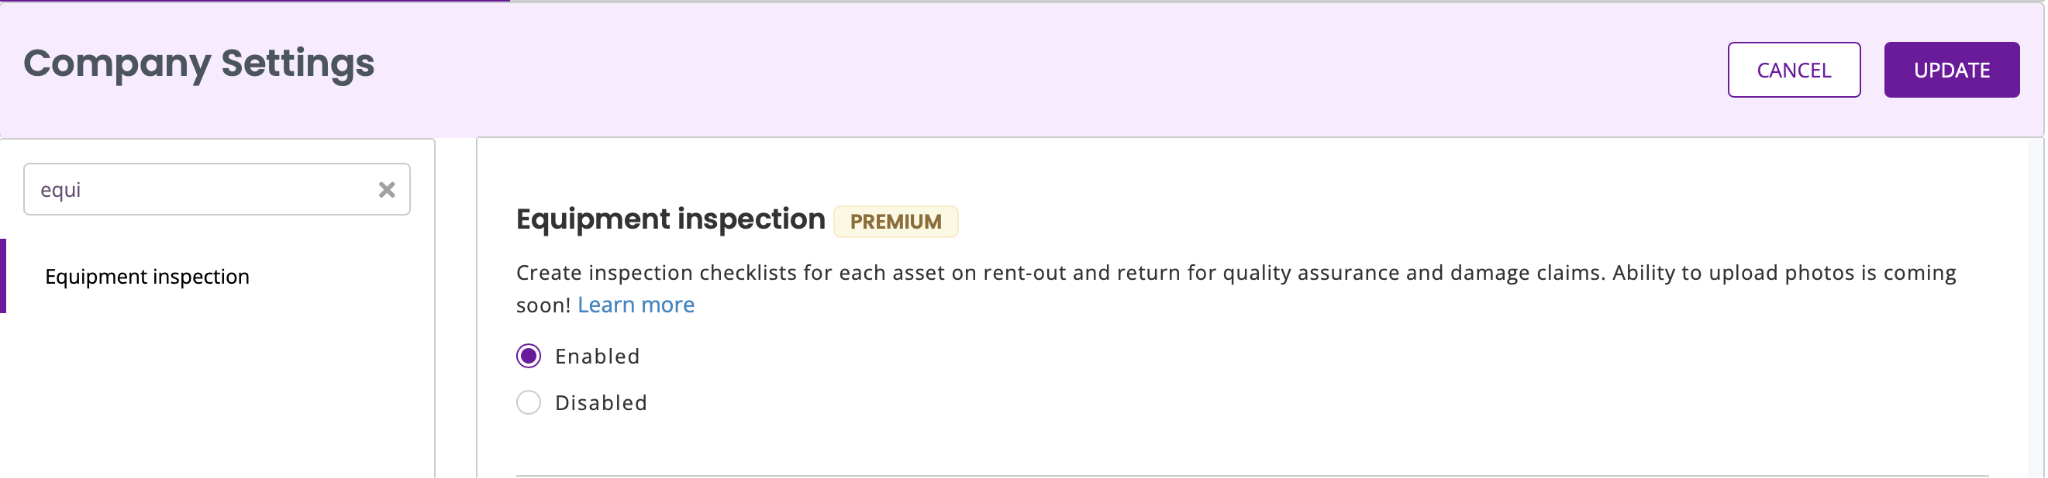
Once enabled, the inspection workflow will be available on orders in the Drafted and Booked states.
Note: When Equipment Inspection is turned off, all inspection-related information will be hidden from orders. Turning it back on will restore access to previously completed inspections.
2. Create an Inspection Checklist
Inspection checklists are created through the Work Orders module. You can use an existing checklist or create a new one specifically for equipment inspections. You can also link a checklist to specific equipment groups and customize the inspection items based on your requirements.
To create a checklist, navigate to Maintenance → Work Orders → Checklists and follow the steps below.
Core Information
Start by adding the basic information for your inspection checklist:
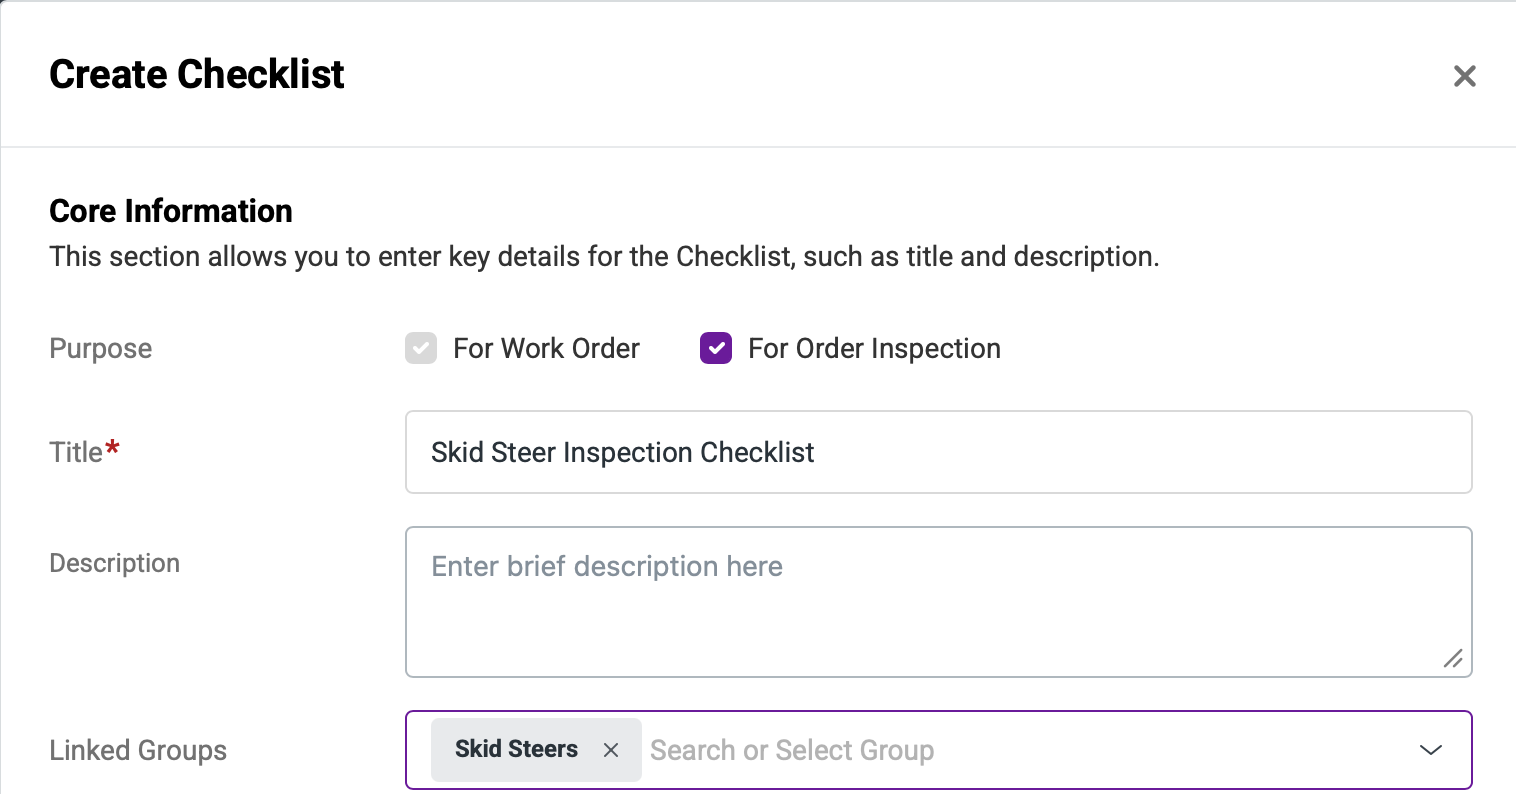
- Under Purpose, select For Order Inspection to make the checklist available for equipment inspections.
- Enter a Title and optional Description for the checklist.
- Under Linked Groups, select the groups you want to assign the checklist to.
You can use the same checklist for multiple equipment groups when they have similar inspection requirements. For example, you could use one checklist for both skid steers and excavators.
When linking a checklist to groups, keep the following in mind:
- One checklist can be linked to multiple equipment groups.
- Each equipment group can have only one checklist assigned to it.
Line Items
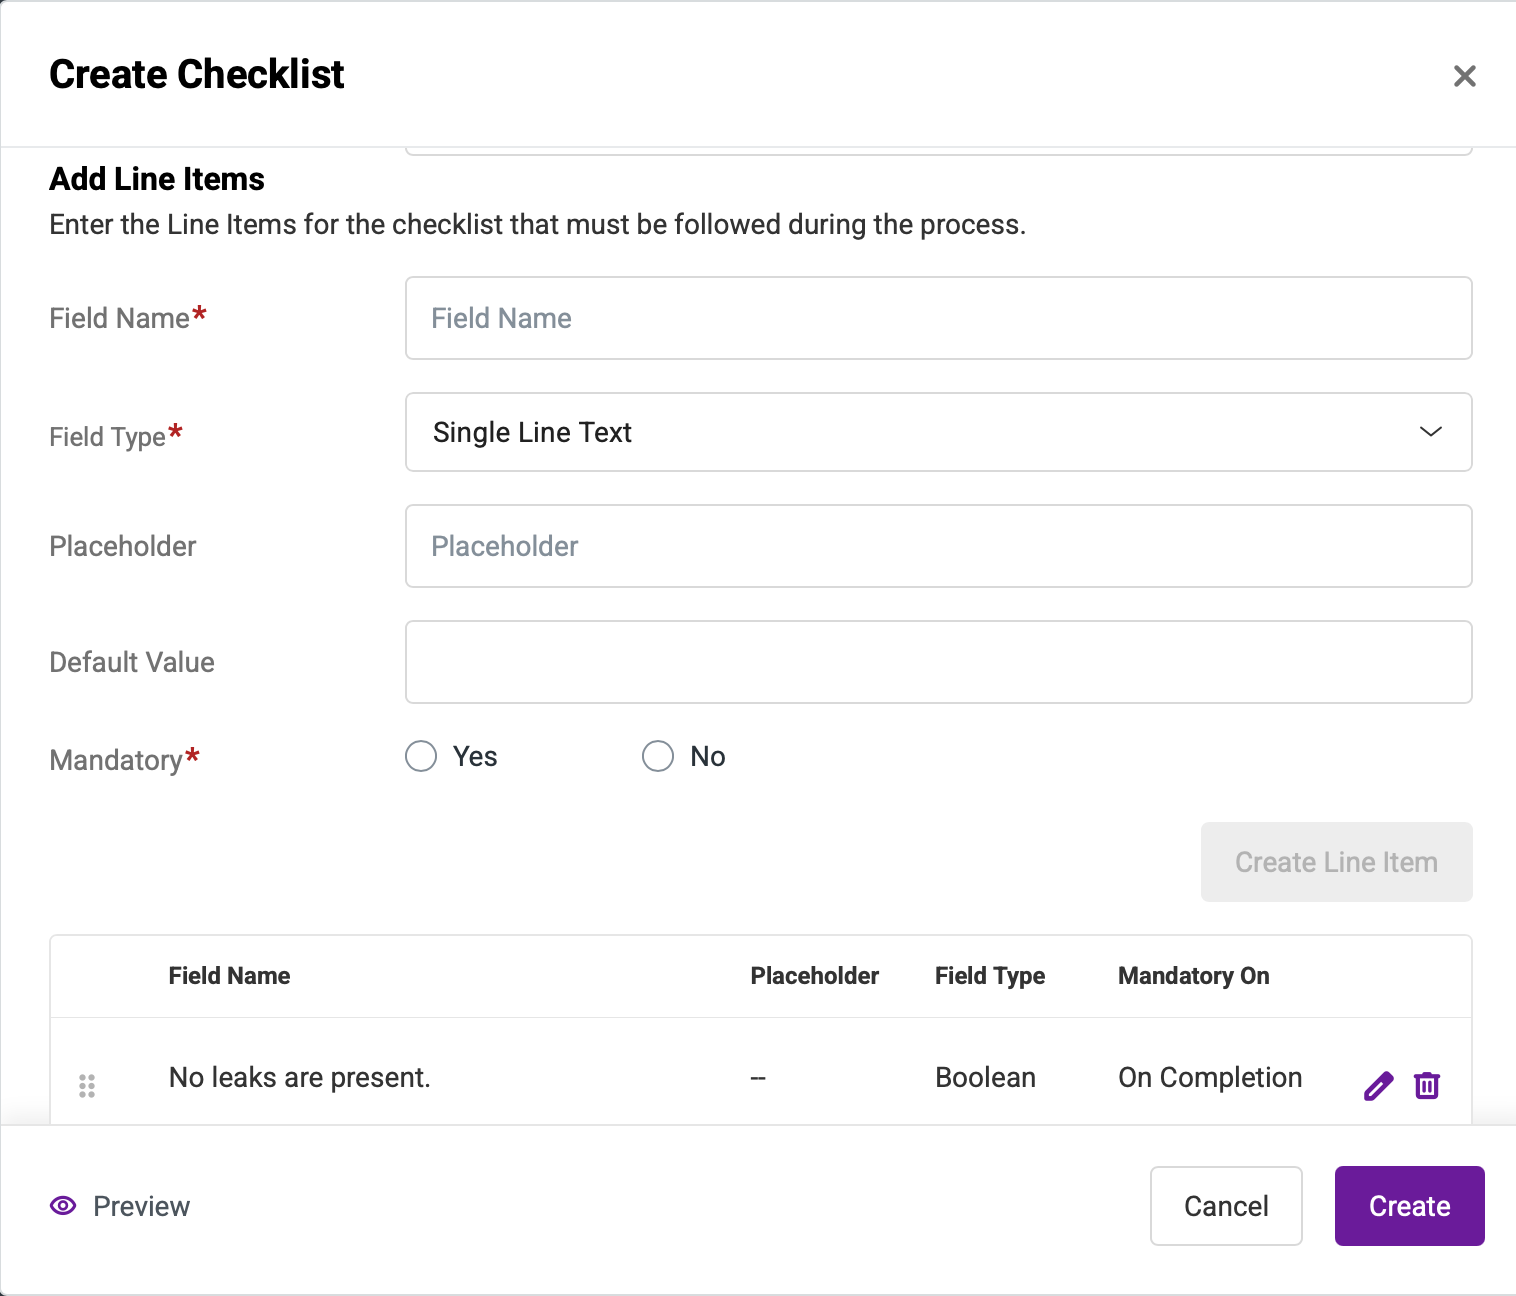
Once you have added the core information, add the inspection questions or conditions as line items. For example, a checklist for a Skid Steer could include:
- Engine oil is at the proper level.
- No leaks are present.
- Wiring is in good condition.
- Machine operates correctly.
- Exterior is clean and free of debris.
To add line items:
- Mark each item as Mandatory or Non-mandatory. Mandatory items must be completed before the inspection can be submitted.
- Click Create Line Item after entering each item. You can add as many line items as needed.
- Preview the checklist to make sure it includes all the items required for the inspection.
- Click Create to save the checklist.
3. Perform a Rent-Out Inspection
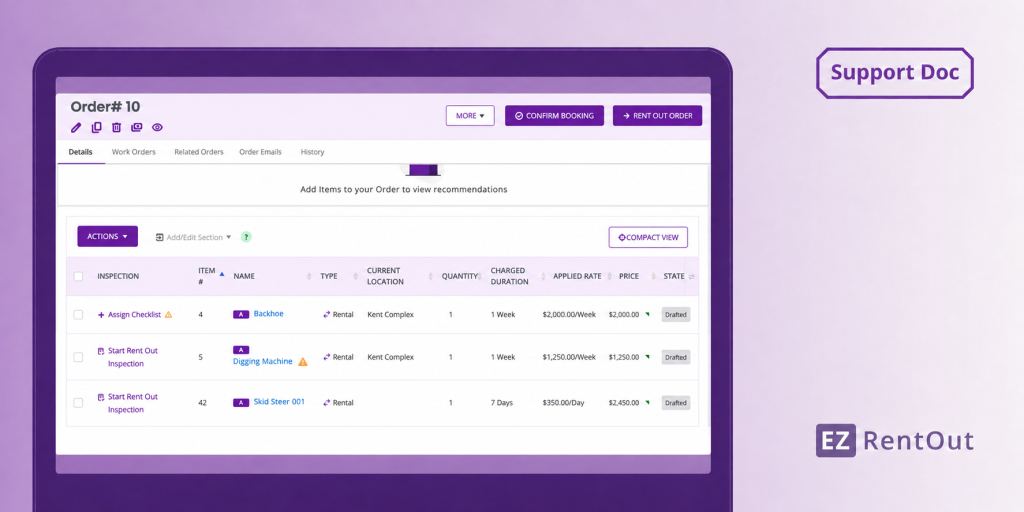
A rent-out inspection allows your team to document the condition of equipment before it is handed over to the renter. When you add an asset to a Drafted or Booked Order, the inspection option will be available for that asset.
If a checklist is linked to the asset’s group, the relevant checklist will automatically be available. If no checklist is assigned, you can assign one directly to the asset from the order using the Assign Checklist option.
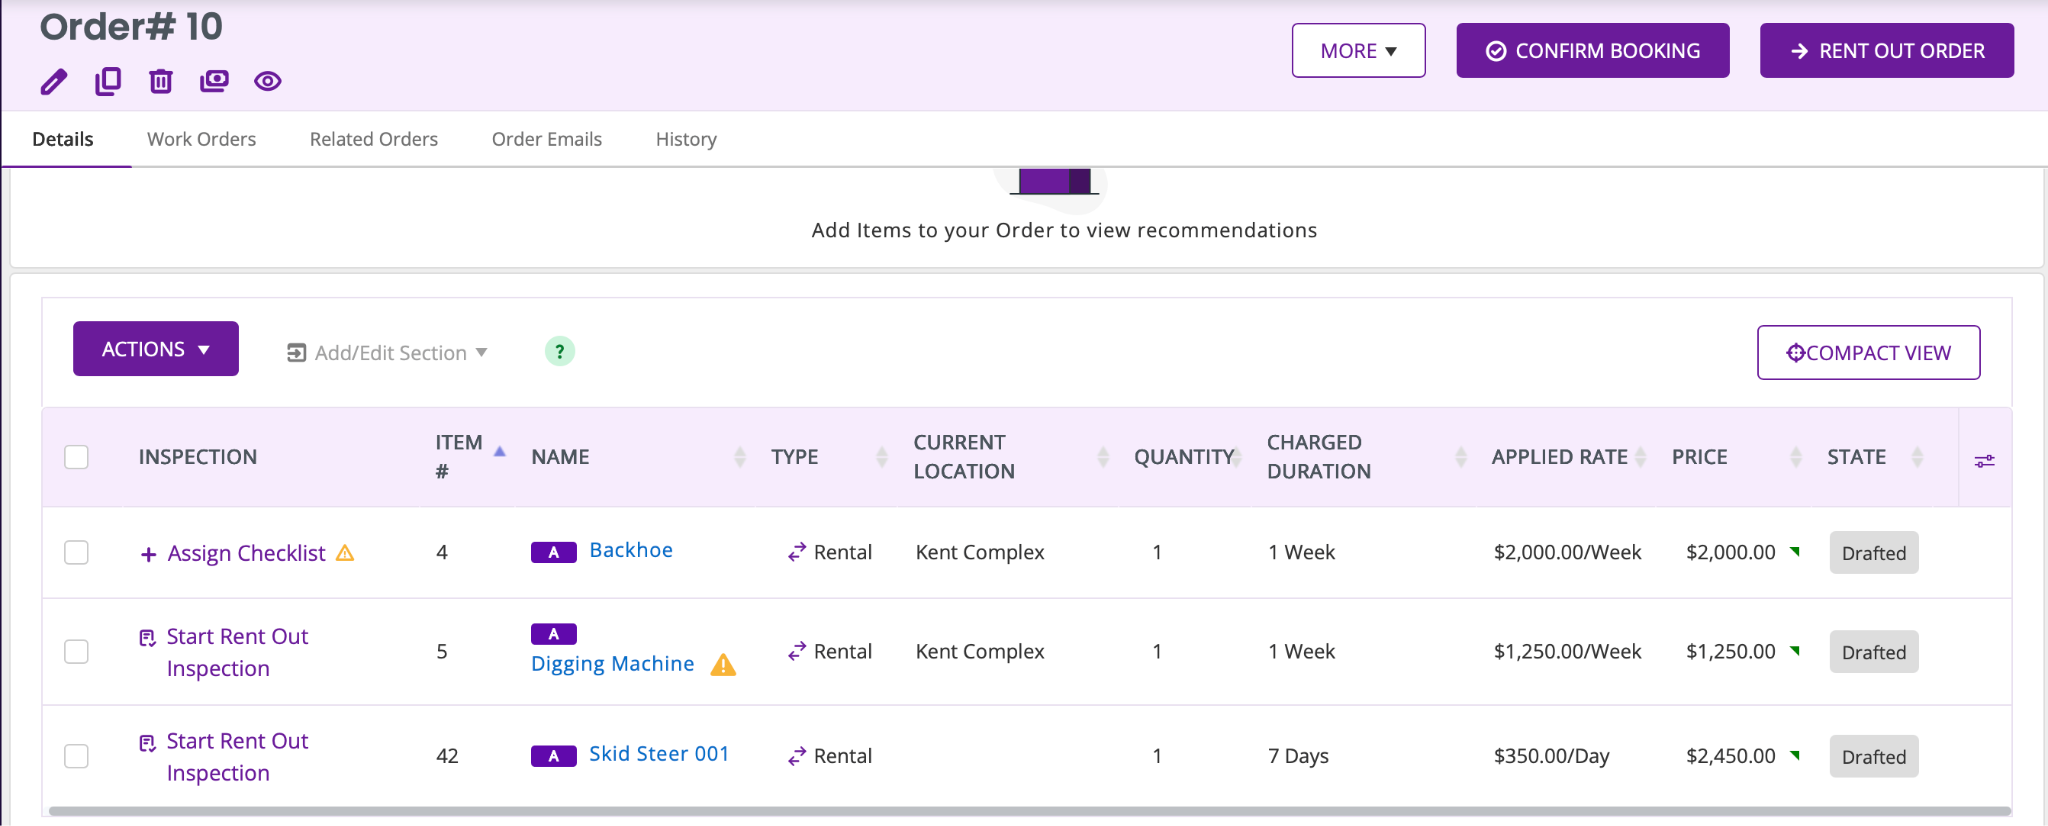
To perform equipment inspection before you rent out an asset:
- Navigate to Orders and open the Drafted or Booked Order containing the asset you want to inspect.
- Find the asset and click Start Rent Out Inspection.
- Review the assigned checklist and complete each inspection item based on the condition of the equipment.
- Click COMPLETE & NEXT to complete the inspection and move to the next asset.
- Once all assets have been inspected, click COMPLETE INSPECTION.
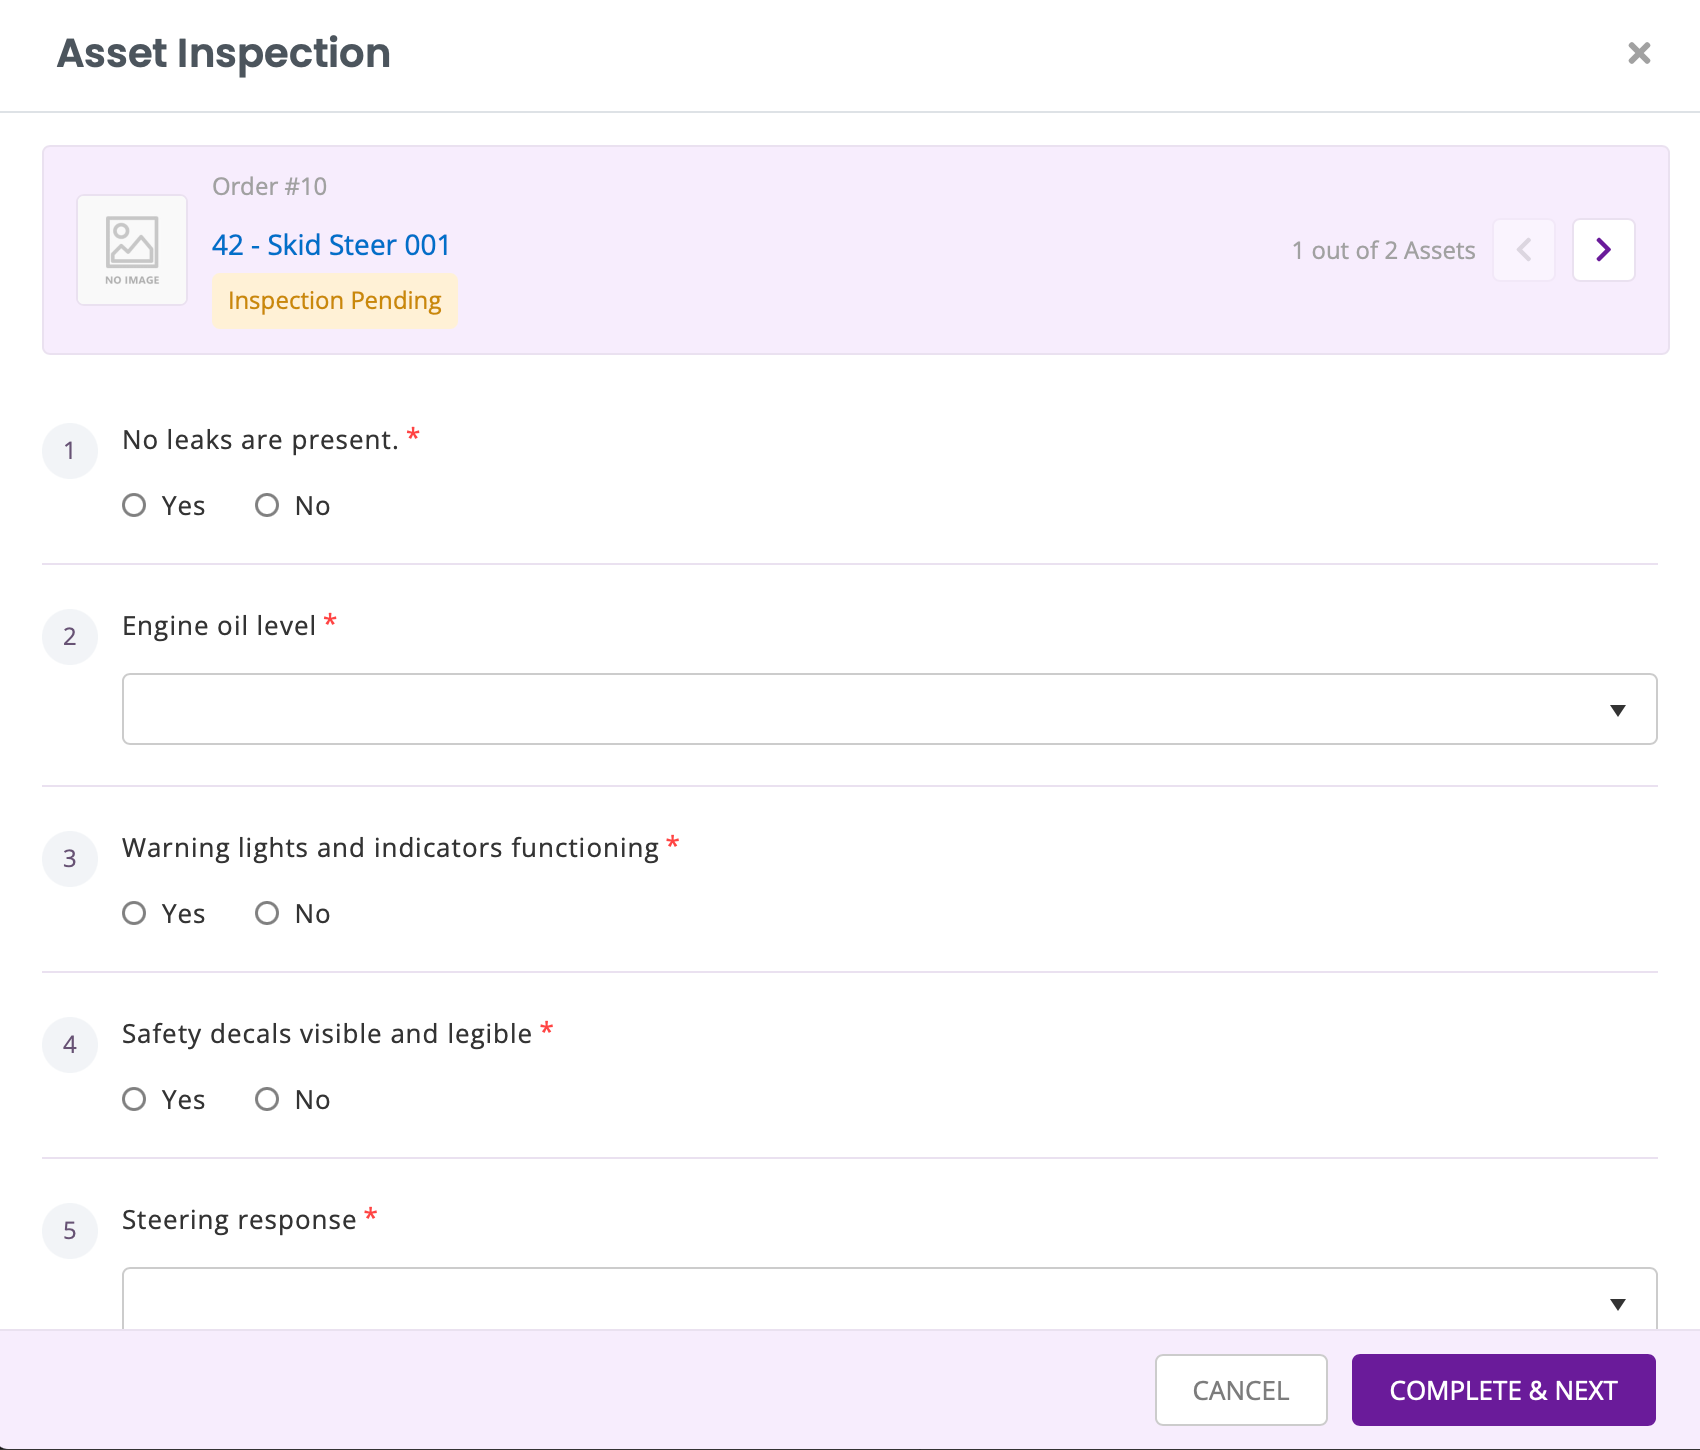
Once the inspection is completed, you can view the inspection details from the order. You can also edit the inspection if changes are required.
4. Perform a Return Inspection
A return inspection allows your team to document the condition of equipment after it comes back from a rental.
To perform a return inspection:
- Open the relevant order.
- For each returned asset, click Start Return Inspection.
- Review the rent-out inspection from the inspection page for reference.
- Complete the return inspection checklist based on the equipment’s current condition.
- Click COMPLETE INSPECTION.
The completed rent-out and return inspections provide a record of the equipment’s condition at both ends of the rental period. This can help your team document changes in condition and provide supporting information when reviewing damage or other issues.
5. View Rent-Out and Return Inspections
You can view all completed rent-out and return inspections from the Orders page.
To view inspection records:
- Navigate to Orders and open the relevant order.
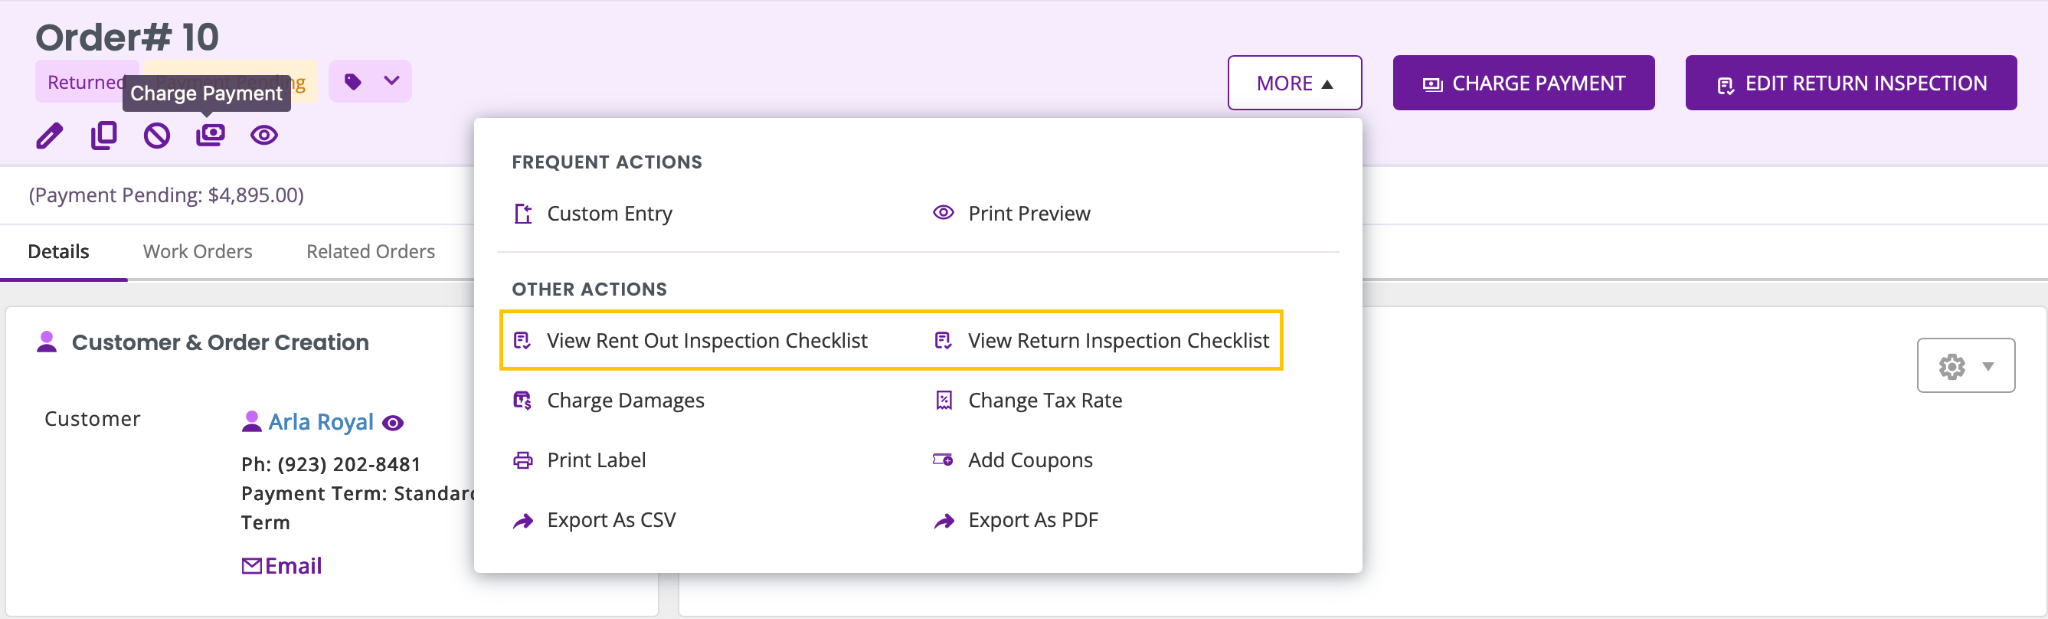
- Click More in the navigation menu.
- Select View Rent Out Inspection Checklist or View Return Inspection Checklist to view the corresponding inspection records.
6. View Inspection Duration
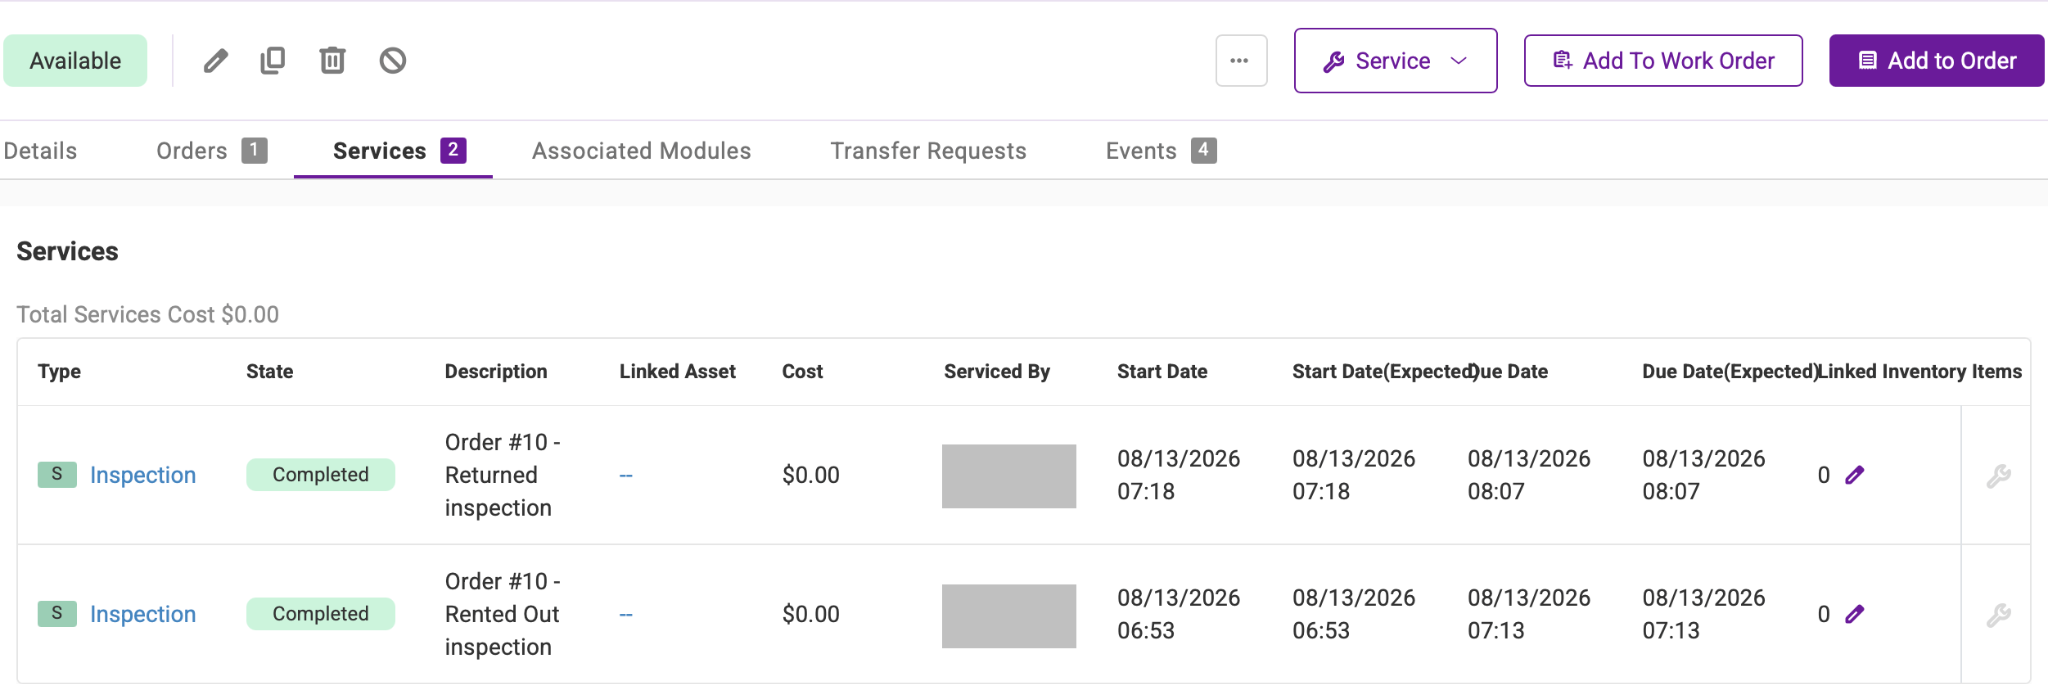
You can also view how long your staff took to complete an inspection from the asset’s page.
To view the inspection time:
- Navigate to Items → Assets and open the relevant Asset.
- Go to the Services tab.
- Locate the inspection record and review the Start Date and Due Date timestamps to see when the inspection started and was completed, the order associated with it, and the staff member who performed the inspection.
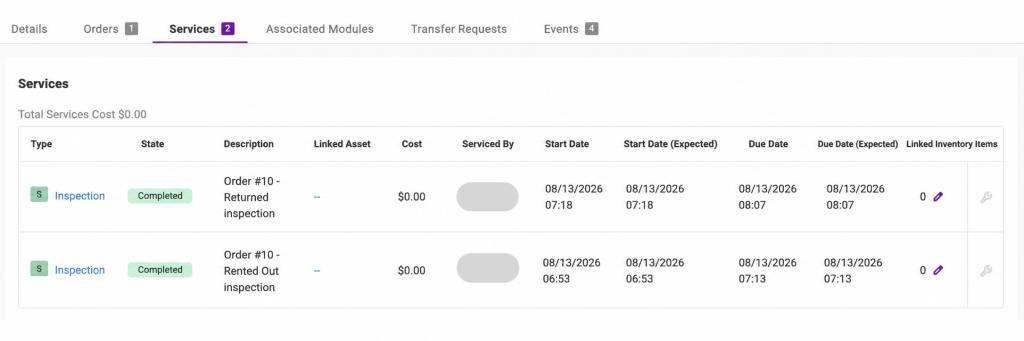
This gives you visibility into how long your staff spend completing equipment inspections and can help you monitor inspection activity.
Coming Soon in EZRentOut
The following features are planned for future releases:
- Photo uploads: Photo uploads for inspection items are not currently available. This functionality is planned for a future release.
- Mobile app support: Equipment Inspection is currently available on the web app. Mobile app support is planned for a future release.
Replace Paper Inspections with a Digital Workflow
Equipment Inspection brings your existing manual inspection process directly into EZRentOut. Instead of completing paper forms and uploading documents to an order, your team can use structured checklists to document equipment condition during the rent-out and return process.
If you have any questions or need help getting started, reach out to us at support@ezo.io. We are happy to help.

![[How-to] Track Equipment Usage and Charge Overage in EZRentOut](https://cdn.ezo.io/wp-content/uploads/2020/09/EZR-Order-Month-Duration-copy-1.jpg)
![[How-To] Create and Sync Credit Memos with QuickBooks Online in EZRentOut](https://cdn.ezo.io/wp-content/uploads/2026/06/22085910/Credit-Memo.png)
![[How-to] Sell Items with Equipment Rental Software](https://cdn.ezo.io/wp-content/uploads/2021/04/How-to-Sell-Items-with-Equipment-Rental-Software.png)