

The Members module in our maintenance management system allows you to create members, and assign them different roles and set visibility and access permissions for them based on their types.
1. Types of Members
There is a maximum of four types of members in EZO CMMS by default: administrator, work supervisor, staff user and technician.
Account Owners and administrators can change the roles of members. To do this, go to Members → Member Details page → Edit ‘Role’ field.
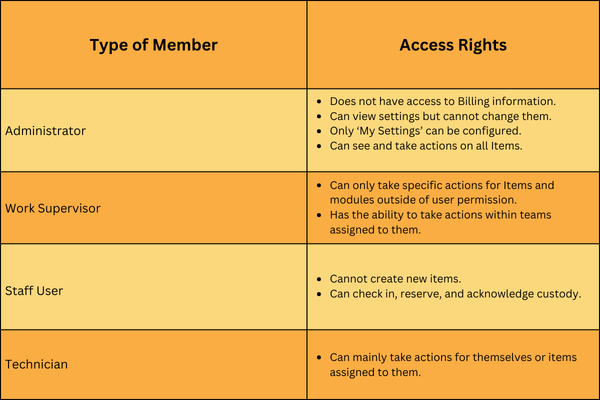
Types of Members and Their Access Rights
Abilities of Members to Take Actions on Items

Abilities of Members to Take Actions on Work Orders

Abilities of Members to take actions on Work Requests


1.2. Administrator
Billing: An administrator cannot access billing information but can be made into the new account owner by the existing account owner.
Settings: Administrators are able to view the software settings but are not able make any changes to them, except ‘My Settings’ that include dashboard, search and filters’ settings. My Settings can be customized for the logged in admin only. They can customize the list view of items, members and purchase orders for themselves only.
Items: Administrators can view and take actions on all items irrespective of their groups, locations, and arbitration setting. They can check in/out and reserve items, verify audits, approve/cancel reservations and check in/out requests for other members as well. An administrator can also send a request to users to check-in Items.
Work Orders: An admin can view, start, edit and delete work orders. Can also create and review work orders assigned to them. They can also take all actions on work requests. However they can only create work logs assigned to them.
Members: An admin can view the members tab, add new members, send password reset emails, edit member details (such as their email address) and activate/deactivate existing members. He/She can also create user listings and assign them to different groups.
Documents: An admin can upload documents/images to the system – access, edit or delete existing documents; those uploaded by other users as well. He/She can also export documents data to an excel file i.e. get all the downloadable links to documents in a CSV file. To upload documents go to Items → Documents → Upload Documents.
Alerts: For admins, the ability to select alerts to receive, create and customize alert templates is also available.
Cart: Admins can take all actions on carts including adding/editing items in carts, moving cart items, reserving carts, swapping out cart items, and print cart transactions. Administrators can also edit checked out or reserved carts created by other users. They can swap items in carts of users by enabling the setting from Company Settings → Swap Checked Out Items.
Additionally, administrators can view and edit:
- Vendors
- Reports
- Print label templates
- Custom fields
- Packages
- Locations
- Service and Maintenance Events
- Purchase orders
1.2. Work Supervisors
A Work Supervisor can only take limited actions for Items and modules outside of user permission. They are able to take actions within teams assigned to them. They can create, delete, review and update Work Orders.
1.3. Staff Users
Staff users have very limited access to the system as compared to other users i.e. account administrators and supervisors. They cannot view or edit account settings, enable/disable Add Ons, or take actions on billing and members. Only ‘My settings’ can be changed by the logged in staff user. They can view the Dashboard, Items, Bundles and Alerts tabs only. However, the advanced visibility and actions may differ. The access rights of staff users can be further checked by setting up arbitration on items and using user listings.
Newsfeed visibility: Admins and account owners can allow staff users to view a newsfeed of the latest activities by users on the dashboard. This can be enabled from Settings → Company Settings → Newsfeed visibility to staff users. Here, select ‘Show staff users activity news feed on dashboard’.
Items: Staff users can only check in/out and reserve items visible to them and for themselves. If arbitration is enabled then they can only send a request for a check in/out and reservation of items. They can only acknowledge the possession of items checked out to them and not request audits on any other items. They can also send a request to members to check-in Items.
Work Orders: They can only view work orders for themselves and view, edit and delete work requests for self.
Cart: Staff users can check in/out, reserve, empty, print, and edit their own current cart and carts and not the ones drafted by other users.
Documents: A staff user can upload documents. He/She can view all documents but cannot edit document description or delete documents uploaded by other users. However, he/she can edit and delete documents uploaded by themselves. They can also export documents data to an excel file i.e. get all the downloadable links to documents in a CSV file. To upload documents go to Items → Documents → Upload Documents.
Packages: Packages are viewable for staff users. They can take actions on bundles and packages like check in/out, and add to cart. However, they cannot create/edit new bundles or packages.
Alerts: Staff users are only able to select which alerts they want to receive and cannot make changes to the email alert templates. They can even subscribe to the newsletter. Staff users receive email alerts for actions they’ve subscribed to only when they’re involved in the action.
Locations: A staff user can only view locations but cannot edit them. Staff users can also be given the permission to change the location of assets. To do this, go to Settings → Add Ons → Location History → Select ‘Enabled’.
Staff users cannot view or edit:
- Members
- Vendor details
- Settings other than some basic view settings.
- Reports
- Print label templates
- Custom fields
- Service and Maintenance Events
- Purchase orders
1.4. Technicians
Technicians are responsible for carrying out work only assigned to them. They cannot view company settings or have access to custom dashboards. Only the existing custom fields are visible to them.
They can view members and receive alerts. With limited access they can only view packages and work orders assigned to them. They can make a work request, edit and delete it as well.
Apart from the default roles, you can create a Supervisor role:
*To create supervisors, the ‘Advanced’ Access Control (also called User Listing) setting must be enabled from Settings → Company Settings → Access Control → Advanced.
1.5 Requestor
A requestor is someone who puts in a request for work without too much involvement in the software. They are also able to coordinate on revisions, updates and progress of the work request. A requestor is able to view Items, Groups, Locations and receive Alerts.
2. Member status
Based on your specified settings, you can classify a member into one of the four different statuses. These include:
- Active Login,
- Active Non-login,
- Unconfirmed, and;
- Inactive.
Here’s a breakdown of the access rights of different member statuses:
Member Statuses and Their Access Rights

**Non login members can only receive confirmation alerts. You can enable this by going to More →Alerts →My Alerts→ Confirmation Alerts→ Select User registration – Non-login.
3. Actions on Members
CMMS enables you to take the following actions on the members that show up on your Member listings page. Simply select the member and go to Actions dropdown for the following options:
- Activate: Changes the member status to Active (login or non-login)
- Deactivate: Changes the member status to Inactive
- Print labels: Allows you to print labels for a member
- Delete: Removes a member’s information from the application database
You can even select multiple members at a time and take these actions enmasse.

3.1 Sear and Apply Filters on Members
You can simply search for Members by name instead of looking through the whole list for a specific user. Type in the name in the Search box and get instant results:

There are multiple Filters you can apply on Member to get an instant snapshot of details like onboarding and offboarding dates.

As an example, when you click on the ‘offboarding due in’ filter, the following overlay appears asking for the due dates:

Once the Filter is applied, you can view all Members who fall within the offboarding due date specified.
4. Adding a new Member
Let’s begin with adding a new member into the system. To add a new member, go to the left navigation bar, click on the three elipses ‘…’ icon and select Members.

This leads to the Members module. Click on ‘Add New Member’ as shown:

Configure member details and hit ‘Done’.

If you wish the concerned member to be able to log into the application and receive email alerts, you can select the options highlighted above.
Selecting or deselecting these options defines the status of the members.
You can also import members from Excel to add or update members. To mass add new members, go to the Members detail page and More → Import Members → Add new members.

Upload the excel and map the relevant columns including First Name, Last Name, Email Address and Role.

Preview the mapped columns and click ‘Import’.

5. Deleting a Member
Members can be deleted if they have no Asset/Asset Stock assigned to them. If the deactivated members have Line Items, Service Events, Carts, Reserved Asset(s), you will be able to delete a member but still have the association through the text ‘Deleted User’ .
When a member who is associated with Carts, Service Events, Line Items, Carts or Reserved Assets is deleted, the following message will appear:

Once the user confirms, the member will be successfully deleted.
About EZO CMMS
EZO CMMS is the next generation maintenance management software. It does more than just simple maintenance, it empowers your teams with a central command center to assign and complete work orders to achieve optimal productivity.


