You can use EZO to create and keep track of Purchase Orders, helping you easily define the types, quantities, and agreed prices for items you need. The Procurement Module ensures that orders are processed quickly by creating linkages between items and vendors.
Moreover, now enjoy greater control over your dealings with suppliers, print invoices to send on to vendors or keep for yourself, and watch items be updated as soon as they’re read as received on the system, without the need for any action on your side!
1. Creating a Purchase Order
If you’re on the advanced features plan or above, you can enable this module by going to Settings → Company Settings & Add Ons → Purchase Orders → Enable.

Note: The settings for staff users will be checked by default. If you want to restrict access for staff users, you can uncheck the checkboxes.
Once this is done, you’ll be able to find the Purchase Orders from the side navigation bar by clicking on More → Purchase Orders:
Please note that Staff Users can access Purchase Orders from the Notification bell → Purchase Orders.
2. Access by User-type
Admins
You must be an Administrator to experience full access to the PO module. An admin can always edit the Purchase Order to account for whoever requested a certain order. They can add new items to a PO that do not exist in the product catalog by clicking the ‘+Add Items not in product catalog’ link.
Admins not only can just edit or approve/deny but also send PO requests for approvals from other admins. In other situations, an admin can approve a PO request made by him/her as well.
Admins can also add multiple items to a Purchase Order using the mass action button on the Items page, speeding up processing times. They can add these to an existing drafted PO, or create a new one right there.
Staff Users
Staff users can add new items to a PO that do not exist in your product catalog by clicking the ‘+Add Items not in product catalog’ link. New items from within the PO Details Page can be added when a PO is in a drafted or pending state.
To allow Staff Users to access the PO module, enable the option to ‘Allow staff users to create purchase order requests for Administrators to review and replenish stock’ in Settings → Add Ons → Purchase Orders. Learn more about how Staff Users can make Stock Requests.
Staff Users can request Inventory Stock via Purchase Orders.
Learn more: How can staff users request inventory stock in EZO
3. Approver and Approved By
EZO enables its users with enhanced requisition submission and response by adding flexibility around who makes requests and who approves them. This plays out well when you want to hold your employees accountable for their actions and keep track of inventory control.
An admin and staff user can set ‘Approver’ to a Purchase Order (drafted or pending) by clicking the edit icon against the ‘Approver’ field in the PO details page. See image below:

Once a PO has been confirmed or approved by an admin, you can no longer edit this field.
The field for ‘Approver’ has 2 different scenarios mentioned below:
- Scenario One: If a PO has an Approver set, but it is approved by a different admin, then ‘Approved by’ field below the ‘Approver’ field will show the name of the admin who approved the PO request. Hover on the name against the ‘Approved By’ field and it will show you the selected Approver’s name. See the image below.
- Scenario Two: If a PO has no approver set, then an admin approving the request is automatically set as the Approver in the PO details page.
For the above to work out, a user who created the PO has to click the ‘Make Request’ button. Based on the above scenarios, an admin approving the PO must click the ‘Approve Request’ button to finalize the PO approval. Once done, the ‘Approver’ field shows up in the PO details page in place of ‘Approver’ field.
Request Approved Alert: An email alert is generated and sent to the Approver when a PO is confirmed or approved with the condition that ‘Request Approved’ alert is enabled in the PO Requester and Approver accounts. Otherwise, the approver and the admin who has approved the PO, will both receive this email separately. In other cases, if no approver is set, all the admins will receive the ‘Request Approved’ alert.
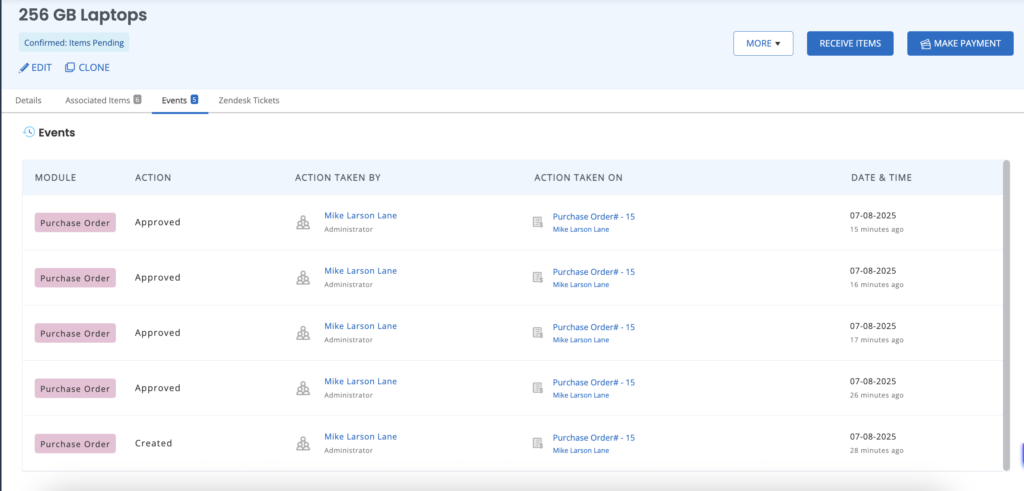
Request and Approval Activity Log and History: A step-by-step activity log is recorded of a Purchase Order including actions taken on it including who created it, approved it, denied it, etc. You can see the activities at the bottom of the PO details page, under the ‘Events’ tab.
Similarly, you can also keep track of all actions taken on a PO from More → History → Purchase Order History button.
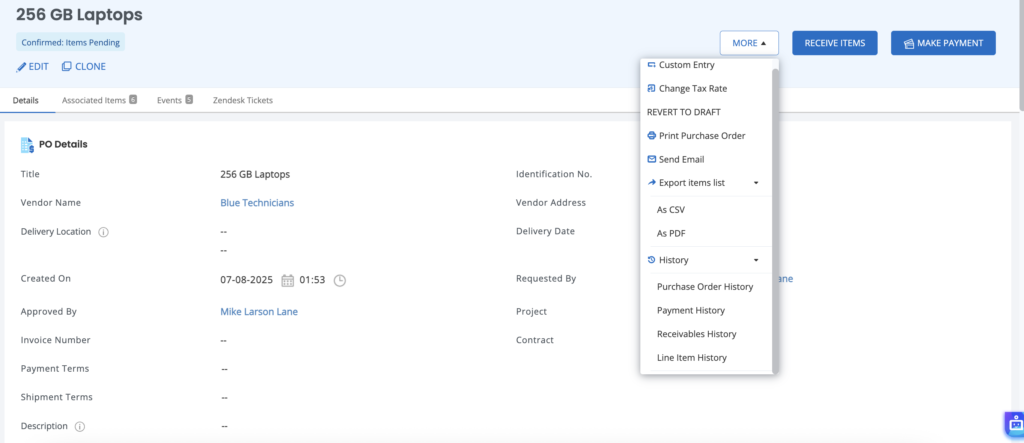
Please note that Staff Users can access Purchase Orders from the Notification bell → Purchase Orders.
You can also view the line item history by selecting the option on the same tab

Your line item history will give you a holistic insight into the action taken on a given purchase order including the items that have been added, removed or reordered.

4. Receiving Items Against a Purchase Order
Any time an item is received against a Purchase Order, the system will automatically update the product catalog as well as any details like cost price, location, etc. For this to work out, hit the ‘Receive Items’ button from the right on the Purchase Order page.

Uncheck ‘Update product catalog with items received’ if you do not want the system to be updated automatically. After receiving items, hit the ‘Make Payment’ button. The image below shows how the pricing table will be shown after you receive the items.

You can put the payment in void state by clicking on the ‘Void’ button.
6.1 Setting Reorder Quantity to Zero
You can set the quantity received when receiving items to zero. This helps avoid errors when you are receiving partial shipments and not the whole order at once.
You can set the default quantity to zero by clicking on the following text button: “Click to reset quantity received to zero.”
This is how you can reset the quantity received to zero.
5. Purchase Orders and Stock Quantities
The system not only updates the list of assets received against a Purchase Order, but also helps you manage asset stock and inventory quantities. On a stock item’s detail page, you’ll find a section entitled ‘Associated Modules’:
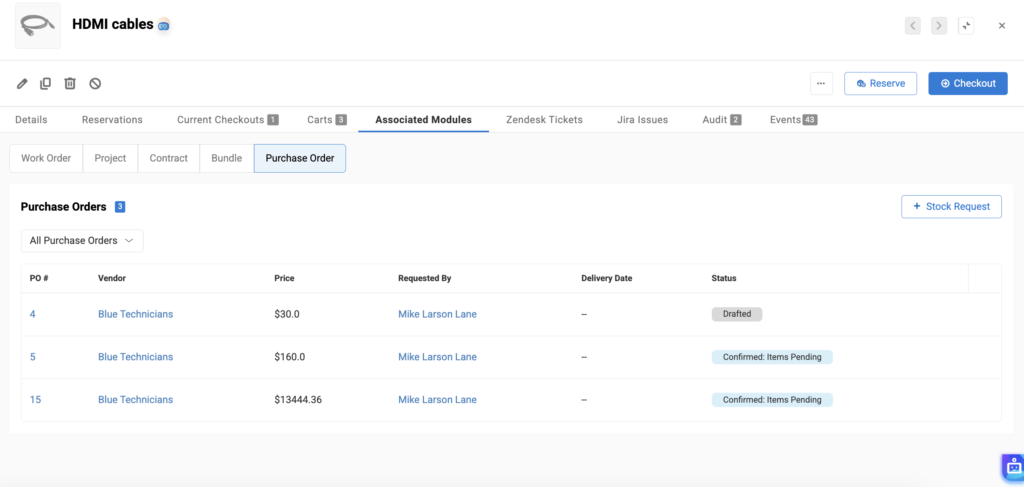
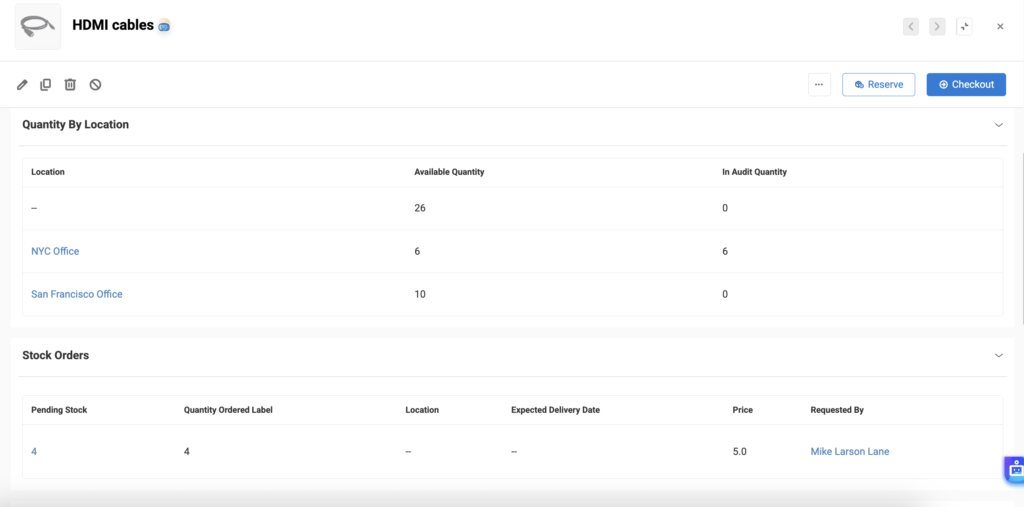
There is also a ‘Quantity by Location’ section which updates after the items from each PO are received:
8. Purchase Order States
A purchase order can move through many states depending on whether an order has been confirmed, payments made, and the items that have been received against it. You can view all purchase orders, their approval pending and denied updates from More → Purchase Orders or Notifications bell → Purchase Orders. You just have to apply the relevant filter from the Purchase Orders Listing page:

To clarify, here’s what the different PO states mean:
- Drafted: The PO has been drafted. You can clone, delete and void the PO at this stage, as well as add items or edit any details you’d like.
- Confirmed Items Pending: This means that the PO is confirmed, but the items ordered are yet to be received. You will not be able to add items to it or edit the price of items, but you can still update delivery dates and custom fields. Note that if both the payment and items are pending in an order, the system will only reflect the ‘Confirmed Items Pending’ status.
- Confirmed Payment Pending: The items ordered through the PO have been received, but the payment has not been made yet. This could mean that either a partial payment is pending or the entire sum.
- Completed: All activities relating the PO have been successfully concluded, with the items received and the payment made in full.
- Void: Although a PO can be cloned at any stage, it can only be voided when it is in the Drafted or Completed state. This will remove all references to the PO from the system, including reports. Please note that if items were created through a PO, they must be first deleted or retired before the PO can be made void.
9. Deleting a Purchase Order
You can delete a Purchase Order considering it is in a drafted or void state. To do this, go to More → Purchase Orders → Click a Purchase Order (Drafted/Void). From the Purchase Order details page, hit the ‘delete’ button.

If it’s a drafted PO, you can clone, delete and void the PO at this stage, as well as add items or edit any details you’d like.
For scenarios where you want to delete a completed PO, you’ll first have to mark it void. As mentioned above, a PO can only be voided when it is in the Drafted or Completed state.
Please note that deleting or voiding a PO will remove all references to the PO from the system, including reports. Items that were created through a PO must be first deleted or retired before the PO can be made void, and then deleted.
You cannot delete multiple Purchase Orders in a single go.
10. Adding and Removing Items to a confirmed Purchase Order
You can add, remove or modify amounts for items in a confirmed purchase order.
Adding Items: Once your purchase order is confirmed, you can add items to it by selecting the option shown below.

When you add your desired item, the following overlay appears, giving you the option to adjust quantities and add any relevant notes.

Once added, the item will appear in your enlisted items in the same purchase order.
Removing Items: You can remove items from a confirmed purchase order by selecting an item and pressing the remove button that appears.

Once you press the remove option, the following overlay appears.

You will have the option to entirely remove an asset or reduce the quantity of said asset in the purchase order. Once completed, press the update button on the bottom right. The removed items will appear in the list as “cancelled”.

Note: Your purchase order now includes a column for its status. This would include received, cancelled and pending orders.

11. Unfulfilled Items
The items removed from the purchase order will appear on the bottom of the page once payment is complete.

Select the items you want to reorder and select the option highlighted above. The following box will appear on your screen.

Next, you can add delivery dates, location, vendor and any notes relevant to the items. When the items are reordered, a new purchase order will be generated for them.
12. Communicating with Vendors
You can send emails to vendors at any stage of a Purchase Order. This can include all relevant correspondence such as quotations or pricing negotiations. Clicking on More and selecting ‘Send Email’ will open an email textbox pre-populated with the vendor’s email address.
You can also add admins to the correspondence in the top section, as well as CC any other individuals you’d like to send the email to:

You can add a PDF link to the Purchase Order directly from this overlay (as shown above).
13. Documentation and Reports
Clicking on ‘Print Purchase Order’ will download a PDF of the Purchase Order documentation that you can then send on to vendors or to people from the accounting department.

For more information, you can click on the ‘History’ button on the right for a history trail of actions and information relating to the Purchase Order.
Under Reports → Purchase Order Line Items report, you can get a summary of PO actions, which can be filtered according to your preferences:
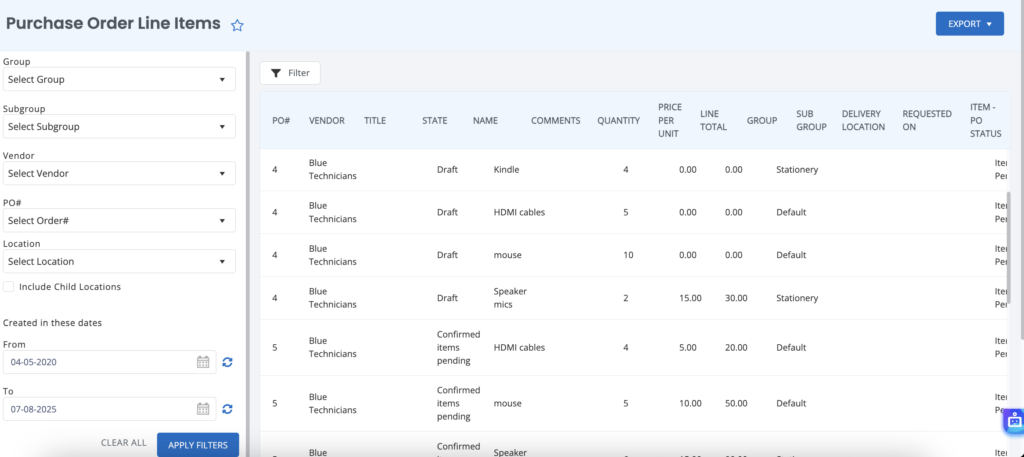
These reports can also be exported as either a PDF or CSV.
14. Alerts
Alerts help you stay on top of your purchase orders and get notified of actions performed on POs. Enable PO alerts from Alerts under ‘Purchase Orders’.

You can also stay on top of all your purchase orders from Notification Bell → My Purchases
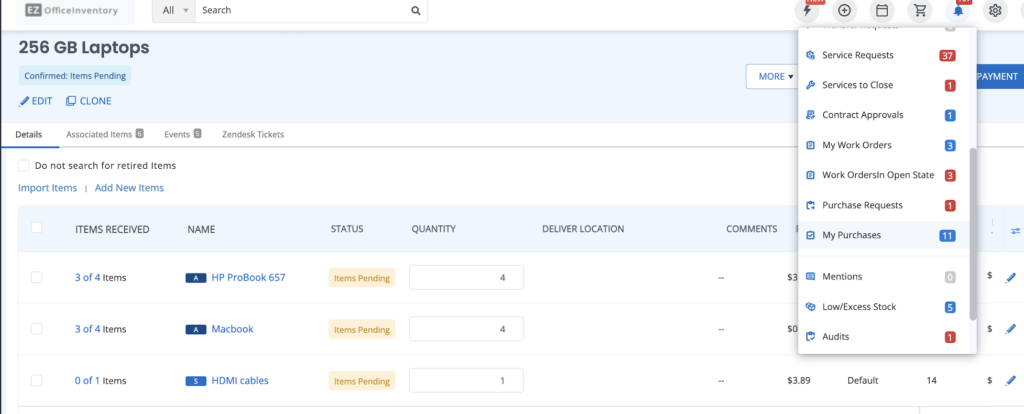
You can use different email addresses for sending out alerts on Purchase Orders using SPF Settings. These email addresses can be applied to both the ‘From’ and ‘Reply To’ addresses.
Go to Settings → Company Settings → System Generated Emails → Enabled → Click the Edit action for Puchase Orders. Here, you can define whether you want to use an admin email address, a custom email address, or the email address of a prompter (the user who triggered an action on a purchase order).

15. Printing a Purchase Order
On the Purchase Order Listings page, users can take mass actions for printing Purchase Orders. Select the Purchase Orders you want to print, then go to Actions → Print Purchase Orders.

You will be prompted to choose a Purchase Order template.

Once a purchase order is printed, it will appear in the form shown below, giving you a overview of all items included or removed.

Items that have been removed will appear highlighted as item number 3. and 5. are in the screenshot above.
Was this helpful?
- 1. Creating a Purchase Order
- 2. Access by User-type
- Admins
- Staff Users
- 4. Receiving Items Against a Purchase Order
- 5. Purchase Orders and Stock Quantities
- 8. Purchase Order States
- 9. Deleting a Purchase Order
- 10. Adding and Removing Items to a confirmed Purchase Order
- 11. Unfulfilled Items
- 12. Communicating with Vendors
- 13. Documentation and Reports
- 14. Alerts
- 15. Printing a Purchase Order


![[How-to] Automate Asset Actions in EZO](https://cdn.ezo.io/wp-content/uploads/2024/09/Automations.jpg)
![[How-to] Manage Purchase Request Approvals in EZO](https://cdn.ezo.io/wp-content/uploads/2021/04/EZO-PO-feedback-1.png)
![[How-to] Run Item Reports in EZO](https://cdn.ezo.io/wp-content/uploads/2017/02/Item-reports.jpg)


