You can use EZO to easily track and manage inventory. Inventory items are consumables that are usually tracked by quantity once checked out. If inventory returns are enabled for carts, unused inventory can also be returned and added back to stock. To track inventory items with our inventory control software, go to Settings → Add Ons → Inventory Module → Enabled.
Note: This blog is a continuation of Inventory Tracking Part 1 that covers adding inventory items, printing labels, managing locations and taking actions on inventory items.
1. Scanning Inventory Items
In order to scan items you can integrate with external hardware scanners. Scanning helps bring up an item for different actions. You can directly scan and search for items by using the search bar on the top of the app, and add items to your cart via scanning.
Additionally, you can also use the mobile app for EZO to scan items using the phone camera, or integrate the app with an external barcode scanner.
Actions that can be taken on inventory items using the mobile app include:
- Creating and editing inventory items.
- Scanning in existing barcodes into the Identification Number field for items. Learn More
- Scanning inventory items to Add, Remove, Reserve, Transfer and Retire inventory, as well as Request Stock. Learn More
To learn more about scanning items, click here.
2. Vendor Management and Purchase Orders
Vendors are used to record details of individuals or businesses who provide services and inventory. For example, you can record details of all purchases that were made from ‘MDSuppliers.’ You can access vendors information from Items → Vendors.
Inventory items can be linked to a vendor when adding stock or creating a purchase order. They can also be added at a later time by editing the ‘vendor’ field on the inventory detail page. When adding stock to an inventory item, you are prompted to specify a vendor from whom the purchase is made. You can also create a purchase order for inventory items from Items → Inventory → Select Inventory Item → Add to Purchase Order. Here you are asked to specify the vendor to whom the purchase request is made.
To learn more about vendor management and purchase orders, click here.
3. Manage Inventory with Packaging Unit Conversions
You can now define Packaging Units for your inventory items, such as boxes, cartons, or pallets, and associate each unit with a number of base units. This lets you work with inventory in the packaging units used by your vendors while EZO automatically calculates the corresponding quantity in base units.
For example, if one box contains 60 units, you can define Box of 60 as a Packaging Unit. When you add 2 boxes to stock, EZO automatically calculates the quantity as 120 base units.
3.1 Enable Inventory Quantity Unit Conversions
To use Packaging Units, an administrator must first enable the Inventory Quantity Unit Conversions setting.
- Go to Settings → Company Settings & Addons.
- In the Inventory Quantity Unit Conversions section, click Enabled.
- Click Update to save your changes.
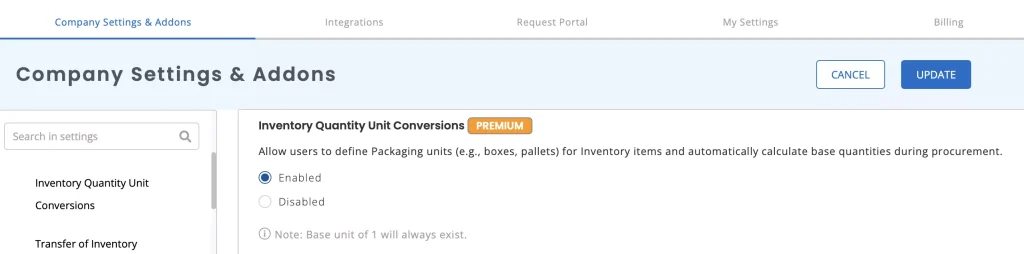
Note: The base unit of 1 is always available. Packaging Units are optional and can be defined separately for each inventory item.
3.2 Define Packaging Units for an Inventory Item
Once the setting is enabled, you can define the Packaging Units available for an inventory item.
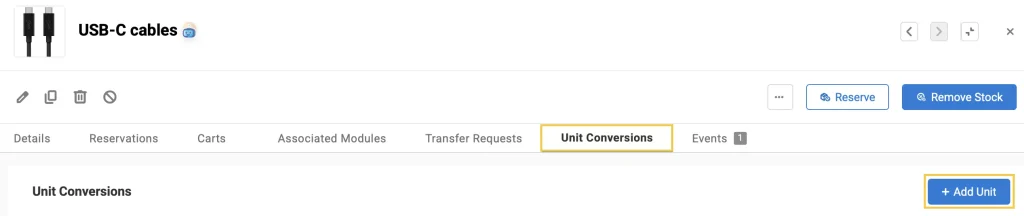
- Go to Items → Inventory and open the relevant inventory item.
- Open the Unit Conversions tab and click + Add Unit.
- In the Add Packaging Unit pop-up, enter the Packaging Unit and the corresponding Quantity of Base Units.
- Click the Add button to save your changes.
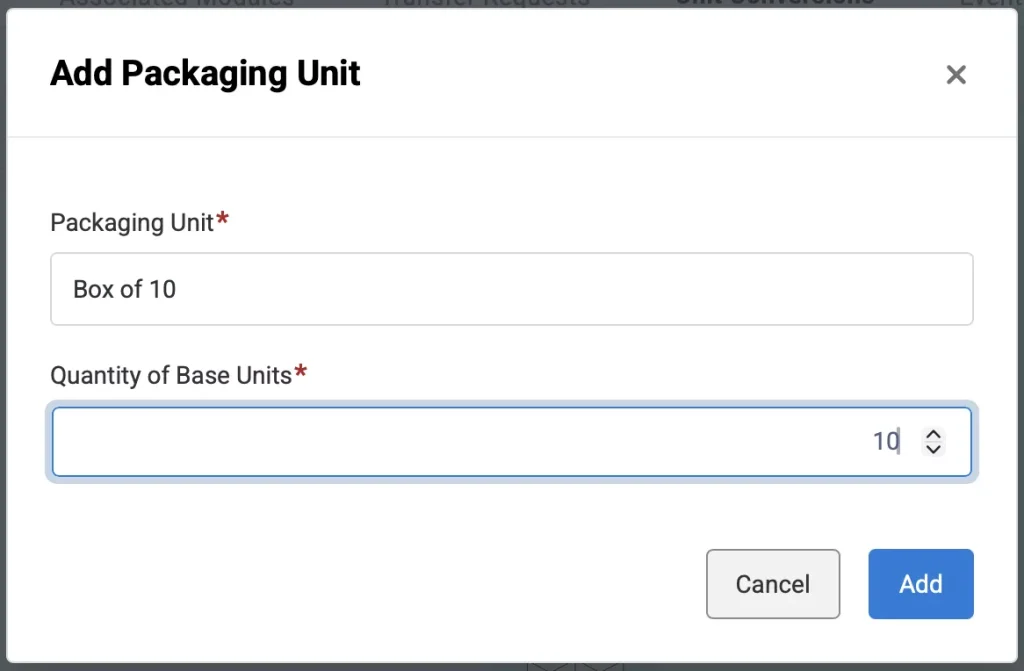
You can add multiple Packaging Units for the same inventory item, such as a box of 60 and a pallet of 600.
3.3 Use Packaging Units When Purchasing or Adding Stock
Once Packaging Units are configured, they are available when creating a Purchase Order or adding stock. Select the appropriate Packaging Unit and enter the quantity you want to procure or add.
EZO automatically calculates the Base Unit Quantity based on the selected Packaging Unit. For example, selecting 5 boxes with 10 base units each results in a Base Unit Quantity of 50. The Package Unit Price is calculated automatically as the Price per Base Unit multiplied by the Base Unit Quantity.
To learn more about Purchase Orders, click here.
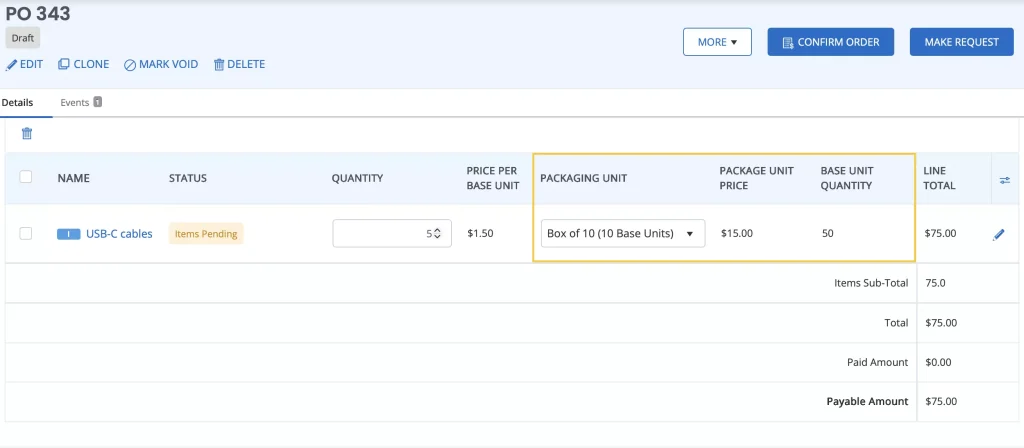
The inventory is ultimately added to the system in its base unit, while the Packaging Unit information provides context for how the inventory was purchased or added.
3.4 View Packaging Units in Reports and Purchase Orders
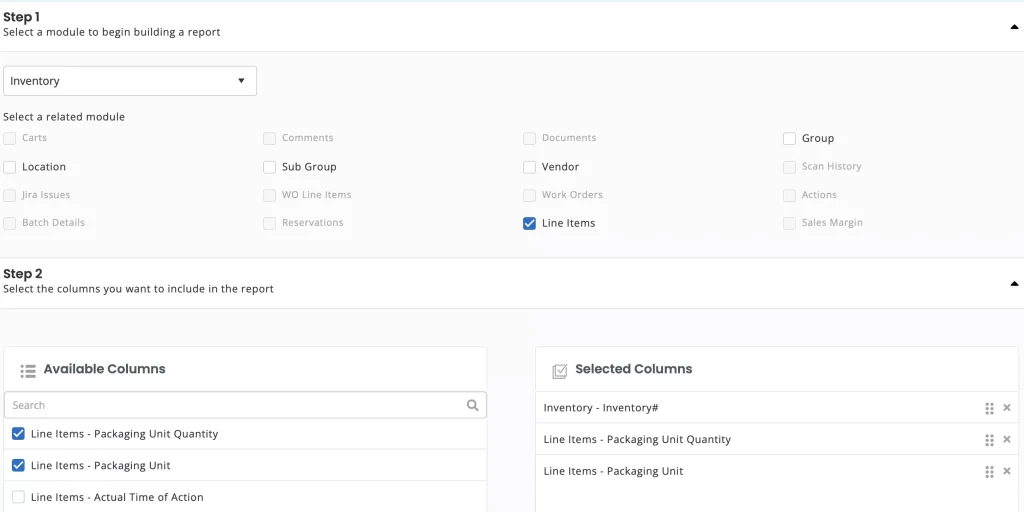
Packaging Unit information is available in the following reports when Unit Conversions is enabled:
- Line Items (sub-module under Inventory)
- Purchase Order Line Items (sub-module under Purchase Orders)
Each report includes the following columns:
- Packaging Units Quantity: The quantity expressed in packaging units.
- Packaging Unit: The name of the packaging unit and its base unit equivalent, for example Large Box (30 Base Units).
- Base Units in Packaging Unit: The total base unit quantity calculated from the packaging units.
To learn more about reports, click here.
Purchase Order printouts and PDFs also include Packaging Unit Quantity and Packaging Unit information, including in Purchase Order Line Items and Purchase Order Received Items.
4. Adding Inventory Items to a Cart
You can use Carts for faster checkouts of multiple Inventory items at a time. To use Carts in EZO, go to Settings → Add Ons → Cart Module → Enabled. To add an item to a Cart, go to Items → Inventory → Select Inventory Item → Add to Cart.

Specify the stock quantity to be added and the location from which stock should be removed once the Cart is checked out. The ‘Default Location’ of the item is used in case no other location is specified.
To add multiple Inventory items simultaneously to a Cart, go to Items → Inventory → Check Inventory Items → Actions → Add to Cart. Note that each inventory item will be added to the cart with a stock quantity of zero and the ‘Default Location’ of the item will be used as the location from which the stock is removed. You can change this location from the cart detail page.

To learn more about carts, click here.
5. Returning Inventory from Carts
In some workflows, inventory checked out through a cart may not be fully consumed. For example, a field team may check out 50 pairs of safety gloves but return 10 unused after the job is complete.
To allow inventory returns from carts, go to Settings → Add Ons → Inventory Module and check Return Inventory.
Click Update to save your changes.
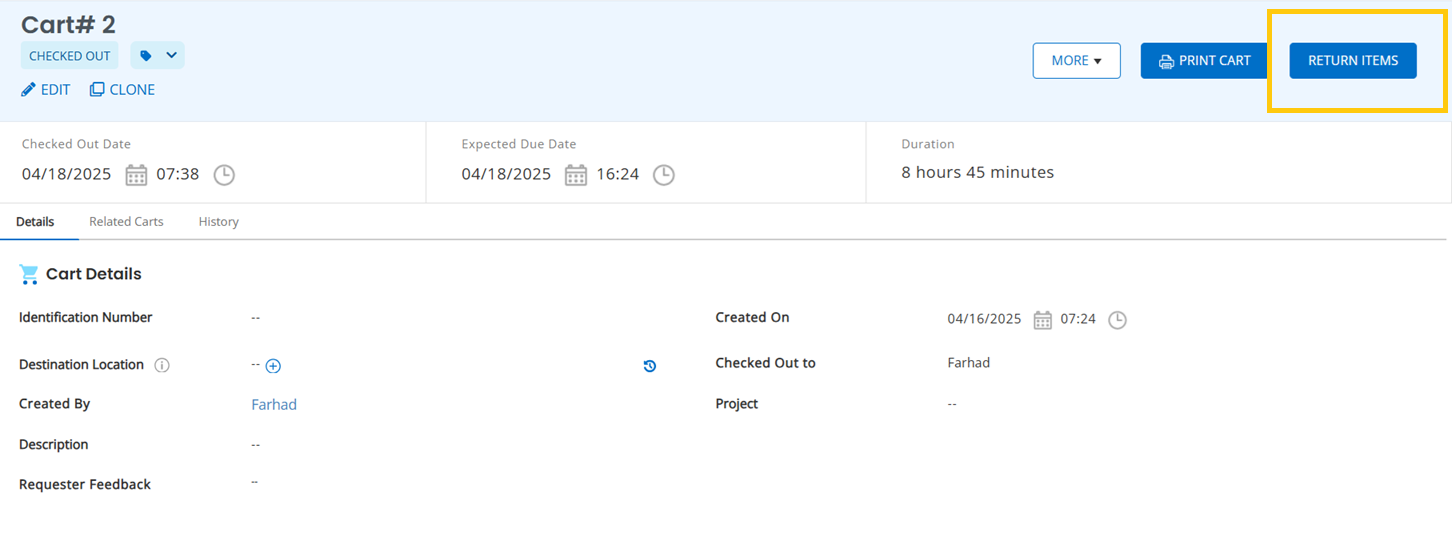
Once enabled, inventory-only carts will remain in the Checkout state instead of moving directly to Completed after checkout. This allows you to return unused inventory later.
For mixed carts that include Assets, Asset Stock, and Inventory, the return flow will also include inventory items along with the existing return options for assets and asset stock.
To return inventory from a cart, go to Carts → Select Cart → Return Items. Select the inventory quantity you want to return and complete the return.
The returned inventory is added back to the same location from which it was originally checked out.
6. Alerts For Inventory Items
Inventory items are tracked by quantity. Therefore, it is important to have threshold alerts for when stock quantity is too low. Other inventory alerts include Sale/Purchase of Inventory, Transfer of Stock and Request for Stock. The email alerts received can be Enabled/Disabled and customized from More → Alerts. To learn more about alerts, click here.
6.1. Low Stock Threshold Alert
An email alert is sent to members when the total stock quantity reaches or goes below the value specified in the field ‘Low Stock Threshold’ on the inventory item detail page. Say you have an item called ‘Blue Plastic Cups’ with a low stock threshold of 100. A checkout leads to the total stock falling to 90 (with 50 in New York and 40 in New Jersey). In this instance, a low stock email alert will be issued by the system.
6.2. Location Threshold Alert
An email alert is automatically sent to members when the stock quantity at any location is less than the value entered in the field, ‘Location Threshold.’ For example, if you have a Location Threshold of 100 and the stock quantity is 90 at the location New York, an email alert will be sent to all relevant parties.
7. Creating Bundles for Inventory Items
In order to make checkouts faster you can bundle inventory items that are frequently checked out together. You can then directly add your bundles to carts and quickly checkout the items. To learn more about bundles, click here.
8. Work Orders for Inventory Items
With our inventory control software you can also create Work Orders to assign and manage tasks for employees. To use the work orders feature go to Settings → Add Ons → Work Orders → Enabled. Create and manage work orders from More → Work Orders. You can create work orders for employees for things like checking inventory condition or relocating inventory to a different location. To learn more about Work Orders, click here.
9. Reports on Inventory Items
Reports on inventory usage, purchase and its movement between locations gives valuable insights. For example, inventory usage reports help in identifying demand or pinpointing unwanted items that can then either be purchased more or less of. Reports on vendors help in understanding past relationships and the reliability of vendors.These reports can be used for cost and service comparisons between vendors for better negotiation and purchase decisions.
Low stock reports on inventory enable you to replenish inventory in a timely manner. Reports are particularly useful for accounting and removing excess inventory that is merely incurring storage costs.
You can also track returned inventory through reports. EZO includes an Inventory Returns report for returned inventory activity. In custom reports, you can use the Cart Line Items – Inventory Returned column to check whether inventory in a cart line item was Returned or Not Returned.
Returned inventory is also reflected in the item’s Stock History and Events tab, so you can review when inventory was returned and added back to stock.
To learn more about item reports, click here.
10. Zoe’s Insight on Inventory Items
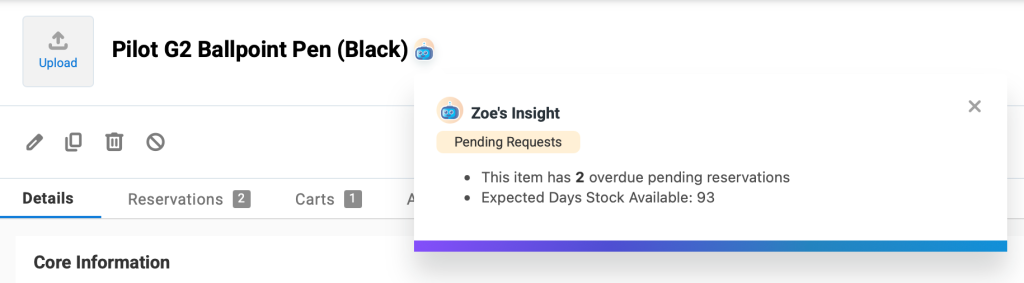
For each inventory item, EZO’s AI copilot Zoe surfaces a quick summary directly on the item detail page. Click the Zoe icon next to the item name to see an at-a-glance breakdown of the item’s current status, including pending reservations and how long the current stock is expected to last.
Have Feedback about our Inventory Control Software?
EZO is the leading inventory control software used by SMBs all over the globe.
For more assistance, drop us an email at support@ezo.io.