Advanced Actions for Assets in EZO automatically consolidates assets that have a similar name into a single Asset to provide users a concise view of available quantities. This consolidated view enables a smooth item reservation and checkout process.
Users can easily identify items they need to reserve and checkout without entering time-consuming details such as Asset Identification Numbers (AINs) again and again.
The Advanced Actions for Assets features offers three main benefits to users in EZO:
Reservations: If you have added multiple items with the same name, it can be tedious work to first look for available items for the required duration and then reserve them. Advanced Actions for Assets allows EZO users to simply enter the quantity of Assets they want to reserve and complete the action— saving time spent on reserving each item separately.
Checkouts: In the case of checkouts, Admins often spend a lot of time looking for reserved or available assets. Under Advanced Actions for Assets, you have all this information conveniently available in a single place. With a consolidated view, Admins can easily checkout multiple items of the same asset to different employees.
Simpler Asset UI: Advanced Actions for Assets eliminates the need to list the same Assets multiple times. Instead, users now have a cleaner, simpler, and more concise view with an overall Asset count.
For clarification here are a few terms being used for Advanced Actions for Assets:
Advanced Actions for Assets: Collective view of Assets with the same name grouped under a single Name. For example, all 4k UHD Smart LED TVs are collectively displayed under the Asset name.

Similar Asset: Quantity of an Asset present in different locations. For example, 4k UHD Smart LED TV has five items available in the California Office Building.

Here is how to get started with Advanced Actions for Assets:
1. Enable Advanced Actions for Assets
Go to Settings → Add Ons → Advanced Actions for Assets, select ‘Enabled’ and update the settings.

2. Create Asset
You can add a new Asset from the Asset Listings page. Click on the ‘Add Asset’ button.

You will be redirected to the Asset creation page. All existing Assets with the same name will appear in the dropdown. This saves the user from creating variations of the same Assets with different AINs.

In case a new Asset is created, the drop-down will not show any existing results. Fill in the details and the Asset will be created.

You will be able to find details related to Assets of the same type under the “Similar Assets” tab. The page displays Available Quantity, Checked Out Quantity and Total Quantity of the asset available in different locations.

Note: To see all Assets created, go to the Asset Listing page and select Group by Name (Catalog View).

Once you click on the dropdown sign next to the Asset name, you will be able to see all its items in the list.

If you do not want to display your Assets with Advanced Actions for Assets, you can choose ‘Select View’ and all the Assets will appear in a list irrespective of the collective Asset name.

2.1 Customize Columns in the Group by Name View
You can now customize the columns displayed in the Group by Name view. This makes it easier to identify individual assets when multiple assets have the same names.
To configure the columns:
- Navigate to Items → Assets and click the Column Customization button.
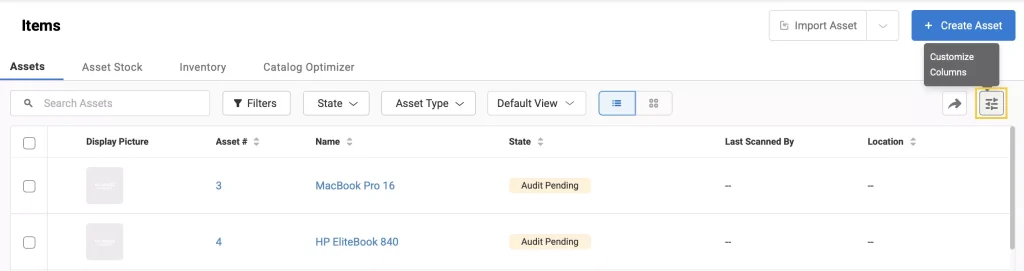
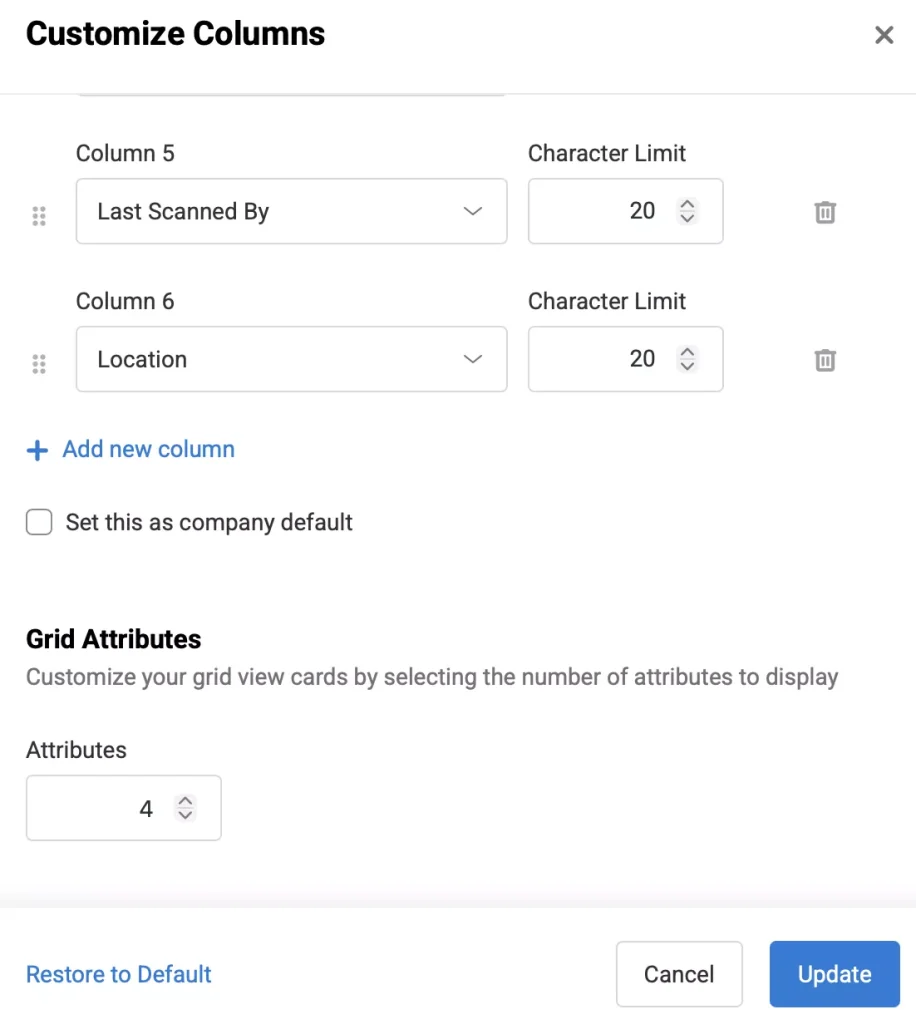
- In the Customize Columns pop-up, click Add New Column.
- Select the column you want to add from the dropdown.
- Click Update to save your changes.
Once you have added the columns select the Group by Name view.
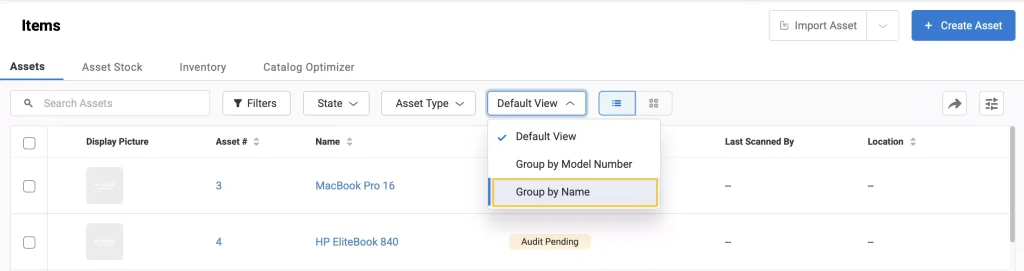
The selected columns are displayed in all sub-tables within the Group by Name view. For example, adding the AIN column lets you quickly distinguish between individual assets with the same name without opening each asset record.
3. Asset actions
You can take 2 actions on collective Assets: Add to Cart and Reserve.
3.1 Reserving an Asset

Advanced Actions for Assets enables users to reserve multiple Assets at a time. Simply go to the Asset details page → Reserve. An overlay will appear asking you to fill in the reservation dates. When you click the option ‘Flexible Reservation’, you can reserve the item selected- for example, 4k UHD Smart LED TV in this case.
Note: The option to Reserve Assets grouped by name is disabled by default. You can enable the options and enter the quantity of the assets you need to reserve.

When you reserve assets grouped by name enabling the option ‘Flexible Reservation’, you will not be able to select the particular item, but only the number of items that you can checkout. This is helpful as the user does not have to specify an item at the time of reservation so they can select it at the time of checkout and not lose sight of it amongst other reservations, especially when they try to find the item in storage after its reservation.

Similarly, the ability to select a particular Location is disabled by default. By enabling this option, users can Reserve Assets from any specific location. In the end, you can also add the quantity of the Available Asset for reservation.
You can see the reservations made for the Asset under the Reservations tab:

To check all Asset Reservations, go to the Notification Bell → Pending reservations. On the details page go to the Assets tab. Here you select the required reservation and click on the Actions tab to either checkout or cancel the reservation:

When you click to checkout the Asset, the following overlay will appear with all the Asset details:

You can select the specific items you want to checkout. You can remove any item from the list by clicking on the ‘x’ sign next to the Asset #. Assets will be randomly selected during checkout, however, you can choose any items by typing in the Asset #.

3.2 Adding Assets to Cart
An Asset can be added to a Cart from the details page as shown below:

You will be redirected to the Cart page where you can enable the ‘View Assets grouped by name in search’ to be able to add individual assets to the cart.

If you have disabled ‘View Assets grouped by name in search’ you will be able to choose from different items of Assets in the dropdown to add to the Cart.

When added, you can click on ‘Choose an Asset’ to select the asset you want to add to the cart.

When you click on the ‘Edit Quantity’ button, the following overlay appears asking you to change the Quantity of the Asset so that you can add more than one Item.

Note:

The specified items will be added to the Cart and displayed as follows:

You can now check out the Cart. However, you will not be able to checkout the Cart without specifying the items within the Asset. However, you can Reserve the Cart without specifying items.

4. Checking out Assets
With Advanced Actions for Assets enabled, when you wish to check out an asset, Go to Asset → Asset Details Page → Check out.
4.1 Select Asset
Here, you can select the asset item you want to check out by selecting it from the asset drop-down.

Go to the Asset Details Page or click on ‘Checkout’ from the Actions tab.

You will get a notification on the bottom left side of your screen informing about the checkout.

5. Asset mass actions
Users can take mass actions from the Asset Listings page with Group by Name enabled. Select all required Assets and click on Actions. You can take multiple actions on the Asset items collectively.

For example, if you want to checkout multiple items, you will have to enter the following details. You can see all the items by clicking on ‘Show Details’.

6. Request Asset Retirement
Staff users can now submit a Retirement Request when an asset needs to be disposed of, written off, or retired. Instead of retiring the asset directly, the request can be routed to an authorized administrator for review and approval.
This is useful when staff need to flag damaged, consumed, or obsolete assets for retirement while keeping the actual retirement under administrative control.
6.1 Enable Retirement Requests
To enable users to request asset retirement:
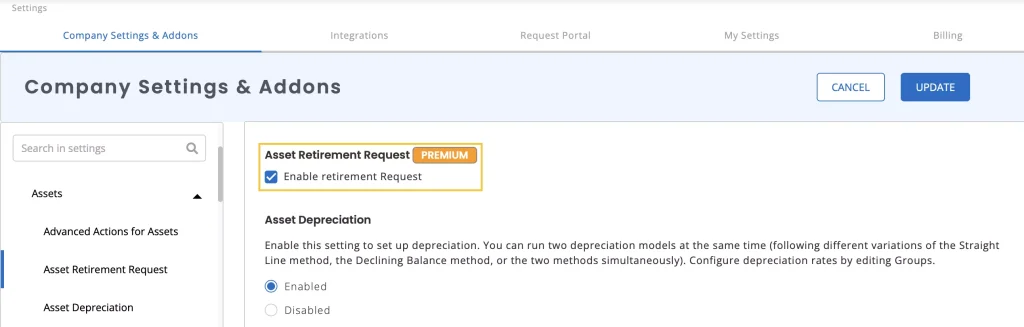
- Navigate to Settings → Company Settings and Addons → Assets.
- In the Asset Retirement Request section, select Enable Retirement Request.
- Click the Update button to save your changes.
6.2 Submit a Retirement Request
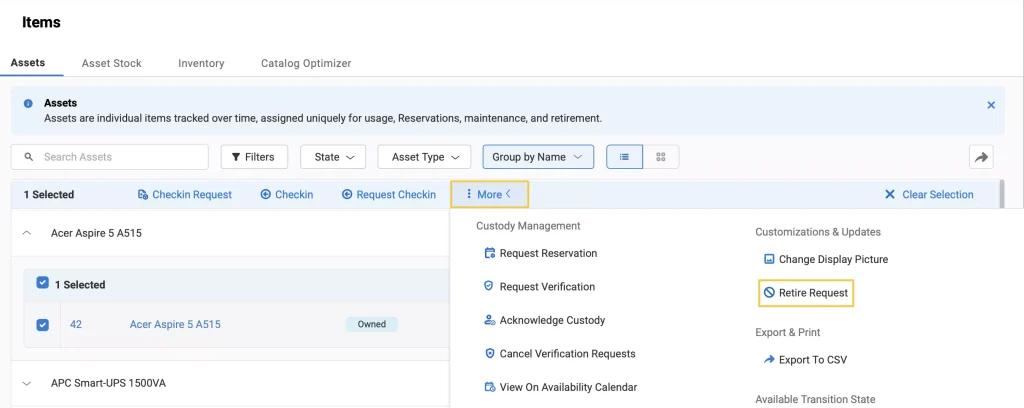
Users can submit a Retirement Request from the Asset Listing page or the Asset Details page. To retire items from the Asset Listing page,
- Navigate to Items → Assets and select the asset you want to retire.
- Click More and then click Retire Request.
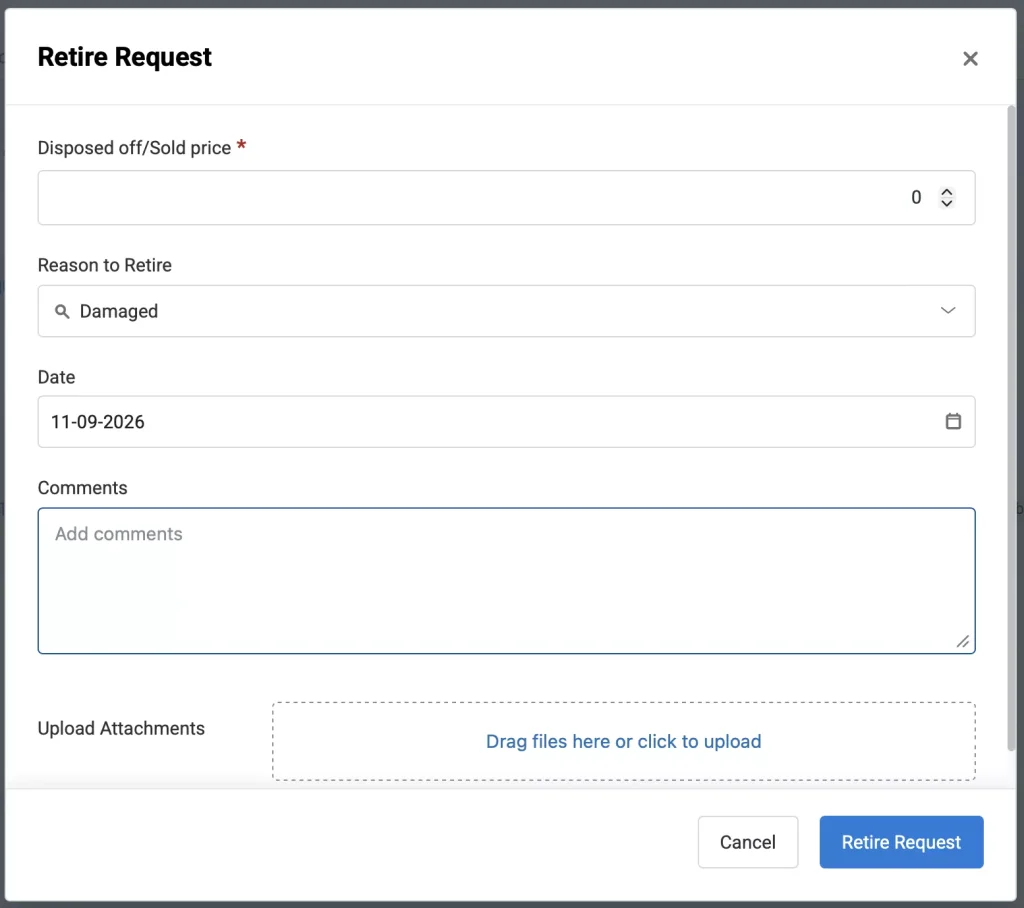
- In the Retire Request pop-up, add the necessary details and then click the Retire Request button.
You can also click the Retire Request icon given on the Asset detail page to submit a retirement request.
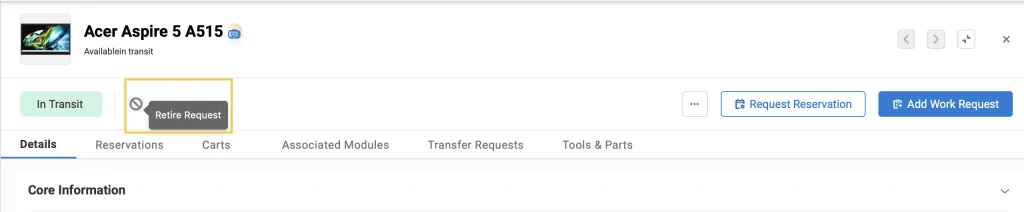
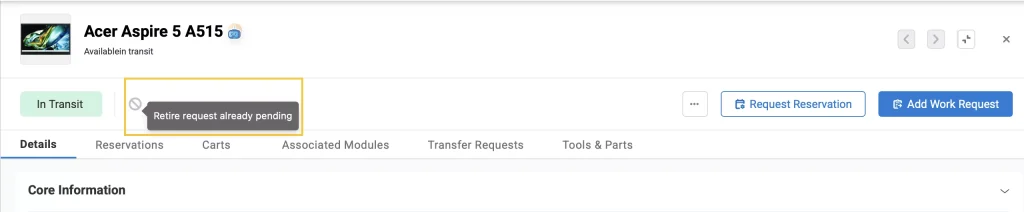
Once submitted, the asset’s retirement action is disabled while the request is pending. If you try to initiate another request, EZO displays Retirement Request already pending.
6.3 Review and Process Retirement Requests
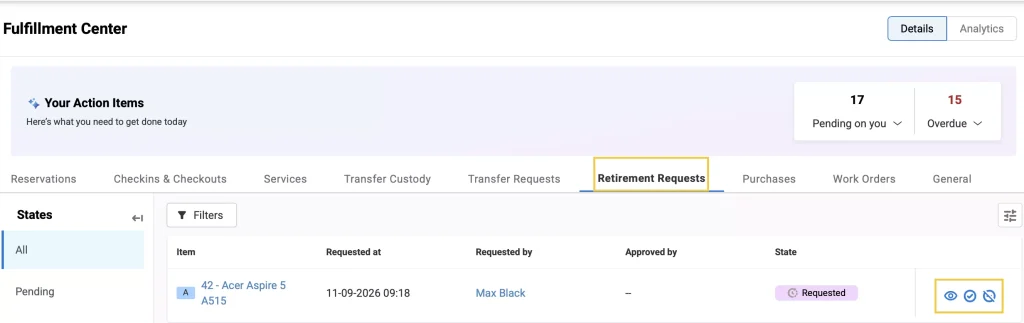
Administrators and users with the appropriate approval permissions can manage pending requests from the Retirement Requests tab in the Fulfillment Center.
From the Action column, authorized users can view, approve or deny the retirement request.
6.4 Retirement Requests Alerts
You can configure Retirement Requested email alerts under Items in the Alerts settings. These alerts can notify designated approvers when a new request requires their attention, either immediately or as part of a digest.

7. Asset thresholds
Businesses often overstock or understock items, failing to maintain an optimal level of assets. With asset thresholds, users can set low and excess asset thresholds for assets grouped by name per location and will be alerted in case they breach the quantitative limit established. This helps businesses manage high-value stock to maintain the right asset thresholds and save costs by avoiding last-minute, or excess purchases.
To enable Asset thresholds, Go to Advanced Action for Assets → Asset thresholds → Tick mark the box to enable location quantity thresholds→ Hit ‘Update’.

To set the thresholds for assets, Go to the Asset details page → Similar Assets → Quantity by Location → ‘Edit Thresholds’.

Once you click on ‘Edit Thresholds’, you will be redirected to the following window where you can assign values to thresholds. Simply put your desired values in the low and excess thresholds fields. These values will apply to all locations without specified thresholds.

To set up location-based thresholds, click on ‘+Add Location Specific Thresholds’. Here, you can choose to set specific item thresholds for each location.

Once you do that, you will see the relevant status of your available quantity in a particular location next to the listed quantity. The status is of three types: Optimal, Low, and Excess. As you can see in the example below, the Los Angeles Head Office has a ‘Low’ quantity since the available quantity is lower than the low and excess thresholds set.

Users will be notified through the notification bell and alerted through email in either of the three cases. Here, the user has been notified of low stock and their ‘Stock Thresholds Alerts’ page updated automatically as well.

To see the notification, click on the notification ‘Low/ Excess Stock’ under the notifications bell.

Note: You can also set thresholds by going to Assets → ‘Import Location Based Thresholds’ and following the steps highlighted here.

8. Zoe’s Insight on Assets
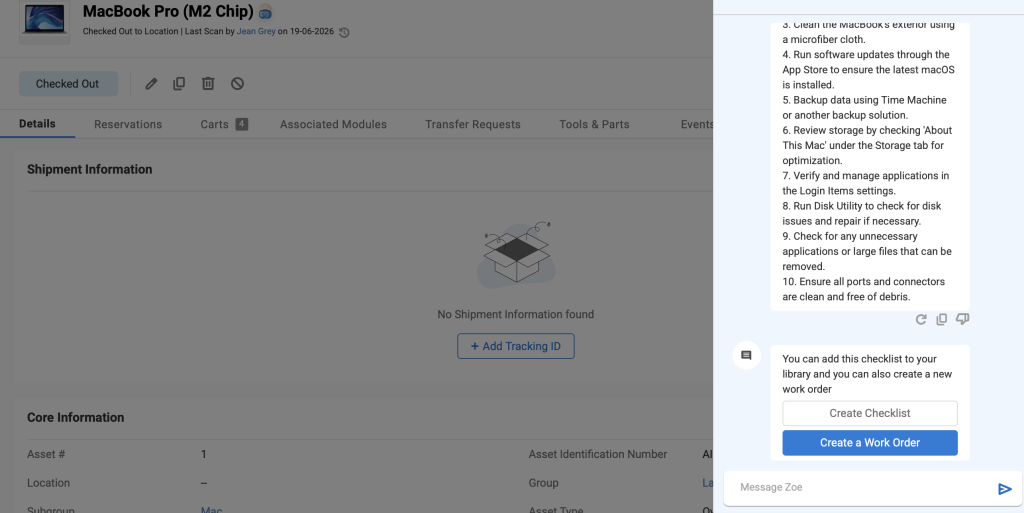
For each asset, EZO’s AI copilot Zoe surfaces a quick health summary directly on the asset detail page. Click the Zoe icon next to the asset name to see an at-a-glance breakdown of the asset’s status, including utilization rate, maintenance history, pending requests, and recent checkout activity
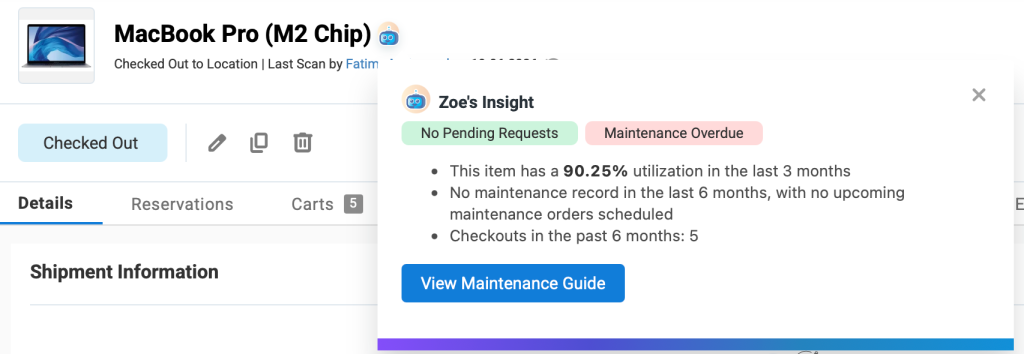
If Zoe detects an issue, you can click View Maintenance Guide to get a structured, AI-generated maintenance checklist for that specific asset, and create a checklist or work order directly from the same screen.