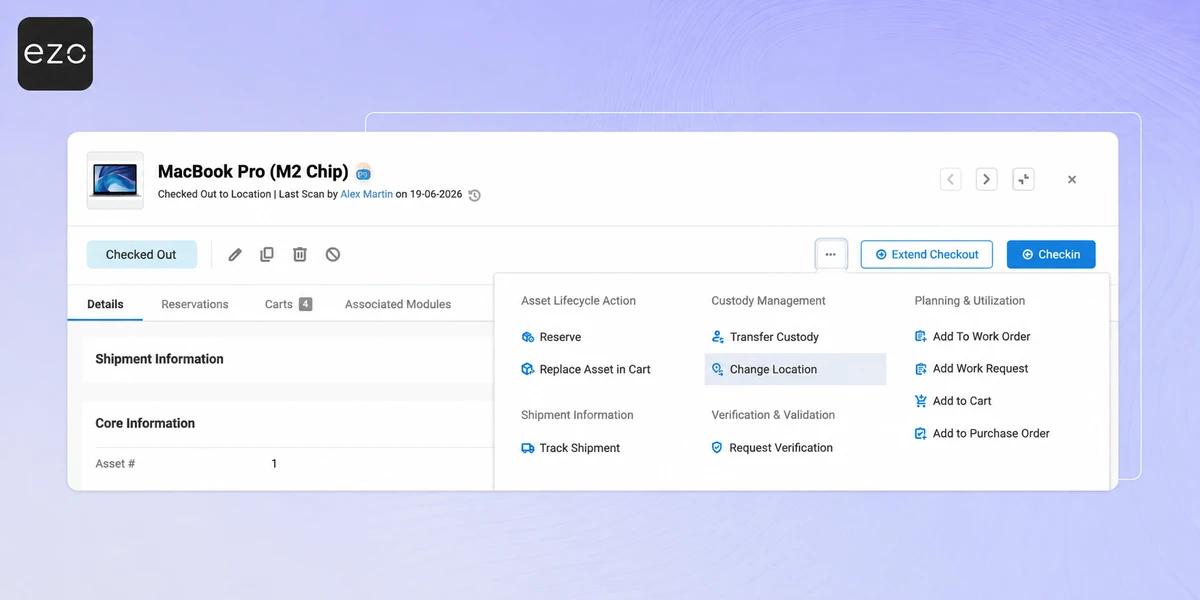
Managing item transfers across locations often requires coordination between staff users and admins. Without a structured request workflow, transfers can happen without the right approvals in place, making it difficult to track who moved what, when, and why.
EZO’s Transfer Requests feature allows staff users to raise location transfer requests for assets, asset stock, and inventory. Admins and authorized users can then review and approve or deny these requests from a central place, keeping transfers controlled and traceable.
This guide walks you through enabling transfer requests, configuring permissions, raising and managing requests, and reviewing them in the Fulfillment Centre.
1. Enable Transfer Requests
Before staff users can raise transfer requests, the relevant settings need to be enabled.
For Assets
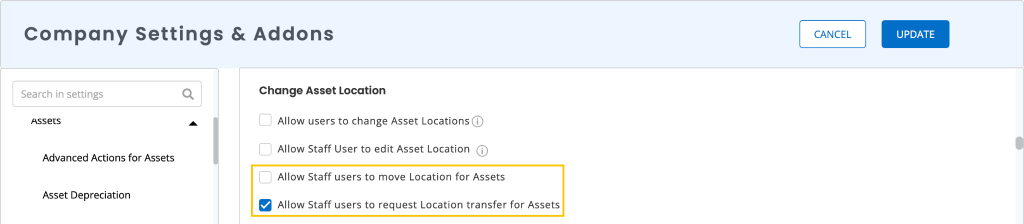
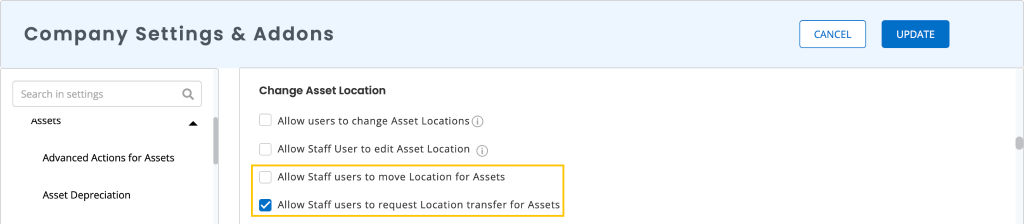
- Navigate to Company Settings & Addons and scroll to the Change Asset Location section.
- You will find the following options:
- Allow Staff users to move Location for Assets: This allows the Staff users to directly move asset locations.
- Allow Staff users to request Location transfer for Assets: This enables the Request Location Transfer action for staff users.
- Enable the relevant option and save your changes by clicking the Update button.
For Asset Stock and Inventory
- Navigate to Company Settings & Addons and scroll to the Transfer of Asset Stock or the Transfer of Inventory section.
- Under this setting, you will find the following options:
- Allow Staff users to transfer Asset Stock
- Allow Staff Users to Request Transfer Stock
- Enable the relevant option and save your changes.
2. Configure Custom Role Permissions
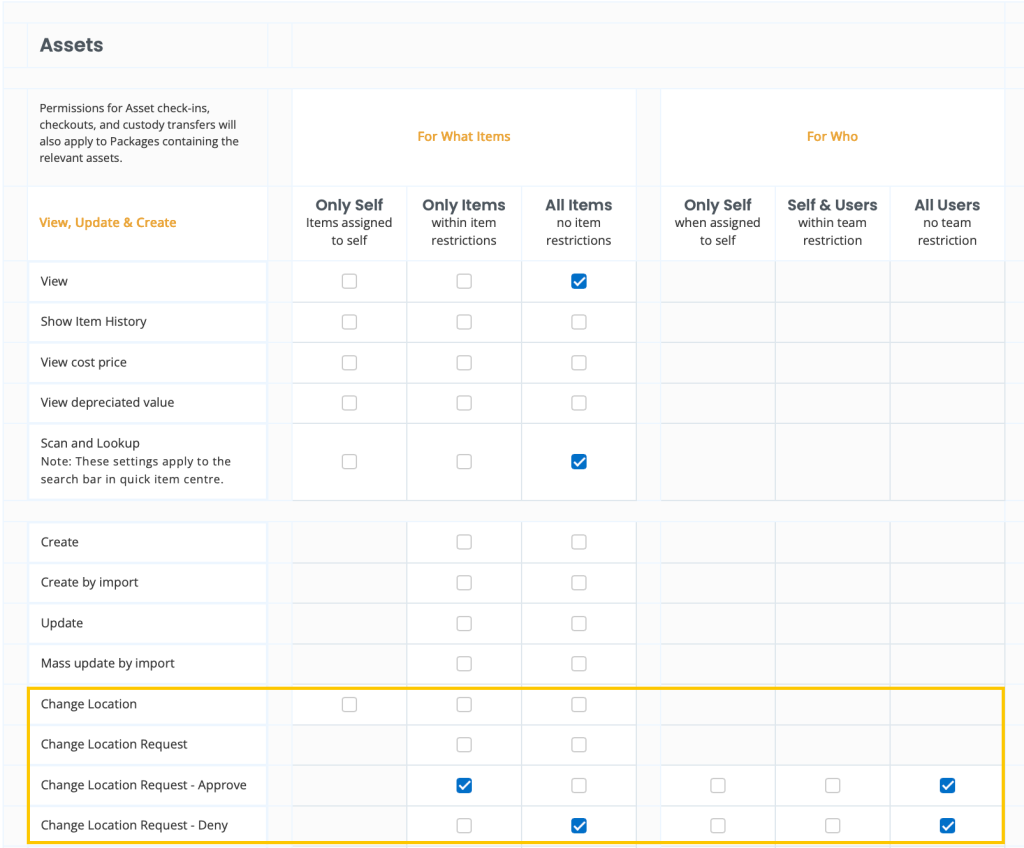
You can control who can raise, approve, or deny transfer requests through Custom Roles. Navigate to Members & Access → Roles and create a new role or edit an existing one.
For Assets
- In the Select any module to modify permissions section, click on Assets to see the following permissions:
- Change Location: Allows the user to change an asset’s location directly from the listing page, detail page, and Quick Action Centre.
- Change Location Request: Allows the user to raise a Request Location Transfer instead of moving the location directly. Users with this permission will see the Request Location Transfer action in the listing page, detail page, and Quick Action Centre.
- Change Location Request – Approve: Allows the user to approve location transfer requests from the item detail page, Fulfillment Centre, and Quick Action Centre.
- Change Location Request – Deny: Allows the user to deny location transfer requests from the item detail page, Fulfillment Centre, and Quick Action Centre.
- Save your changes once you have configured the relevant permissions for each role.
For Asset Stock and Inventory
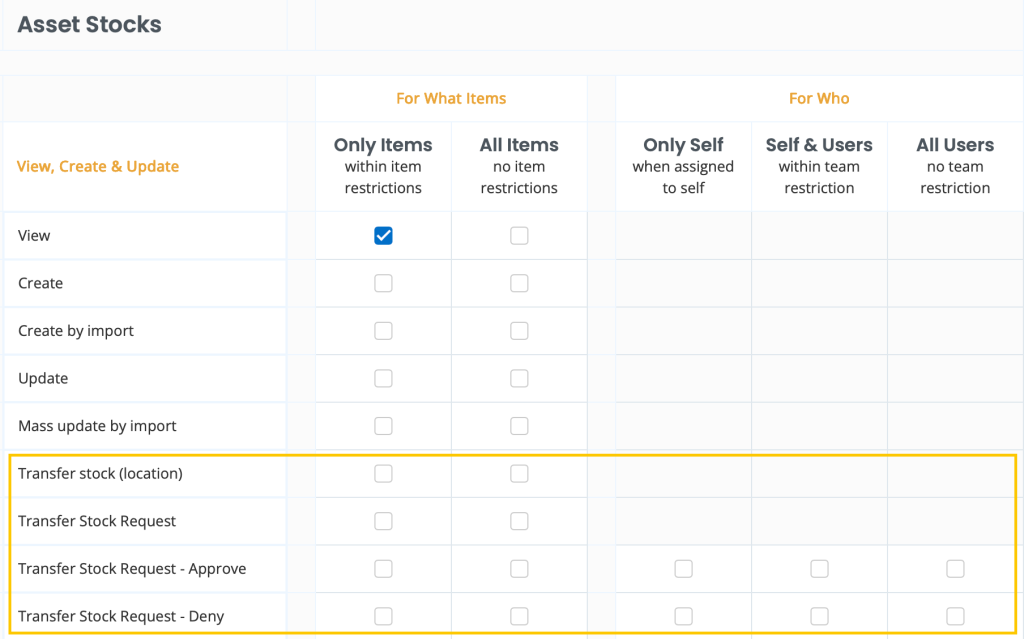
Under the Asset Stock and Inventory sections respectively, you will find the following permissions:
- Transfer stock (location): Allow the user to transfer stock directly.
- Transfer Stock Request: Allow the user to raise a request to transfer stock.
- Transfer Stock Request – Approve: Allows the user to approve location transfer requests from the item detail page, Fulfillment Centre, and Quick Action Centre.
- Transfer Stock Request – Deny: Allows the user to deny location transfer requests from the item detail page, Fulfillment Centre, and Quick Action Centre.
3. Raising a Transfer Request
Once the settings and permissions are configured, staff users can raise transfer requests from multiple places in EZO.
From the Item Detail Page
Go to Items → Assets, Items → Asset Stock, or Items → Inventory and locate the item you want to transfer. Depending on your permissions, you will see one of the following actions:
- Request Location Transfer for assets.
- Request Stock Transfer for asset stock and inventory.
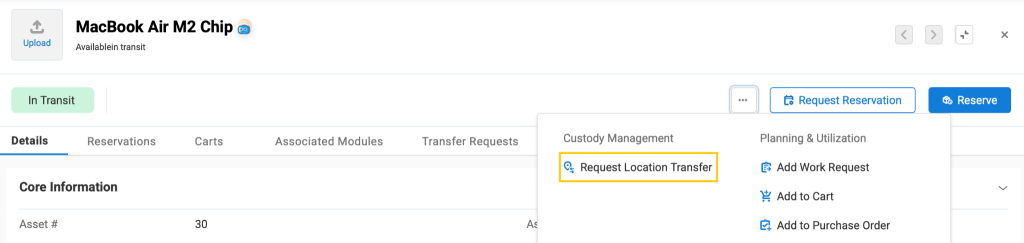
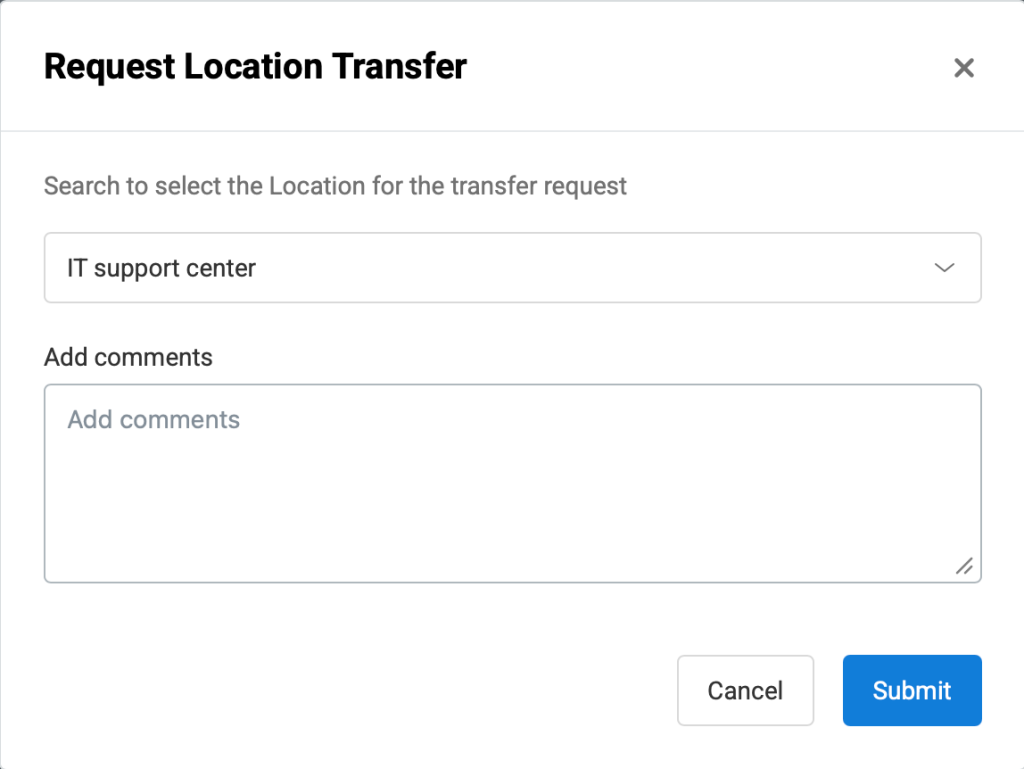
Click the relevant action and fill in the transfer request form with the destination location, and any other required details. Click Submit to raise the request.
4. View Transfer Requests on the Item Detail Page
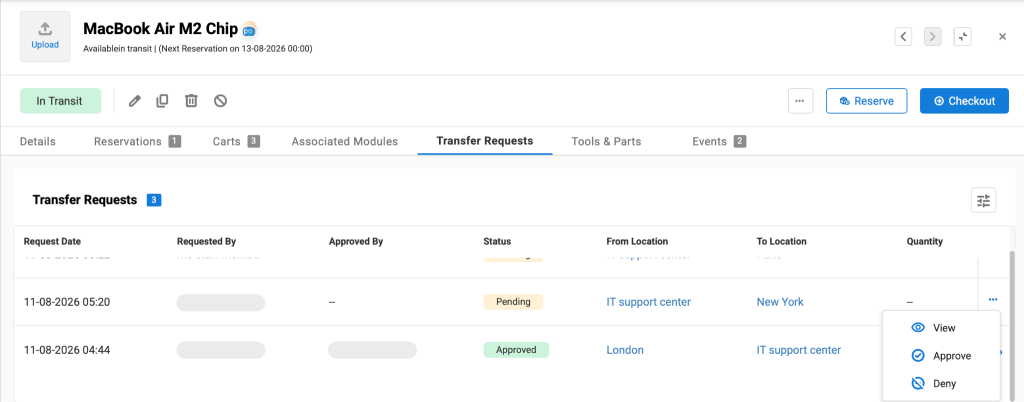
Once a transfer request has been raised, it appears in the Transfer Requests tab on the item detail page. This tab has two sub-tabs:
- Transfer Items: This tab shows all location transfer requests for that item.
- Transfer Carts: This tab shows carts containing the item that have move item requests associated with them.
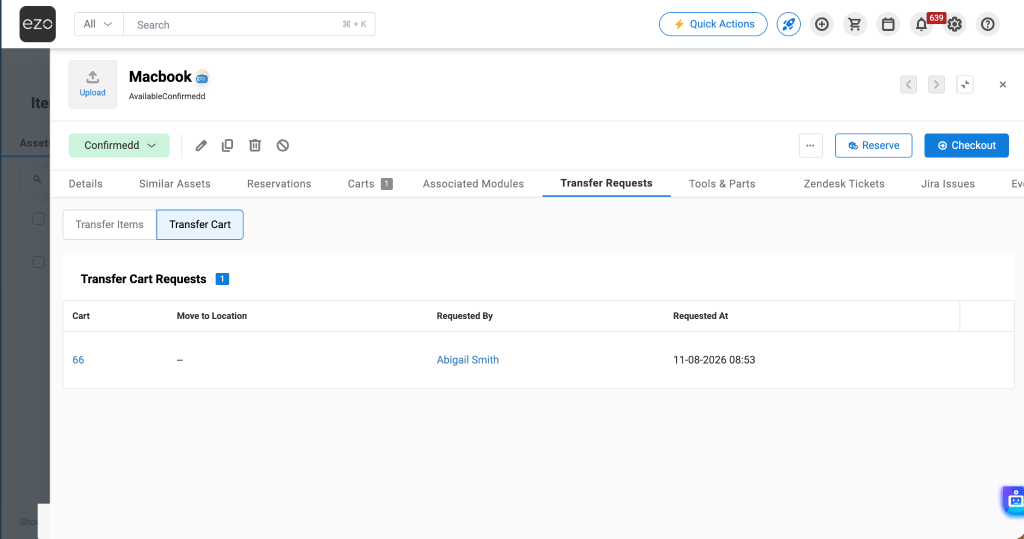
From the Actions column, you can:
- View Details: This opens the request form in editable mode.
- Approve: This updates the request status from Requested to Approved.
- Deny: This updates the request status from Requested to Denied.
5. Manage Transfer Requests in the Fulfillment Centre
All transfer requests are also visible in the Fulfillment Centre, giving admins and approvers a central place to manage requests across all items.
Navigate to the Fulfillment Centre from the left navigation menu and click the Transfer Requests tab.
The Fulfillment Centre tab contains the same table as the item detail page, with four state filters on the left: All, Pending, Approved, and Denied.
From here, approvers can review and take action on transfer requests across all items without having to navigate to individual item detail pages.

6. Track Transfer Activity in Item History
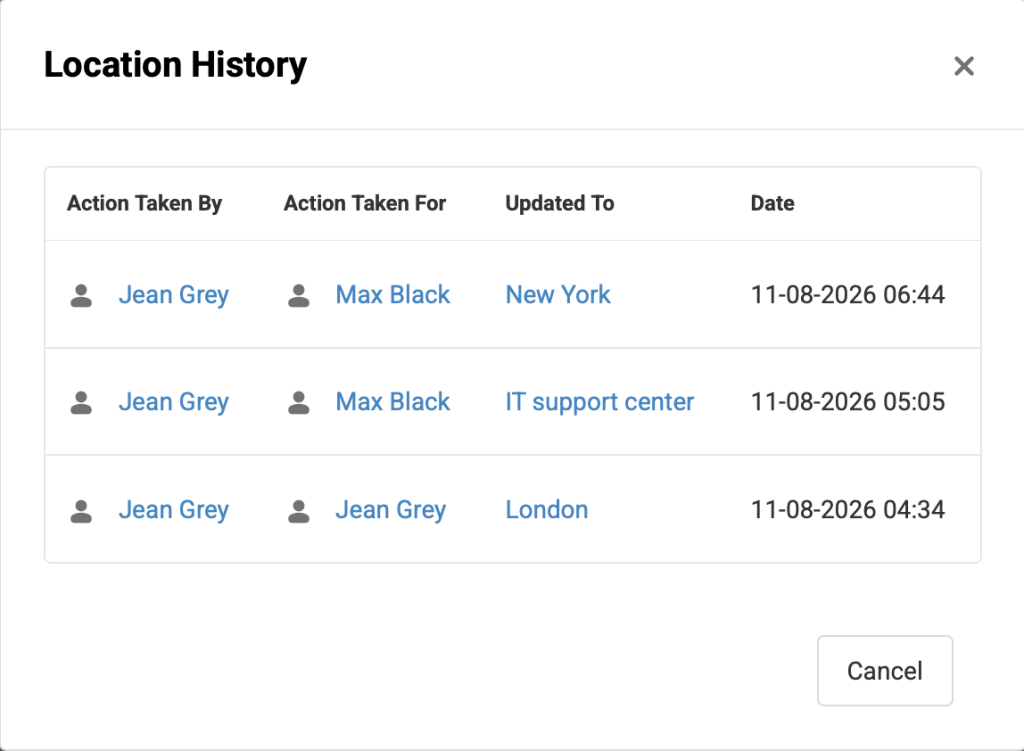
Transfer request activity is recorded in the item’s history so you always have a clear record of who requested a transfer and who approved it.
In the Location History table on the item detail page, two columns are available: For and By.
- Action Taken By shows the name of the person who approved or actioned it.
- Action Taken For shows the name of the person who requested the transfer.
If a user moves the location directly without a request, both columns will show the same name. If the location changes during a checkout or check-in, the For column will show the custodian’s name.
7. Configure Custom Fields for Transfer Requests
EZO allows you to configure custom fields specifically for transfer requests, giving you more control over what information is captured when a location transfer takes place.
- Navigate to More → Customize → Custom Fields and click Add Custom Field.

2. Configure the required fields and select Display on Transfer Location from the Preferences section.
Once selected, you will see the following sub-options:
- Make Mandatory on Transfer Location: This option ensures the custom field must be filled in before a transfer request can be submitted.
- Only record with Transfer Location event, don’t update for Item: This option saves the field value only for the transfer event. The item’s own record stays unchanged.
- Display at Transfer Location Request: This option makes the field visible on the transfer request form.
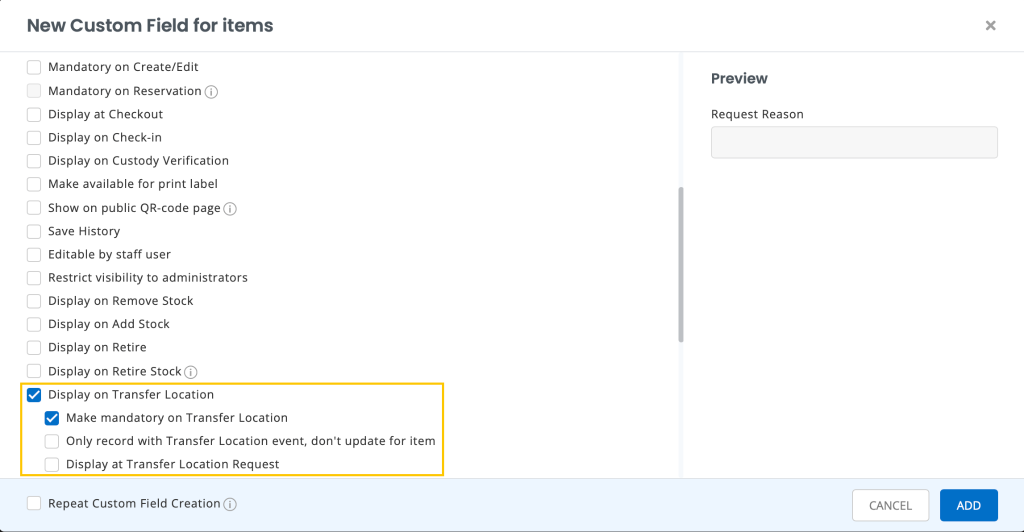
Note: The Make Mandatory on Transfer Location option is only available for Asset Stock and Inventory.
Once configured, these settings apply to all future transfer requests and can be updated at any time from Custom Fields.
8. Custom Reports for Transfer Requests
EZO allows you to generate detailed reports on all transfer request activity. To create a custom report:
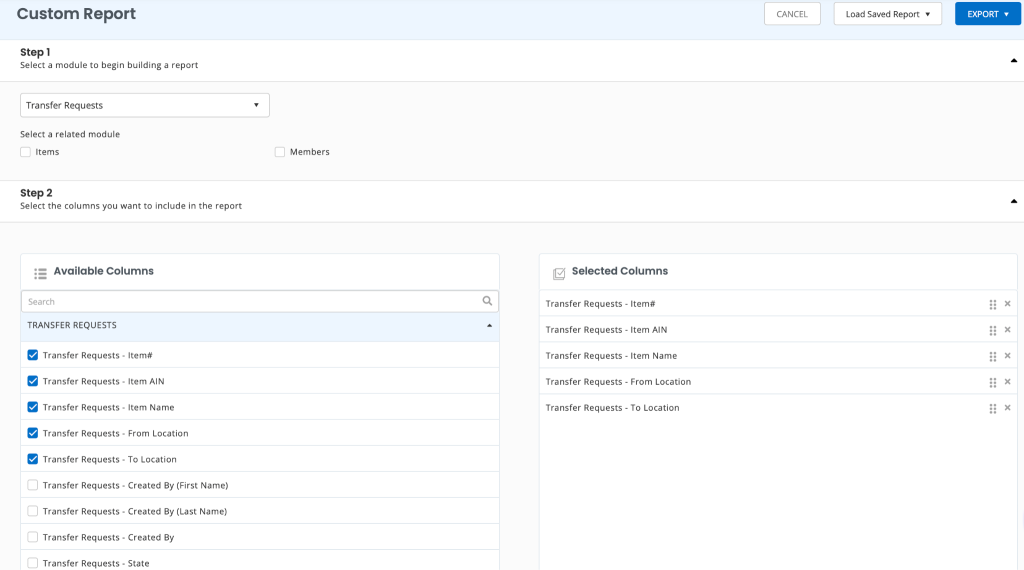
- Navigate to More → Reports and click Create Custom Report.
- From the dropdown in the Step 1 section, select Transfer Requests.
From here, select your preferred submodules and columns and run the report.
Keep Transfers Controlled and Traceable
Transfer Requests give your team a structured way to move items between locations without bypassing approval workflows. Staff users can raise requests from wherever they are working, and admins can review and action them from the Fulfillment Centre or directly on the item detail page.
If you need help setting this up or have any questions, reach out to us at support@ezo.io. We are happy to help.

![[How-to] Use the Fulfillment Center in EZO](https://cdn.ezo.io/wp-content/uploads/2025/01/02071820/EZOoffice-support-blog-1.webp)
![[How-to] Generate Custom Reports in EZO](https://cdn.ezo.io/wp-content/uploads/2018/05/EZOoffice-support-blog-25-sep.jpg)
![[How-to] Create General Requests Using the EZO Request Portal](https://cdn.ezo.io/wp-content/uploads/2024/10/02072156/General-Requests-1-scaled-1.webp)