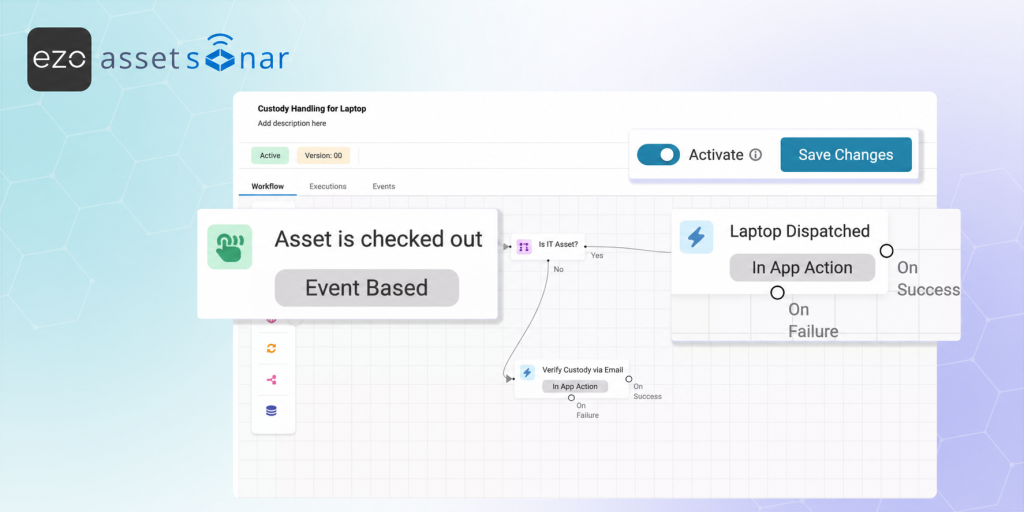
An asset may be purchased in one system, discovered in another, assigned through a separate process, and serviced through a ticket that never updates its lifecycle record. These disconnected handoffs create incomplete records, delayed actions, and assets that remain active long after they should have been recovered or retired.
AssetSonar connects procurement, discovery, assignment, service, decommissioning, retirement, and audit activities through integrations, purpose-built automations, and configurable workflows. This guide explains how to automate the repetitive movement between lifecycle stages while keeping approvals, custody verification, repair decisions, and final retirement under human control.
New to AssetSonar? Complete the Getting Started with AssetSonar guide first to configure your discovery sources, users, groups, locations, and core account structure. Then return to this guide to automate the lifecycle handoffs from procurement to retirement.
Before You Begin
Before configuring lifecycle automations, make sure you have:
- Account Owner or Administrator access to the relevant AssetSonar modules.
- Access to the systems you want to connect to AssetSonar, such as your device-discovery or MDM platform, identity provider, procurement source, and supported warranty provider.
- Consistent user email addresses across AssetSonar and the connected identity and device-management systems.
- A small group of users and devices for testing each automation before a wider rollout.
Although the asset journey begins with procurement, configure your discovery and identity sources before enabling downstream assignment and workflow automations.
How AssetSonar Automates the Lifecycle
AssetSonar uses complementary automation layers to connect and coordinate each stage of the IT asset lifecycle:
| Automation layer | What it handles | Human checkpoint |
| Procurement integrations | Synchronize purchase orders, vendors, pricing, and purchasing data. | Validate synchronized records and approve managed purchase orders. |
| Discovery and directory integrations | Synchronize devices, software, users, and warranty data. | Resolve duplicates, missing matches, and source conflicts. |
| Purpose-built automation | Run Auto Checkout, assignment rules, alerts, approvals, and scheduled reports. | Approve sensitive transactions. |
| Workflow Automation Engine | Run triggers, conditions, actions, branches, and external requests. | Design and test workflows and investigate failed executions. |
| Lifecycle workspaces | Coordinate service, maintenance, decommissioning, and retirement activities. | Diagnose, approve, and execute controlled steps. |
| Audit and reporting | Preserve changes, workflow executions, custody results, and lifecycle outcomes. | Verify custody and location; investigate failed actions, mismatches, and incomplete records; adjust the relevant rules. |
Together, these layers move assets from acquisition and assignment through service, financial tracking, decommissioning, and retirement. The following sections explain how to configure the underlying records and connect each lifecycle handoff.
1. Automate Procurement and Asset Creation
Connect purchasing data to the asset record as early as possible. AssetSonar supports both direct procurement ingestion and controlled purchase-order workflows.
1.1. Import purchases automatically through a supported procurement integration
- If your organization purchases through a supported procurement vendor, connect the corresponding integration under Settings → Integrations → Procurement Integration. The following example uses CDW; follow the guide for your selected integration because activation requirements and synchronized fields may differ.
- Enable the integration. Go to Settings → Integrations → Procurement Integration → CDW Integration, select Enabled, and save the settings.
- Connect the account. Select Connect, enter your CDW account number, and update the configuration.
- Review the first synchronized order. Confirm the item, vendor, order dates, pricing, shipping destination, and requester information on the Purchase Order details page.
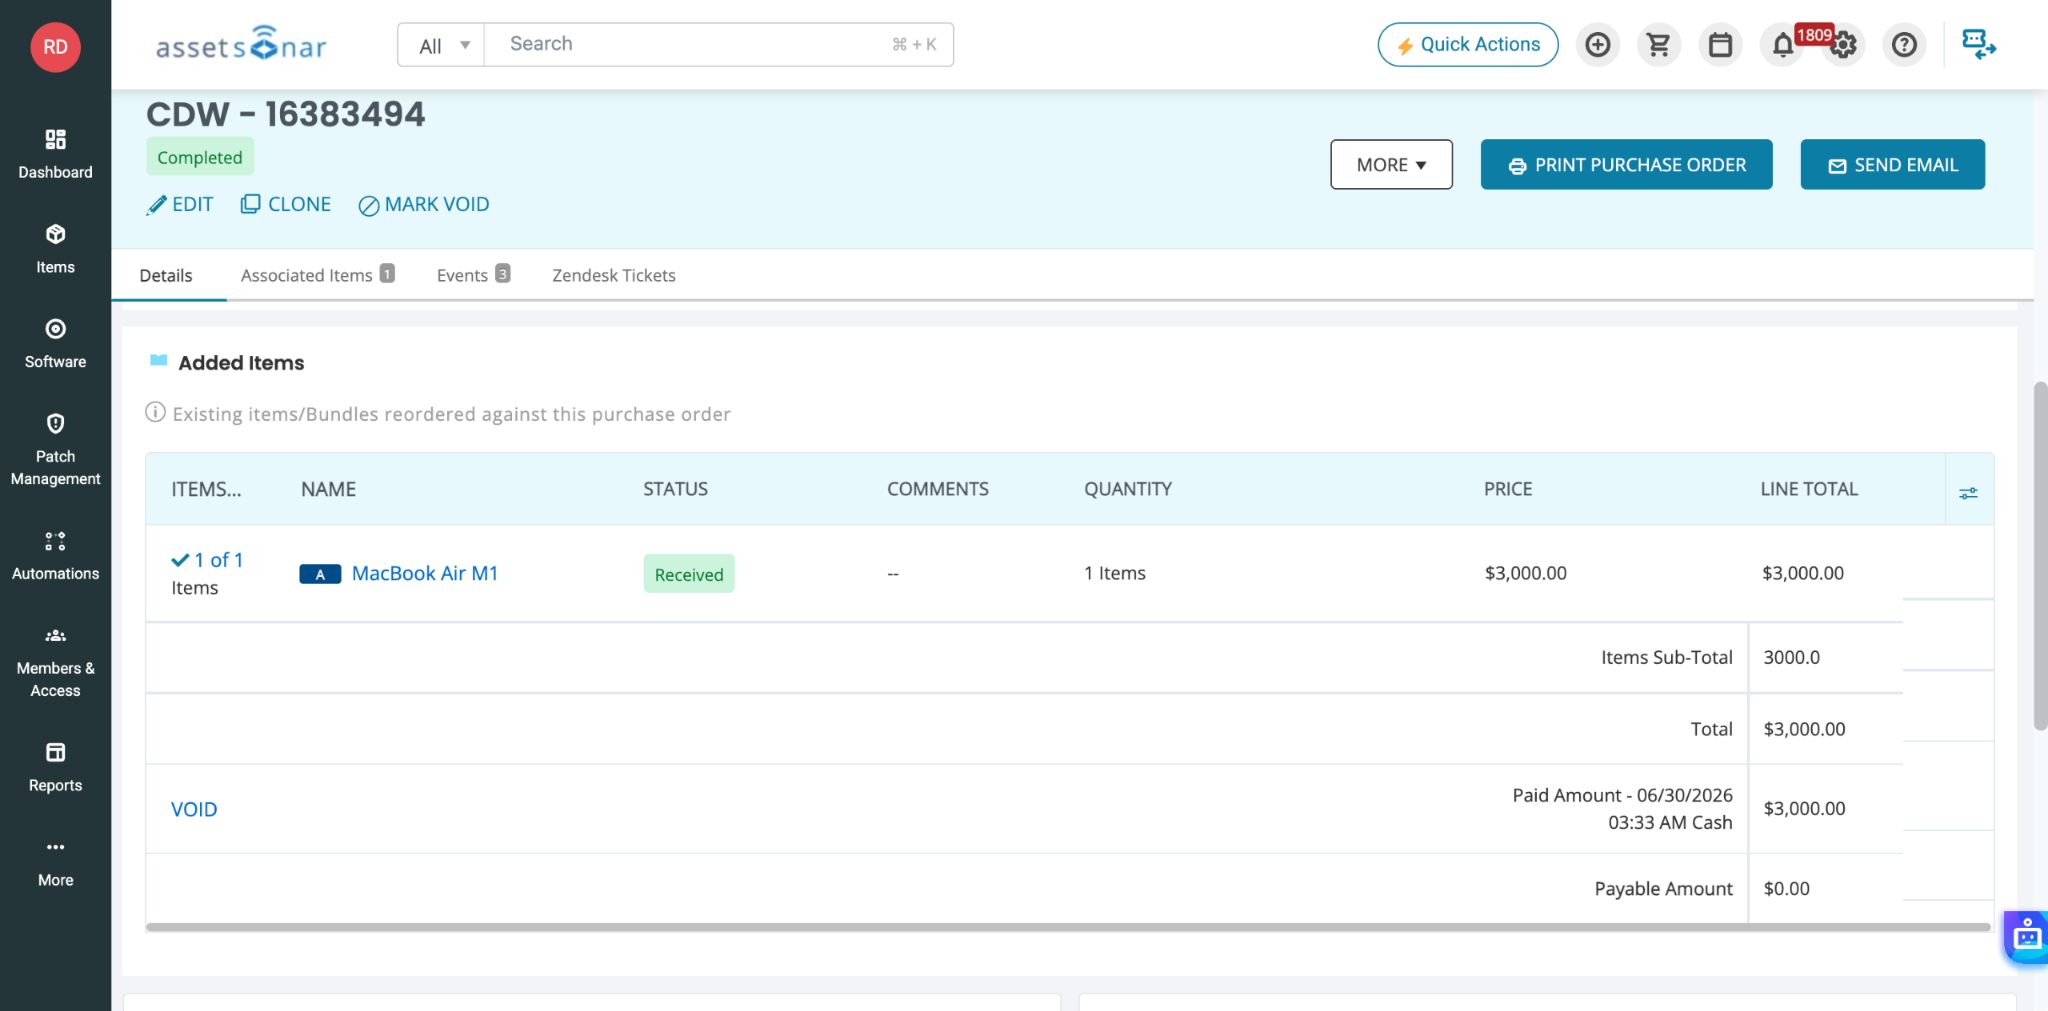
When the first order arrives, AssetSonar can create the CDW vendor automatically if it does not already exist. Hardware and software purchases are linked with their purchase information, preserving traceability from acquisition onward.
Note: Enabling the toggle does not complete CDW activation. Notify your CDW representative so CDW and the AssetSonar team can coordinate the connection. Purchase orders created through the integration are non-editable to preserve procurement-data integrity.
Purchased hardware initially enters AssetSonar as a regular Asset. When the corresponding device is later synchronized and matched through an MDM integration, AssetSonar converts the record into an IT Asset while retaining its purchase information.
1.2. Use managed purchase orders for other vendors
If no direct procurement integration is available, use AssetSonar’s Purchase Order module. Enable it from Settings → Add Ons → Purchase Orders, then open More → Purchase Orders.
Use the module to:
- Create purchase orders against existing vendors and product-catalog items.
- Add items that do not yet exist in the catalog. AssetSonar creates them when the purchase order is received.
- Specify delivery locations per line item so received assets enter the correct location.
- Apply approval controls before purchase orders move forward.
- Subscribe relevant teams to purchase-order alerts instead of relying on manual email follow-ups.
The expected outcome is a complete acquisition record containing the vendor, cost, purchase order, delivery location, and asset identity required by later lifecycle stages.
2. Build AssetSonar as Your Connected Source of Truth
AssetSonar becomes the central lifecycle record when procurement, device, user, warranty, and service data is organized consistently. Before connecting external systems, define how AssetSonar will classify assets, identify custodians, represent locations, and capture the information required by your workflows.
2.1. Configure how AssetSonar will organize lifecycle data
Set up the basic account structure that imported and manually created records will use:
Create asset groups and subgroups. Open Groups → Group Listings and select Add Group. Use groups and subgroups to organize assets by type, department, operational purpose, or another structure that remains consistent across your organization.
See the Groups and Subgroups guide guide for the complete process.
Create your location hierarchy. Open Locations and add the offices, warehouses, storage rooms, or other places where assets can be received, stored, assigned, serviced, or retired. AssetSonar supports nested locations for more granular tracking.
See the Default and Stock Locations guide for more information.
Add or synchronize members. Add the users who can receive custody of assets and confirm that their email addresses match the corresponding records in your identity and device-management systems.
The Member Types guide explains the available member roles and permissions.
Create essential custom fields. Go to More → Custom Fields and create only the fields needed by your lifecycle processes. Examples include Deployment Status, Device Condition, Refresh Date, Lease Return Date, Disposal Method, and Data Destruction Status.
See the Custom Fields guide for field types and configuration options.
Keep the structure simple enough to maintain consistently. Groups, locations, and custom fields should help your automations make decisions rather than create additional data-entry work.
2.2. Connect the asset-discovery sources your environment requires
AssetSonar supports multiple discovery routes. Connect one or more sources based on your device environment:
- Deploy the AssetSonar ITAM Agent to discover Windows, macOS, and Linux endpoints. The Agent can be installed individually or deployed in bulk.
- Connect the relevant MDM or endpoint-management integration to synchronize devices already managed through another platform.
- Connect Open-AudIT to discover routers, switches, printers, firewalls, and other IP-based infrastructure across your network.
These are alternative or complementary routes rather than cumulative requirements. For example, an organization may use an MDM integration for managed employee devices, the ITAM Agent for other computers, and Open-AudIT for network infrastructure.
See the Getting Started guide for an overview of these discovery methods and the relevant integration guide for complete configuration instructions.
For each discovery source:
Start with a limited scope. Deploy the Agent to a small device group, synchronize a limited MDM scope, or scan a controlled IP range before expanding coverage.
Review the discovered records. Confirm that serial numbers, model information, operating-system details, discovery source, group, and location are populated correctly. Where applicable, verify the detected device-to-user relationship. Review and provision devices discovered through Open-AudIT as required.
Schedule ongoing synchronization. Enable automatic or scheduled synchronization where supported so AssetSonar continues to receive device changes.
Define exception handling. Decide who will review duplicate records, invalid serial numbers, devices without an owner, conflicting source data, and assets that stop synchronizing.
2.3. Synchronize users and identity data
Connect the directory or identity source your organization already uses so user changes do not depend on manual updates. AssetSonar supports member synchronization through Google Workspace and LDAP, as well as SCIM-based provisioning with identity providers such as Microsoft Entra ID (Azure AD), Okta, and OneLogin.
For example, to configure SCIM, go to Settings → Integrations → User Provisioning via SCIM and use the Tenant URL and connector credentials supplied by AssetSonar. See the Azure AD SCIM guide for a complete configuration example.
If automated synchronization is not available, add or import members from Members & Access and define who will keep those records current.
Use a consistent email attribute across your identity provider, MDM, and AssetSonar. Auto Checkout relies on this relationship when matching a discovered device with its primary user.
2.4. Validate the foundation before automating actions
Before moving to assignments or workflow actions, verify that your pilot produces the expected asset records and, where applicable, device-to-user relationships.
Review at least:
- One newly discovered device.
- One updated device.
- One new user.
- One deactivated user.
- One device without a matching custodian.
- One duplicate or incomplete record.
Correct field mappings and duplicate-handling rules before expanding the integration. Automating inaccurate data only makes the errors move faster.
3. Automate Assignment and Location Updates
Once device and user data are synchronized, use Auto Checkout to remove the recurring task of assigning every discovered device manually.
3.1. Configure Auto Checkout and Automatic Checkouts
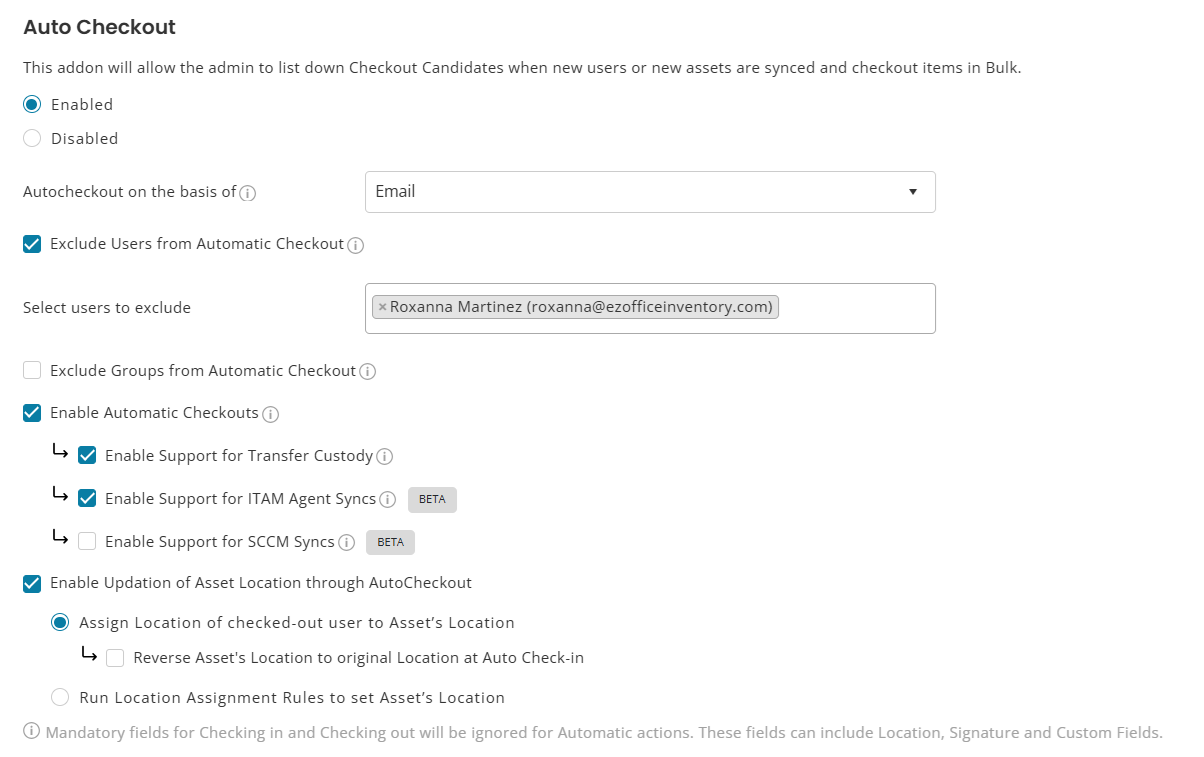
Auto Checkout and Automatic Checkouts are related but distinct. Enabling Auto Checkout creates Checkout Candidates when users or devices are synchronized, allowing administrators to review differences and check out items in bulk. Enabling Automatic Checkouts performs the checkout without manual action when the detected primary user matches an AssetSonar member.
- Go to Settings → Automations → Auto Checkout and select Enabled.
- Choose the field used to match discovered primary-user data to an AssetSonar member. Email is the default for MDM-detected devices; a custom field can be used if it contains the corresponding valid email address.
- Enable Automatic Checkouts if matching devices should be assigned without manual review.
- Enable Support for Transfer Custody if custody should move automatically when the primary user changes in the discovery source.
- Enable the applicable ITAM Agent or SCCM option when assignment should use the last logged-in user.
- Exclude shared, service, automation, or other accounts that should never receive custody automatically.
3.2. Review Auto Checkout activity
Open Workflows & Automations → Auto Checkout and select Auto Custody Sync Logs to review automatic assignments.
You can also go to Reports → Asset Reports → Check-in/out Events and filter the action taker to Automation User. The Auto Checkout guide covers the complete configuration and reporting flow.
Note: Assets in maintenance cannot be checked out through Auto Checkout. Keep an exception queue for devices that fail assignment because of their state, missing user information, or an excluded account.
3.3. Automate asset-location updates
Choose how the asset location should be updated after checkout:
- Select Assign Location of the checked-out user to Asset’s location to inherit the user’s location.
- Select Run Location Assignment Rules to set Asset’s location to apply the location rules created under Workflows & Automations → Assignment Rules.
3.4. Keep custody verification as a controlled checkpoint
Automatic assignment updates the record, but the custodian should still acknowledge possession where accountability matters.
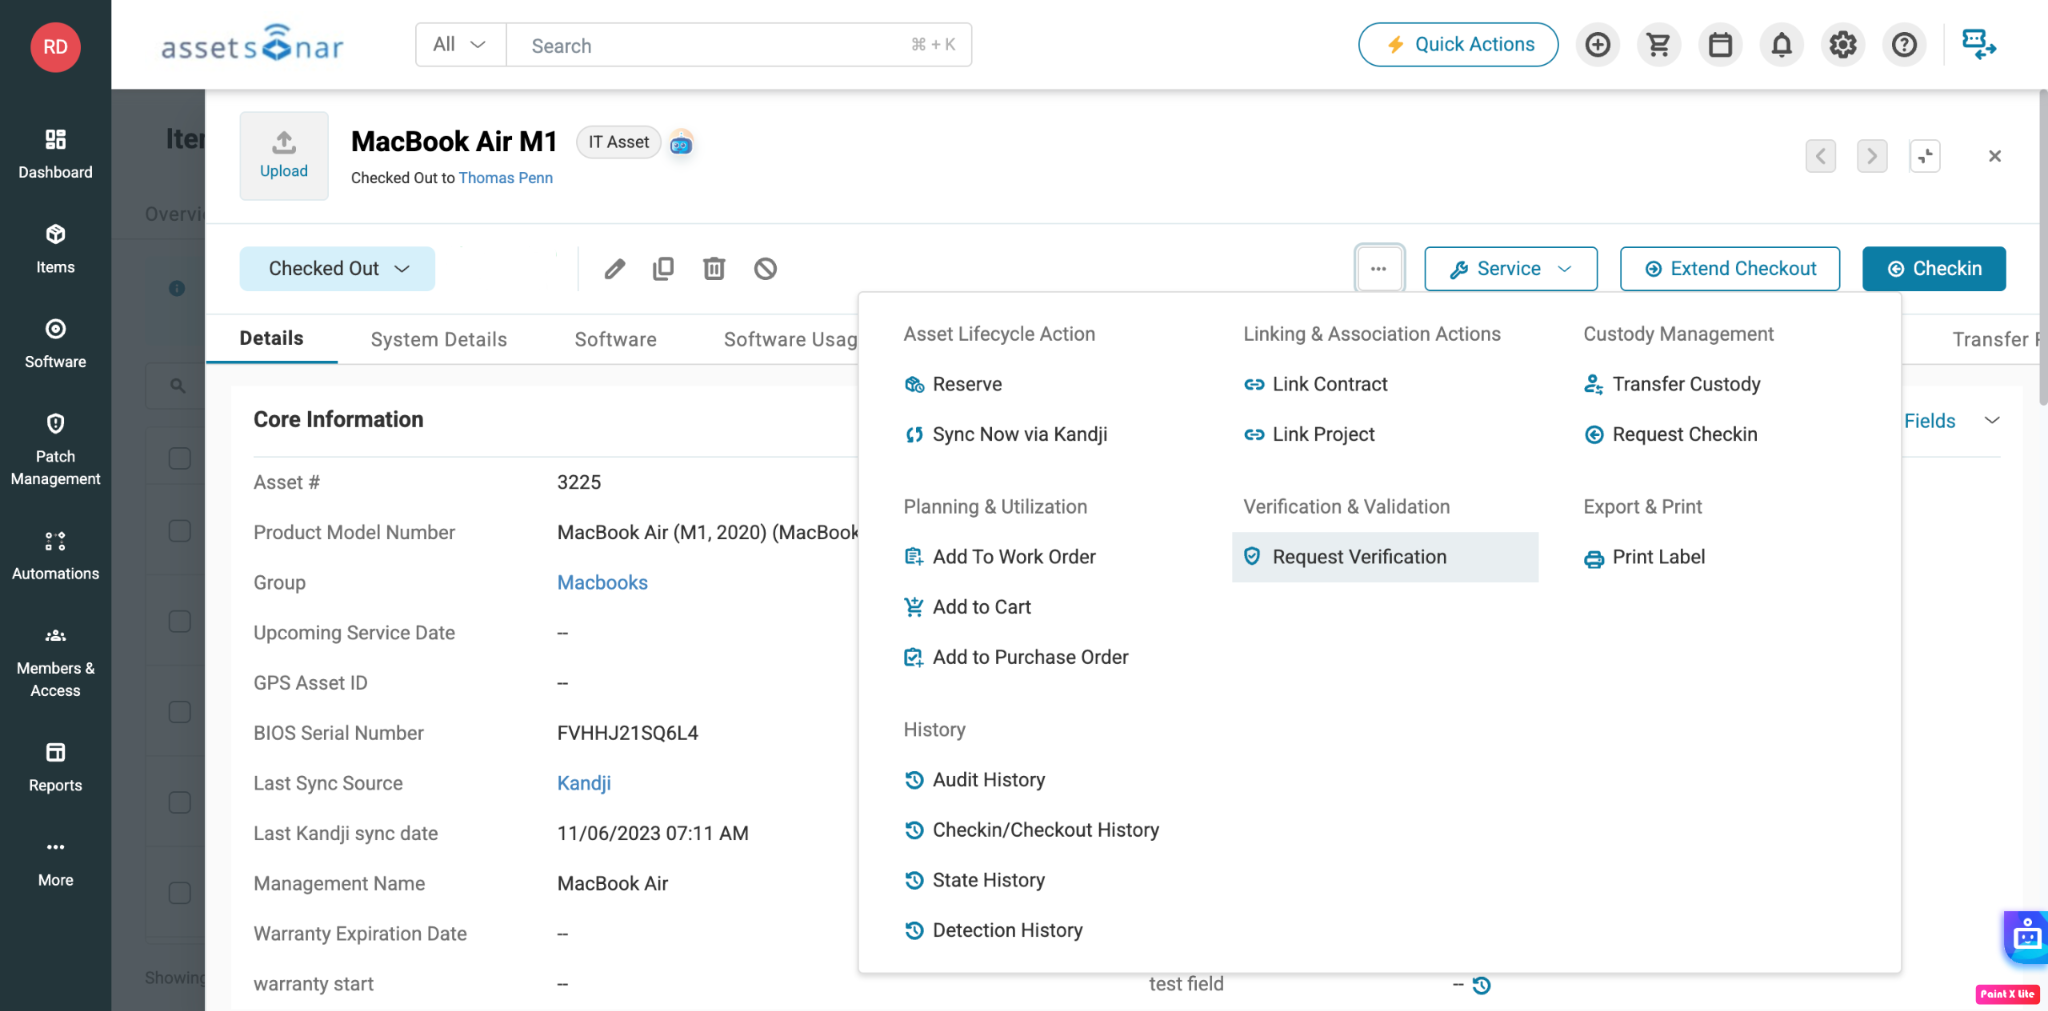
From the Asset details page, select Request Verification to send a custody verification request. The user can verify the device and its condition, giving you evidence that the assignment is correct.
You can also create a custom field such as Honor Code or Device Condition, then enable:
- Display on Custody Verification
- Mandatory on Custody Verification
This turns the acknowledgment into a structured control rather than a simple confirmation click.
4. Use the Workflow Automation Engine for Lifecycle Handoffs
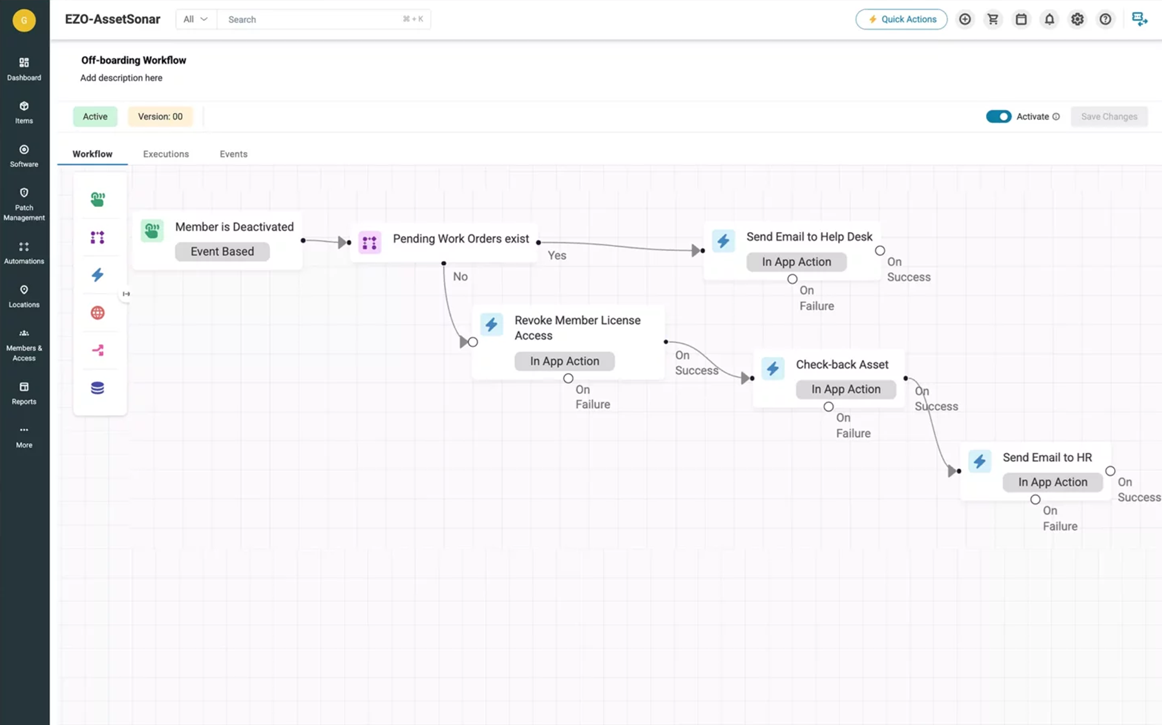
Once assets are being created, synchronized, and assigned automatically, use the Workflow Automation Engine to connect these events with downstream lifecycle actions. You can use triggers, conditions, and actions to update records, notify responsible teams, call connected systems, and route exceptions without creating separate manual handoffs.
4.1. Enable the Automation module
- Enable Automations. Go to Settings → Company Settings & Add Ons → Automations, select Enabled, and click Update.
- Open the workflow listing. Navigate to Workflows & Automations → Automations to view your existing workflows.
- Create a workflow. Select Create New Workflow, then enter a clear title and an optional description. AssetSonar will open the visual workflow canvas where you can configure the workflow logic.
4.2. Configure the trigger, conditions, and actions
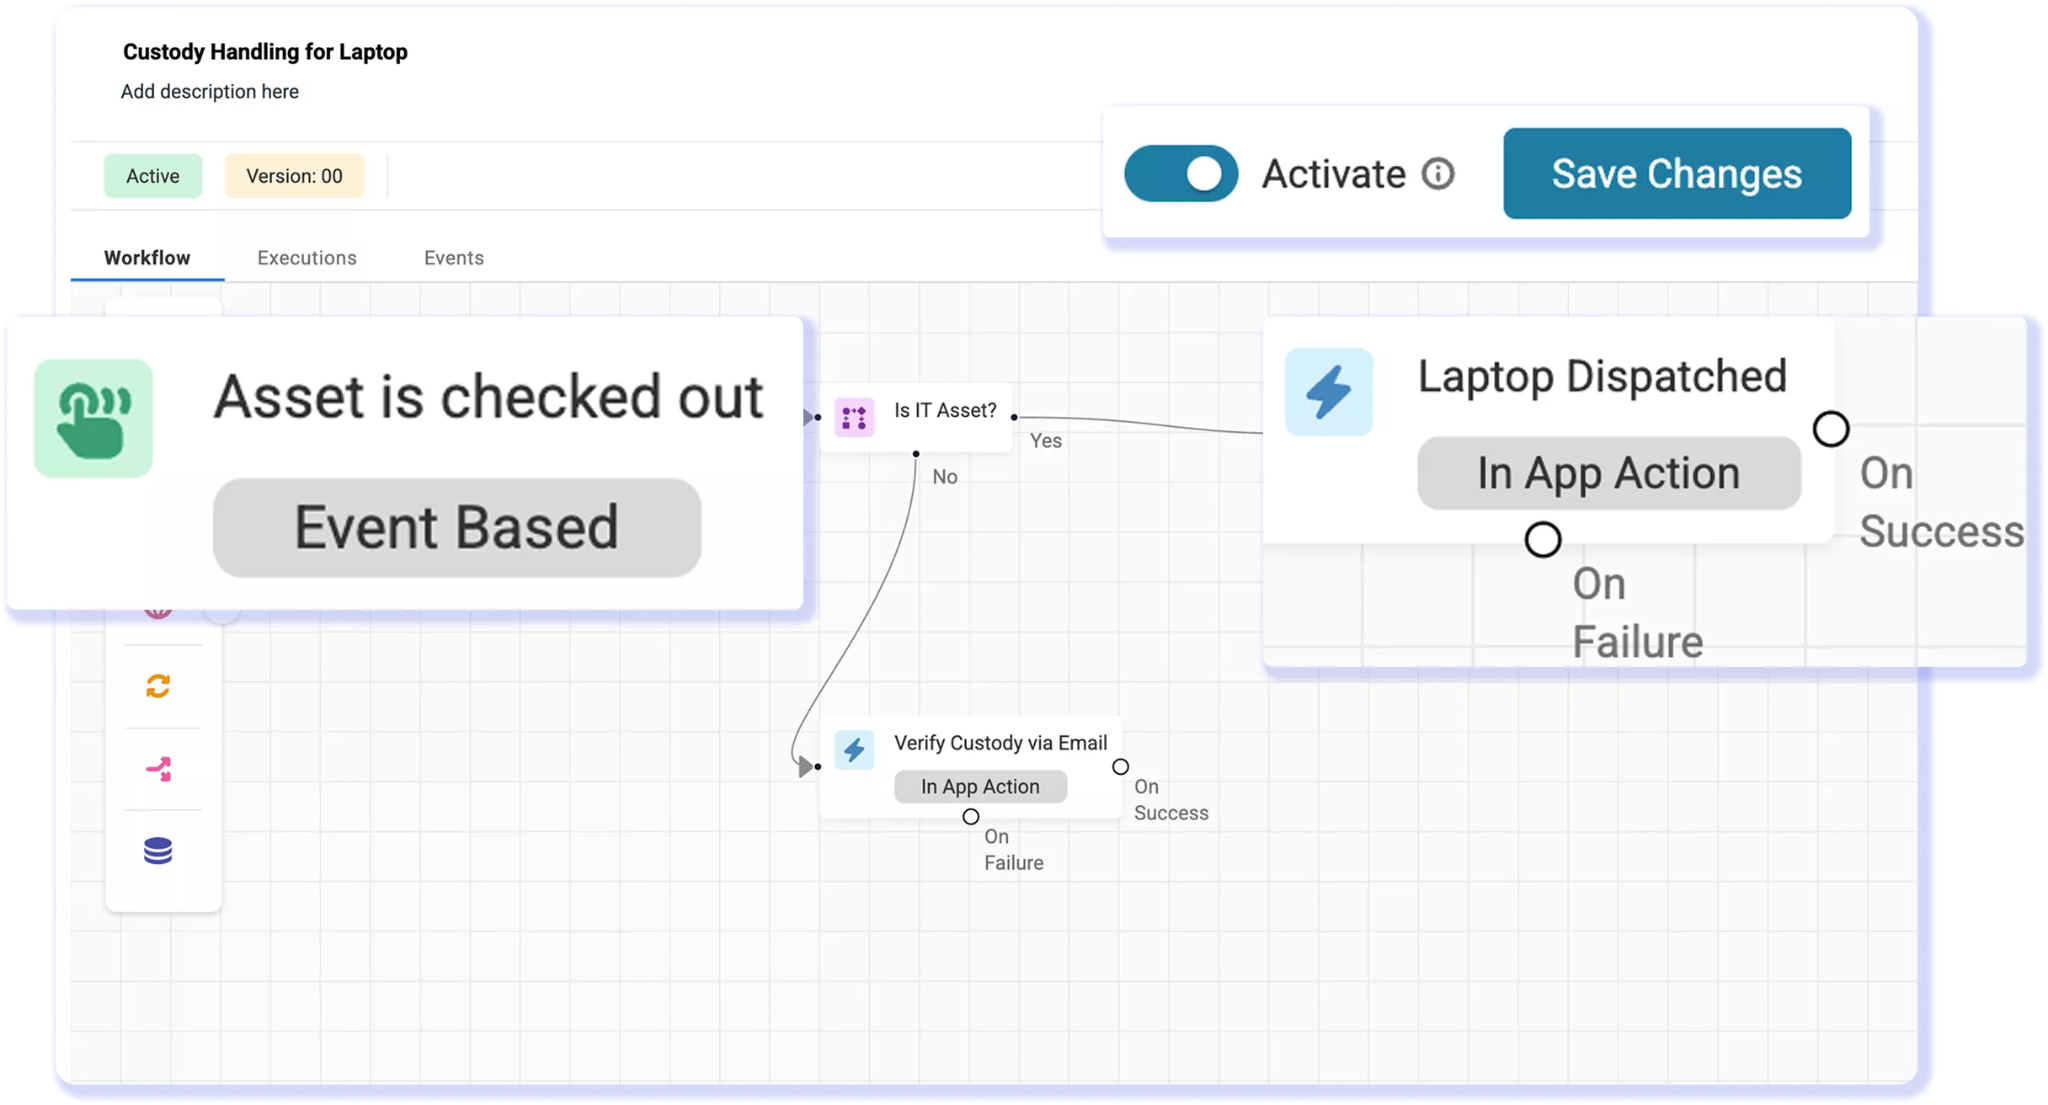
Every workflow begins with one Trigger and must contain at least one Action. Conditions are optional and allow you to limit the workflow to records that meet specific criteria.
- Configure the Trigger node. Choose the relevant module and an event-based or time-based trigger. If AssetSonar must send the trigger event to another system, configure a Trigger Webhook and its endpoint.
- Add Condition nodes where required. Define the criteria that must be true before an action runs. Available fields depend on the module selected in the Trigger.
- Add an Action node. Choose a module-specific action, such as updating an asset field or status, sending an email, retiring an asset, or making a Web Request.
- Configure the action. Enter the required recipients, values, or message content. Use placeholders where available to insert information from the triggering record.
- Connect the nodes. Connect the Trigger to the Condition and then to the Action. If no condition is required, connect the Trigger directly to the Action.
For example, you can use Asset is Created as the trigger, add conditions confirming that the record is an IT Asset assigned to your deployment location, and send an email containing the asset details to the deployment team.
This follows the worked example in the Workflow Automation Engine guide. Once the basic workflow works, add the actions required by your operating process.
4.3. Add branches, multiple actions, and placeholders
As the workflow becomes more advanced:
- Use success and failure branches when later steps should depend on the result of an earlier action.
- Chain multiple actions when the same event should update the record and notify another team.
- Use placeholders to insert event data—such as the asset name, custodian, location, or status—into emails and downstream actions.
- Use the Web Request node when the workflow must call a third party system for orchestration.
- Use the Data Transformation node to filter, sort, or deduplicate lists before downstream actions run.
4.4. Activate and monitor the workflow
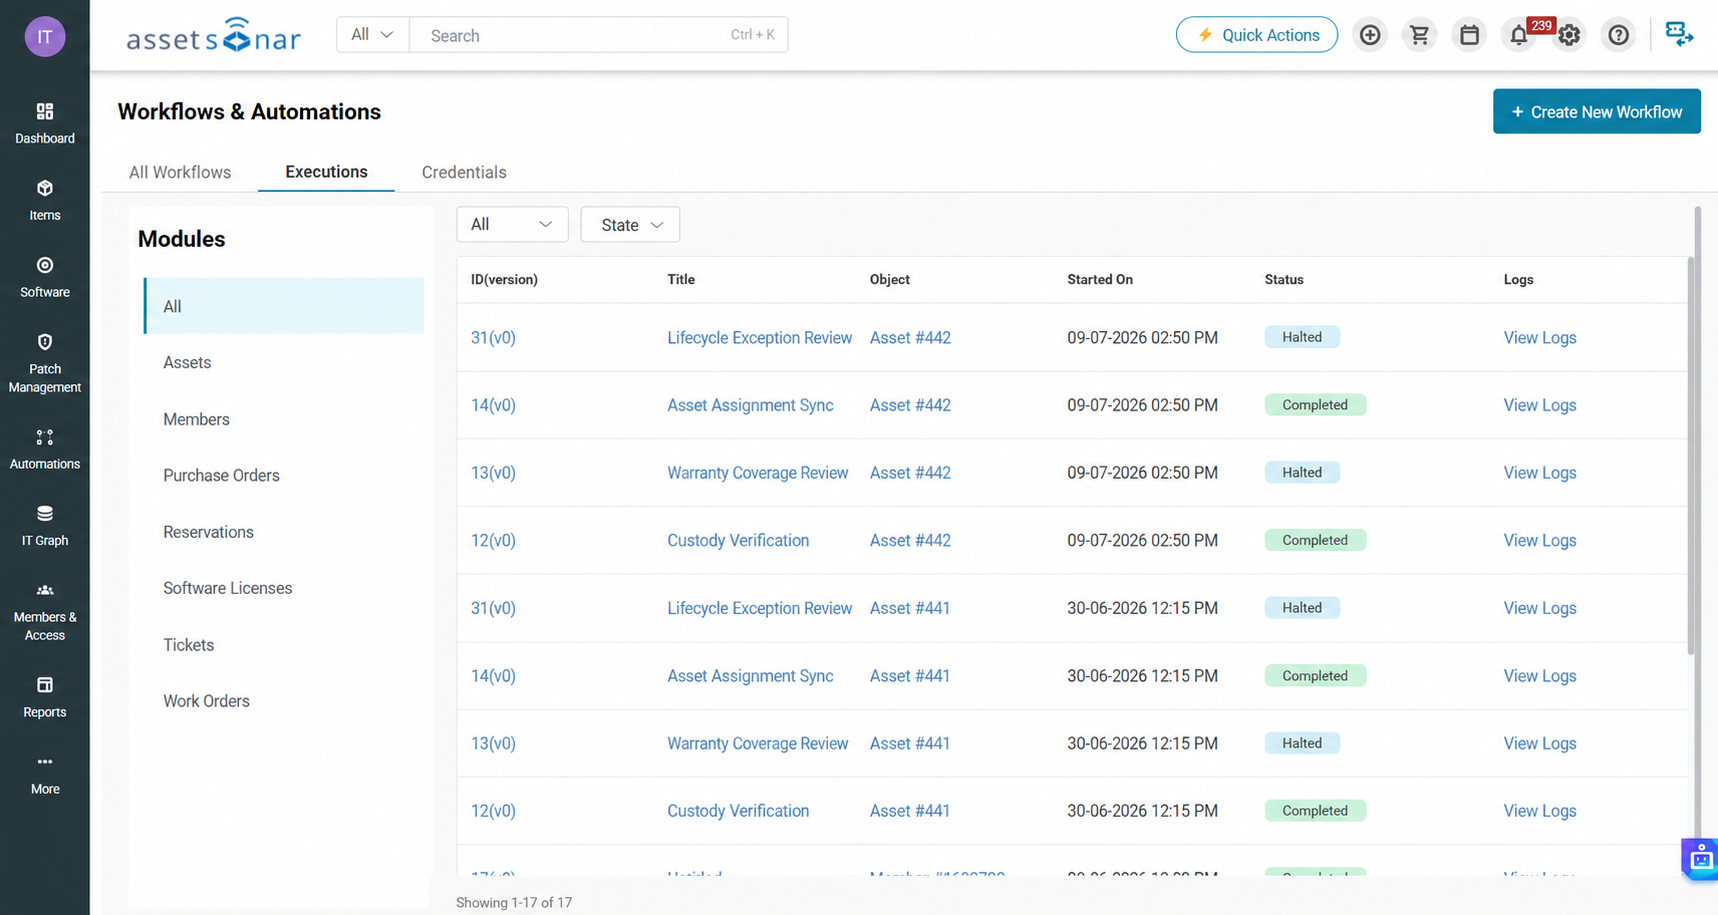
Save and activate the workflow. To test it, perform the configured trigger event on a pilot record—for example, create a test asset for an Asset is Created trigger—or wait for the configured schedule to run. Open Executions to verify the result.
Review:
- The trigger data received by the workflow.
- The nodes that were executed.
- Success and failure statuses.
- The condition branch followed.
- Detailed action and response logs.
Use the execution details to correct the workflow configuration or source data, then repeat the trigger. Apply the workflow to the wider process only after it produces the expected result consistently.
Important: Do not assume that every module exposes the same triggers, conditions, or actions. Configure only the options currently shown in your AssetSonar account, and test every branch before activating the workflow at scale.
With these workflows in place, asset information and lifecycle events can move directly into service and maintenance processes without losing ownership, location, or deployment context.
5. Connect Service Requests to Asset Maintenance
This section covers the handoff from an employee’s service request to the affected asset’s service or maintenance record. ITSM manages intake, routing, and assignment, while the asset-service features record the maintenance work and outcome.
5.1. Automate service intake and ticket routing
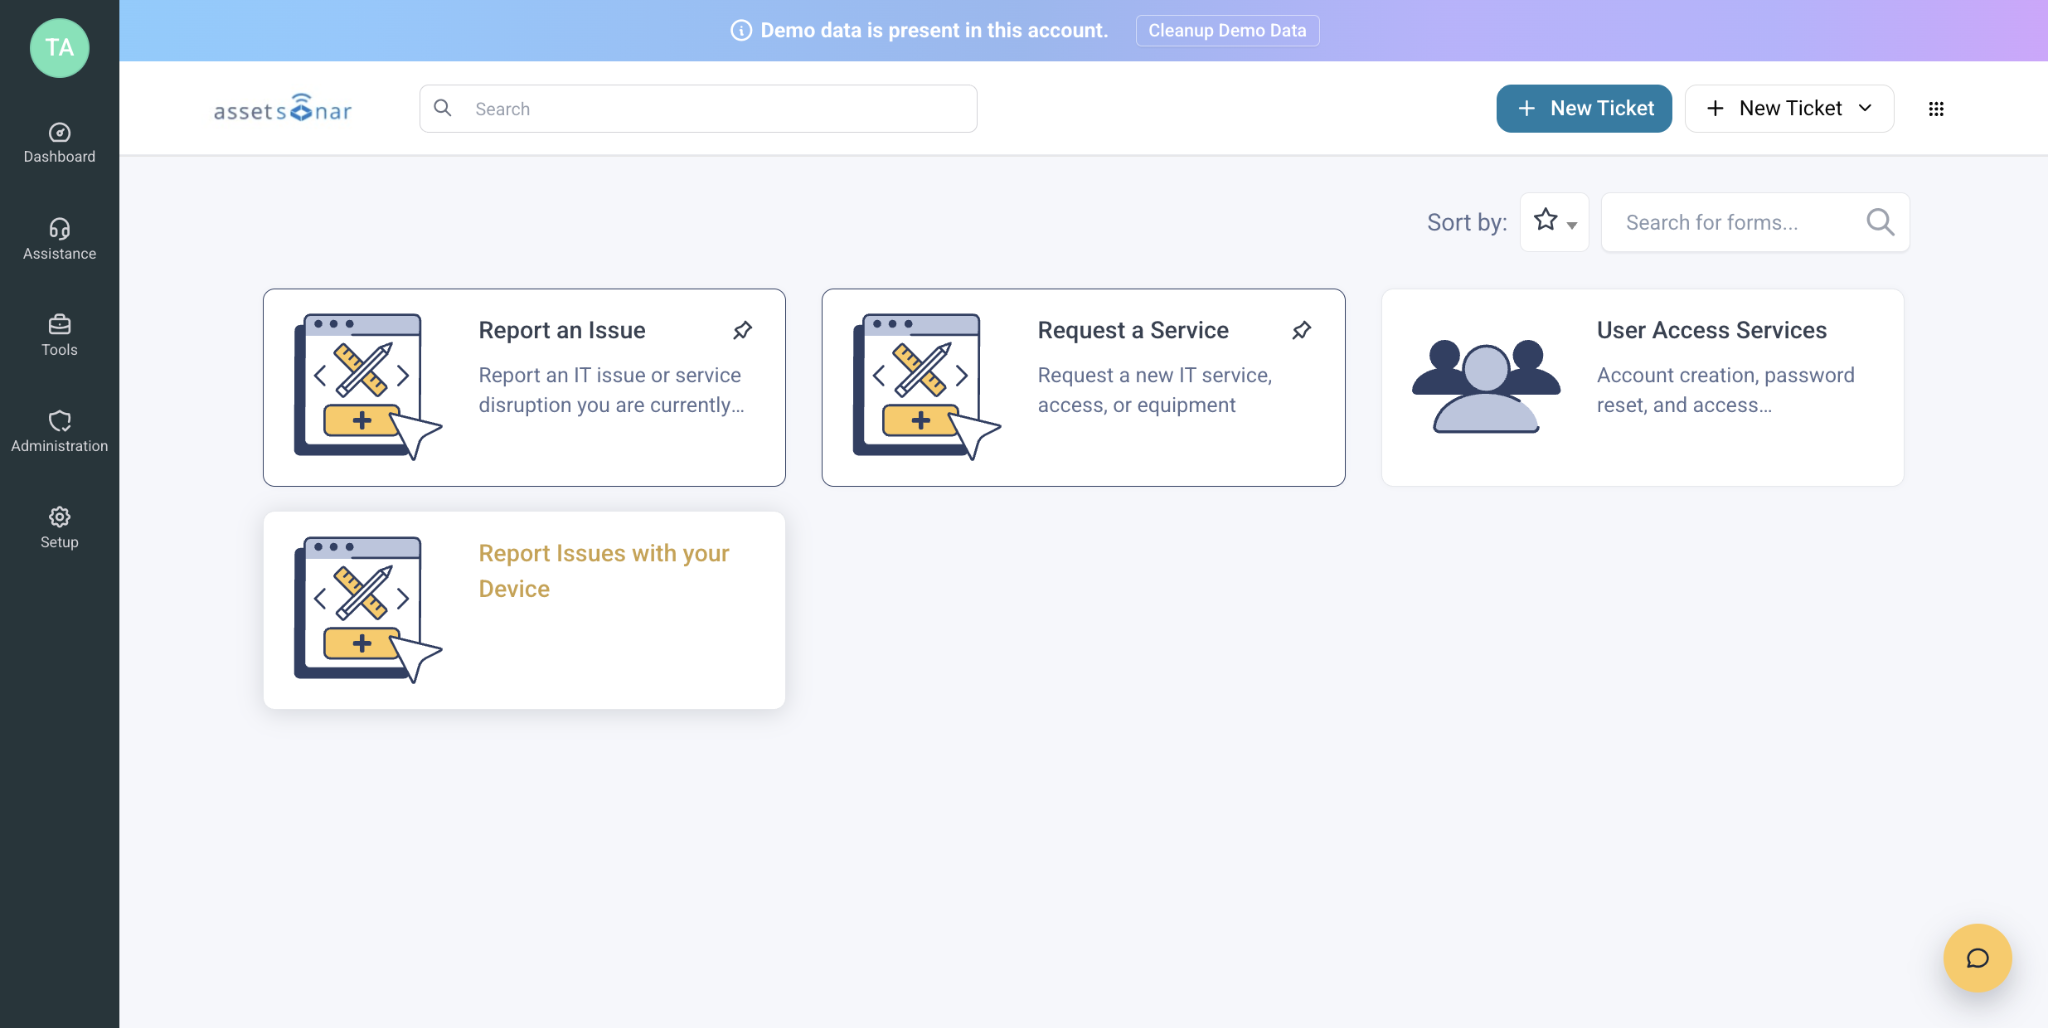
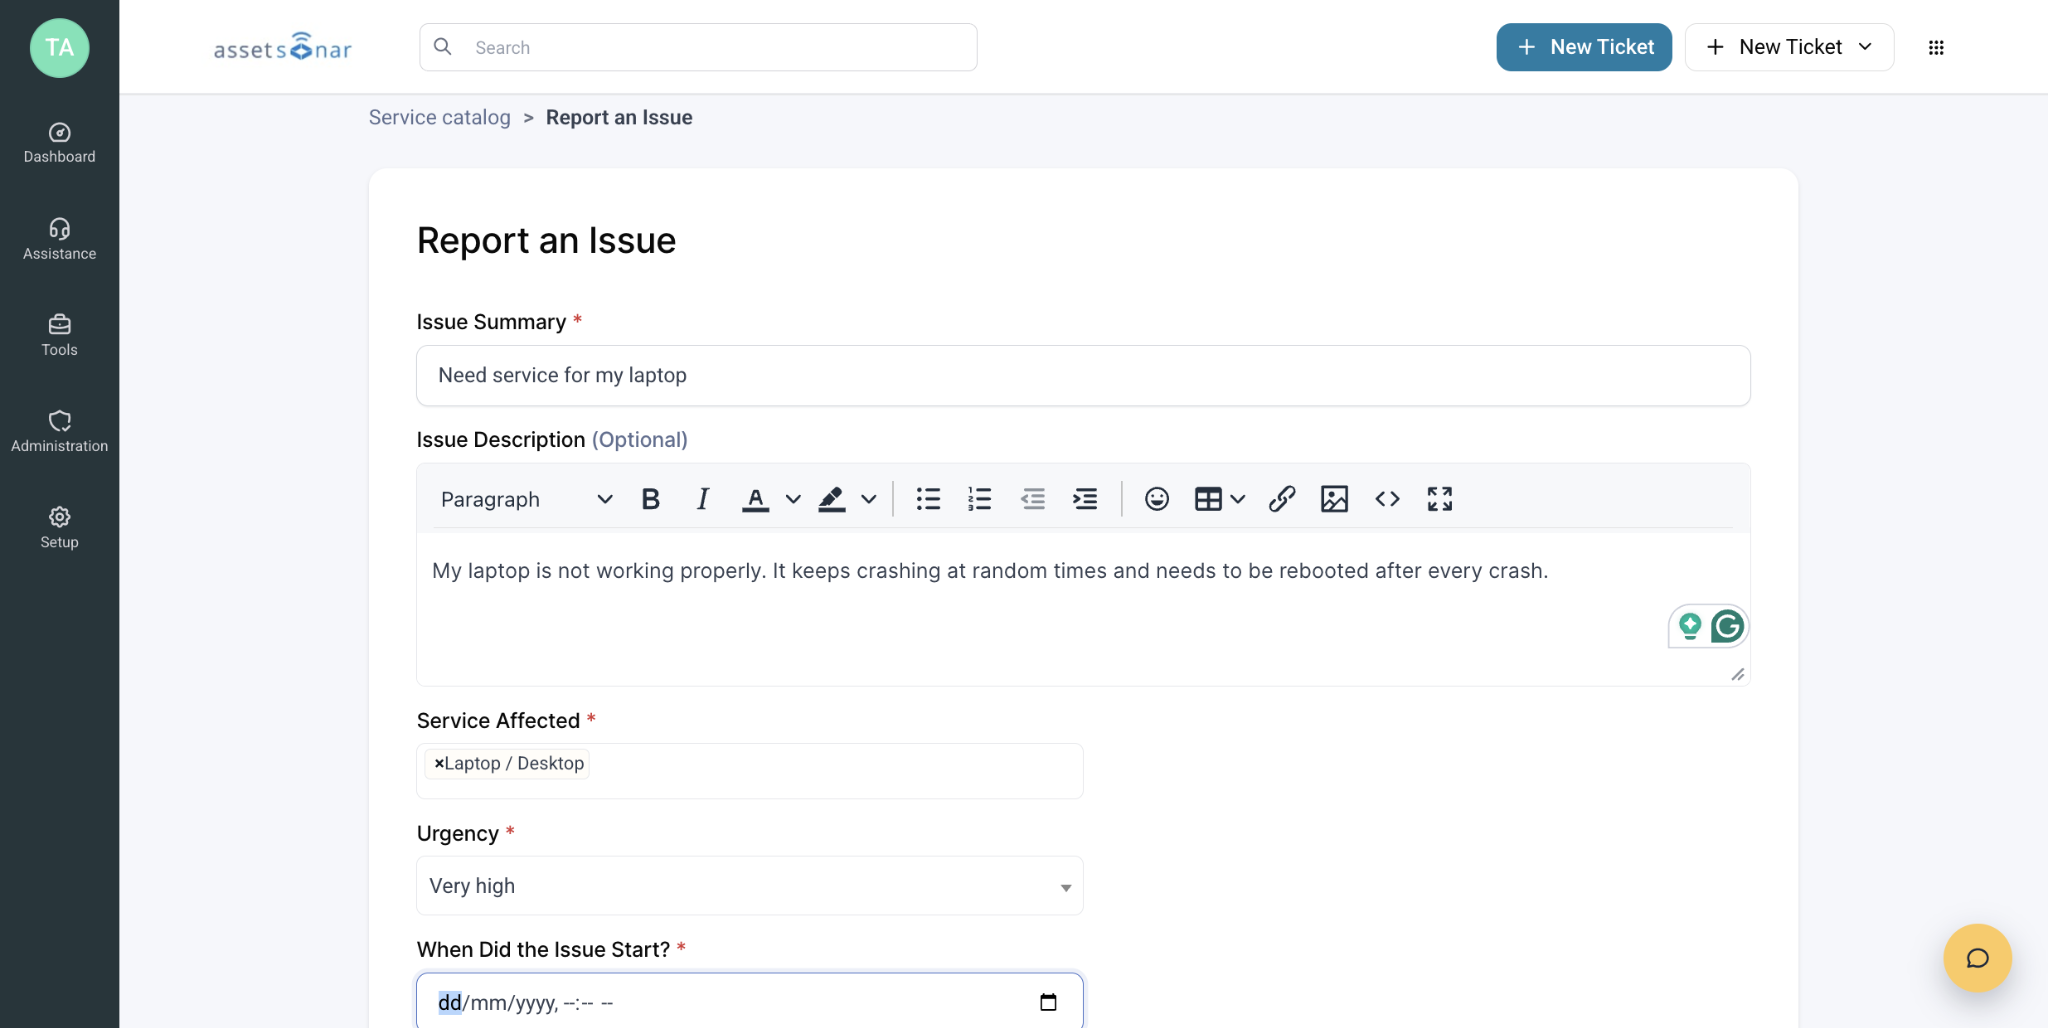
Publish forms for common requests such as Report an Issue, Request a Service, Hardware Access, or Software Access. Map the responses to the appropriate ticket fields so the service team receives the information required to categorize and investigate the request.
From the form’s Destinations tab, configure the submission to create a Ticket, Problem, or Change record automatically. Where required, the same submission can conditionally generate a follow-up, task, or approval. See the guides for creating tickets from the Service Catalog and linking workflows, tasks, and approvals to forms.
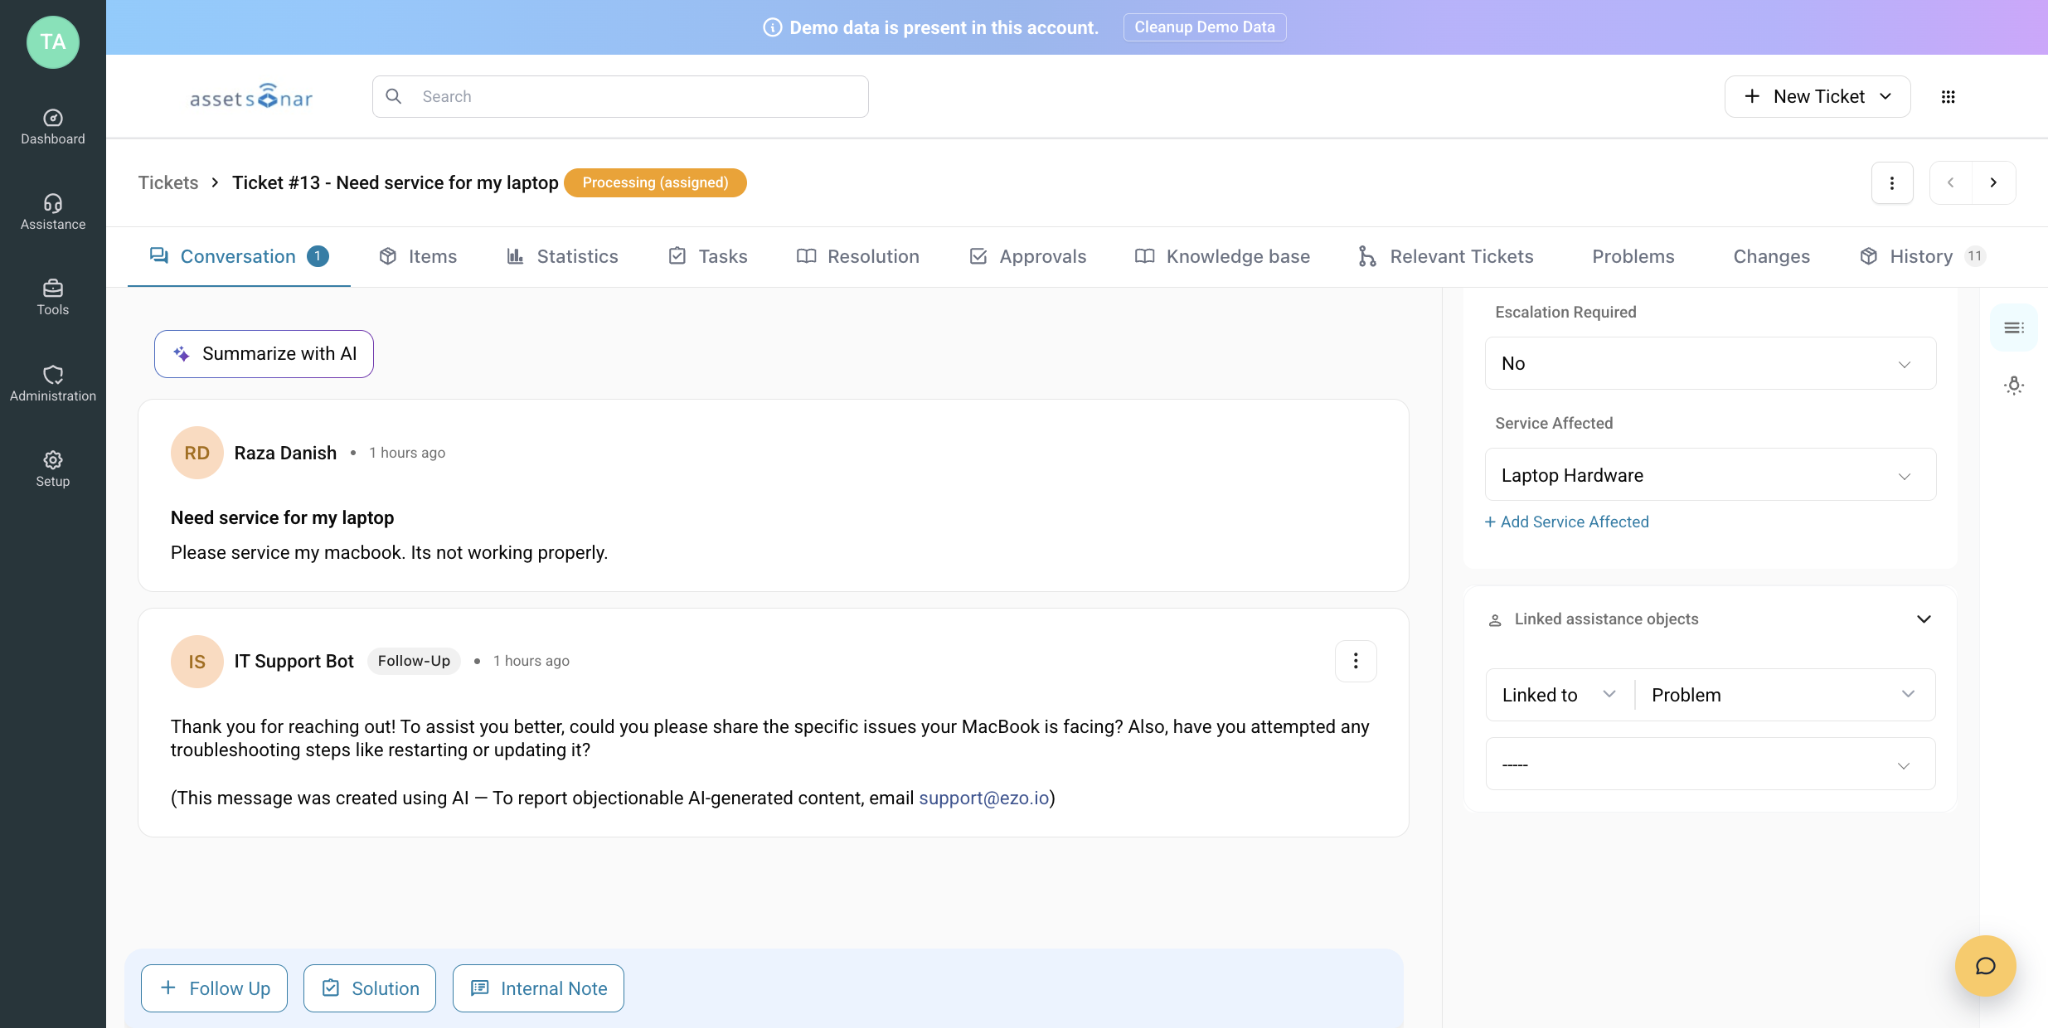
You can also configure email forwarding to convert messages sent to a shared support inbox into tickets automatically.
After the ticket is created:
- Use the ITSM Rule Engine to evaluate details such as category, urgency, impact, requester, location, or request source and route the ticket to the appropriate technician group.
- Use Ticket Routing to assign it to an individual technician through load balancing or round robin.
- Apply the required SLA, priority, approval, and notification rules for the request.
See the ITSM Rule Engine guide for the complete routing flow.
5.2. Connect the ticket to service and maintenance work
Open the ticket’s Items tab to view the requester’s assigned devices and software or link another affected item. Agents can take supported asset actions—including starting, scheduling, extending, or completing service—without leaving the ticket workspace. See Taking Actions on Items from ITSM Tickets.
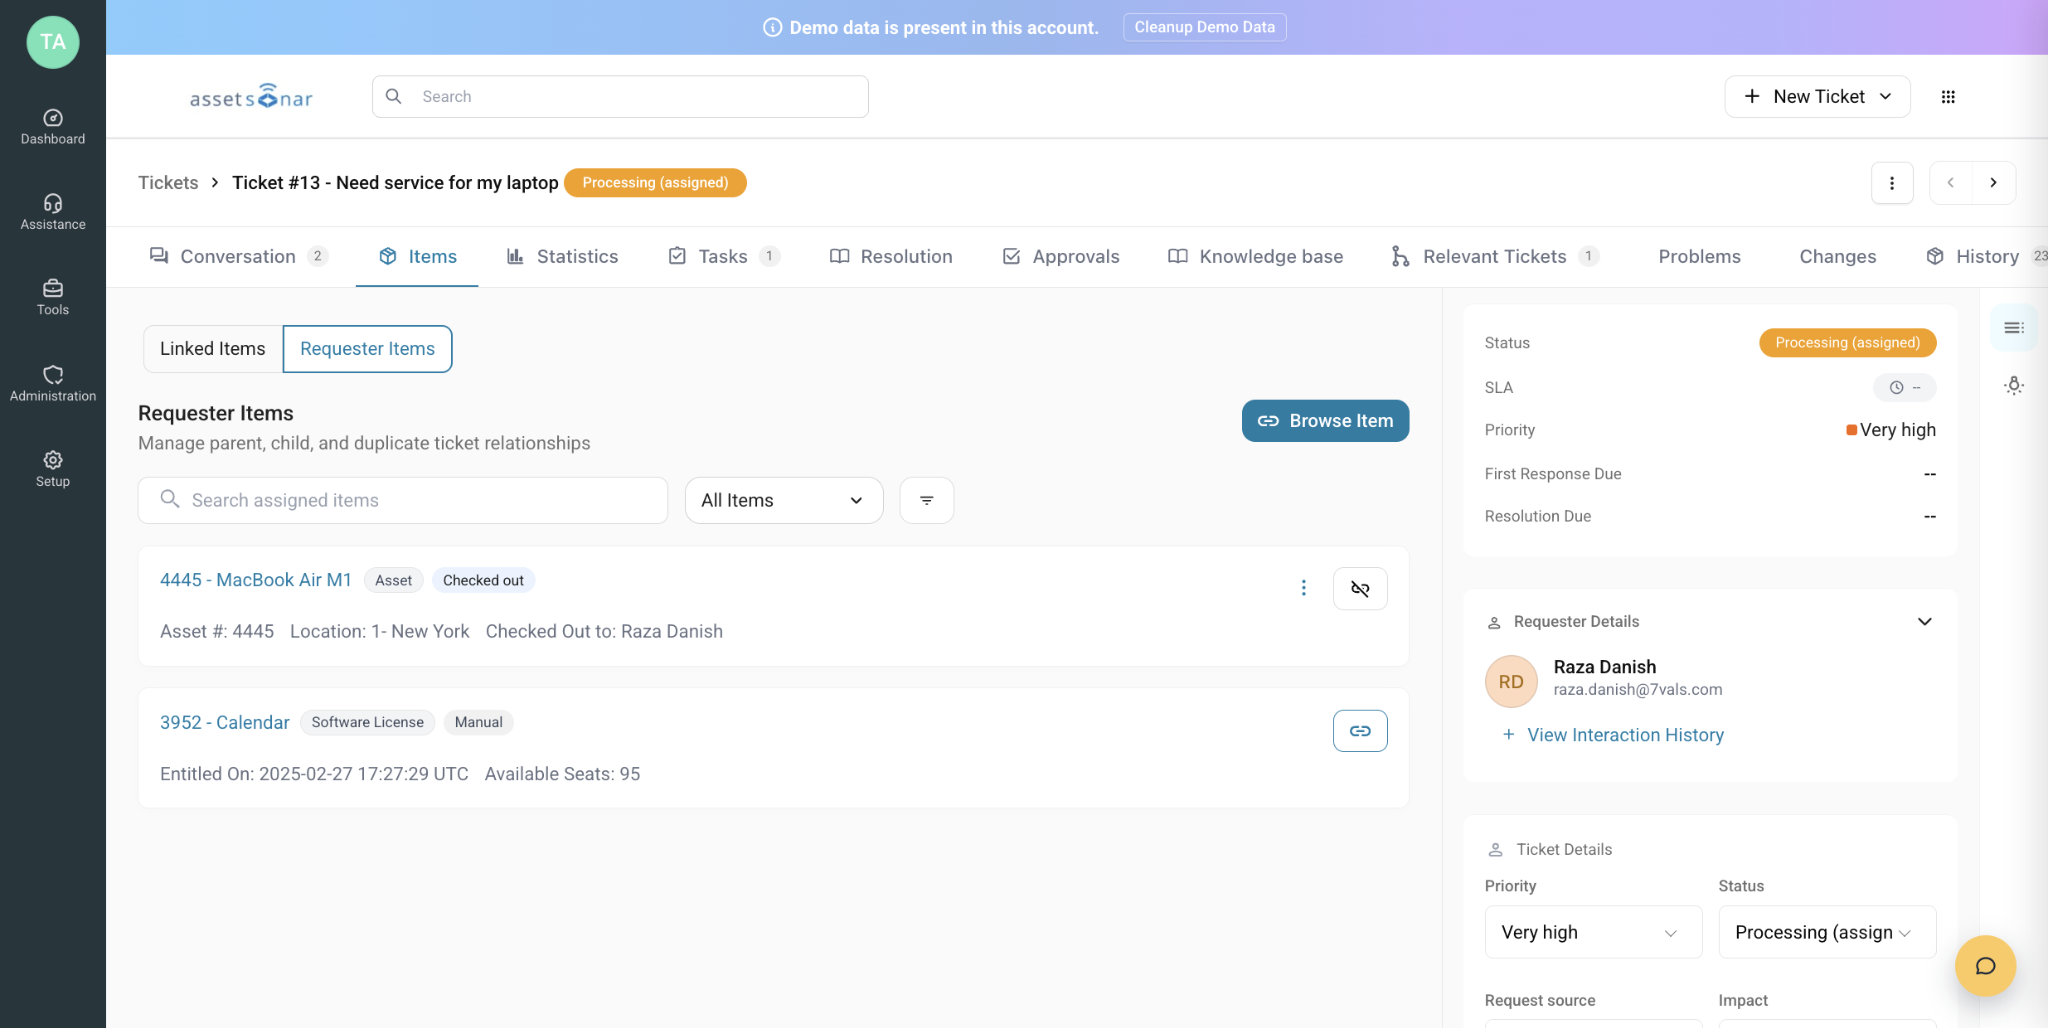
Use the Workflow Automation Engine described in Section 4 to coordinate the surrounding ticket and maintenance handoffs. Depending on the triggers and actions available in your account, a workflow can:
- Evaluate ticket, asset, user, location, priority, or other relevant data.
- Update supported records and notify the responsible team.
- Send the requester an acknowledgment.
- Follow different branches based on the request or action outcome.
- Send data to a warranty provider, repair vendor, or internal system through a Web Request.
For example, when a hardware-issue ticket is created, the workflow can acknowledge the requester and notify the hardware support team. If a Web Request to a repair system fails, the action’s On Failure branch can notify the automation owner for manual follow-up. Refer to the Workflow Automation Engine guide for the complete configuration process.
You can also manage service directly from the Asset details page. Open Service and select Start Service or Schedule Service. Use the Services tab to review maintenance activity, service dates, costs, service providers, and completion states. The Service and Maintenance guide explains the complete module.
For multi-step maintenance, create a Work Order containing assigned members, to-do items, instructions, dates, expenses, and labor information. Subscribe the responsible teams to service and work-order alerts so overdue work does not depend on someone checking a dashboard manually.
5.3. Preserve the human repair decision
Automate request creation, routing, assignment, acknowledgments, reminders, record updates, and documentation. Keep diagnosis, repair approval, repair-versus-replacement decisions, acceptance of completed work, and final service closure with the responsible technician or manager.
Together, the ticket, workflow, service, and Work Order histories give IT the evidence needed to decide whether an asset should remain in service, be repaired or replaced, or move toward decommissioning and retirement.
6. Automate Warranty, Contract, and Depreciation Tracking
Bring warranty, contract, and value data into the asset record so teams can act before coverage expires or maintenance costs make replacement the better option.
6.1. Synchronize manufacturer warranty data
AssetSonar provides native warranty integrations for supported manufacturers. Enable the integrations that correspond to the devices in your environment:
Follow the relevant guide to connect the manufacturer, configure the warranty and fulfillment-vendor details, run the initial synchronization, and enable automatic synchronization where available. In a mixed-device environment, configure each applicable integration rather than relying on one manufacturer connection for the entire fleet.
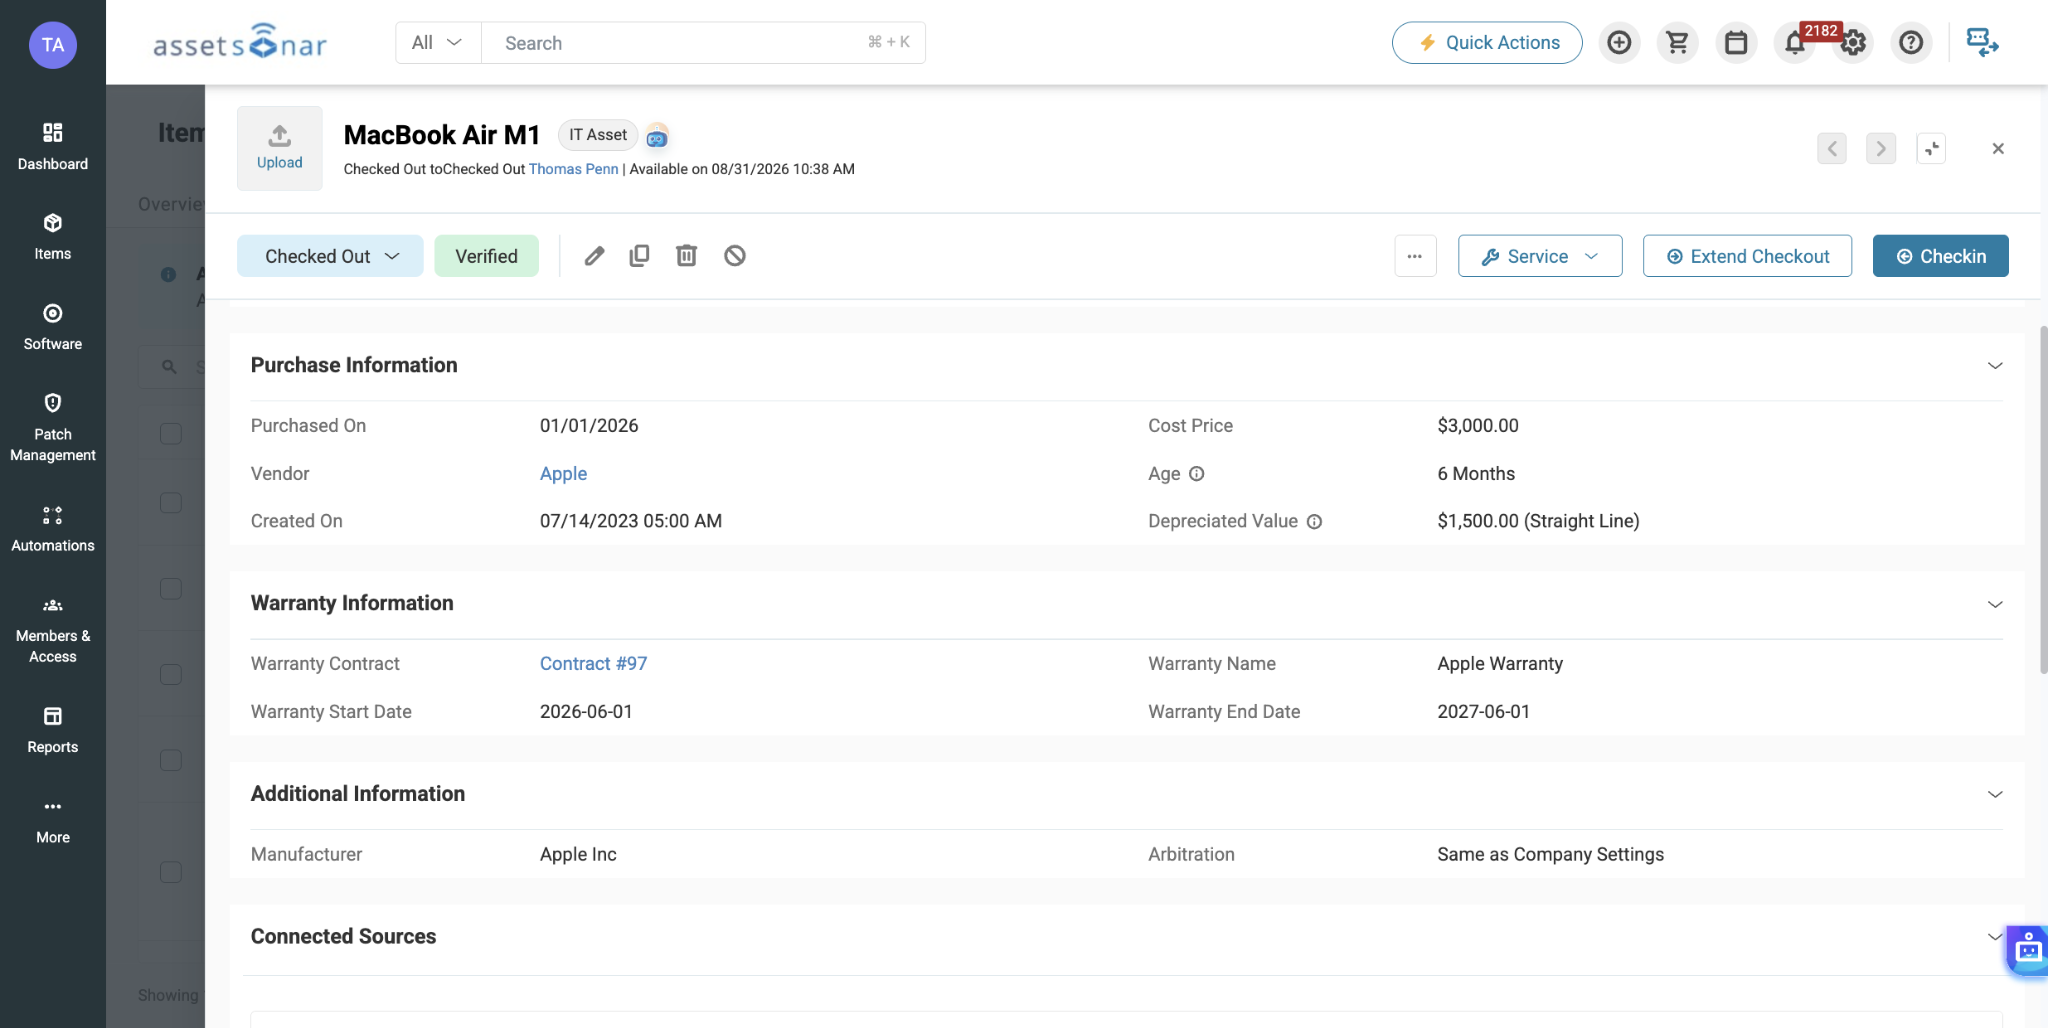
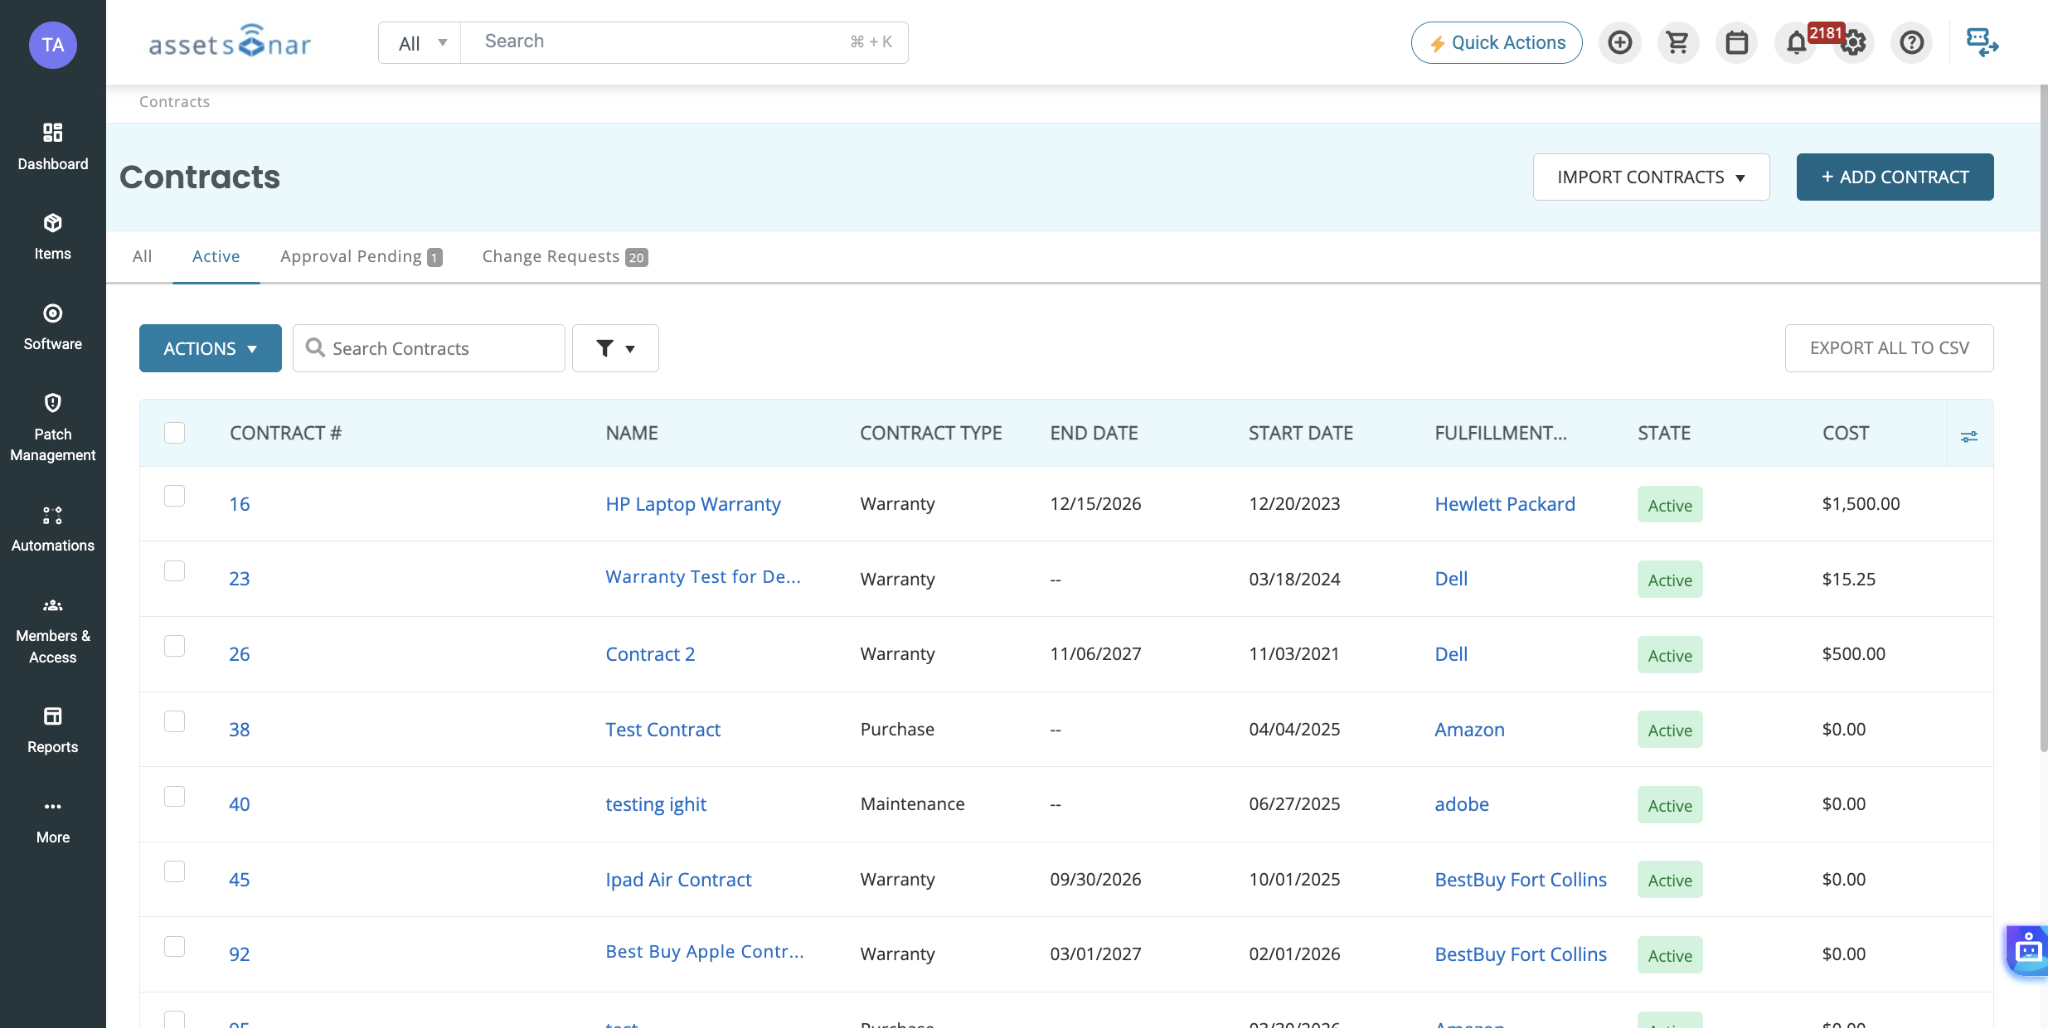
Synced warranties are linked to their corresponding assets as contracts. Review them from the asset’s Contracts tab or go to More → Contracts to view warranty coverage across multiple assets. This allows IT to check the coverage provider, start and end dates, and related device information before approving paid service, replacement, or renewal.
If AssetSonar does not provide a native integration for a manufacturer or warranty provider, go to More → Contracts to create the warranty contract manually or import multiple contracts from an Excel file. Link each contract to the covered assets, then configure the expiration alerts described in the next section. See the Contract Management guide for the complete process.
6.2. Create lifecycle date alerts
If the integration you need is not available—or if your process needs another milestone—create a Date Time Field (alert) under More → Custom Fields.
Configure email notifications on, before, or after the specified date. Useful examples include:
- Warranty review.
- Planned refresh.
- Lease return.
- Certificate renewal.
- Contract renewal.
- End-of-support review.
Use More → Alerts to subscribe the appropriate administrators and teams to contract, service, purchase-order, member, license, retirement, and other lifecycle events.
The Alerts guide explains recipient behavior and available alert categories.
6.3. Track operational depreciation
- Enable depreciation. Go to Settings → Add Ons → Asset Depreciation and select Enabled.
- Choose the model. Configure Straight Line, Declining Balance, or both models based on your reporting needs.
- Set group-level rates. Enter the applicable depreciation rate on each asset group.
- Review reports. Use the built-in depreciation reports to compare purchase cost, depreciated value, asset age, and retirement timing.
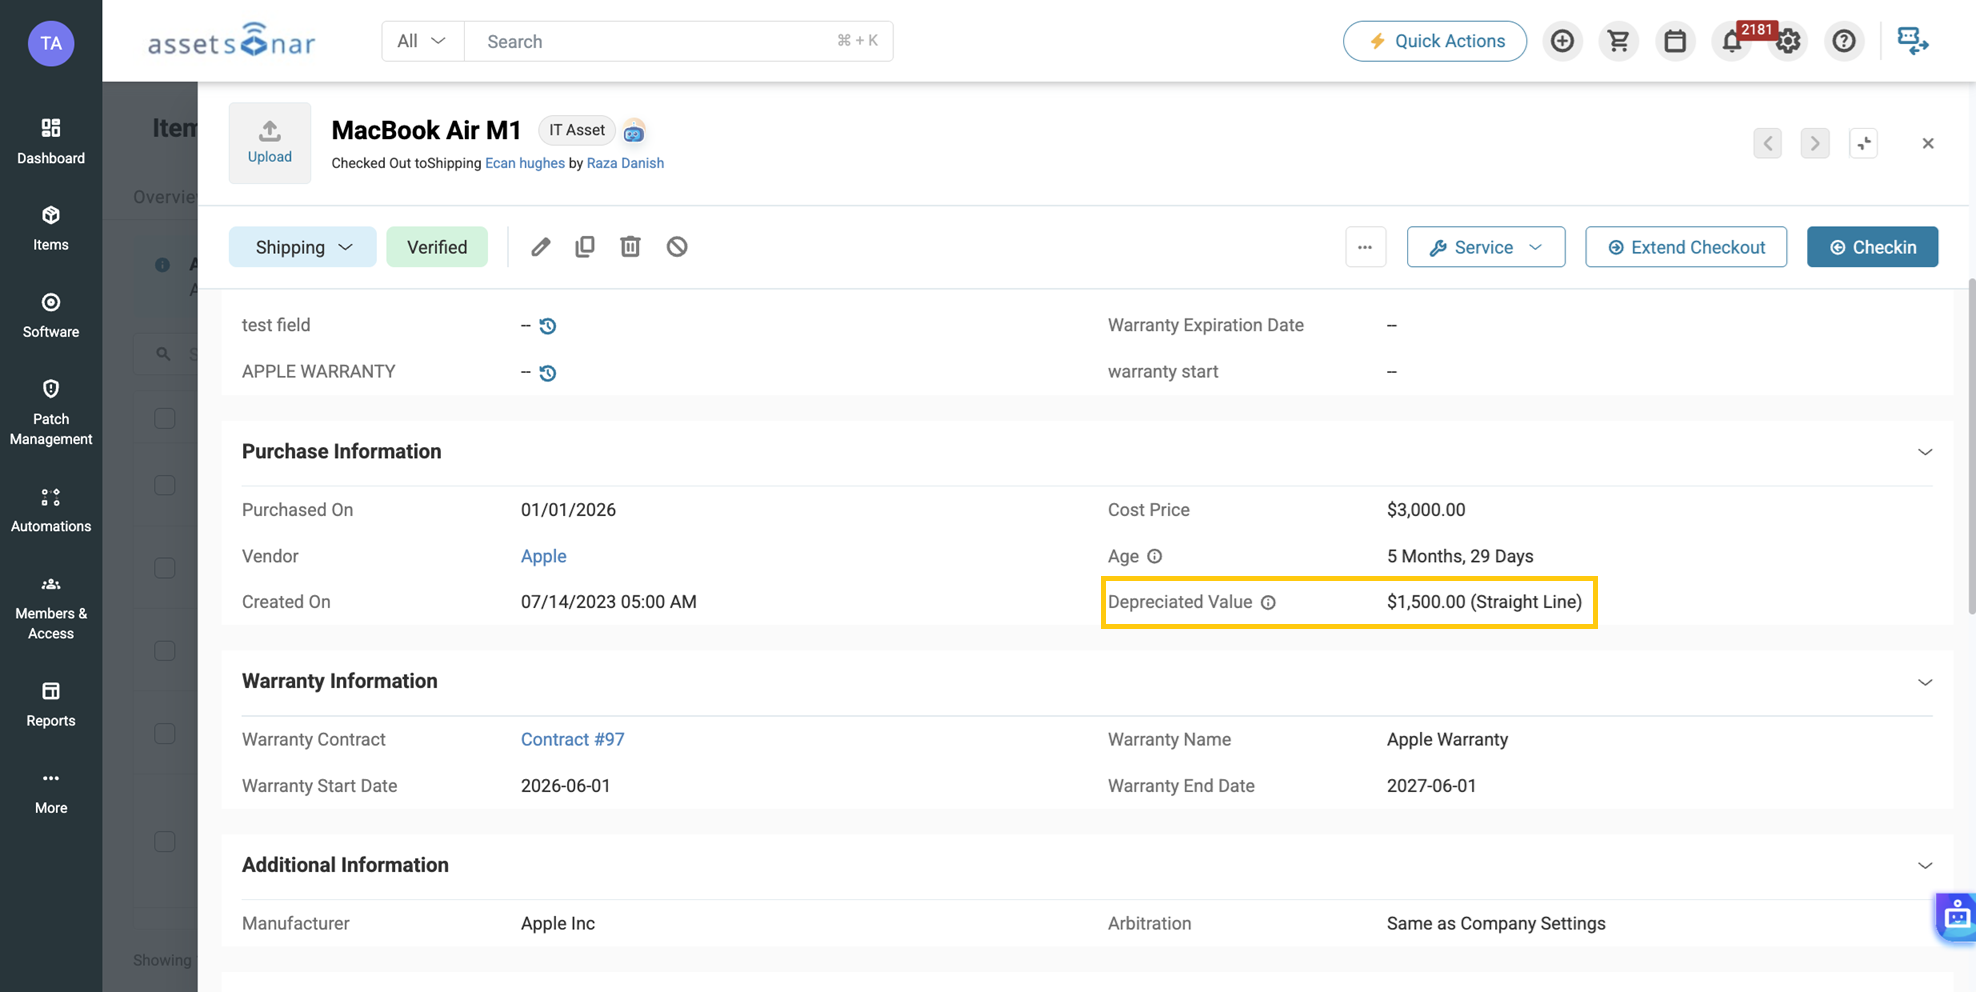
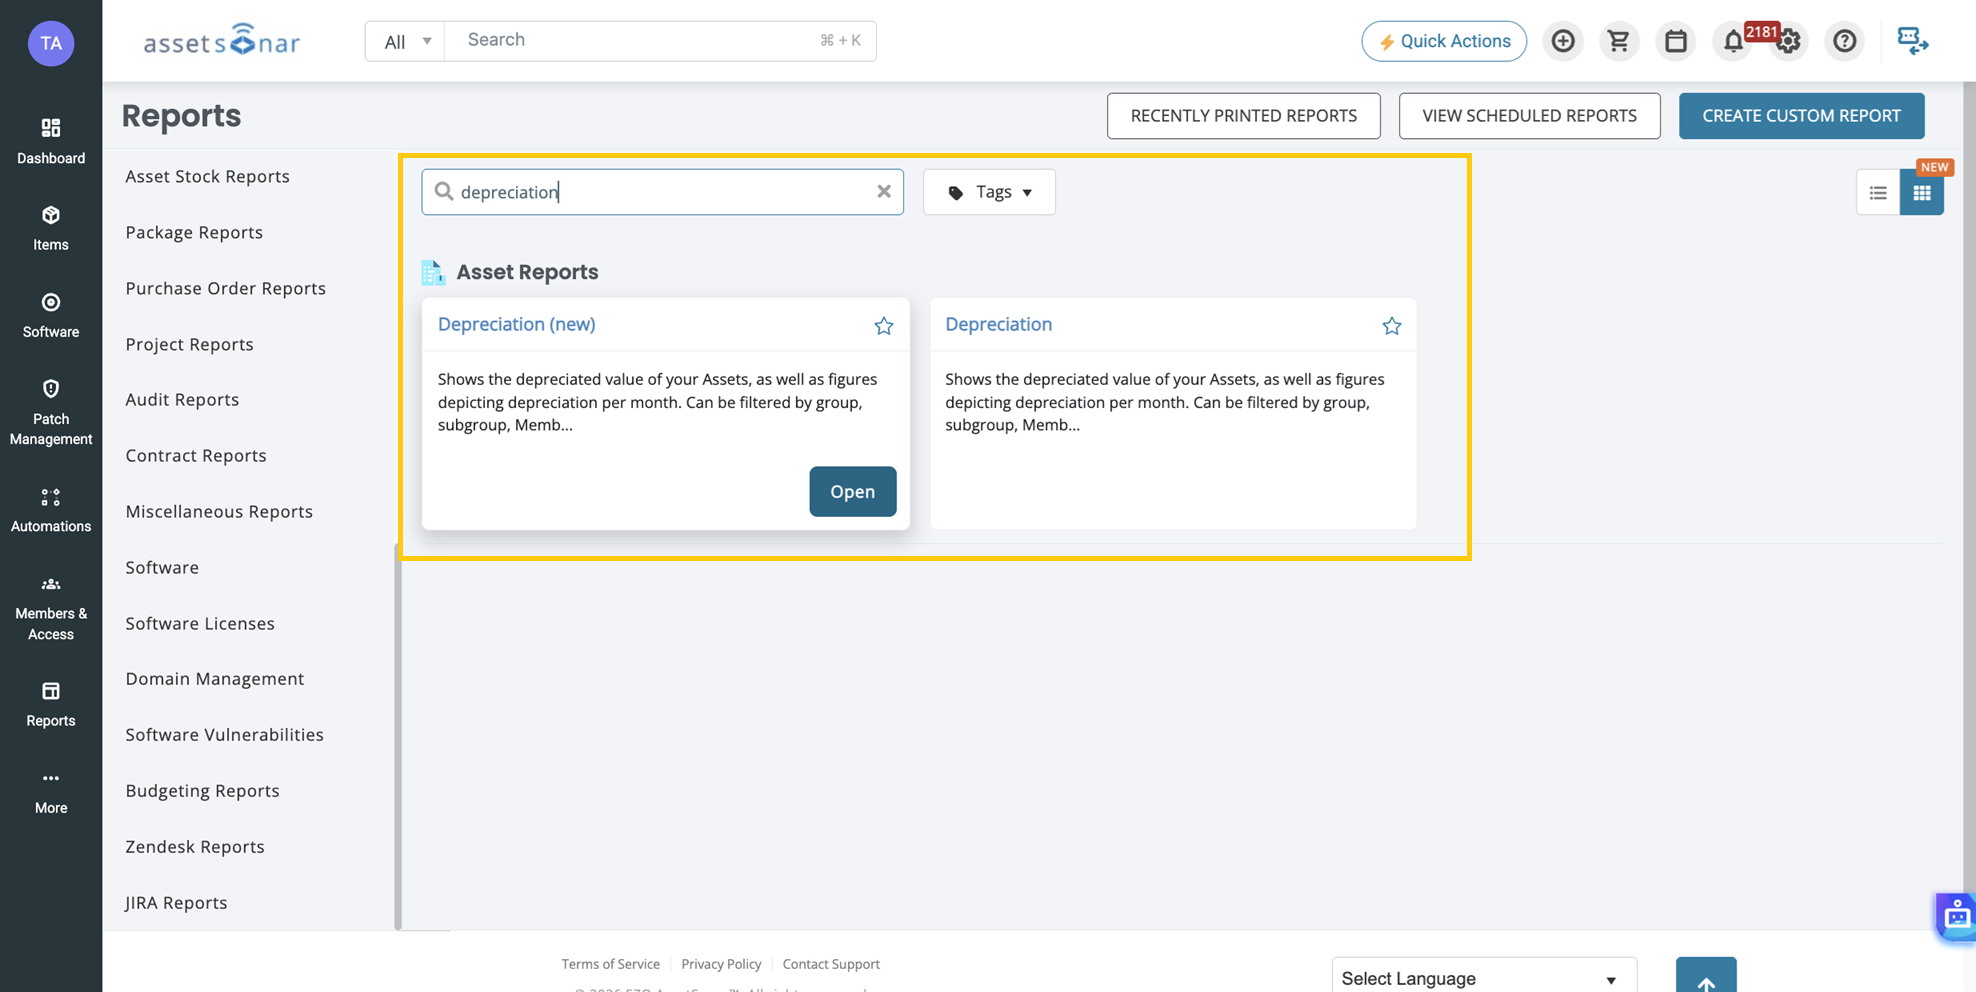
See the IT Asset Depreciation guide for calculation behavior around purchase, disposal, retirement, salvage value, and year-end settings.
Note: Use AssetSonar depreciation to support operational planning and refresh decisions. Your Finance or ERP system may remain the authoritative ledger for book depreciation.
7. Standardize Asset Decommissioning
Decommissioning begins before an asset is formally retired. IT must recover the device, remove or transfer custody, record its condition and location, resolve outstanding work, and decide whether it should be reassigned, repaired, stored, sold, disposed of, or retired.
Employee departure may initiate this process, but the focus here is completing the required actions and evidence for the affected assets. Use the dedicated Offboarding Center guides for the complete employee-exit workflow.
7.1. Complete the decommissioning checks
Before decommissioning or retiring an asset, confirm that:
- The physical device has been recovered, or its absence has been documented.
- Custody has been removed from the departing employee.
- The asset’s current location and condition are recorded.
- Open service requests, tickets, and work orders have been resolved or transferred.
- Applicable software licenses and access requirements have been reviewed.
- Repair, reassignment, storage, sale, disposal, or retirement has been approved.
- Any required data-transfer or data-destruction evidence has been attached.
- The final asset record contains enough evidence for another administrator or auditor to understand the outcome.
Important: Offboarding Center automates the creation, staging, visibility, and tracking of work. Physical device recovery, approvals, and any linked action that requires authorization remain controlled steps. Do not mark the exit complete until the required evidence is present.
8. Retire Assets With Complete Records
Retirement may be recorded manually or triggered automatically through supported MDM integrations. In either case, your policy should define when retirement is authorized and what evidence must be retained.
Review the asset’s age, condition, service costs, warranty, utilization, depreciation, ownership, decommissioning checks, and open work before retiring it.
8.1. Configure automatic retirement for deleted MDM devices
Supported MDM integrations can detect devices deleted from the source and, where available, automatically retire the corresponding IT Asset in AssetSonar. Enable device-deletion detection and the Automatically Retire Deleted Devices option in the relevant integration settings.
Devices that are checked out, in maintenance, or connected to multiple discovery sources are not retired automatically and should be reviewed as exceptions. Treat deletion from the MDM as an approved retirement signal before enabling this option. If your process requires review, enable deletion detection and alerts without automatic retirement.
8.2. Record the retirement
- Open the asset. Go to Items → Assets and open the relevant Asset details page.
- Select Retire. Choose Retire from the available asset actions.
- Enter the outcome. Record the disposed or sold price, retirement reason, date, and comments explaining what happened to the asset.
- Confirm the action. Select Retire to move the asset to the retired state while preserving its lifecycle record.
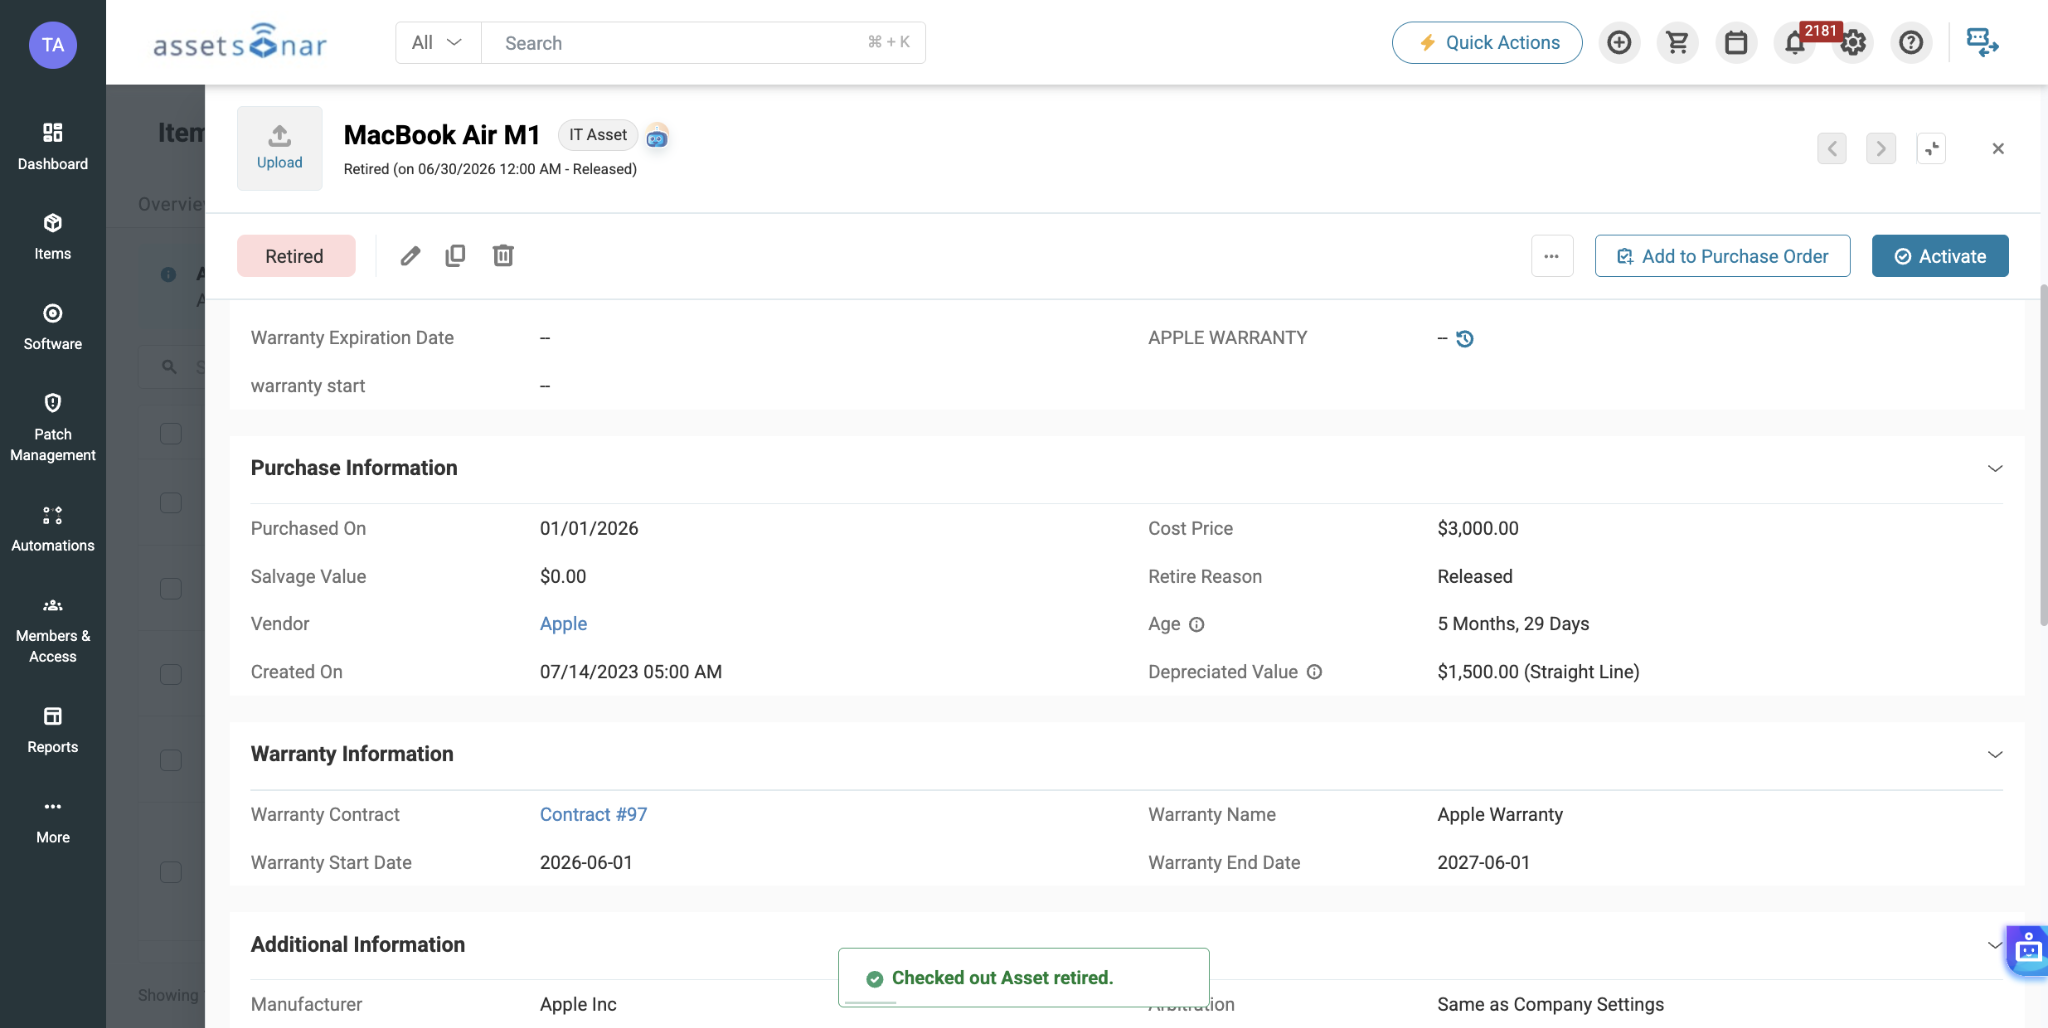
If your process permits the retirement of assets that are still checked out, enable Retire Checked Out Items under Settings → Company Settings.
The Checked-out Asset Retirement guide covers this flow and its related controls.
8.3. Preserve and review retirement evidence
After retirement:
- Subscribe administrators to retirement and reactivation alerts from More → Alerts.
- Create a retirement report from Reports → Create a Custom Report using Asset as the primary module.
- Include the previous state, retirement date, reason, custodian, action taker, cost, depreciated value, and disposal or sale value.
- Attach the disposal certificate, data-destruction evidence, approval, or sale documentation required by your policy.
- Review retired assets with incomplete reasons, values, or supporting documentation.
9. Monitor Automations and Maintain Audit Evidence
Lifecycle automation is complete only when you can show what ran, what changed, where it failed, and what a person approved.
9.1. Review workflow executions
Use the Automation Engine’s Executions tab to review each workflow run.
Investigate:
- Failed nodes.
- Missing trigger or condition data.
- API and webhook responses.
- Unexpected condition branches.
- Actions that completed only partially.
- Runs that did not produce the expected record change.
Correct the workflow or source data before retrying or expanding its scope.
9.2. Review Item Trail and lifecycle history
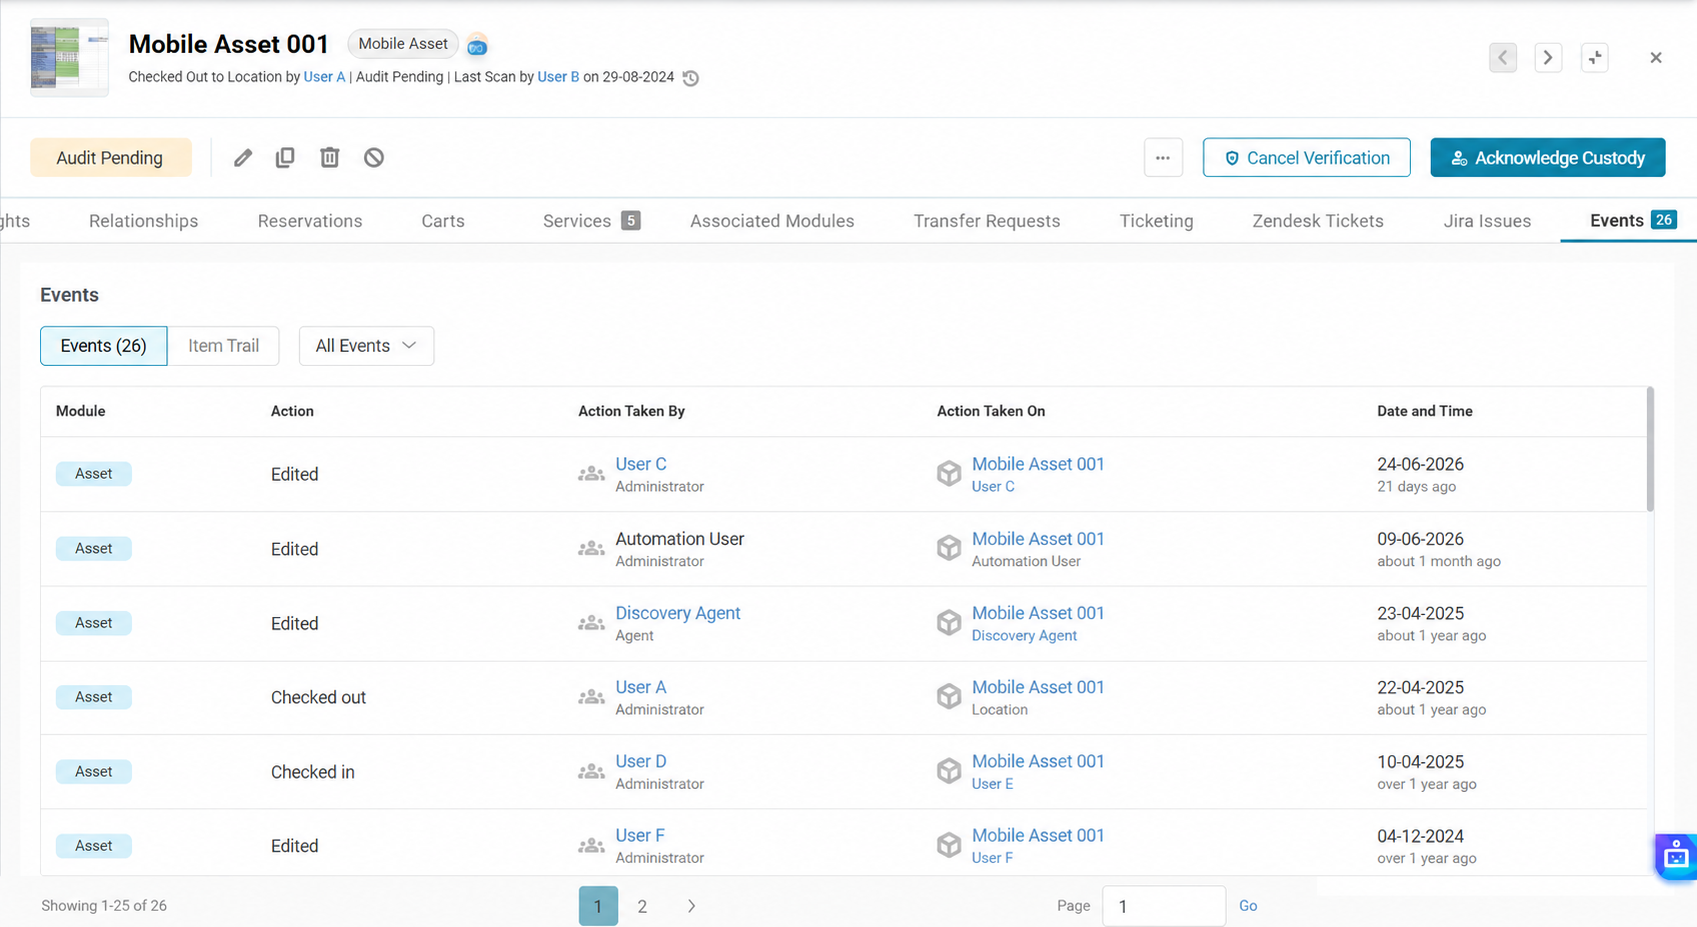
Open an asset’s Events tab and select Item Trail to review changes made by users and integrations.
The Item Trail guide explains how to filter changes by module, action, date, and time.
Use Item Trail alongside checkout history, service history, ticket history, workflow executions, and retirement reports to reconstruct the complete asset story.
If Item Trail is not available in your account, contact support at support@ezo.io to confirm enablement requirements.
9.3. Use reports for lifecycle exceptions and audits for physical verification
Use Custom Reports to monitor exceptions such as:
- Discovered assets without a custodian, group, or location.
- Duplicate or incomplete asset records.
- Auto Checkout failures.
- Assignments awaiting custody verification.
- Assets with warranties, leases, or refresh dates approaching expiry.
- Overdue service and open work orders.
- Assets with repeated repair activity.
- Assets awaiting a decommissioning decision.
- Retired assets without a reason, disposal value, or supporting documentation.
Use Location Audits separately to verify whether assets expected at a location are physically present, missing, denied, or flagged. Use Custody Audits to confirm that checked-out assets remain with their assigned custodians.
10. Roll Out Lifecycle Automation in Stages
Avoid rolling out every lifecycle control at once. Use a controlled rollout:
- Phase 1 — Data foundation: Configure your AssetSonar structure, connect discovery and identity sources, and resolve data-quality exceptions.
- Phase 2 — High-volume handoffs: Automate procurement ingestion, Auto Checkout, location updates, and essential alerts.
- Phase 3 — Operational workflows: Add service, maintenance, and custom Automation Engine workflows.
- Phase 4 — Financial and end-of-life controls: Connect warranty data, configure depreciation, standardize decommissioning and retirement, and schedule audit reports.
- Phase 5 — Continuous improvement: Review execution failures, Item Trail, audit exceptions, and lifecycle KPIs to refine the rules.
For each phase:
- Test the new integration, configuration, report, or automation with a limited group.
- Define the expected outcome.
- Name the owner of failed executions and exceptions.
- Document the human checkpoint.
- Confirm that the required evidence is being retained.
- Expand the rollout only after the pilot produces consistent results.
Build a Lifecycle That Moves Without Losing Control
AssetSonar helps you automate the repetitive work between acquisition and retirement while keeping the decisions that carry financial, security, or compliance risk under human control. With reliable integrations, focused workflows, structured service and decommissioning processes, and complete audit evidence, each lifecycle stage can begin with the context created by the stage before it.
For additional assistance with configuring asset lifecycle automations, contact us at support@ezo.io.

![[How-to] Automate IT Workflows in AssetSonar](https://cdn.ezo.io/wp-content/uploads/2024/09/04125918/Automate-IT-Workflows-in-AssetSonar-1.jpg)