SonarSight gives authorized users secure, desktop-style remote access to supported devices directly from their asset records. IT teams can use it to investigate device issues and provide remote support while keeping the device’s ownership, software, and service context available.
You can also start sessions from IT Graph, asset cards in ITSM, and connected Zendesk and Jira views. Session activity is recorded against the asset and can be included in custom reports.
This guide covers enabling SonarSight, deploying it to devices, configuring access permissions, starting sessions, and reviewing session activity.
Before You Begin
Use an account with permission to manage company settings and user roles to complete the setup. You will also need to enable Two-Factor Authentication; to do that, go to Company Settings → Log in Authentication → Enable Two-Factor Authentication.
Additionally, the target device must have SonarSight installed, be online, and fall within your permitted asset scope for a remote session to be started on it.
1. Enable and Configure SonarSight
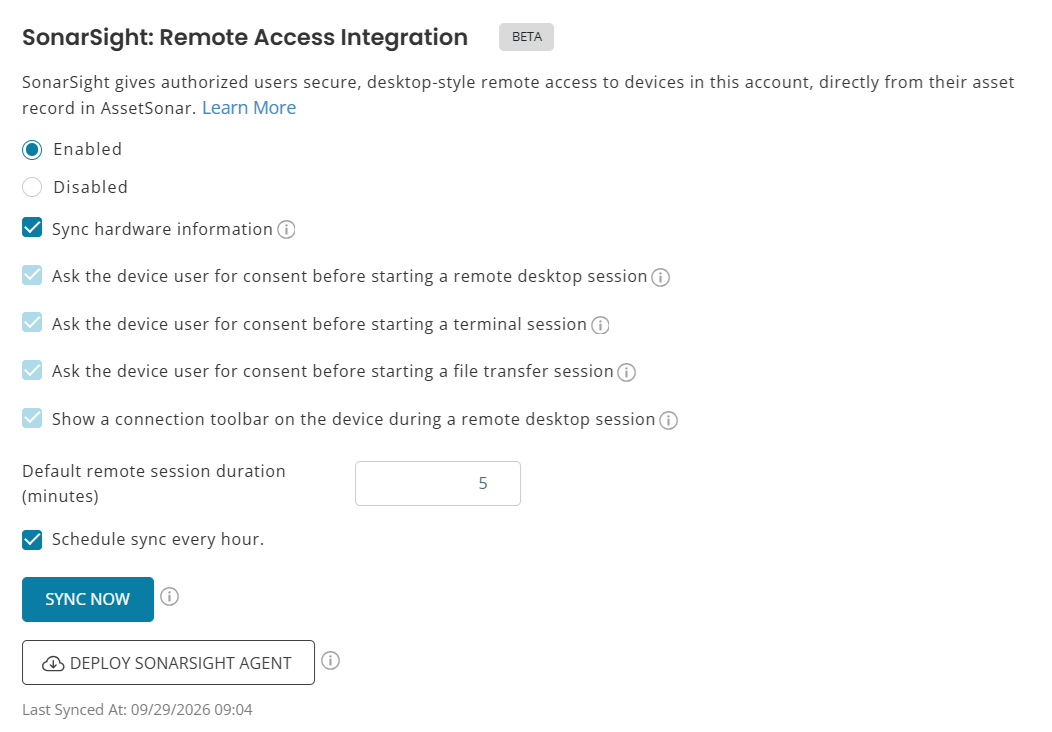
- Go to Settings → Integrations and locate SonarSight: Remote Access Integration.
- Select Enabled.
- Select Sync hardware information if you want device hardware details synced to your account. With this option enabled, deploying SonarSight also installs the latest ITAM Agent.
- Review the consent settings for remote desktop, terminal, and file-transfer sessions. These settings control whether the device user is asked for consent before the respective session starts.
- Review Show a connection toolbar on the device during a remote desktop session. This setting controls whether a connection toolbar appears on the device during desktop access.
- Set Default remote session duration (minutes) to the duration you want to use. For example, enter 5 for a default duration of five minutes.
- Select Schedule sync every hour if you want synchronization to run hourly.
- Click Update to save your changes.
To sync immediately, click Sync Now.
For details about device discovery and the ITAM Agent, see Install the AssetSonar ITAM Agent on Your Computer.
2. Deploy SonarSight to Devices
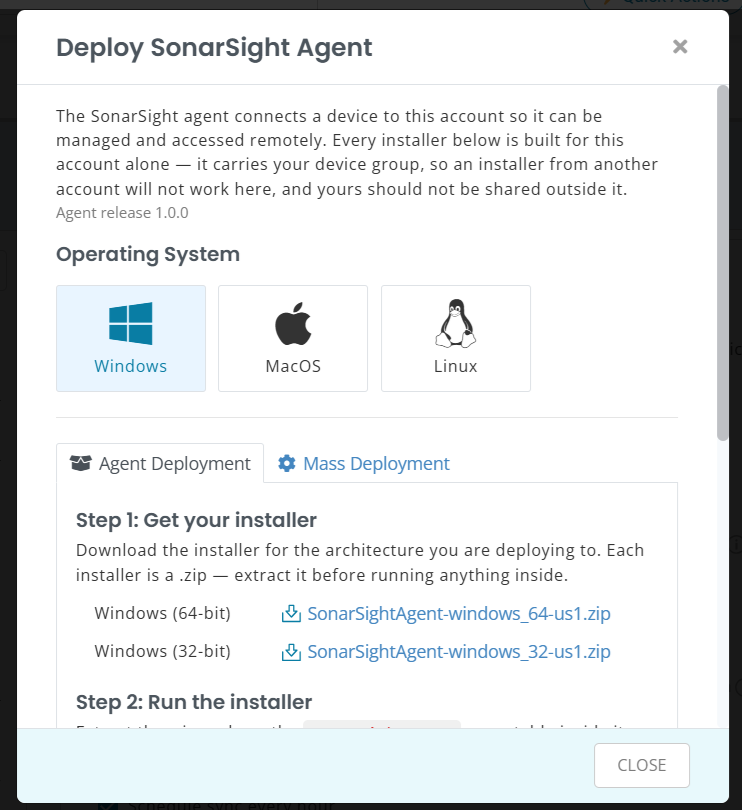
Once you have enabled SonarSight, click Deploy SonarSight Agent to access the installation options for supported operating systems. You can install SonarSight on an individual device or deploy it across multiple devices.
2.1 Install on an Individual Device
- Go to Settings → Integrations → SonarSight: Remote Access Integration.
- Click Deploy SonarSight Agent.
- Select the target device’s operating system from the supported options.
- Choose the individual installation option and download the installer.
- Run the installer on the target device and follow the displayed installation instructions.
If Sync hardware information is enabled, the deployment package includes SonarSight and the latest ITAM Agent.
Tip: Start by installing SonarSight on one test device. Validate remote access before rolling it out across your organization.
2.2 Deploy Across Multiple Devices
- Click Deploy SonarSight Agent and select the operating system used by the target devices.
- Choose the mass deployment option.
- Follow the displayed instructions for the required deployment package and configuration.
- Deploy SonarSight to the intended devices.
3. Configure Remote Access Permissions
After deploying SonarSight, configure who can start remote sessions and who can view session activity. Access is controlled by the View and Create permissions and the role’s asset scope.
| Permission | What it allows |
| View | View remote session events on asset records and access session reporting. |
| Create | Start remote sessions on supported assets within the user’s permitted asset scope. |
The predefined roles have the following permissions:
| Base role | Default SonarSight permissions |
| Administrator | View and Create |
| Agent | None |
| Staff User | None |
To configure access through a custom role:
- Go to Members & Access → Roles.
- Create a role or open an existing role for editing.
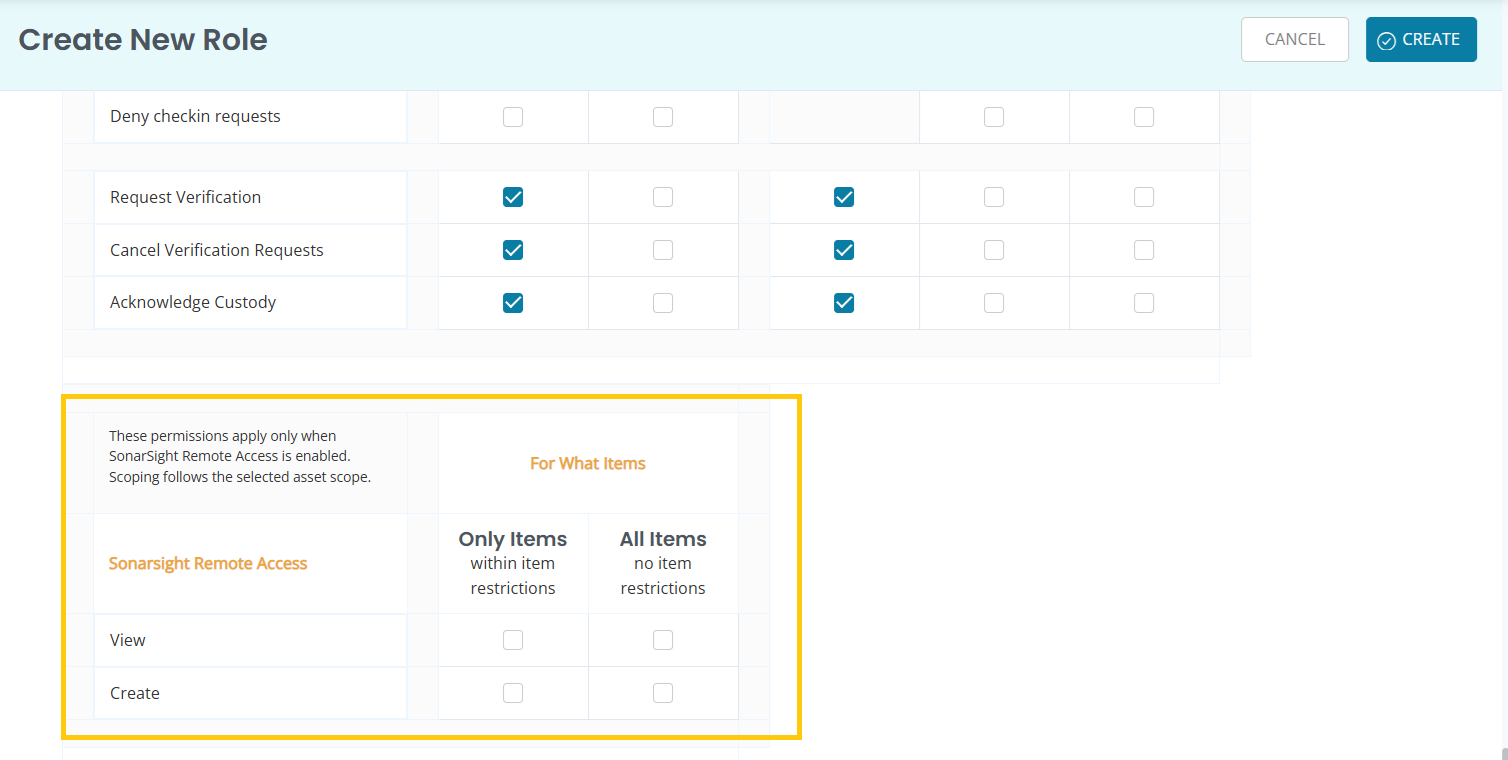
- Under the Assets module, locate the SonarSight Remote Access permissions.
- Select View, Create, or both, depending on the access required.
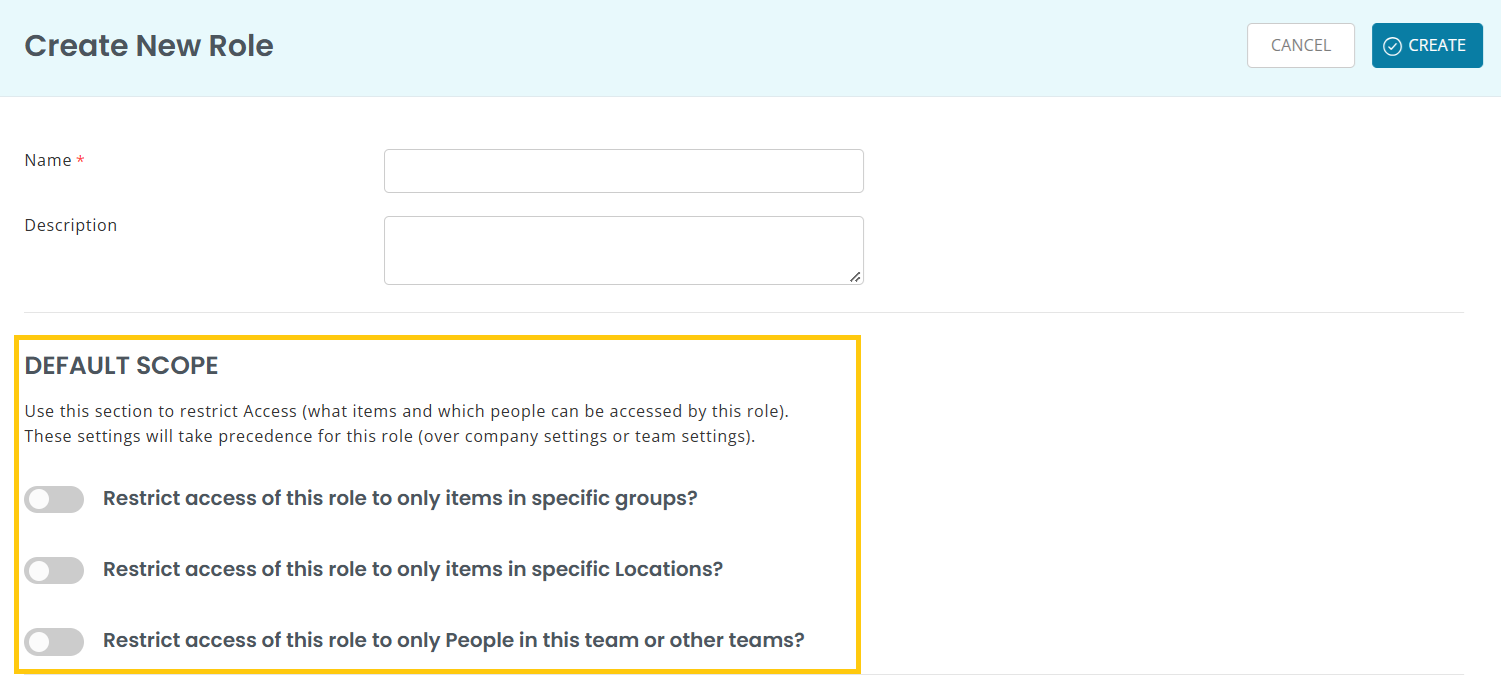
- Configure the role’s asset scope to define which assets users can access.
- Save the role and assign it to the relevant users.
For example, a support technician who needs to troubleshoot devices and review session activity would need both View and Create, with an asset scope covering the devices they support.
For the complete role creation and assignment workflow, see Configure Custom Roles.
Before expanding deployment, test remote access on one device using an account with Create permission and access to that asset. Follow the session instructions below to complete this check.
4. Start a Remote Session
Use the following instructions to start a remote session from an asset record, IT Graph, or an asset card in ITSM, Zendesk, or Jira.
4.1 From an Asset Record
- Go to Items → Assets and open the device you want to access.
- From the available asset actions, select Start Remote Session through SonarSight.
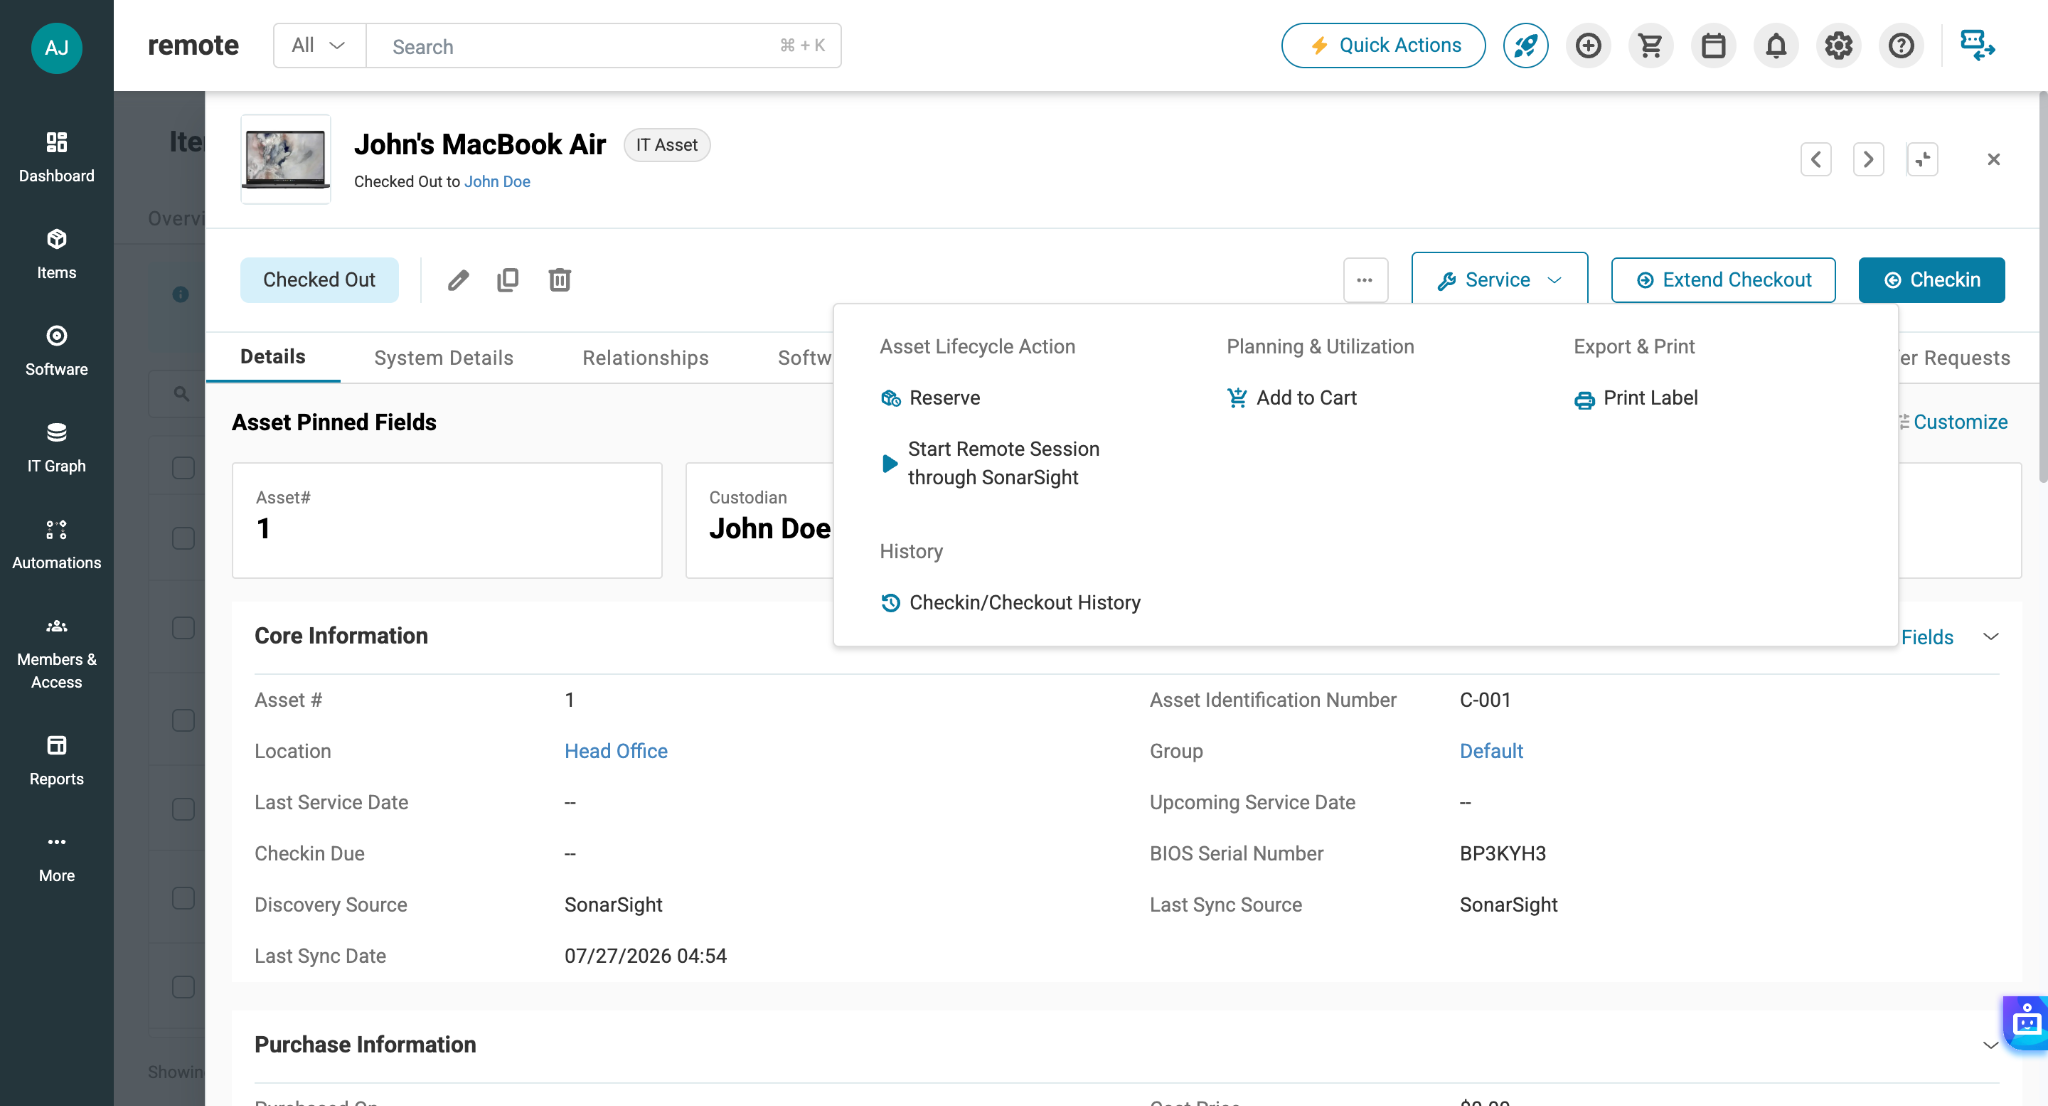
- Use the remote session to investigate the issue or perform the required support task.
- End the session using the controls in the remote-session interface when your work is complete.
Note: Viewing an asset does not automatically grant permission to access it remotely. If the action is unavailable, check that your role has the Create permission for SonarSight Remote Access and that the asset falls within your permitted scope.
4.2 From IT Graph
You can start a session while reviewing a device’s relationships in either ITAM or ITSM.
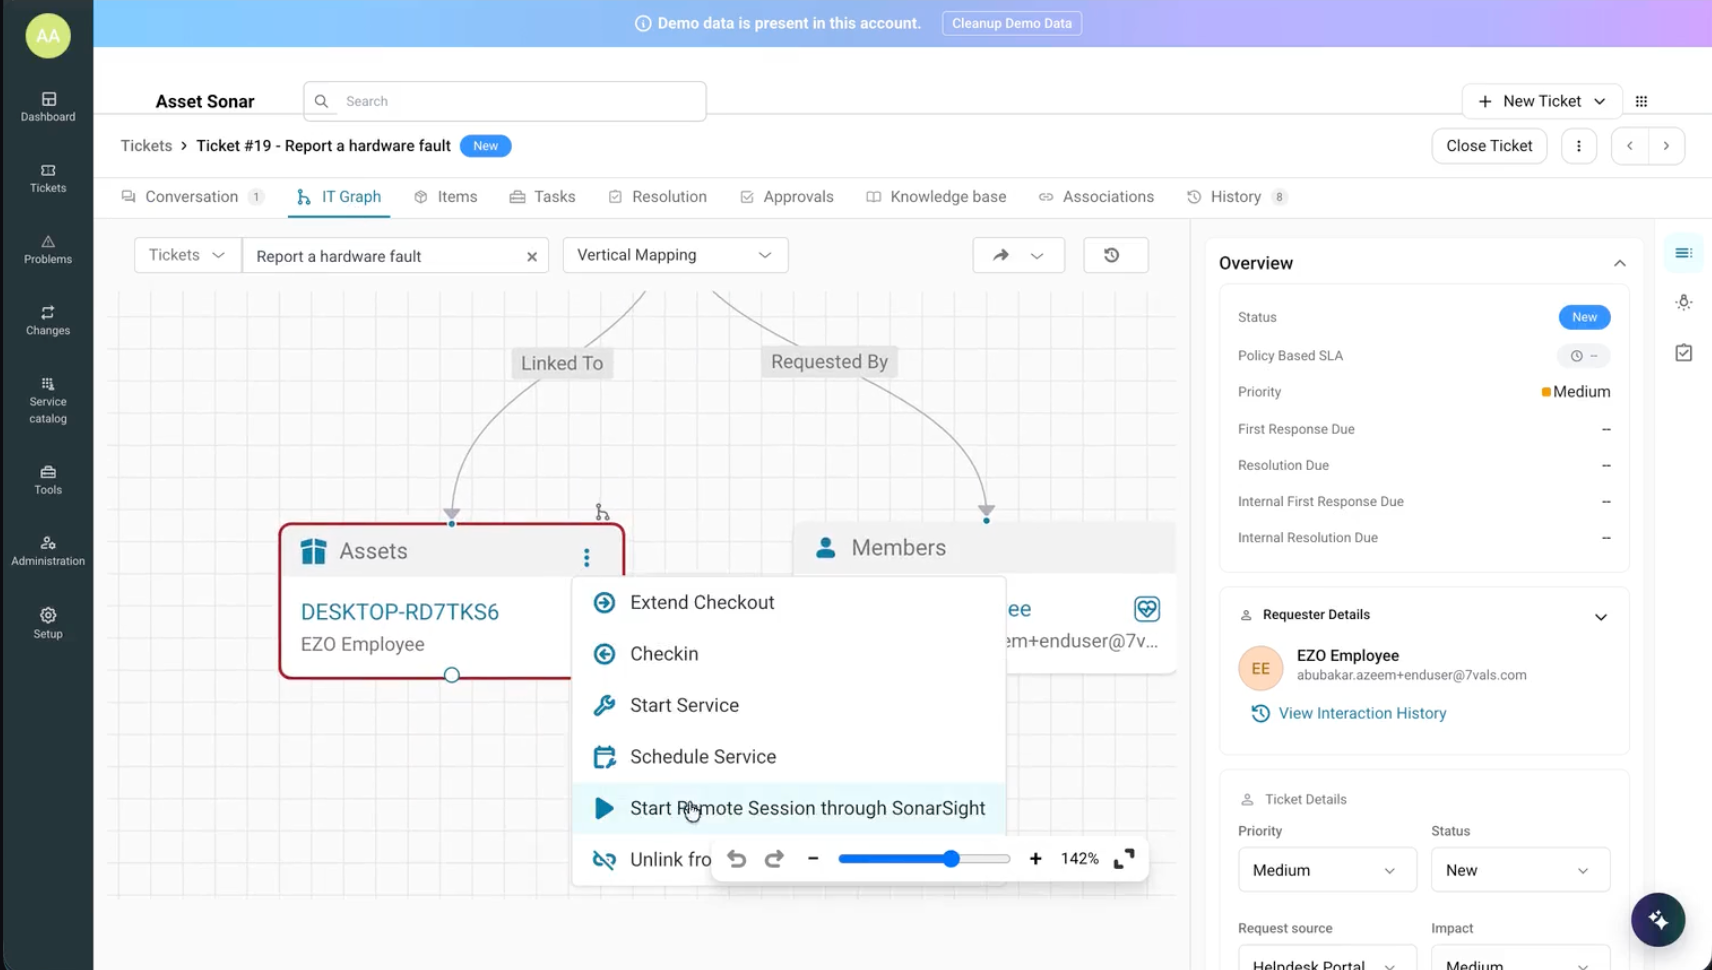
- Open the relevant relationship diagram in IT Graph.
- Select the supported asset you want to access.
- From its available actions, select Start Remote Session through SonarSight.
This lets you move from reviewing the device’s connected records to troubleshooting the device itself.
For help navigating relationship diagrams, see Visualize and Manage CMDB Relationships With IT Graph.
4.3 From an ITSM Ticket
- Go to Tickets and open the relevant ticket.
- Open the Items tab.
- Locate the supported device under Linked Items or Requester’s Items. Use Browse Items if you need to find the device.
- Open the asset card’s available actions and select Start Remote Session through SonarSight.
You may also access it from the IT Graph tab on the ticket interface. The same SonarSight permission and asset-scope restrictions apply when starting a session from a ticket.
For more information about asset cards and their available actions, see Take Actions on Items from Tickets.
4.4 From Zendesk or Jira
If your service desk is integrated with AssetSonar:
- Open the relevant Zendesk ticket or Jira issue.
- Locate the supported device’s asset card in the AssetSonar integration.
- Select Start Remote Session through SonarSight from the card’s available actions.
The action is available according to the user’s SonarSight permissions and asset scope.
If you have not connected your service desk, follow the relevant setup guide:
5. Review Remote Session Activity
To review activity for a device:
- Go to Items → Assets and open the relevant asset.
- Open the SonarSight Remote Session Events tab on the asset details page.
- Review the recorded session details.
Use this view to review remote-access activity associated with a particular device, including session timing, duration, and status.
6. Create a Remote Session Report
Custom reports let you review SonarSight session activity across assets and include the asset details relevant to your investigation.
- Go to Reports → Custom Reports and create a report.
- Select Assets as the primary module.
- Add SonarSight Remote Session Events as a related module.
- Select the relevant columns you want to include:
- Session Type
- Status
- Guest Name
- Started At
- Ended At
- Duration
- Bytes In
- Bytes Out
- Add relevant asset fields, such as the asset name, location, or custodian.
- Apply filters to focus on the period and assets you want to review.
- Click Run Report.
- Once the report has run, click Save Report if you want to reuse its configuration.
For example, include the asset name, guest name, session timestamps, and duration to review remote-support activity across devices during a selected period.
For additional guidance on filters, exports, and scheduling, see Generate Custom Reports.
If you have any questions, our support team can help. Please reach out to support@ezo.io.
