AssetSonar allows IT administrators to checkout IT assets to a particular location instead of individual users.
This functionality is useful when certain assets are required at a particular location for a limited time. For example, the software development team checks out several laptops with specialized software installed at the client’s location for a temporary project.
During checkout, the item’s custody is set to “Location.” This function is also used in Custody Transfers, Reservations, Mass Checkout/Reserve, Quick Checkout/Quick Item center, and Carts.
Benefits of Checkout to Locations
Checking out IT assets directly to locations can be helpful in the following ways:
- Simplified location-based custody management
It reduces the friction caused by assigning assets to individual members who primarily manage items by physical spaces, such as rooms or buildings. Industries like Education (universities), IT-based firms (offices, client sites), and organizations with multi-location-based IT warehouses can benefit from the seamless ability to checkout assets directly to locations.
- Enhanced collaboration and faster custody transfers
A conference room with shared laptops and projectors allows multiple employees to use and collaborate more efficiently. This also reduces administrative tasks by not transferring IT assets to individual members multiple times and only checking out to a specific location once.
- Efficient resource allocation
Different teams and departments need access to specific IT assets based on demand. For example, printers can be checked out to a shared location to ensure everyone can access it as needed.
- Better oversight and control over IT inventory
With the help of detailed reports, administrators can have enhanced visibility into asset distribution and assess location-specific needs. They can easily track and monitor usage patterns, resulting in informed purchasing decisions and optimized asset allocation.
Note: Admins and Custom Roles with baseline admin (role) can checkout to locations.
Now let’s understand how we can set up and use this feature:
1. Enable Checkout to Location settings
1.1. Navigate to the AssetSonar dashboard. Go to Settings → Company Settings & AddOns → Locations and check ‘Allow locations to have custody of items.’

1.2. Click ‘Update’ to save the settings.
1.3. Go to the Assets listing page from Dashboard → Assets. Let’s choose an available asset to checkout. For our process below, we’ll checkout Chromebook.

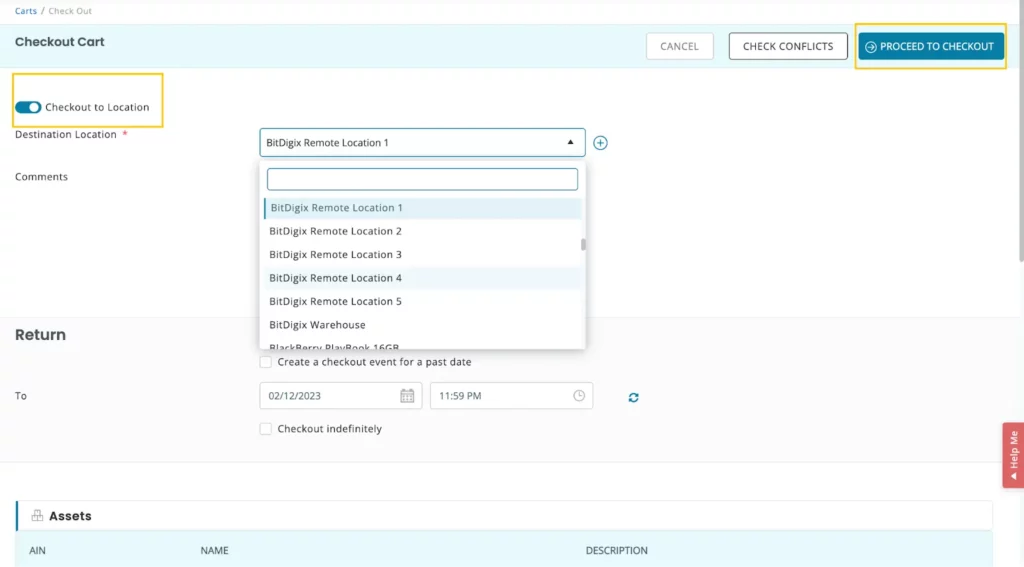
2.4. The checkout overlay will appear as shown below. Please enable the ‘Checkout to Location’ button.

2.5. Now, you can select the location to checkout your Chromebook from the dropdown menu. Next, click ‘Proceed to Checkout’ to complete the action.

2.6. You can verify terms and conditions and other specific checkout details. Once verified, check ‘I agree to the terms and conditions’ and put your signature to submit the agreement.

2.7. On the Assets listing page, you can view the custody of the Asset listed as Location. It is recommended that you keep the Custody and Location columns side by side to view the exact custody location.

2.8. From the Location details page, you can view all assets in the location’s custody. For example, here, we view ‘Austin.’

2.9. Go to the Assets tab on the Austin location details page. Here, apply the filter ‘Custody of this location’ to view all assets under custody of this location.

3. Transfer custody from members to location
3.1. Select the Asset you want to transfer custody to location. Click on ‘Transfer Custody’ from the drop-down menu shown below.
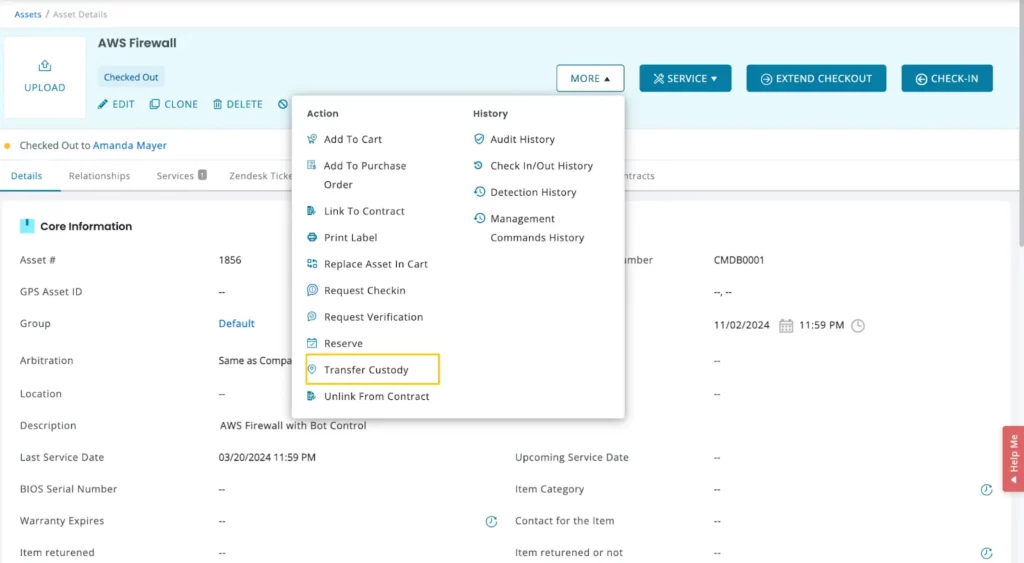
3.3. On the Transfer custody overlay, enable the ‘Transfer custody to location’ toggle and select the desired location. Once done, click the Transfer button.

3.4. The location transfer will be visible on the Asset Details page.

4. Reserve assets at a location
4.1. Go to the Asset Details page and click the Reserve button.

4.2. On the New Reservation overlay, click the ‘Reserve for location’ toggle. Next, select your location from the dropdown and click Reserve.

5. Checkout Carts to a location
5.1. Go to the Carts details page, click Checkout, and enable the ‘Checkout to Location‘ toggle. Select a location from the dropdown and click the ‘Proceed to checkout’ button.
6. Mass checkout of available assets
6.1. Select all the assets you want to mass checkout on the Asset listings page.

6.2. From the Actions dropdown, select ‘Checkout‘

6.3. On the checkout overlay, enable the ‘Checkout to location’ toggle and select the location

6.4. All assets will be checked out at the new location.

7. Quick checkout to a location
7.1. Go to Quick Actions → Quick checkout from the dashboard. On the Quick Checkout overlay, enable the location toggle, enter a location, and select the checkout button.

8. Mass import for Checkout to Locations
You can mass import assets via CSV imports and quickly check these out at locations.
8.1. Go to Assets → Import Assets and click ‘Checkout Assets‘. Then, upload your CSV file and click ‘Upload and proceed.’

8.2. Select the ‘Checkout to Location (yes/no)‘ and ‘Location‘ options as columns. Then, select the relevant checkboxes and click ‘Checkout.’ Your assets will be checked out at the locations collectively.

9. Checkout to Location:
9.1. In the Zendesk app
To checkout an Available Asset directly from Zendesk, click Actions → Checkout.

You’ll be redirected to the Checkout Details page, which has the same fields as shown in AssetSonar. Enable the ‘Checkout to Location’ toggle, enter your location, and your asset will be checked out to that location.

9.2. In the Jira app
Select the Asset you want to checkout and click Actions → Checkout.

You will then be redirected to the Checkout Details page, which is similar to the one in AssetSonar. Enable the ‘Checkout to Location’ toggle, enter your location, and your asset will be checked out to that location.

10. Checked Out Assets Report
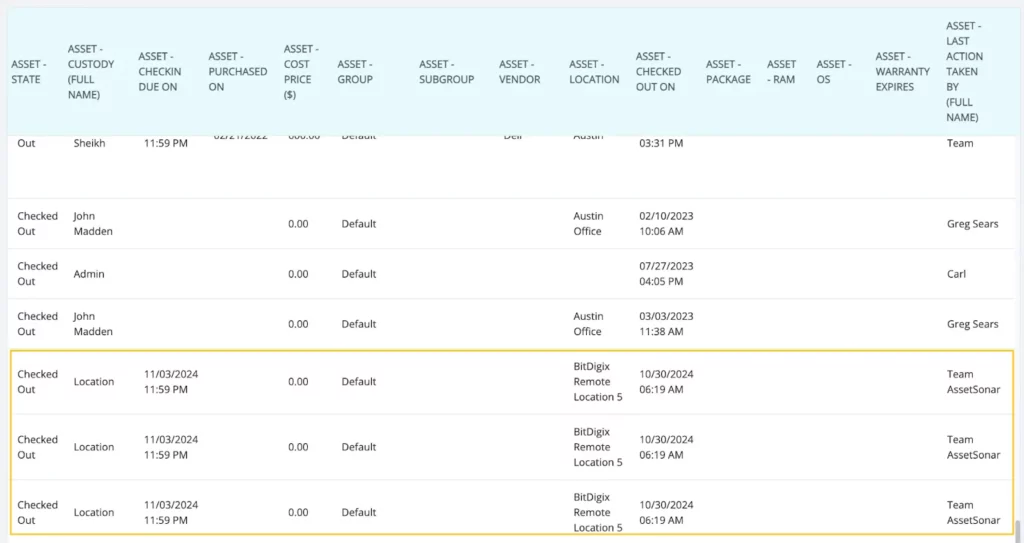
All assets checked out to locations will have ‘Location‘ under the custody column. To view, go to Reports → Checked Out Assets Reports.