Connect AssetSonar to Claude, ChatGPT, or Cursor using the Model Context Protocol (MCP). This lets your preferred AI assistant use supported AssetSonar tools to retrieve and review data through natural-language questions.
An administrator enables MCP for the company, and eligible users configure their own connections from My Settings. The integration provides read-only access: it cannot create, update, or delete records.
Before You Begin
To request access to MCP Configuration for your company, contact support@ezo.io.
Once the feature is available, make sure you have:
- Access to My Settings in AssetSonar.
- An administrator who can enable MCP for your company and allow staff access if needed.
- API Integration enabled under Settings → Integrations.
- Permission to add custom MCP connections in your AI assistant or workspace.
1. Enable MCP for Your Company
An administrator completes these steps:
- Go to Settings → Company Settings & Addons.
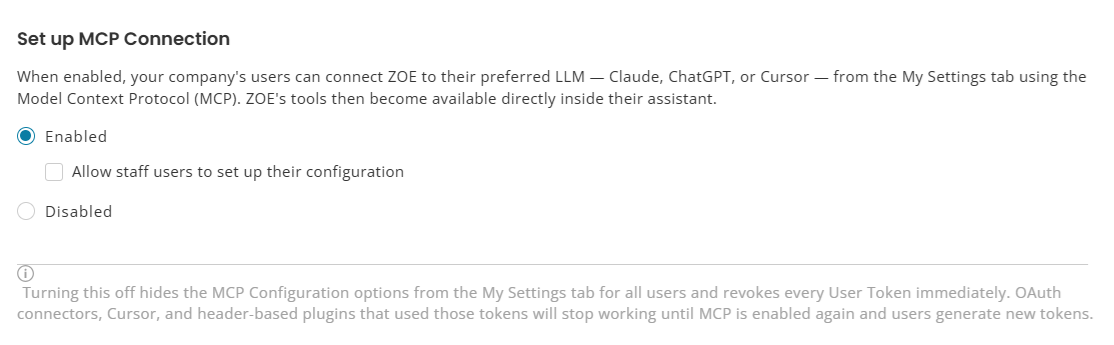
- Select Set up MCP Connection from the left sidebar.
- Select Enabled.
- To let staff users configure their own connections, select Allow staff users to set up their configuration.
- Click Update.
Eligible users can now access MCP Configuration under My Settings.
2. Open Your Personal MCP Configuration
- Go to Settings → My Settings.
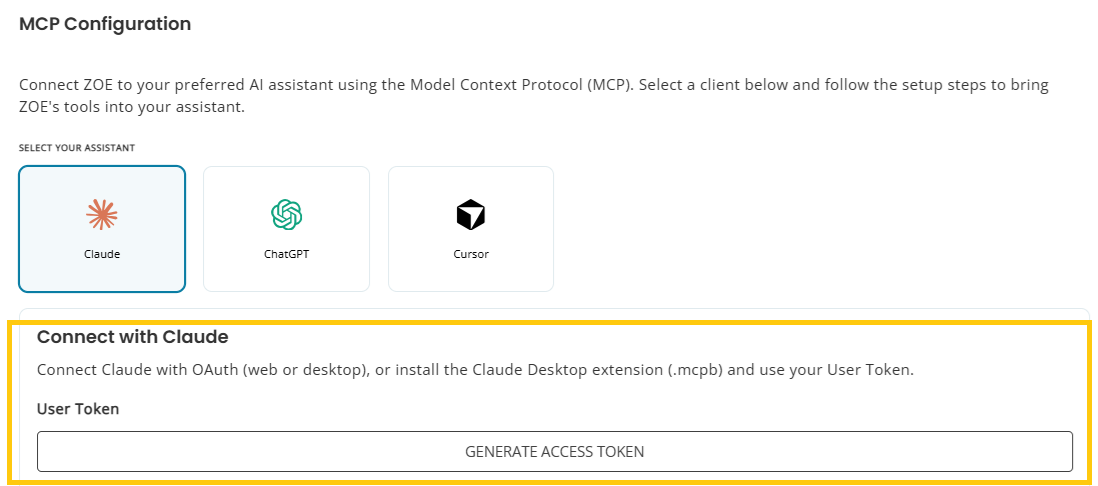
- Select MCP Configuration from the left sidebar.
- Choose Claude, ChatGPT, or Cursor.
- Click Generate Access Token if you do not already have a User Token.
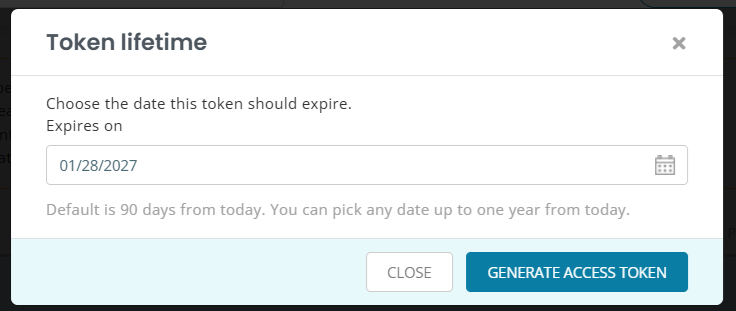
- In the Token lifetime dialog, choose an Expires on date. The default is 90 days; you can select a date up to one year from today. Click Generate Access Token.
- Copy the token when it is displayed.
Follow the instructions below for your selected assistant. You only need to complete one connection method for that assistant.
Keep your User Token private. Use the URLs, company values, and configuration displayed in your own AssetSonar account.
3. Connect with Claude
You can connect through OAuth or install the Claude Desktop extension.
3.1 Connect Through OAuth
This method is available for Claude on the web or desktop.
Note: Before setting up the OAuth connection, sign in to AssetSonar in the browser you’ll use to authorize it. If you’re using the desktop app, sign in to AssetSonar in your default browser first.
- With Claude selected in AssetSonar, copy the Remote MCP server URL under Option 1 — OAuth connector.
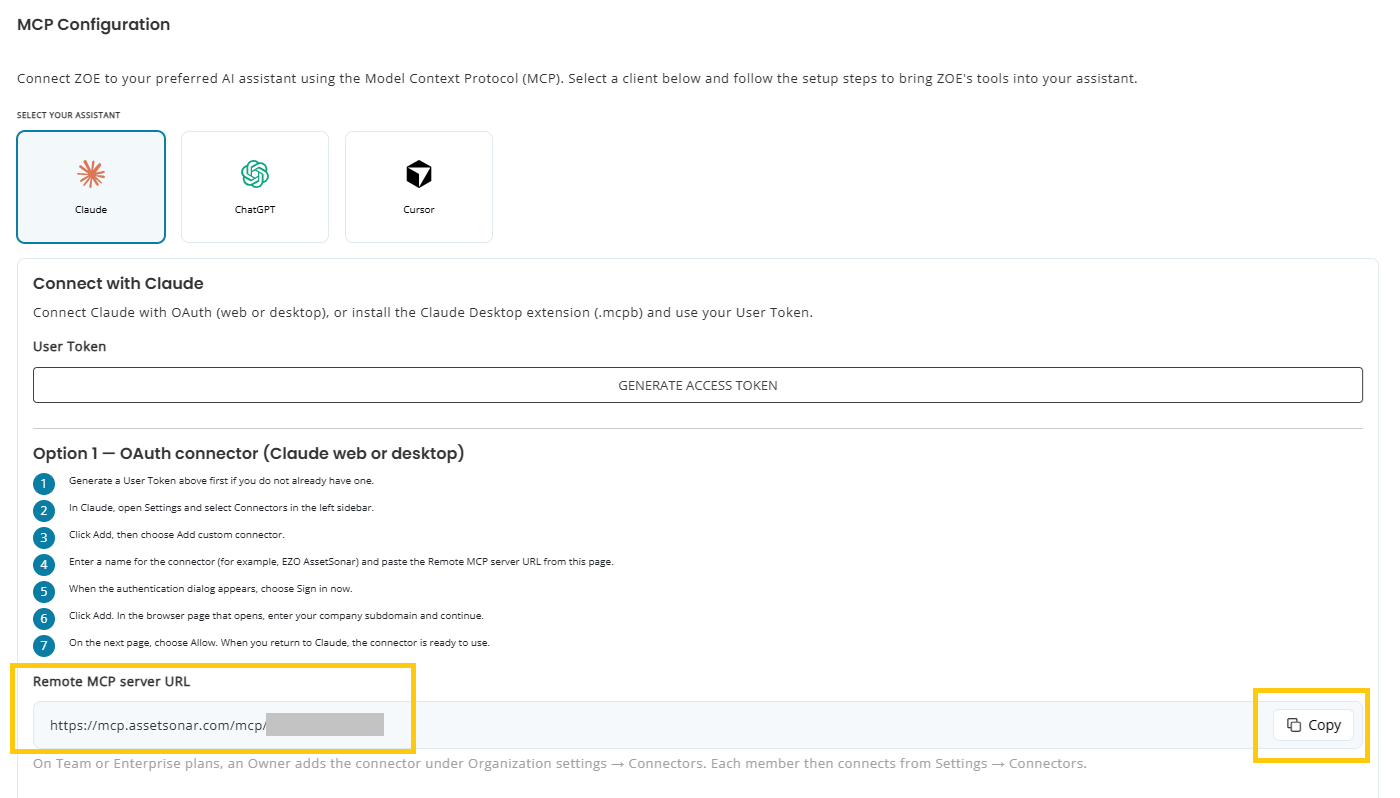
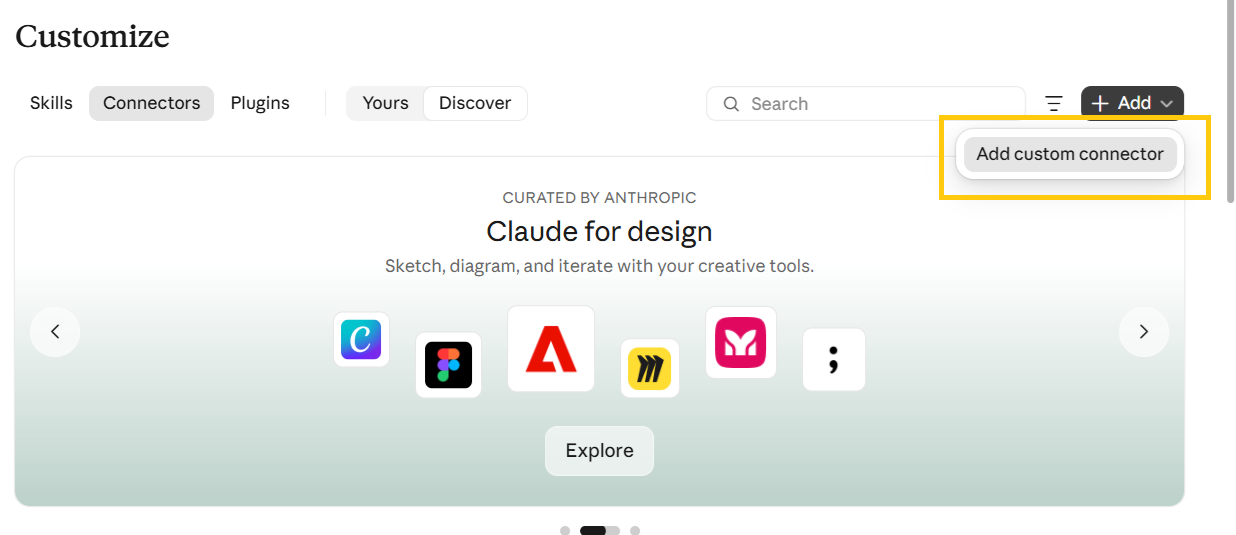
- In Claude, click Customize and open Connectors. Then select Add → Add custom connector.
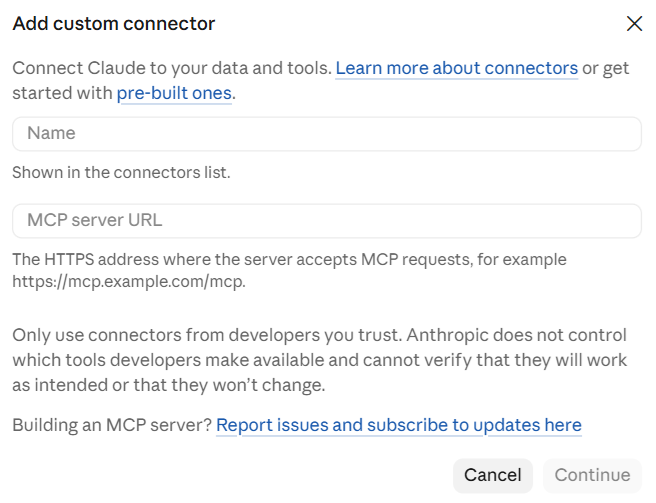
- Enter a name, such as AssetSonar MCP Server, and paste the copied URL. Click Continue, review the detected authentication settings, and click Continue again.
- When prompted to authenticate, select Sign in now, then click Add.
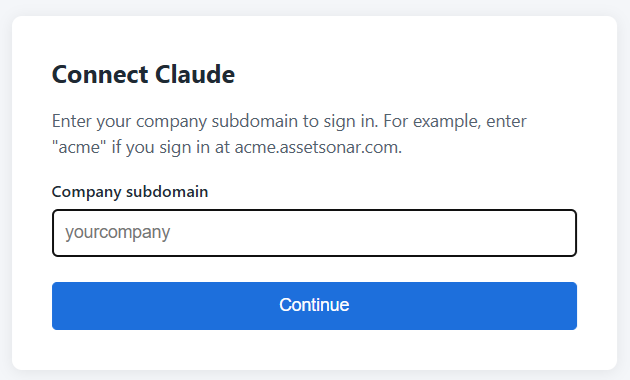
- On the browser page that opens, enter your company subdomain and continue.
- Select Allow to authorize the connection.
- Return to Claude to use the connector.
For team-managed workspaces, a workspace owner may need to add the connector under Organization settings → Connectors before individual members can connect it.
3.2 Install the Claude Desktop Extension
- With Claude selected in AssetSonar, go to Option 2 — Claude Desktop extension (.mcpb).
- Click Download Desktop Extension.
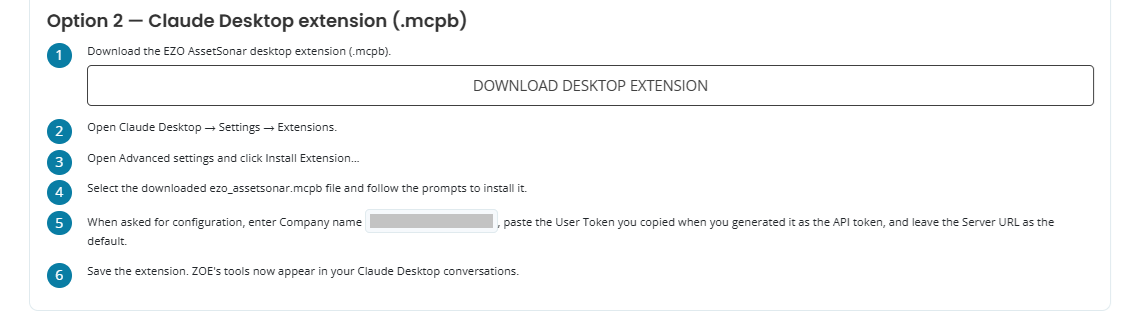
- In Claude Desktop, go to Settings → Desktop app and click Manage beside Extensions. In older versions, go to Settings → Extensions.
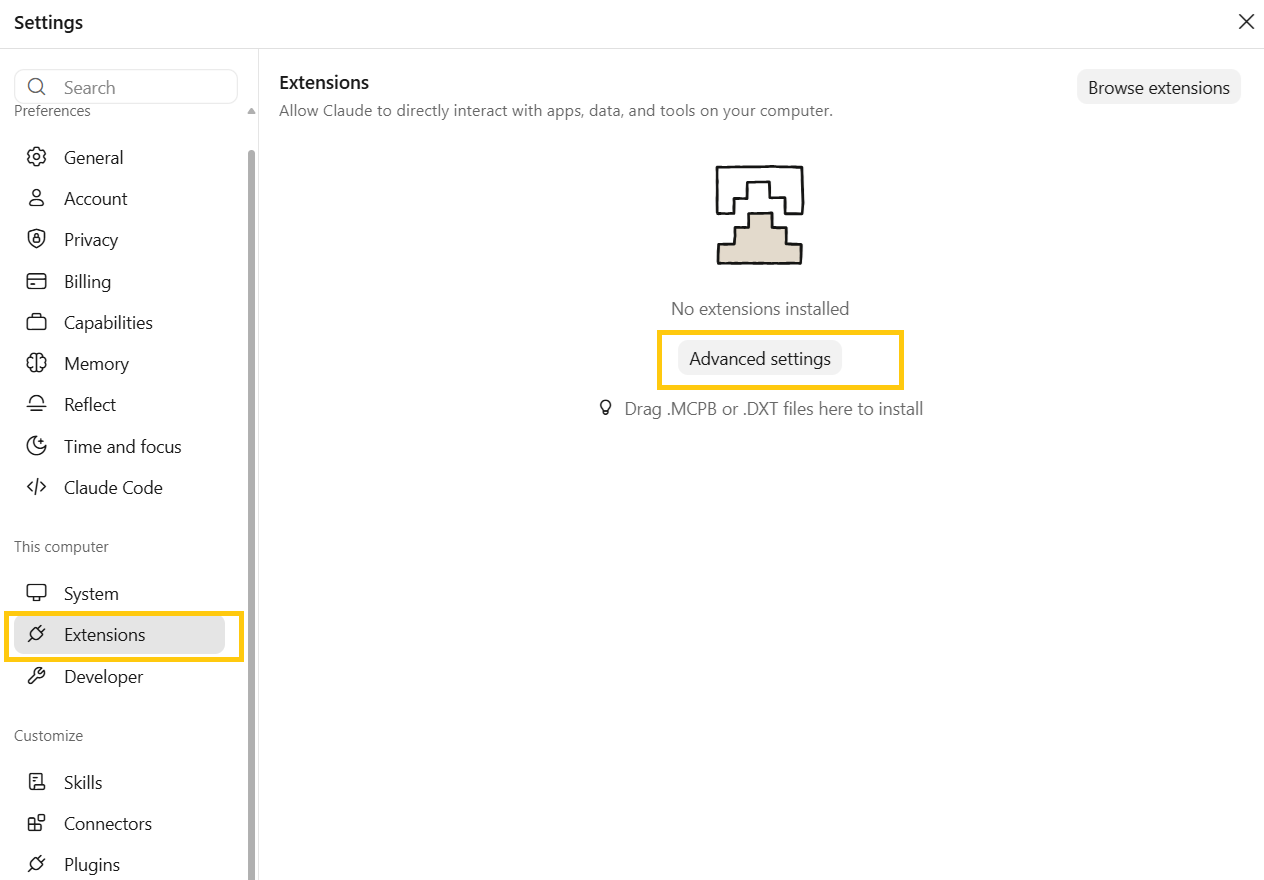
- Open Advanced settings and click Install Extension.
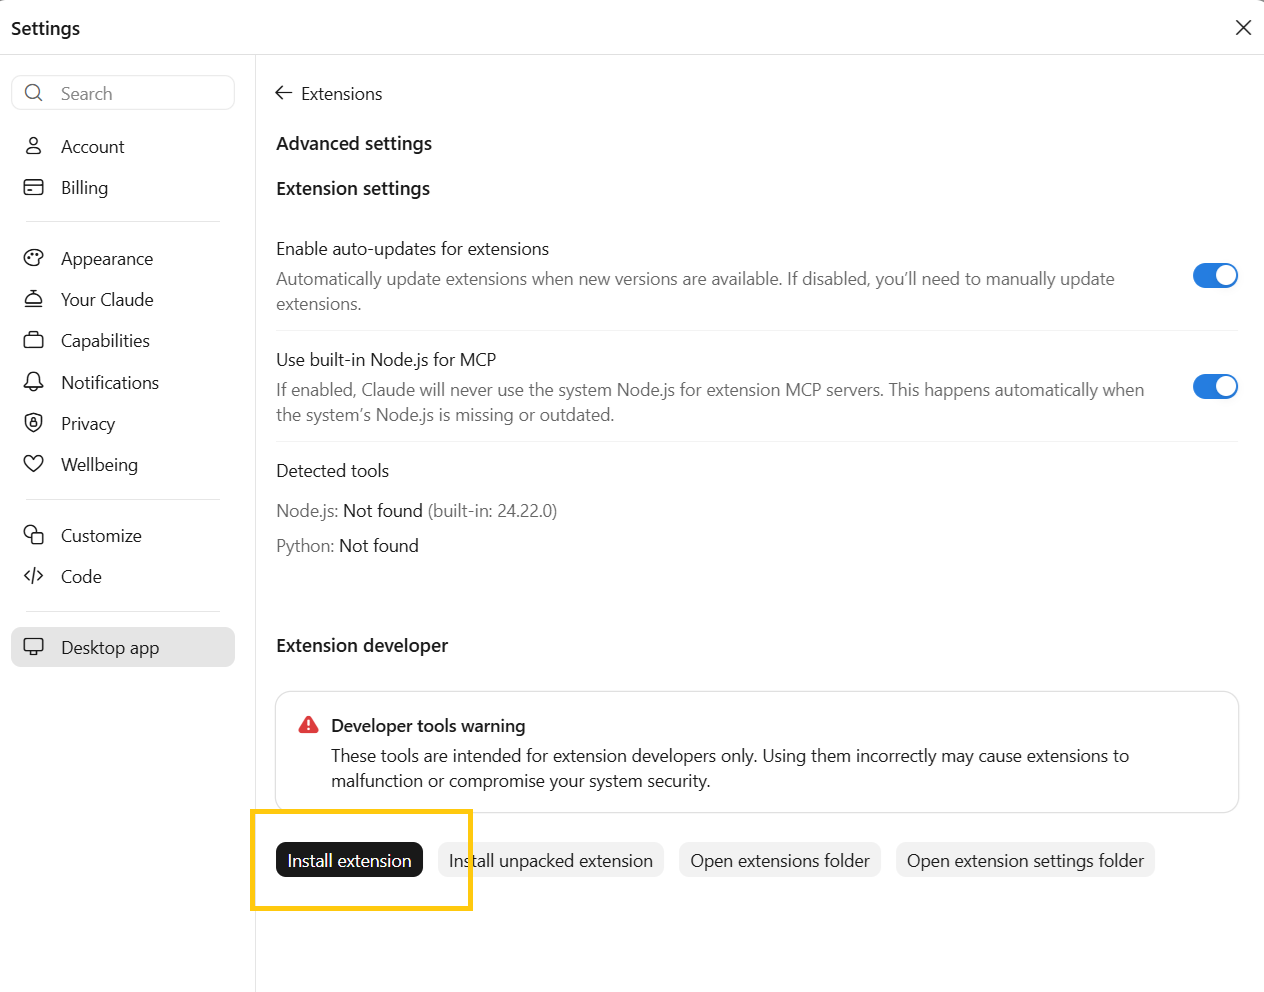
- Select the downloaded .mcpb file and follow the installation prompts.
- Enter the following configuration values:
| Field | Value |
| Company name | Your company subdomain, as shown in AssetSonar |
| API token | Your personal User Token |
| Server URL | Keep the default value |
Save the extension configuration. AssetSonar’s tools are now available in your Claude Desktop conversations.
4. Connect with ChatGPT
You can connect through OAuth or add a custom MCP server in the ChatGPT desktop app using your User Token and request headers.
4.1 Connect Through OAuth
Note: Before setting up the OAuth connection, sign in to AssetSonar in the browser you’ll use to authorize it. If you’re using the desktop app, sign in to AssetSonar in your default browser first.
- With ChatGPT selected in AssetSonar, copy the Remote MCP server URL under Option 1 — OAuth / Plugins with sign-in.
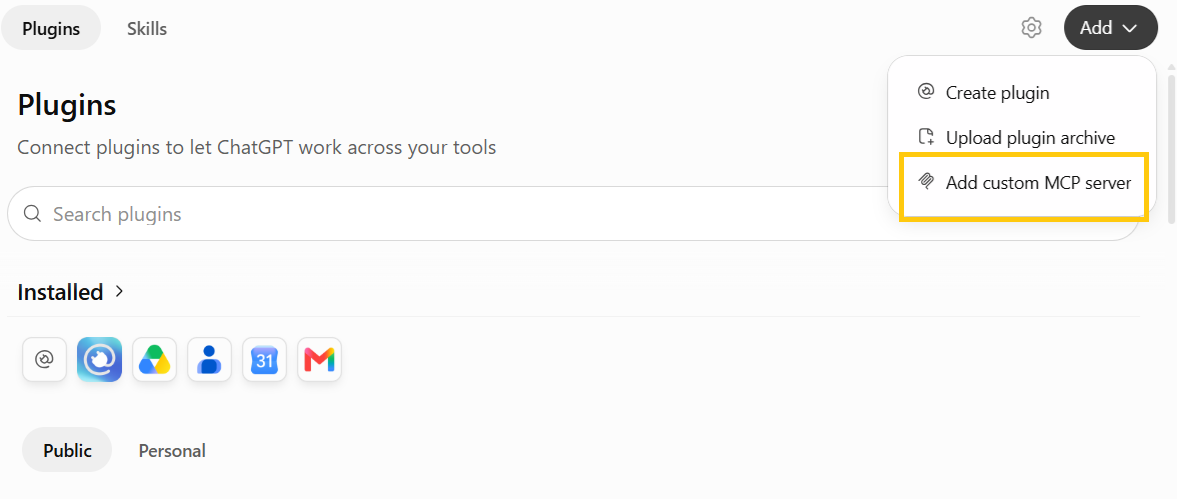
- In ChatGPT on the web, open Plugins, click Add, and select Add custom MCP server.
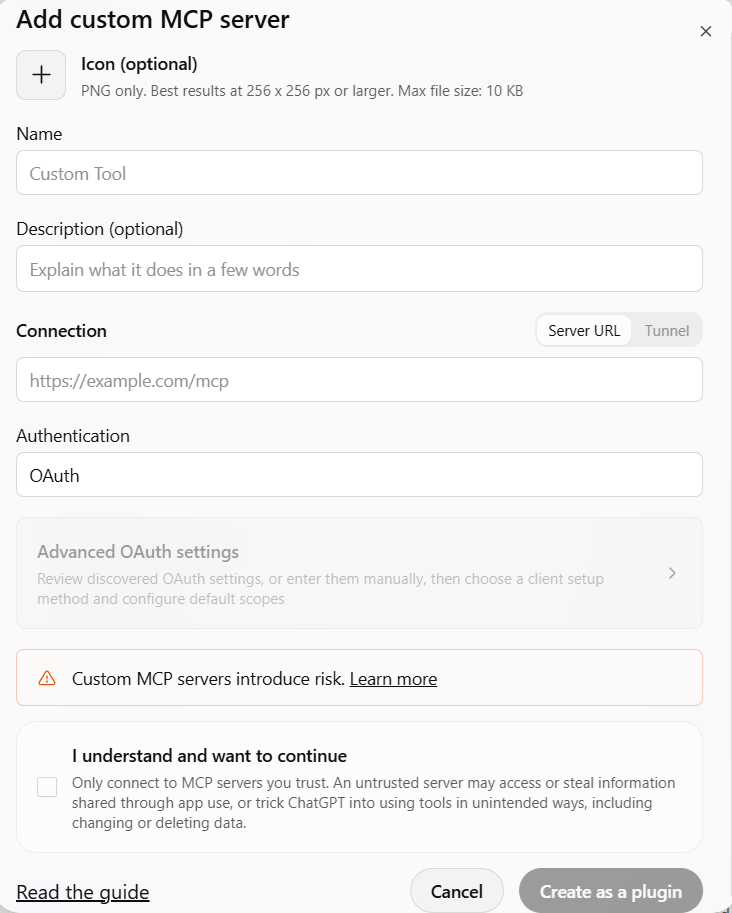
- Enter a name, such as AssetSonar MCP Server, and an optional description.
- Under Connection, paste the URL you copied from AssetSonar.
- Under Authentication, select OAuth.
- Read and acknowledge the risk warning, then click Create as a plugin.
- Click the created plugin’s Connect button.
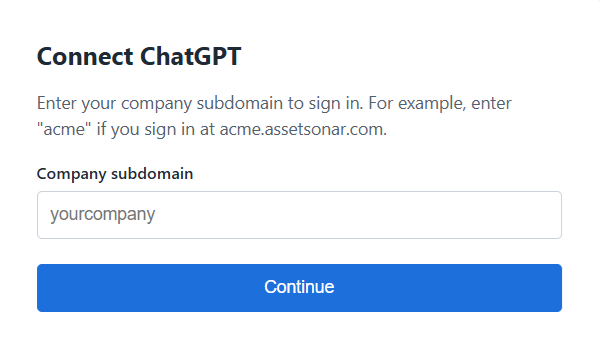
- On the Connect ChatGPT page, enter your company subdomain and click Continue. For example, enter acme if your account URL is acme.assetsonar.com.
- Sign in if prompted, then select Allow to authorize the connection.
- Return to ChatGPT, install the plugin if prompted, and start a new chat. Type @ and select your AssetSonar plugin.
4.2 Connect Using Custom Token Headers (Desktop)
- With ChatGPT selected in AssetSonar, copy the MCP Server URL under Option 2 — Plugins with User Token headers.
- In the ChatGPT desktop app, go to Settings → Plugins, select the MCPs tab, and add a custom MCP server.
- Enter a name, such as AssetSonar MCP Server.
- Under Type, select Streamable HTTP.
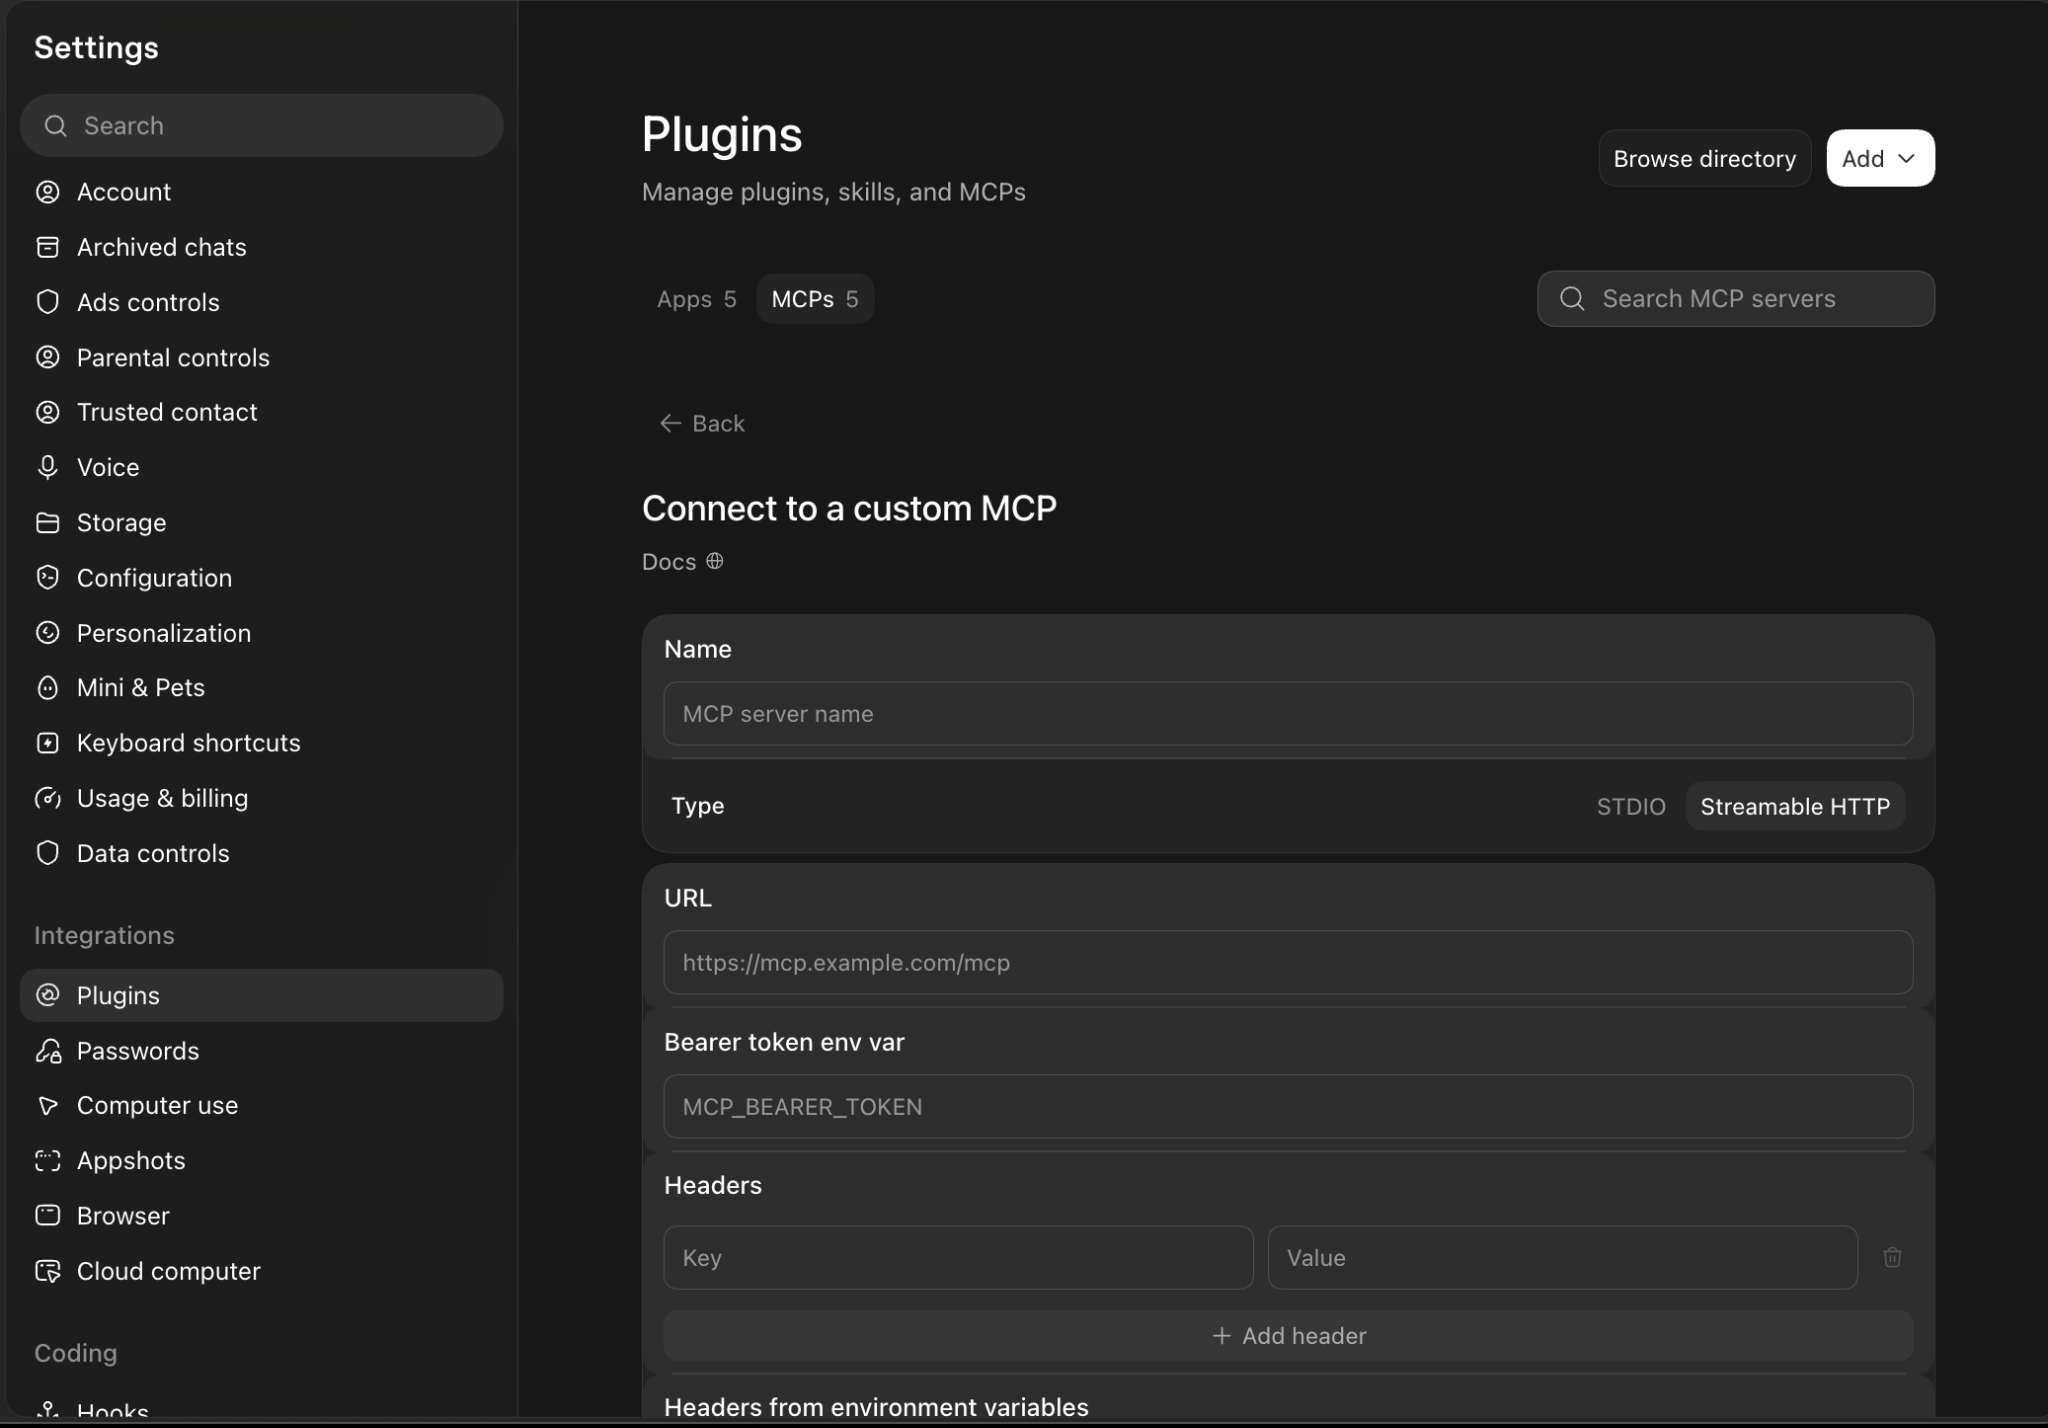
- Paste the copied server address into URL.
- Under Headers, add the following entries. Use Add header to add the second row.
| Header | Value |
| X-Company-Name | Your company subdomain, as shown in AssetSonar |
| X-User-Token | Your personal User Token |
Leave Bearer token env var blank for this method.
Save the MCP server configuration, then select Restart. In a new desktop conversation, use /mcp to check that the server is connected before asking a question that uses its tools.
Use the URL shown under Option 2, which ends in /mcp. Your company subdomain is supplied through the X-Company-Name header.
5. Connect with Cursor
- In Settings → My Settings → MCP Configuration, select Cursor.
- Generate and copy your User Token if you have not already done so.
- Under Set up in Cursor, click Copy on the configuration block.
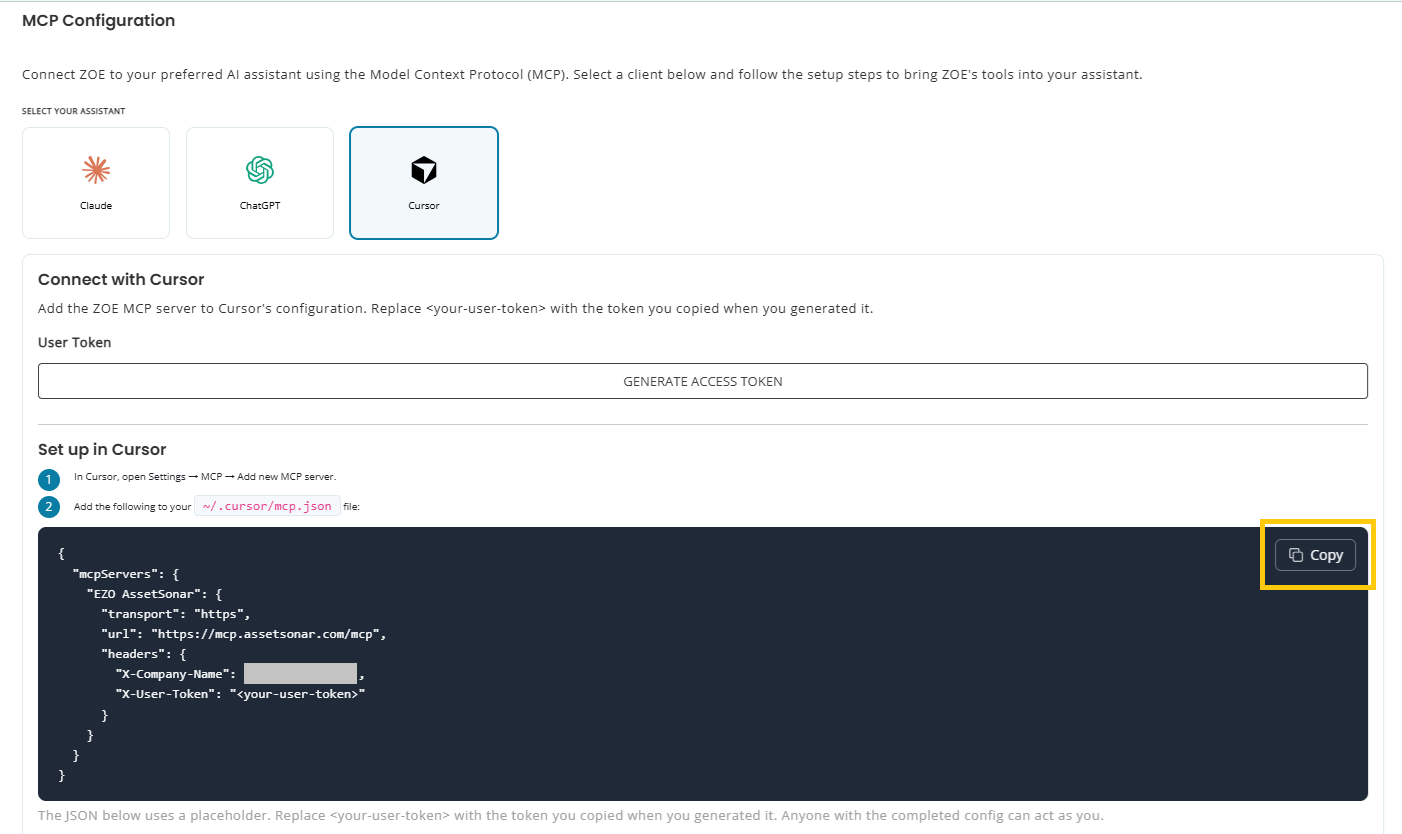
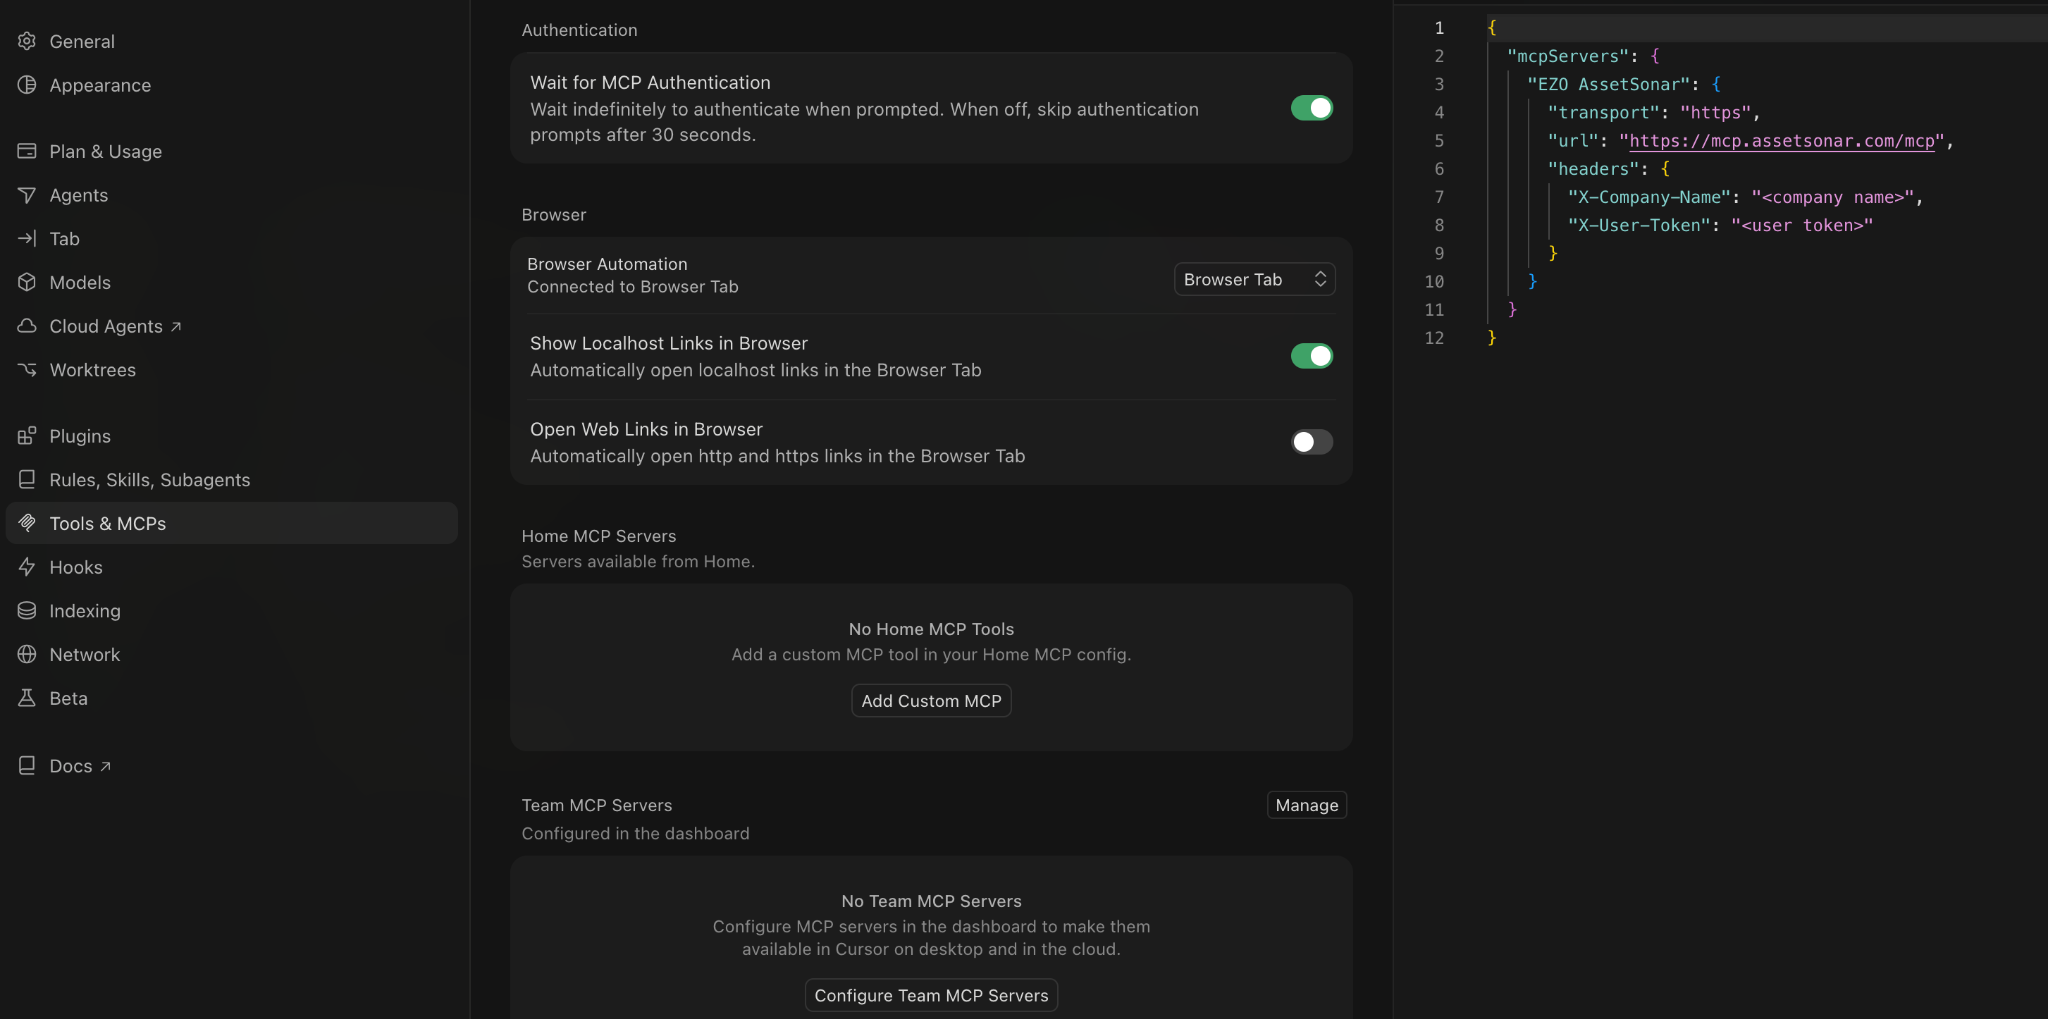
- In Cursor, open the MCP settings and edit your global configuration file, ~/.cursor/mcp.json.
- Add the copied configuration. If the file already contains other servers, add the EZO AssetSonar entry within the existing mcpServers section.
- Replace <your-user-token> with your personal User Token.
- Confirm that X-Company-Name contains the company value shown in your AssetSonar account.
- Save the configuration file and restart Cursor. Confirm that the EZO AssetSonar server is enabled and its tools are available before opening an Agent chat.
Open an Agent chat to ask questions about your AssetSonar data.
Keep the completed configuration private because it contains your User Token.
6. Ask Questions About Your Data
Once connected, use your AssetSonar connection to ask questions through the assistant’s available MCP tools. For plugin or connector connections, select the relevant plugin or connector first.
For example, you can ask:
- “Show me the details for asset number 125 in AssetSonar.”
- “Find the AssetSonar record for this serial number: [serial number].”
The available tools determine which questions the assistant can answer. Review the returned records before using the information to make decisions.
7. Manage or Reconnect Your Integration
Replace Your User Token
Return to Settings → My Settings → MCP Configuration and use the token regeneration option.
After generating a replacement, update the token in connections that use it directly:
- Claude Desktop extension: update the API token.
- ChatGPT custom headers: update X-User-Token.
- Cursor configuration: update X-User-Token.
For OAuth connections, reconnect and authorize access if prompted.
Disable MCP for Your Company
An administrator can go to Settings → Company Settings & Addons → Set up MCP Connection, select Disabled, and click Update.
Disabling MCP hides the personal configuration options and immediately revokes all User Tokens. Existing connections stop working. After MCP is enabled again, users must generate new tokens and reconnect.
Troubleshoot a Connection
If your assistant cannot access AssetSonar, check that:
- MCP and API Integration are enabled for your company.
- Staff configuration is allowed if you are a staff user.
- You used the URL and company value displayed in your own account.
- Token-based connections contain your current User Token.
- The tokens have not expired.
- Your AI assistant’s workspace permits the connection.
For further assistance, contact us at support@ezo.io.
