Bundle IT Assets together to reserve and check out with ease and speed. A Bundle is a flexible combination of items. It acts as a check out list. It is used to optimize checkouts based on the characteristics and availability of IT Assets. Enable Bundles from Settings → Add Ons → Bundles.

1. When to use Bundles
Bundles are used to combine different IT Assets that are regularly checked out together. For example, if two Macbooks, two chargers, two headsets, and a webcam need to be assigned on a ‘video conference’ engagement, then having this as a Bundle will serve both as a checklist and a quick one-step process for their checkout. You need to have a Cart enabled to use Bundles. Enable Cart from Settings → Add Ons → Cart Module.

2. Creating a new Bundle
You can create a new Bundle from Bundles → Add New Bundle. Fill in the data fields for Bundle Name, Description, and Location. See image below:


3. Adding Bundle Lines
A Bundle can have multiple line items based on the types of IT Assets needed; based on their Name, their association to a Group, or a number of flexible options presented in the dropdown when choosing the type of Bundle line (Asset, Asset Stock, Inventory). Bundle Line Items explain what a Bundle contains and they can be changed as needed (discussed later).
Let’s create a ‘2P Video Conference’ Bundle that consists of two Macbooks, two chargers, two headsets, and a webcam!
a. Two Macbook Pros — We’ve set up our IT Assets such that there is a Group called Macbooks and all Macbook Pros are associated with it. We’ll use the ‘Advanced (Assets)’ in the type.

b. Two Macbook Chargers from Asset Stock — We’ll use the ‘Asset Stock’ in the type:

c. Two headphones from Assets — We’ll use ‘Assets’ in the type:

d. A webcam from Assets — We’ll use ‘Assets’ in the type:

While adding items to a Bunde, you can also select the option ‘Pick items only from this location’. This ensures that you’re picking items from one specified location.

Once done, our Bundle Details page shows a summary of the associated IT Assets. See image below:

Note: When a Bundle is added to a Cart, and some of its items are not added along with it due to unavailability, then the Bundle is called a Partial Bundle.
4. Editing a Bundle
You can edit a Bundle from its Details page. To do this, go to ‘Bundles’. Select the relevant Bundle and click the ‘Edit’ button.

Here, you can make changes to a Bundle. You can edit a Bundle’s Name, Description, Identification Number, or Location. You can also add/delete Bundle line items.
You can also retire, delete and clone a Bundle from its Details page. If you are adding a Bundle to a Cart, the ability to delete it will not be available.
5. Adding Bundle to a new Cart
Now that the Bundle has been created, we can add it to a Cart from the Bundle Details page by clicking on the ‘Add to Cart’ button.

This action will identify the available Assets from this Bundle and add them to your Cart. Now whenever there is a Two-person Video Conference scheduled, simply add the Bundle to the Cart to checkout or reserve.
Specified quantities will be pulled up from available items with a single click to be checked out or reserved for a Video Conference(see image below).

Hit the ‘Add to Cart’ button. You will be redirected to the Cart Details page, where you can either add more items OR you can also add a Bundle to a reserved Cart. Once done adding items/bundles, the Cart is now ready for getting reserved or checked out for a later date. See image below:

Once a Bundle is added to a Cart, you can toggle between the Bundle View and the Item View.
Here’s what the Bundle View looks like:

Here’s what the Item View looks like:

Reserved Carts can be edited on the fly. Items (also Bundles) can be removed/added, giving IT Admins more control over their equipment. You can enable this setting from the Settings → Add Ons → Cart Module.

You can now reserve more IT Assets at the last minute and update the Cart. Say you reserved a Cart for Steven Hyde that consists of a Macbook Pro for a video conference call but then you realized you forgot to add the webcam. Simply click on ‘Add More Items’ and add the webcam as illustrated.

You can print the Cart by clicking on the ‘Print Cart’ button after you have finalized the items/Bundles in your Cart.
6. Bundles in reserved Carts
Once a Bundle has been added to a reserved Cart, you can take different actions on it. Note that these actions do not apply to Carts that have been checked out.
6.1. Adding more Bundles to a reserved Cart
Let’s say after you reserved a Cart for the video conference call, you were notified that two more of your employees are to attend it. You can add another ‘2P Video Conference’ Bundle to the same Cart and check it out for the event when needed.
Here’s how to go about it!
On your Cart Details page, click on ‘Add More Items’ and add the Bundle as shown.

Once added, the two Bundles will show up in the Bundle Lines like this:

6.2. Removing Bundle from a reserved Cart
You can also remove a Bundle from a reserved Cart. There are two ways to do this. You can either remove the entire Bundle or remove items individually from the Bundle.
Select on a Bundle and click on the ‘Delete’ icon on the top left corner of the Bundle Lines section.

Choose the relevant option.

‘Delete Whole Bundle’ deletes the entire Bundle and its constituent IT Assets whereas ‘Delete Individual Items’ removes the association between the Bundle and its constituent IT Assets so that the items are left in the Cart. These items are not part of the Bundle anymore and you can remove them individually as needed.
6.3. Editing a Bundle in a reserved Cart
You can also edit the items in a Bundle after you’ve added it to a reserved Cart. Simply go to the Bundles tab and click on the relevant Bundle. From the Bundle Details page, click ‘Edit’, make the appropriate changes, and hit ‘Update’. That’s it, you’re done!
However, note that the relevant changes do not apply to the current reserved Cart but the subsequent Carts the Bundle is added to.
7. View Bundle history
AssetSonar keeps a snapshot of the changes made to a Bundle. To access a Bundle’s edit history, simply go to the Bundles tab and click on the relevant Bundle. From the Bundle Details page, click on the ‘History’ button on the right.

This opens up a dialog box showcasing all the actions taken on the Bundle:

8. Software Licenses in Bundles
When a new employee joins the organization, IT administrators can assign software licenses along with the hardware devices in one go. Here is a workflow as to how a bundle is created and assigned if it contains a software license and how it would help the IT team during the employee onboarding process:
8.1. Creating a Bundle containing software license:
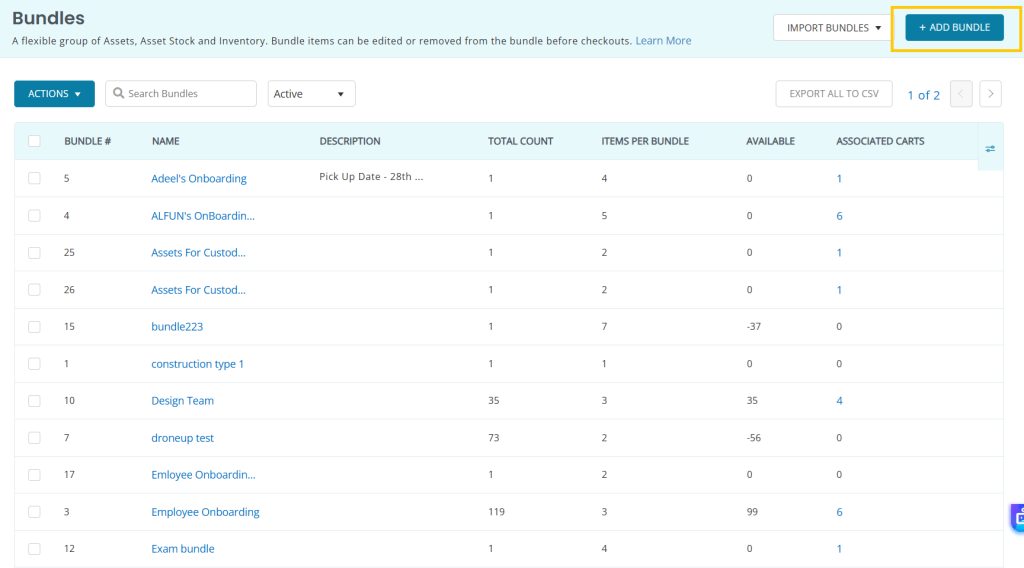
From the Bundles detail page, click on the ‘Add Bundle’ button on the top right.
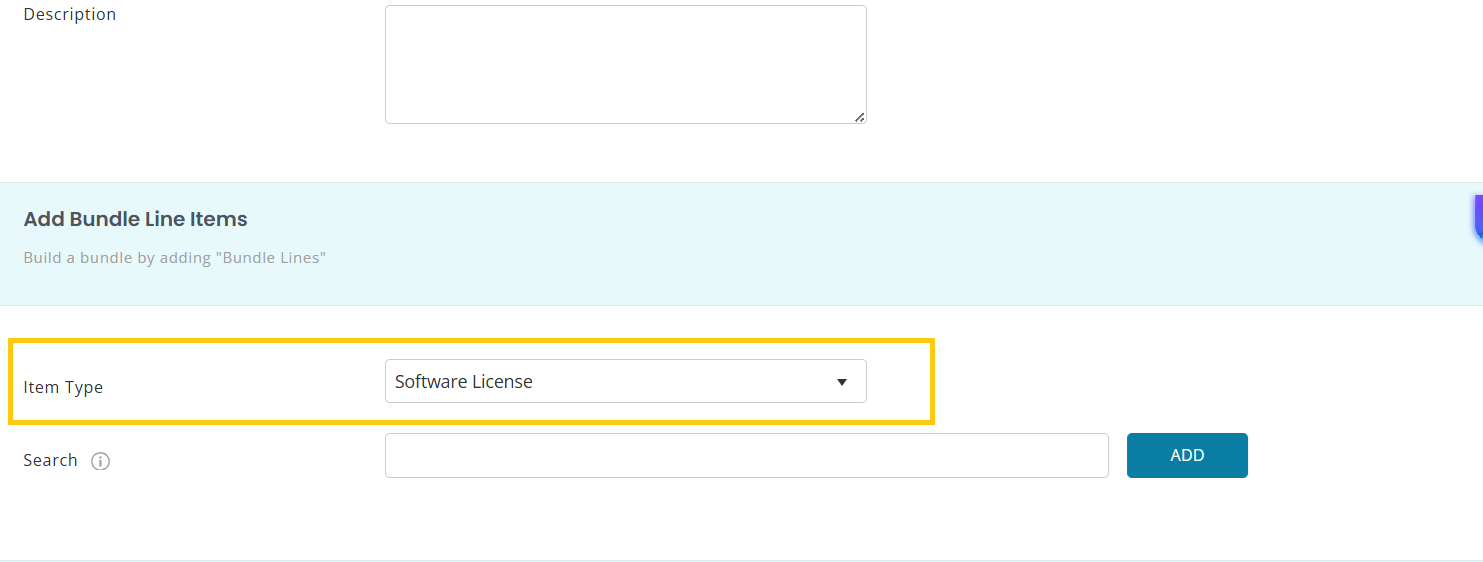
Now while adding items to the bundle, choose ‘Software License’ to be the item type and then add software licenses to the bundle.
Here are a few pointers to keep in mind while adding software licenses to the bundle:
- Software licenses in their active state only can be added to the bundle. Licenses that are expired, or terminated cannot be added to the bundle. Furthermore, if the software license is active but has no specified entitlement criteria, it would also not be added to the bundle.
- Multiple licenses of the same Cloud software cannot be added to the bundle either. This rule doesn’t apply on on-prem software.
- Multiple seats can be assigned for Machine based & User-Machine based licenses in a Bundle but you cannot assign more than one seat for User-based or Cloud-user based software license.
Once you have created a bundle containing one or more software licenses, click on Done to finish creating the bundle.
8.2. Checking out a Bundle containing software license
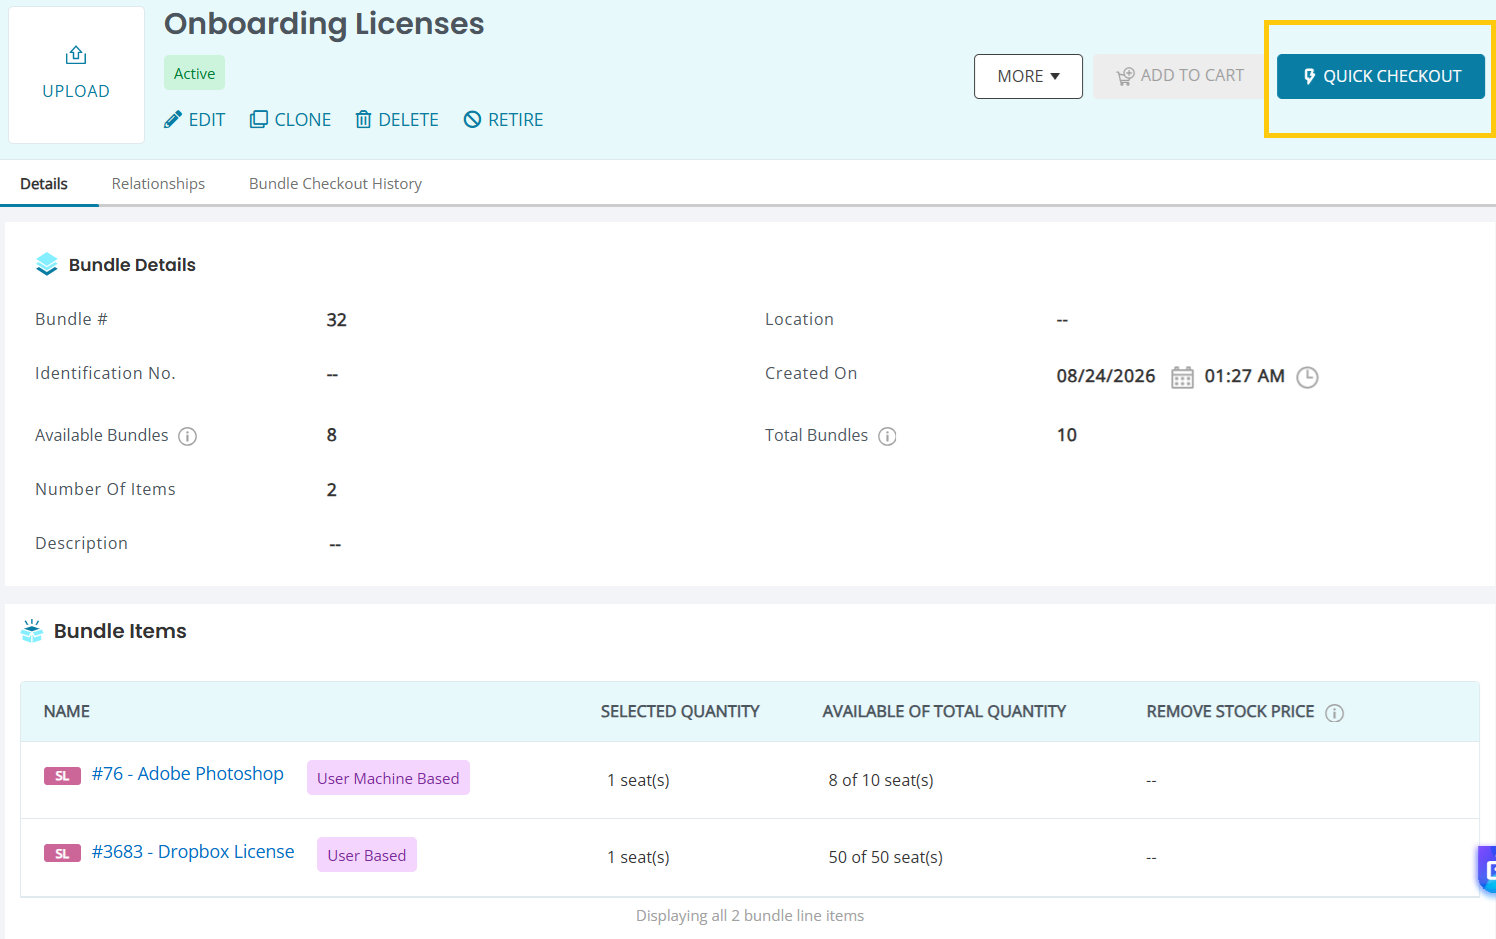
Unlike bundles that only contain hardware assets, asset stock or inventory items, bundles with software licenses can only be checked out via quick checkout capability. From the bundle’s detail page, click on the ‘Quick Checkout’ button on the top right.
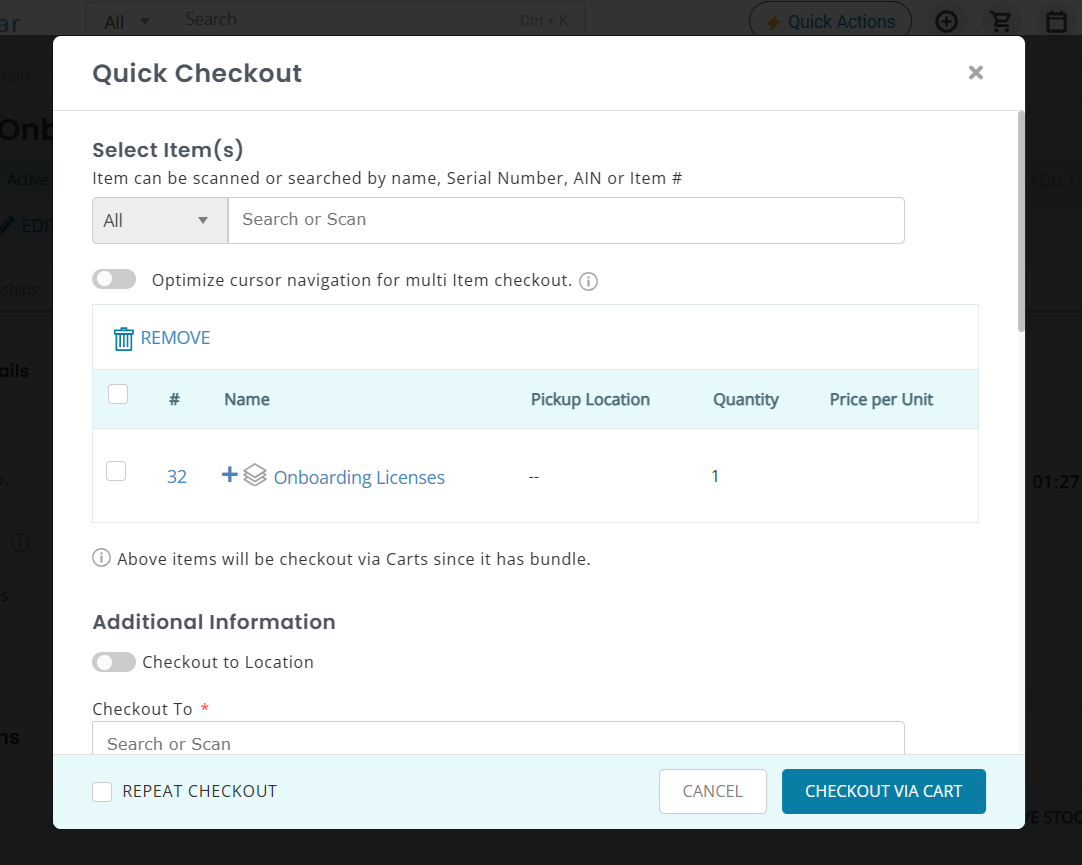
Enter the relevant information and then click on ‘Checkout via Cart’ to proceed. If your bundle has been successfully checked out, you’ll be able to view a confirmation message on the screen.
Now if your bundle contains software licenses that have Machine based or User-machine based entitlements, you’ll have to specify the IT Assets for them during checkout.
In the bundle shown below, Adobe license is a Machine based license so you have to choose an IT Asset for this license to be entitled on:
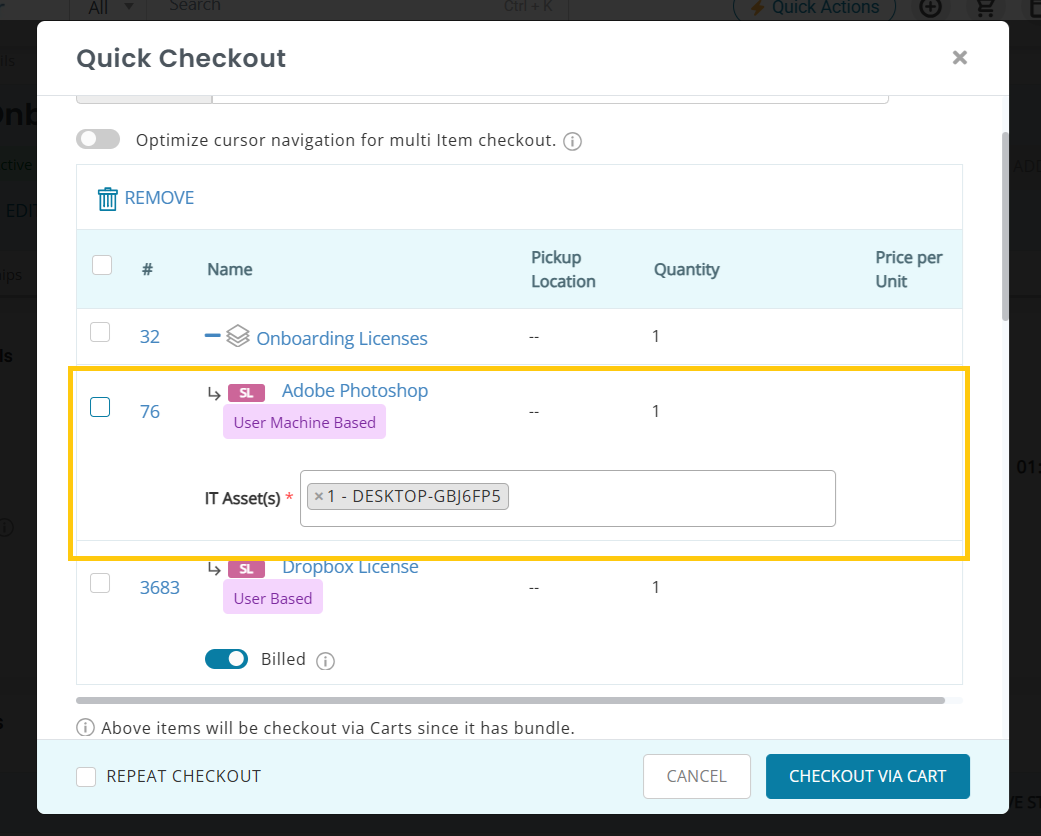
Please note that you can only choose IT assets that appear on the quick checkout table or the ones that are already checked out to the selected user.
8.3. Actions on Bundle containing Software License
Please note that item return and transfer custody actions are applicable to assets, asset stock etc. in a bundle but wouldn’t be applicable to software licenses in a bundle.
Furthermore, if you want to clone a cart that contains a bundle with software licenses, you’ll be able to clone all items in the cart except the bundle containing a software license.
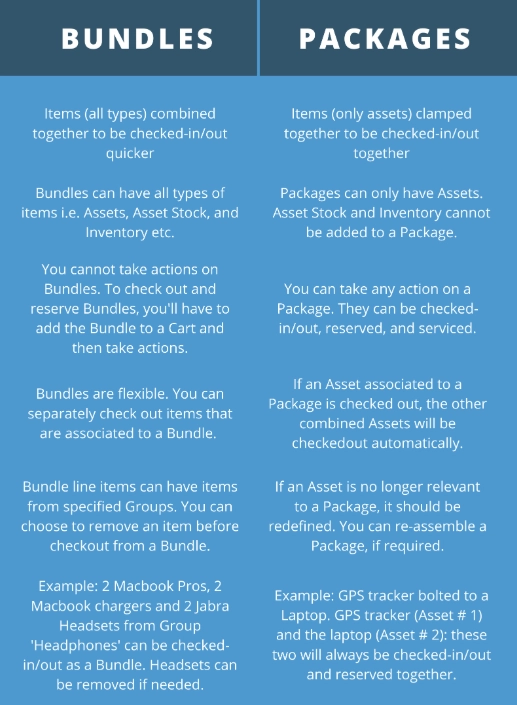
9. Bundles Versus Packages
Bundles differ from a related feature, Packages.
Read more: Carts in AssetSonar: ITAM for Jobs and Events
Frequently Asked Questions
What happens if I only add Software License in the bundle?
Bundles which contain only Software Licenses can be checked out via quick checkout. The cart containing such bundles will be marked complete automatically.
What happens if a Software License is expired/terminated after it has been added to a Bundle?
You cannot checkout a bundle with expired/terminated licenses. You will need to remove or re-activate such a license to proceed.
What IT Assets are shown in the selection dropdown table for Machine based and User-Machine based licenses?
To entitle IT Assets for Machine based and User-Machine based licenses, you can choose IT Assets which are part of the quick checkout table (i.e., part of the bundle or separately added to the quick checkout) or already checked out to the selected member.
