
AssetSonar offers multiple login options such as Google, Microsoft, LDAP, or SAML so your employees can sign in to the application without having to remember separate credentials for AssetSonar. You can select your preferred login options including SAML from Settings → Company Settings → Authentication → SAML → Update.

With SAML Single Sign-on as a login option, you can eliminate the use of passwords, centralize access control, and prevent illegal or unnecessary access from former employees.
This blog details how you can enable SAML SSO in your AssetSonar account using Okta as an Identity Provider.
Let’s get started!
1. Adding the AssetSonar application in Okta
To enable Okta SSO for AssetSonar, you must first add the AssetSonar application to your Okta account.
For this purpose, log in to your Okta account. Go to Applications and click on the ‘Add Application’ button.

This directs you to the Okta marketplace. Here, search for ‘AssetSonar’ and add the application as shown.


Configure details such as Application Label and Subdomain, and hit ‘Done’.

Note: Make sure that you enter the correct value in the Subdomain field under the General tab in Okta. Using the wrong value will prevent you from authenticating via SAML to AssetSonar.
The application is now added to your Okta account.

Note: Okta SSO is not ready to use until you have configured SAML 2.0 in AssetSonar.
2. Configuring SAML 2.0 in AssetSonar
2.1. View setup instructions in Okta
To configure SAML, navigate to the Sign On tab of your AssetSonar application in Okta and click on ‘View Setup Instructions’.
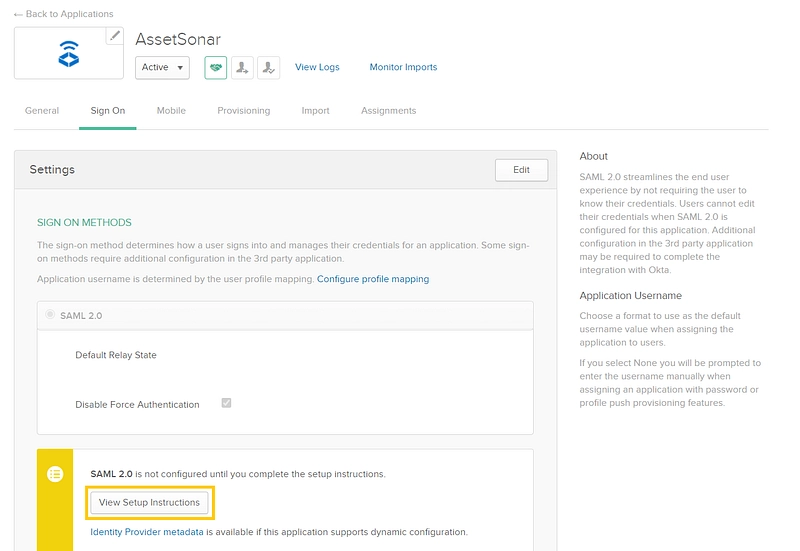
Here, you can find all the key parameters you need to configure SAML 2.0 in AssetSonar. These include the Identity Provider URL and Identity Provider Certificate.

2.2. Fill configuration settings in AssetSonar
Now, traverse to your AssetSonar account. Go to Settings → Add Ons → SAML Integration, and select ‘Enabled’.

This reveals additional settings as illustrated.

Configure these data fields using the information provided below:
- Identity Provider URL: Copy and paste the Identity Provider URL from Section 2.1.
- Identity Provider Certificate: Copy and paste the Identity Provider Certificate from Section 2.1.
- Login Button Text: Type your preferred text e.g. ‘Log in via Okta SSO’.
- Clock Drift (seconds): Enter your preferred value e.g. 1.
- First Name: Enter ‘first_name’.
- Last Name: Enter ‘last_name’.
- Email: Type ‘email’.
- AssetSonar Role By default: Select your preferred option.
Click ‘Update’ once you’re done.
This is how the AssetSonar login page should look like once SAML 2.0 has been configured in AssetSonar.

3. Assigning the AssetSonar application to users in Okta
Next, you must assign the AssetSonar application to users that you want to give the SAML SSO login authorization.
In your Okta account, go to Applications → AssetSonar → Assignments tab → Assign → Assign to People.
Select the users you want to assign AssetSonar to and click on the ‘Assign’ button next to their name. Hit ‘Done’.

You can see that Sunny Gardner has now been assigned to AssetSonar in Okta.

Sunny Gardner is now authorized to log into AssetSonar using Okta SSO.
4. Login experience
Once Okta SSO has been set up, the following takes place when you try to log in to a SAML-enabled AssetSonar account:
– You see the ‘Log in via Okta SSO’ button on the AssetSonar login page.

– Clicking on the ‘Log in via Okta SSO’ button takes you to the Okta login page for authentication.
– If you are already signed in to Okta, you’ll directly land onto the AssetSonar portal. As illustrated, Sunny Gardner (the user you previously assigned in Okta) has logged into AssetSonar.

– The email addresses of users determine which AssetSonar members they are.
– Users who aren’t added to an AssetSonar account under the Members tab, but access that AssetSonar account for the first time via SAML, are added as new Staff Users.
Note: If you want your employees to use Okta SSO as the only authentication option in AssetSonar, you can disable other options from Settings → Company Settings → Authentication.
5. Provision users to a custom role
If you want to provision your employees and their respective roles in a way that their hierarchy is reflected in AssetSonar, you can do so by selecting a Default Role that your users will get imported into AssetSonar as.
To enable this setting, go to Settings → Add Ons → SAML Integration from your AssetSonar account. Select your preferred custom role as a Default Role into which you want to provision a certain set of employees.
Let’s say, you want to import a set of Hardware Technicians from Okta into AssetSonar. Select the following option and hit ‘Update’.

AssetSonar also supports SAML SSO for the following IdPs:
Read more: [How-to] Implement User Provisioning via SCIM with AssetSonar and Okta
