Why It Matters
A ticket often requires more than a single response. Technicians may need to follow up with the requester, break work into tasks, request authorization, or document the final solution before resolving the issue.
AssetSonar keeps these actions connected to the ticket so technicians can manage the complete support workflow without losing context.
How to Do It
Use the timeline filter in Conversation to hide selected action cards while reviewing the ticket.
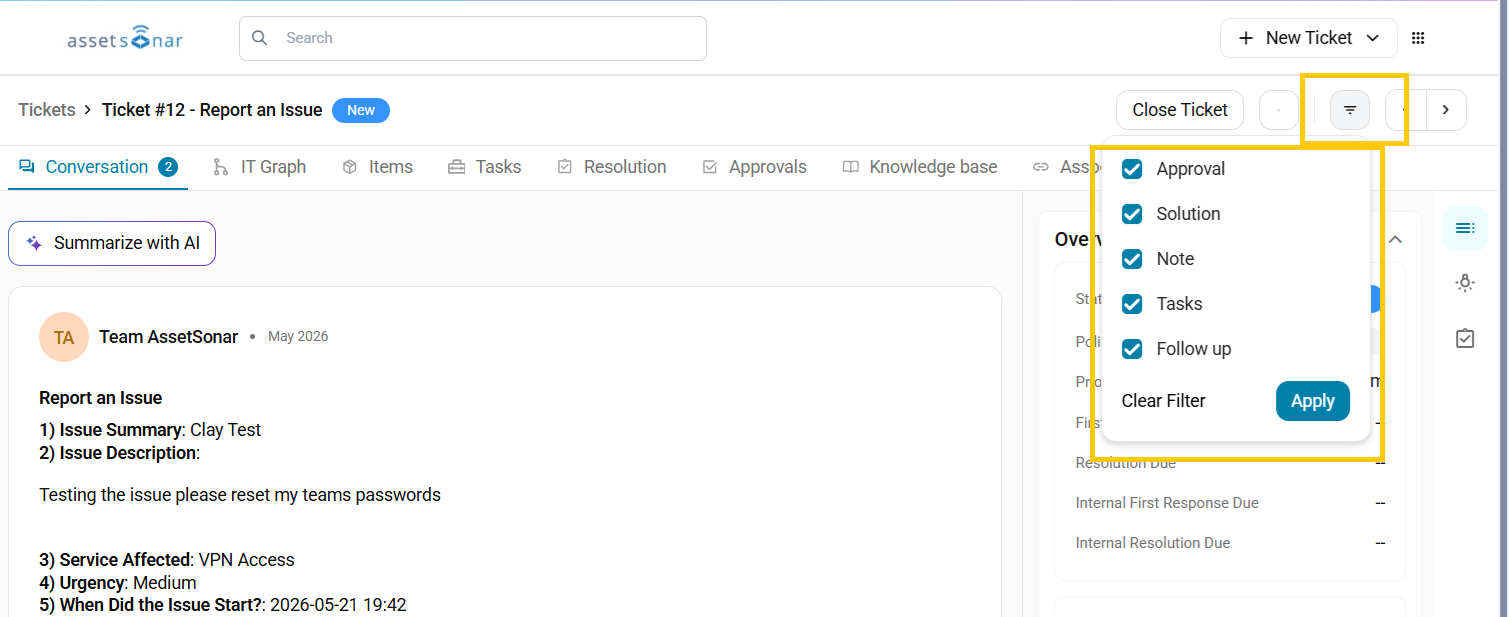
Add a Follow-up
- Access the Ticket: Go to Tickets from the Navigation Menu and open the ticket you want to update.
- Open the Conversation Tab: Go to the Conversation tab on the ticket details page.
- Select Follow-up: Click Follow Up at the bottom of the conversation. Alternatively, open the response-type dropdown in the composer and select Follow-up.
- Enter and Submit the Follow-up: Enter your response and click the relevant Submit option.
- Edit a Follow-up: Locate the Follow-up in the conversation, open its action menu, and select Edit. Update the response and save your changes.
Add a Task
- Open the Tasks Tab: Click Tasks on the ticket details page.
- Create the Task: Add a task and complete the required fields for the work that needs to be performed.
- Edit a Task: Open the edit option for an existing task. AssetSonar opens the task pane with its existing fields pre-filled so you can update and save the task.
Request an Approval
- Open the Approvals Tab: Click Approvals on the ticket details page.
- Create the Approval Request: Add an approval, select the relevant approver, and complete the required details.
- Submit the Request: Save the approval so the designated approver can review and act on it.
- For complete approval workflows, refer to [ITSM | How-to] Requesting and Managing Approvals for Tickets in AssetSonar.
Add a Solution
- Open the Conversation Tab: Go to the Conversation tab on the ticket details page.
- Select Solution: Click Solution at the bottom of the conversation. Alternatively, open the response-type dropdown in the composer and select Solution.
- Enter the Solution: Document the resolution in the editor.
- Submit the Solution: Use the Submit button to save the solution. You can also use the available submission options to update the ticket status as part of the action.
- Save to the Knowledge Base: If the solution would be useful for future requests, select Submit and Save to Knowledge Base from the Submit dropdown. The resulting Knowledge Base article is created as a Draft by default, although its visibility can be changed.
- Edit a Solution: Locate the Solution in the conversation, open its action menu, and select Edit. Update the content and save your changes.
Next Steps
Open a test ticket and add a Follow-up, Task, Approval, and Solution to familiarize yourself with where each action is managed. Try editing an existing Follow-up, Task, or Solution to see how completed ticket activity can be updated.
